How to Install and Activate LifterLMS
Please take a moment to review the minimum system requirements before installation or you may encounter issues when using LifterLMS. If you need a new host or don’t have one yet, you can see our recommended hosts here.
This help document is divided into six sections:
- Video Tutorial
- Install LifterLMS From a .ZIP File
- (Alternative Install Option) Install LifterLMS From the WordPress Admin
- LifterLMS Setup Wizard
- Navigating Your New LifterLMS Site Admin
- I’m done setting up LifterLMS. What should I do next?
The following video will walk you through installing and activating LifterLMS:
To install LifterLMS by uploading a ZIP file, follow these steps.
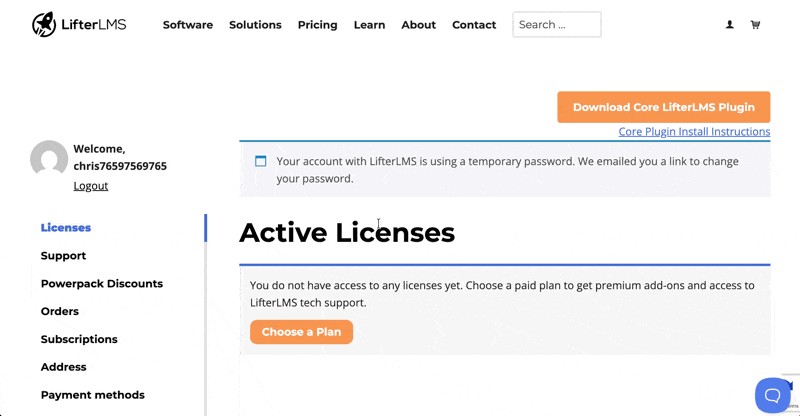
Step 1. Click here to receive a link to download the full LifterLMS plugin .zip file.
Step 2. If you don’t already have an account on the LifterLMS website, Download the current version of LifterLMS by creating a free account on the LifterLMS website, and clicking the Download Core LifterLMS Plugin button.
Step 3. Log in to your WordPress site and navigate to Plugins > Add New Plugin.
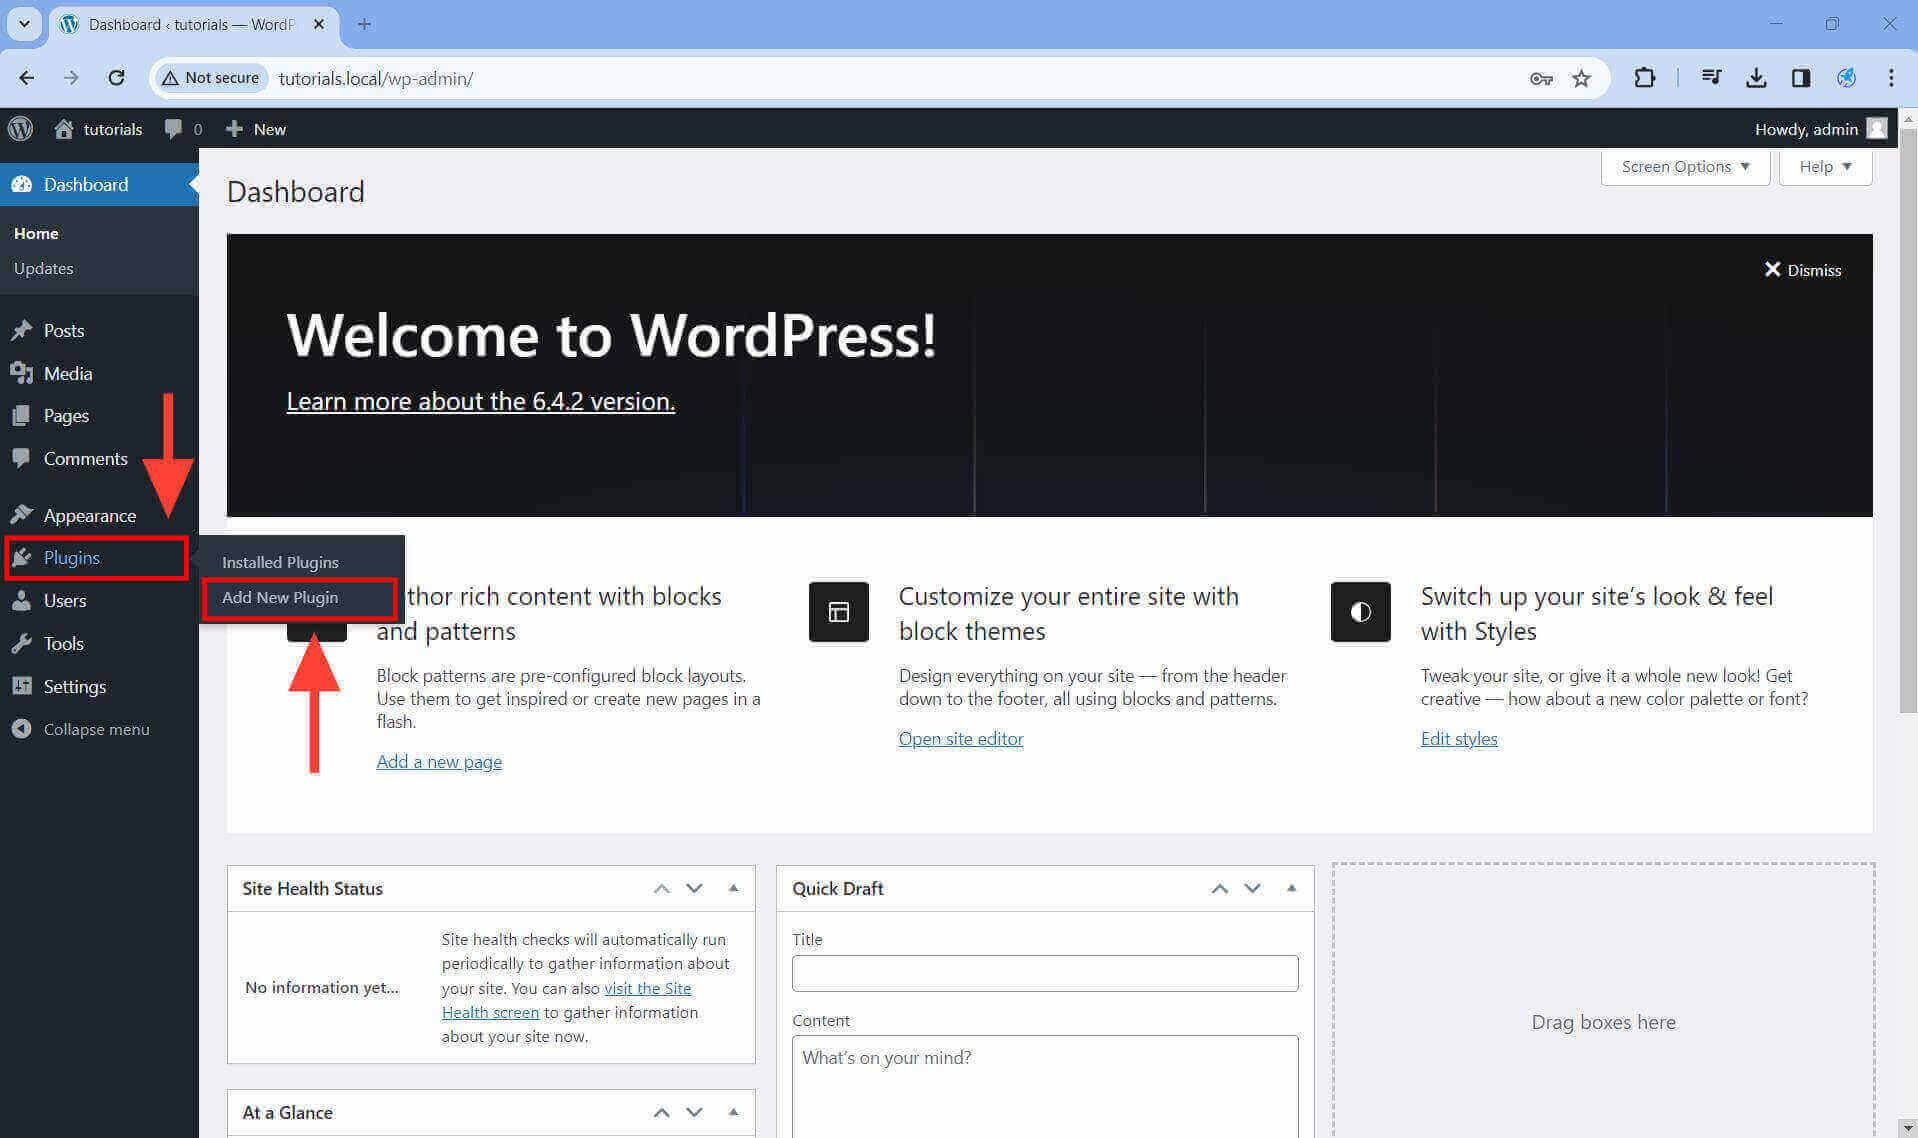
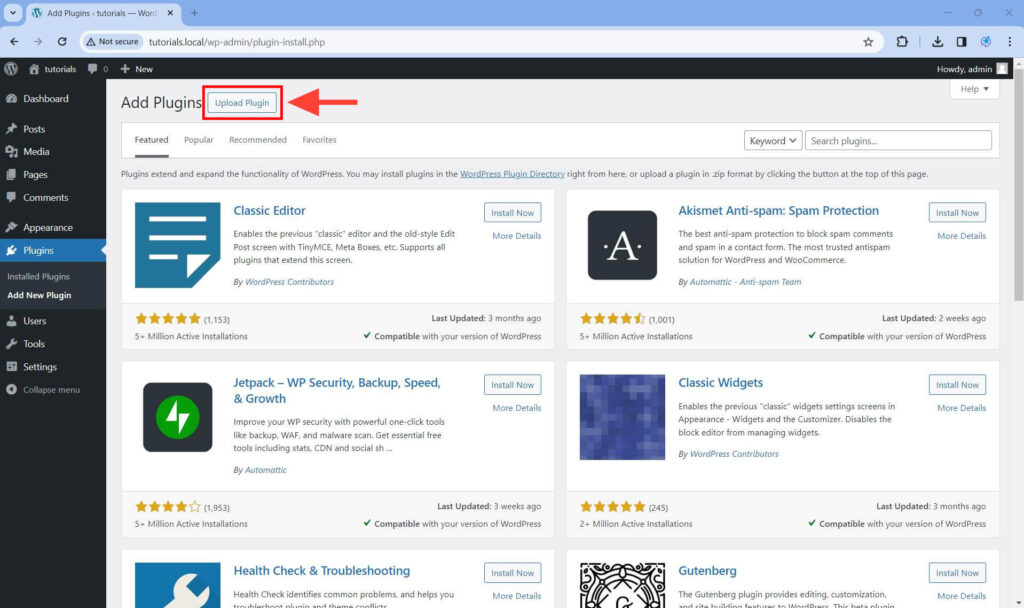
Step 4. Click on the Upload Plugin button.
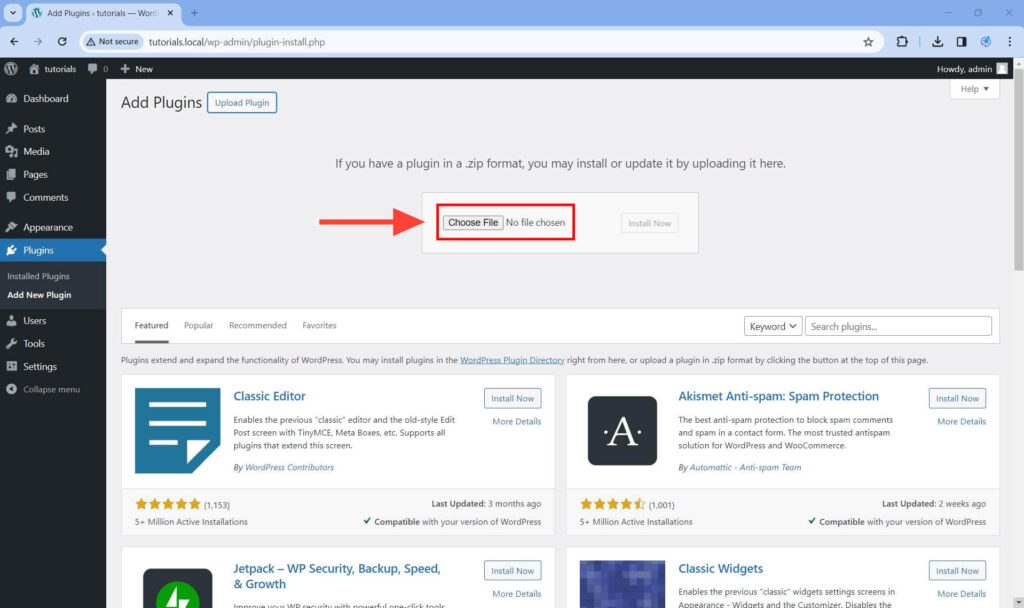
Step 5. Click on the Choose File button and select the ZIP file you just downloaded.
Step 6. Click on the Install Now button.
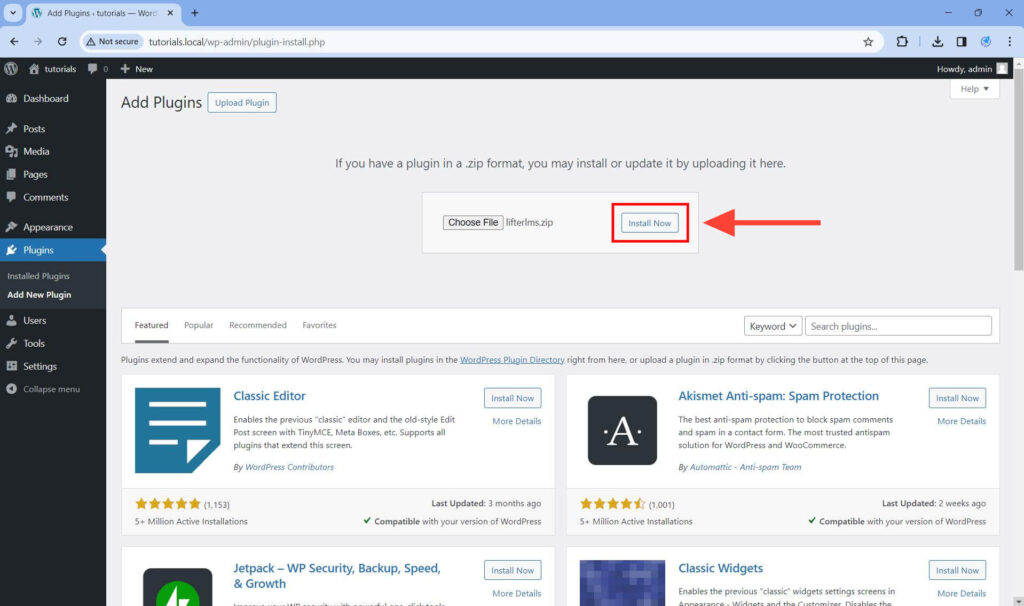
Step 7. On the page that loads, click on the Activate Plugin button.
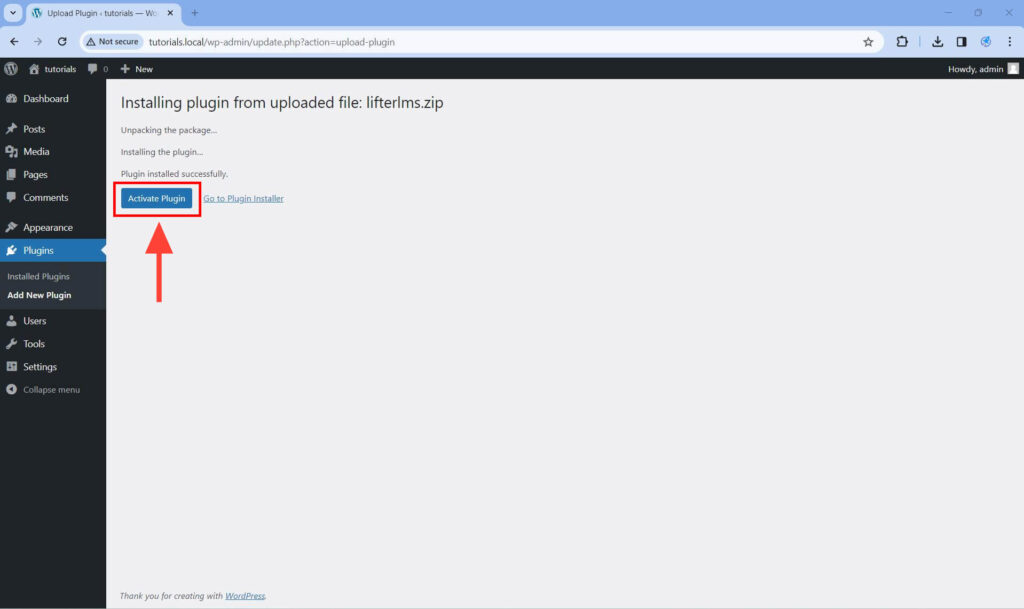
Step 8. If this is your first time installing LifterLMS, activating the plugin should take you to the Setup Wizard screen. Jump to the “LifterLMS Setup Wizard” section below to complete the setup.
If you were not taken to the Setup Wizard, you can manually rerun the wizard by following this documentation.
LifterLMS is also a free plugin available in the WordPress.org plugins repository. You can install it right from the admin of your new or existing WordPress site—no license or upgrade required.
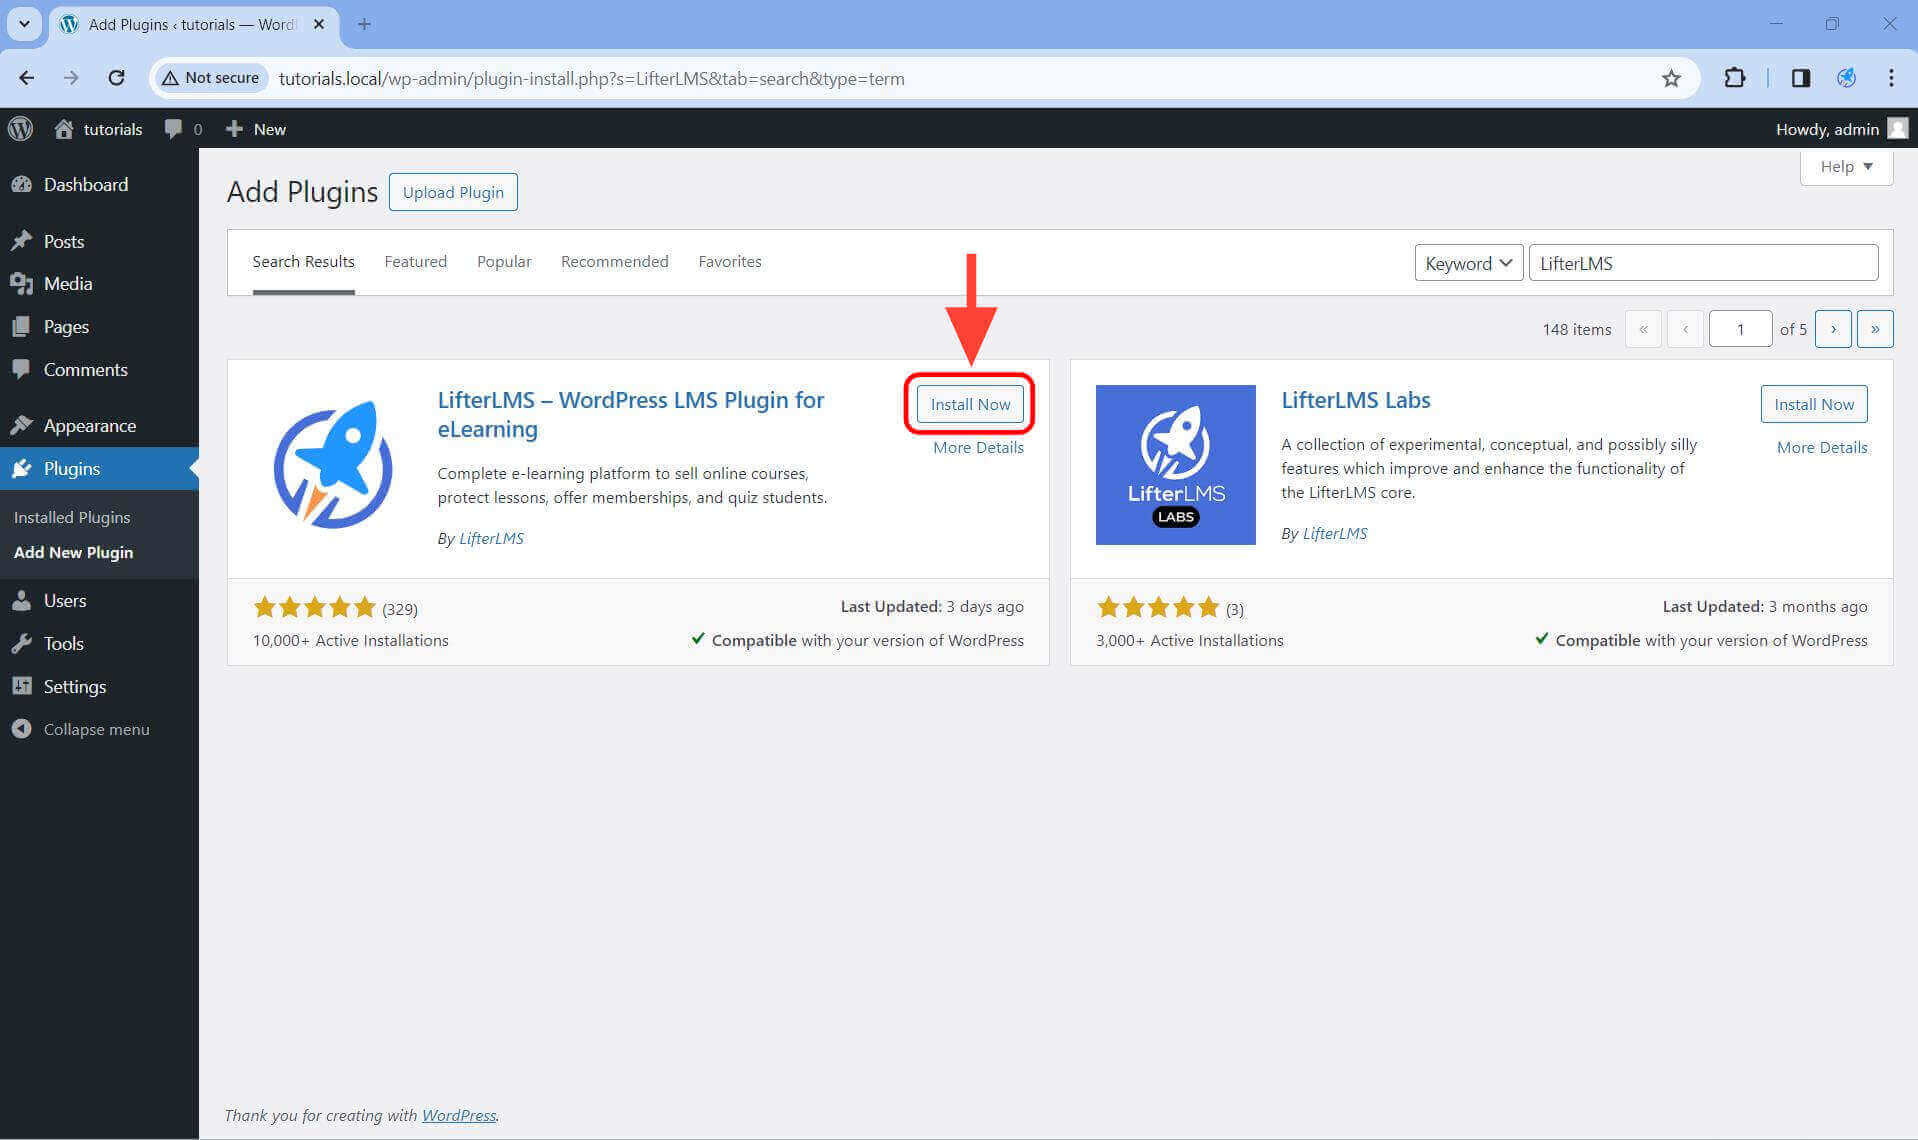
Step 1. Log in to your WordPress site and navigate to Plugins > Add New Plugin.
Step 2. Locate the Search plugins… text input field.
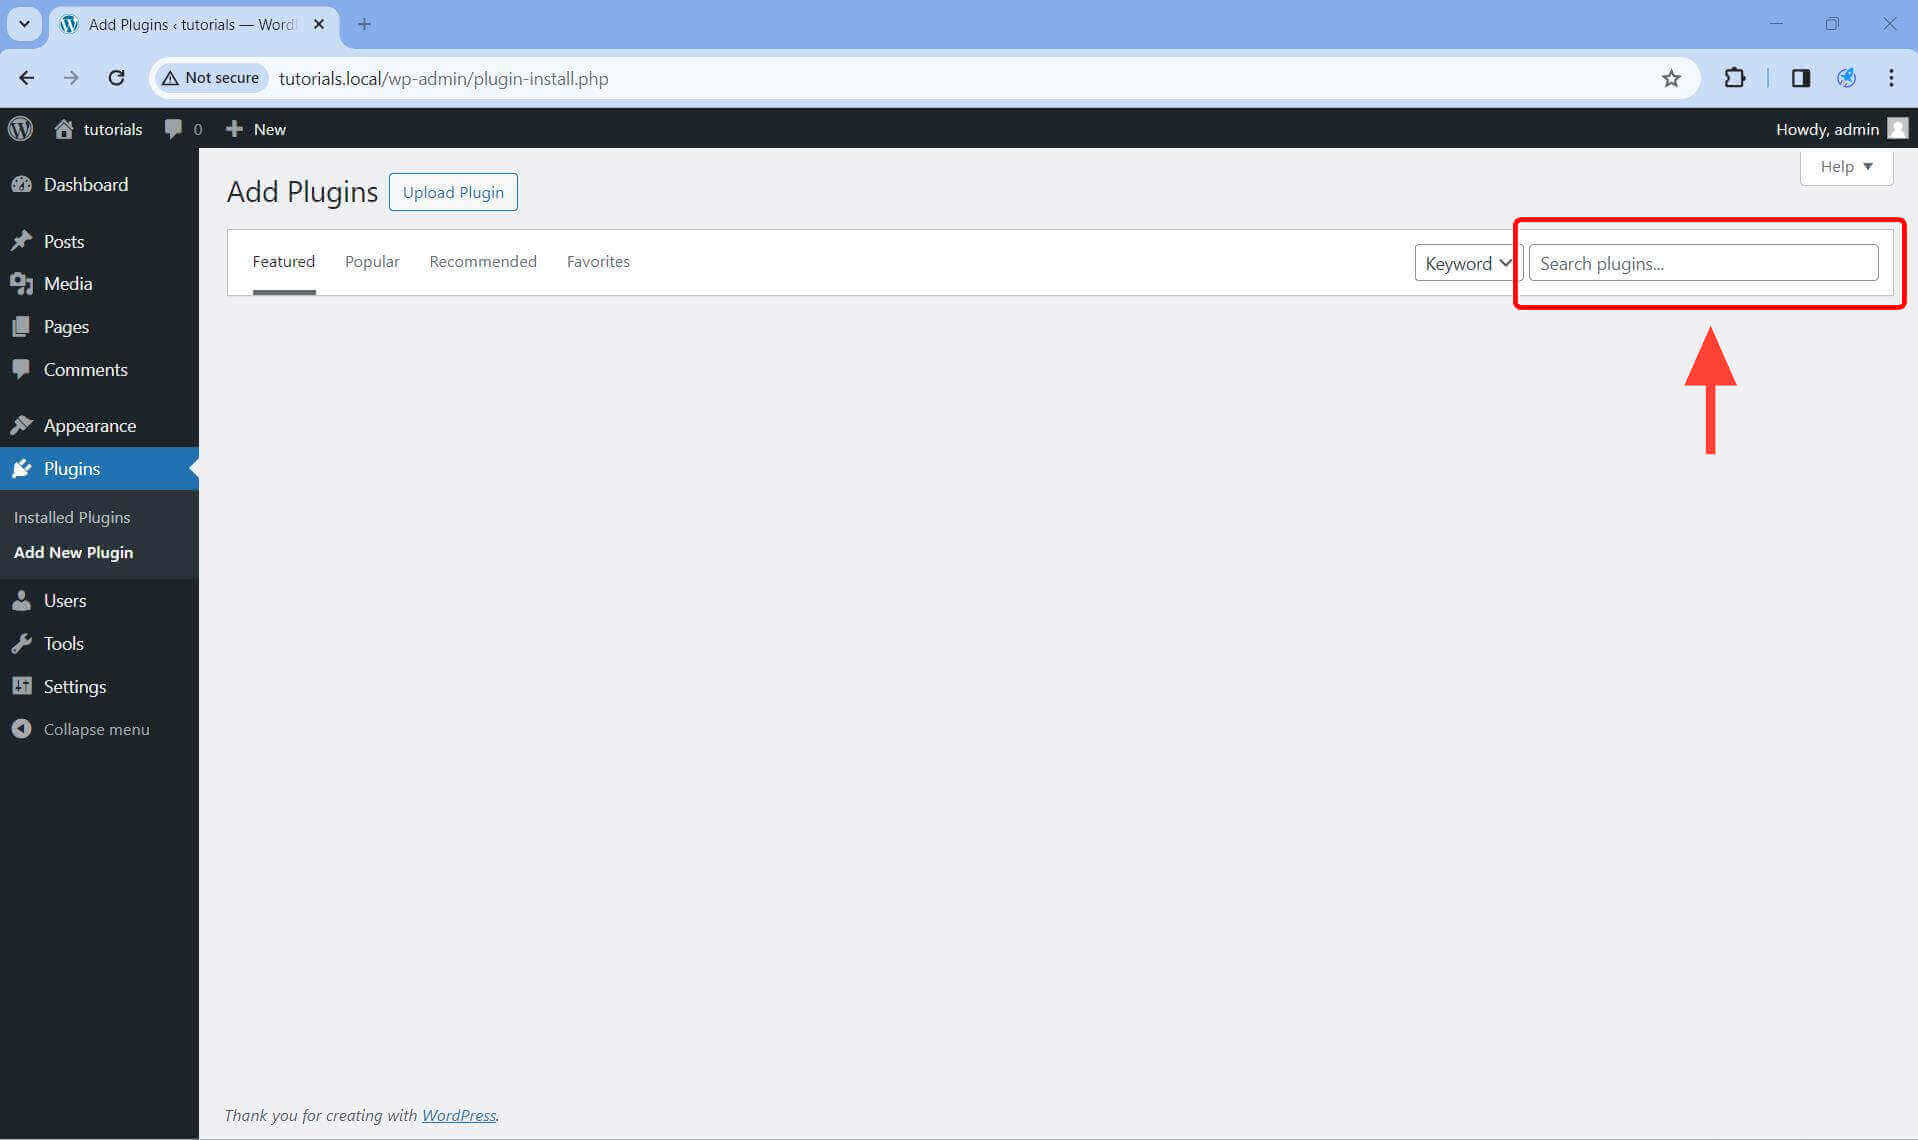
Step 3. Type “LifterLMS” in the search field.
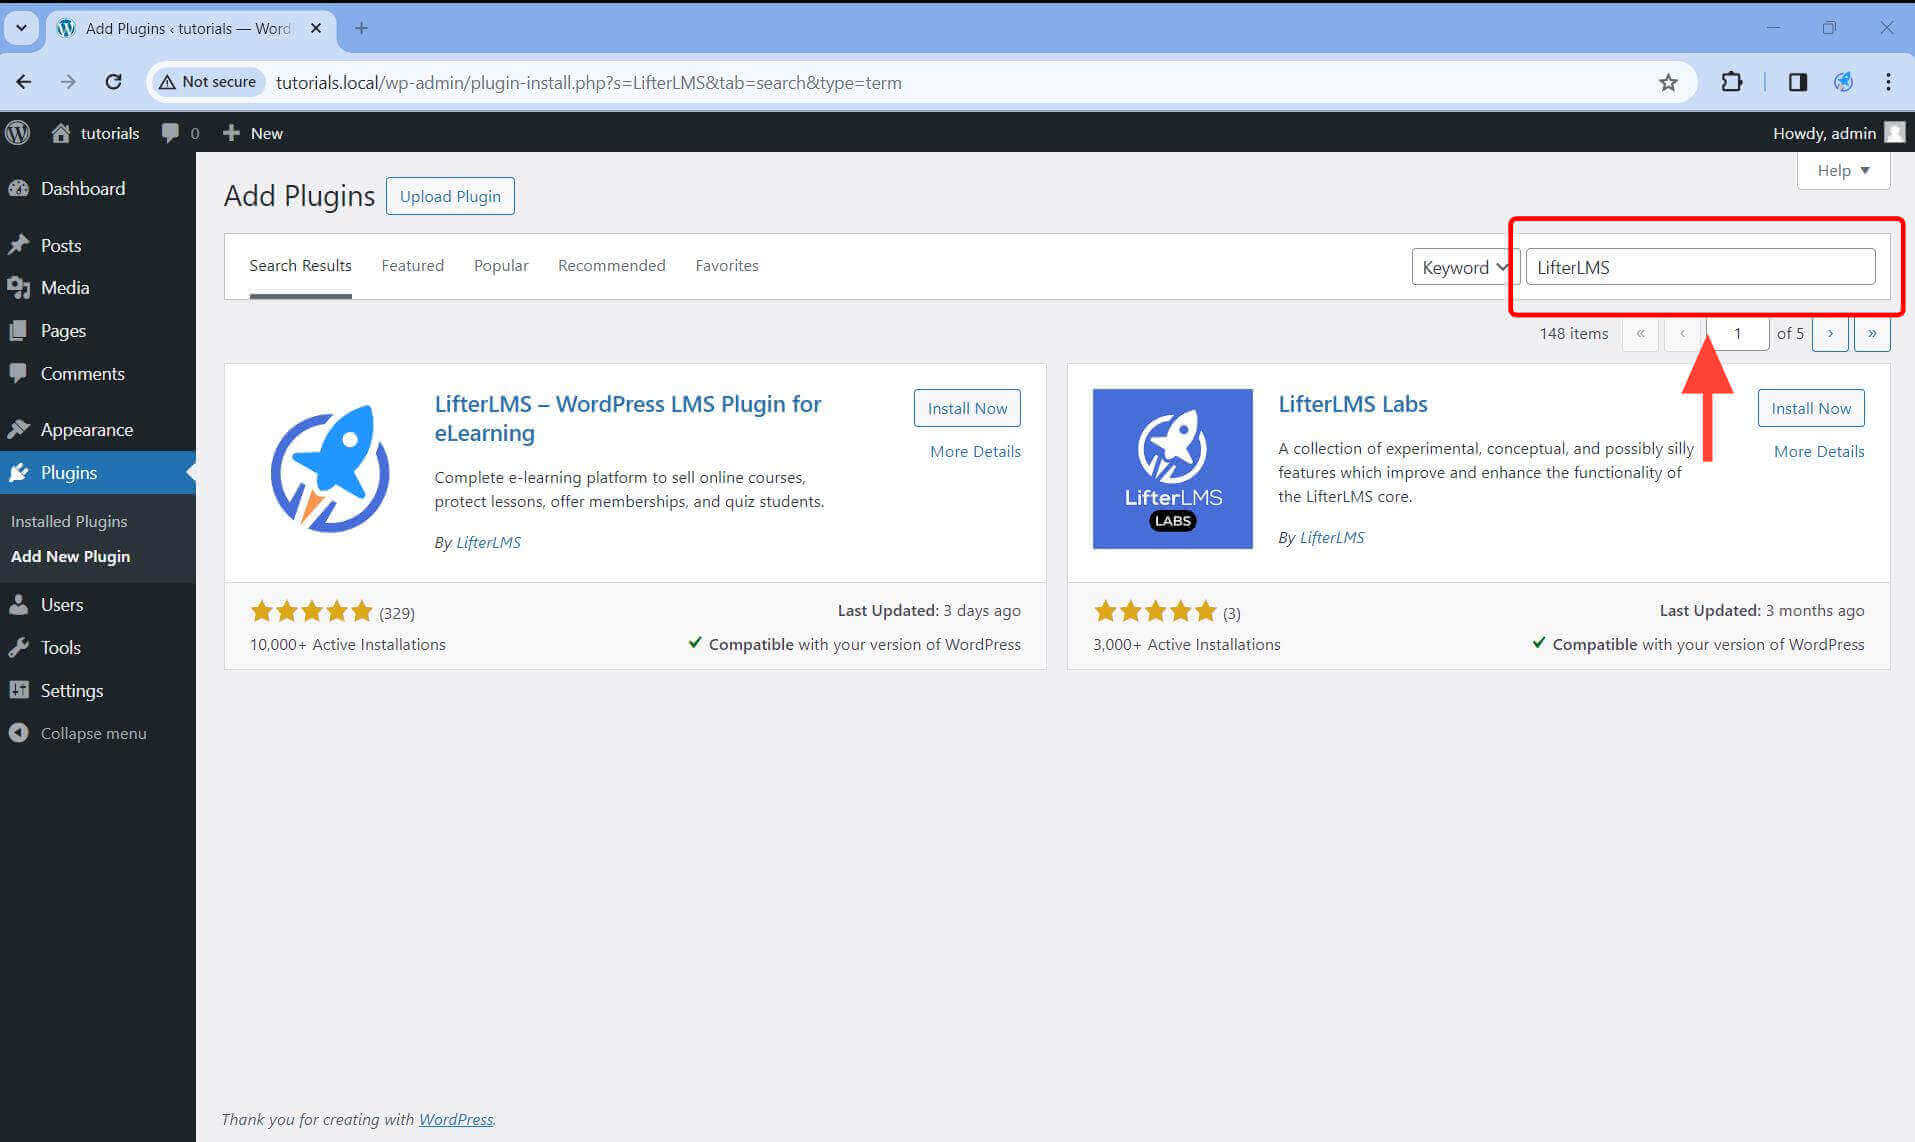
Step 4. On the search results, locate LifterLMS and click Install Now.
Step 5. Once the plugin is finished installing, click Activate.
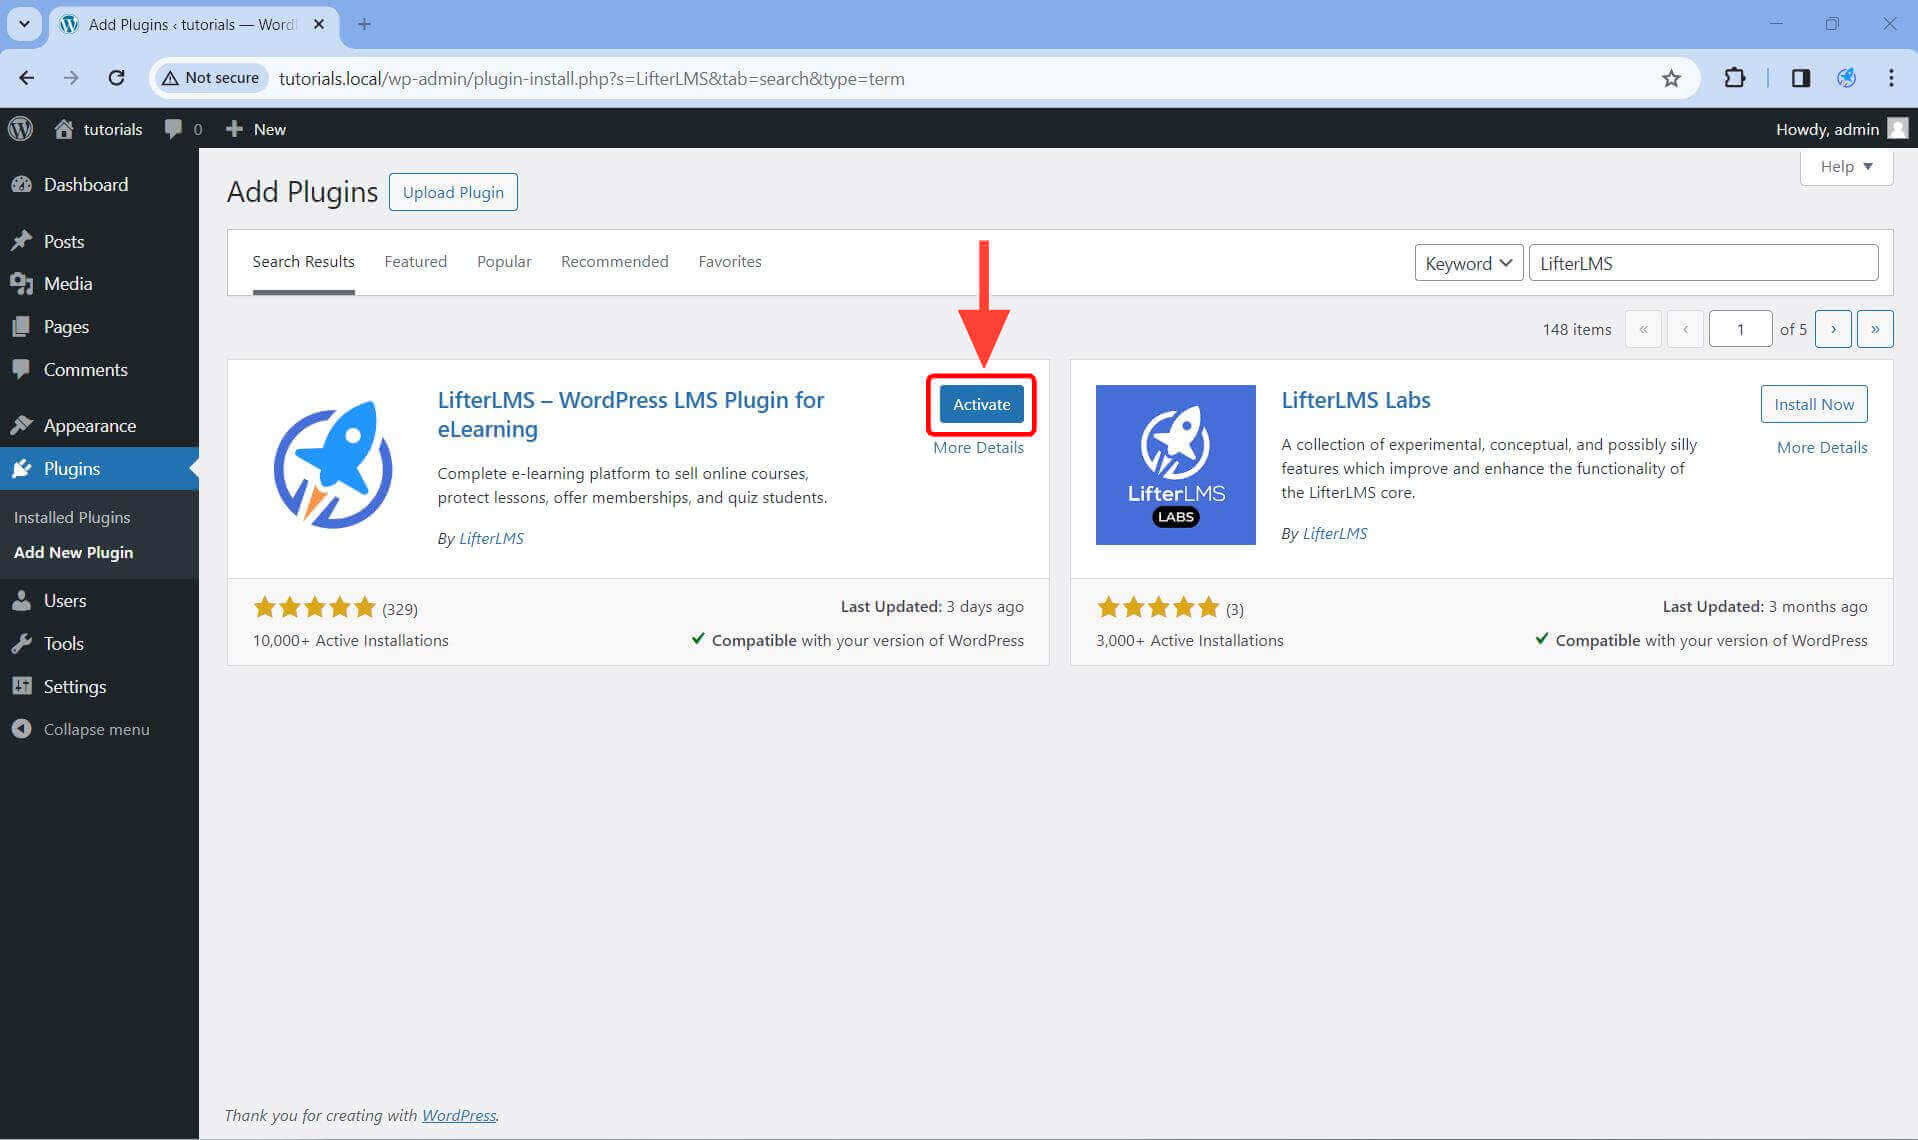
Step 6. If this is your first time installing LifterLMS, activating the plugin should take you to the Setup Wizard screen. Jump to the “LifterLMS Setup Wizard” section below to complete the setup.
If you were not taken to the Setup Wizard, you can manually rerun the wizard by following this documentation.
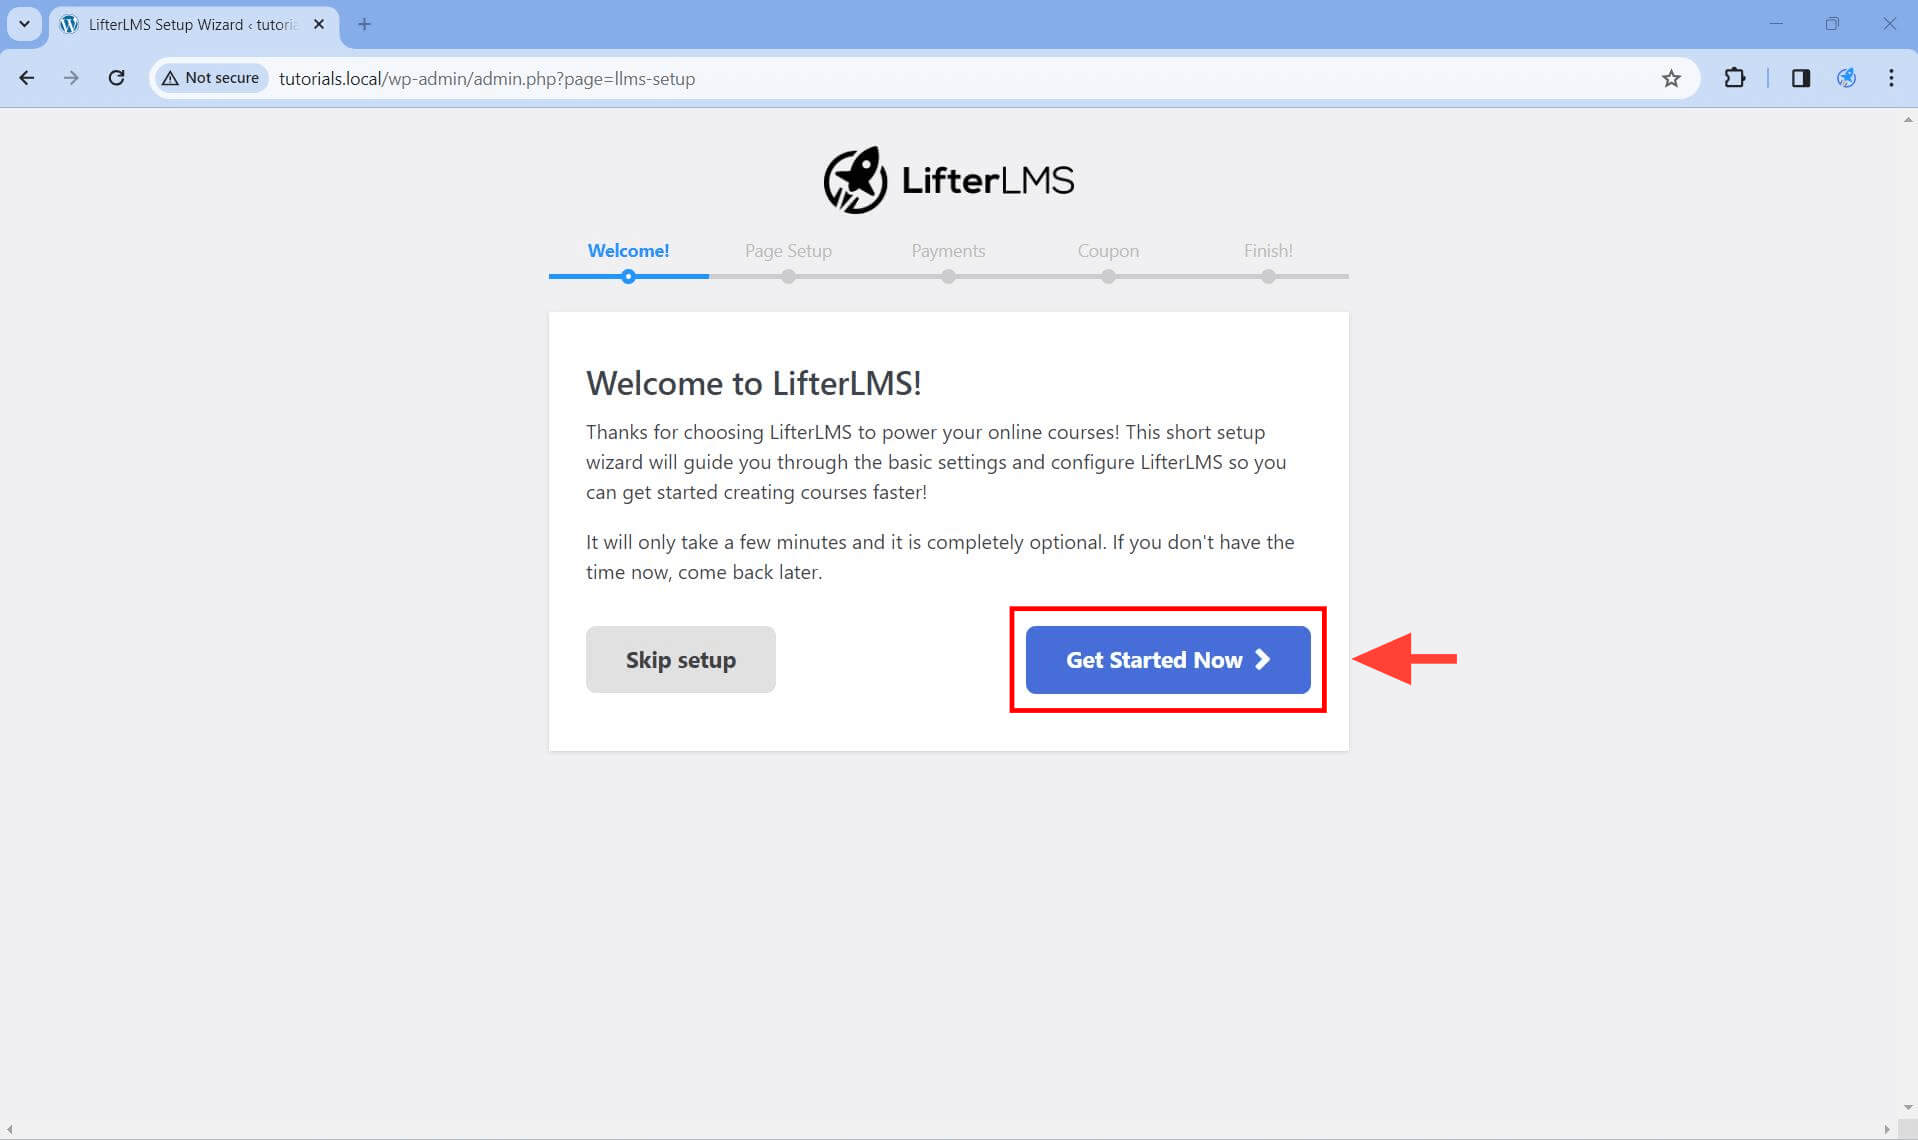
Step 1. If this is your first time installing LifterLMS, you should be taken to the welcome page of the Setup Wizard after activation. Click on the Get Started Now button.
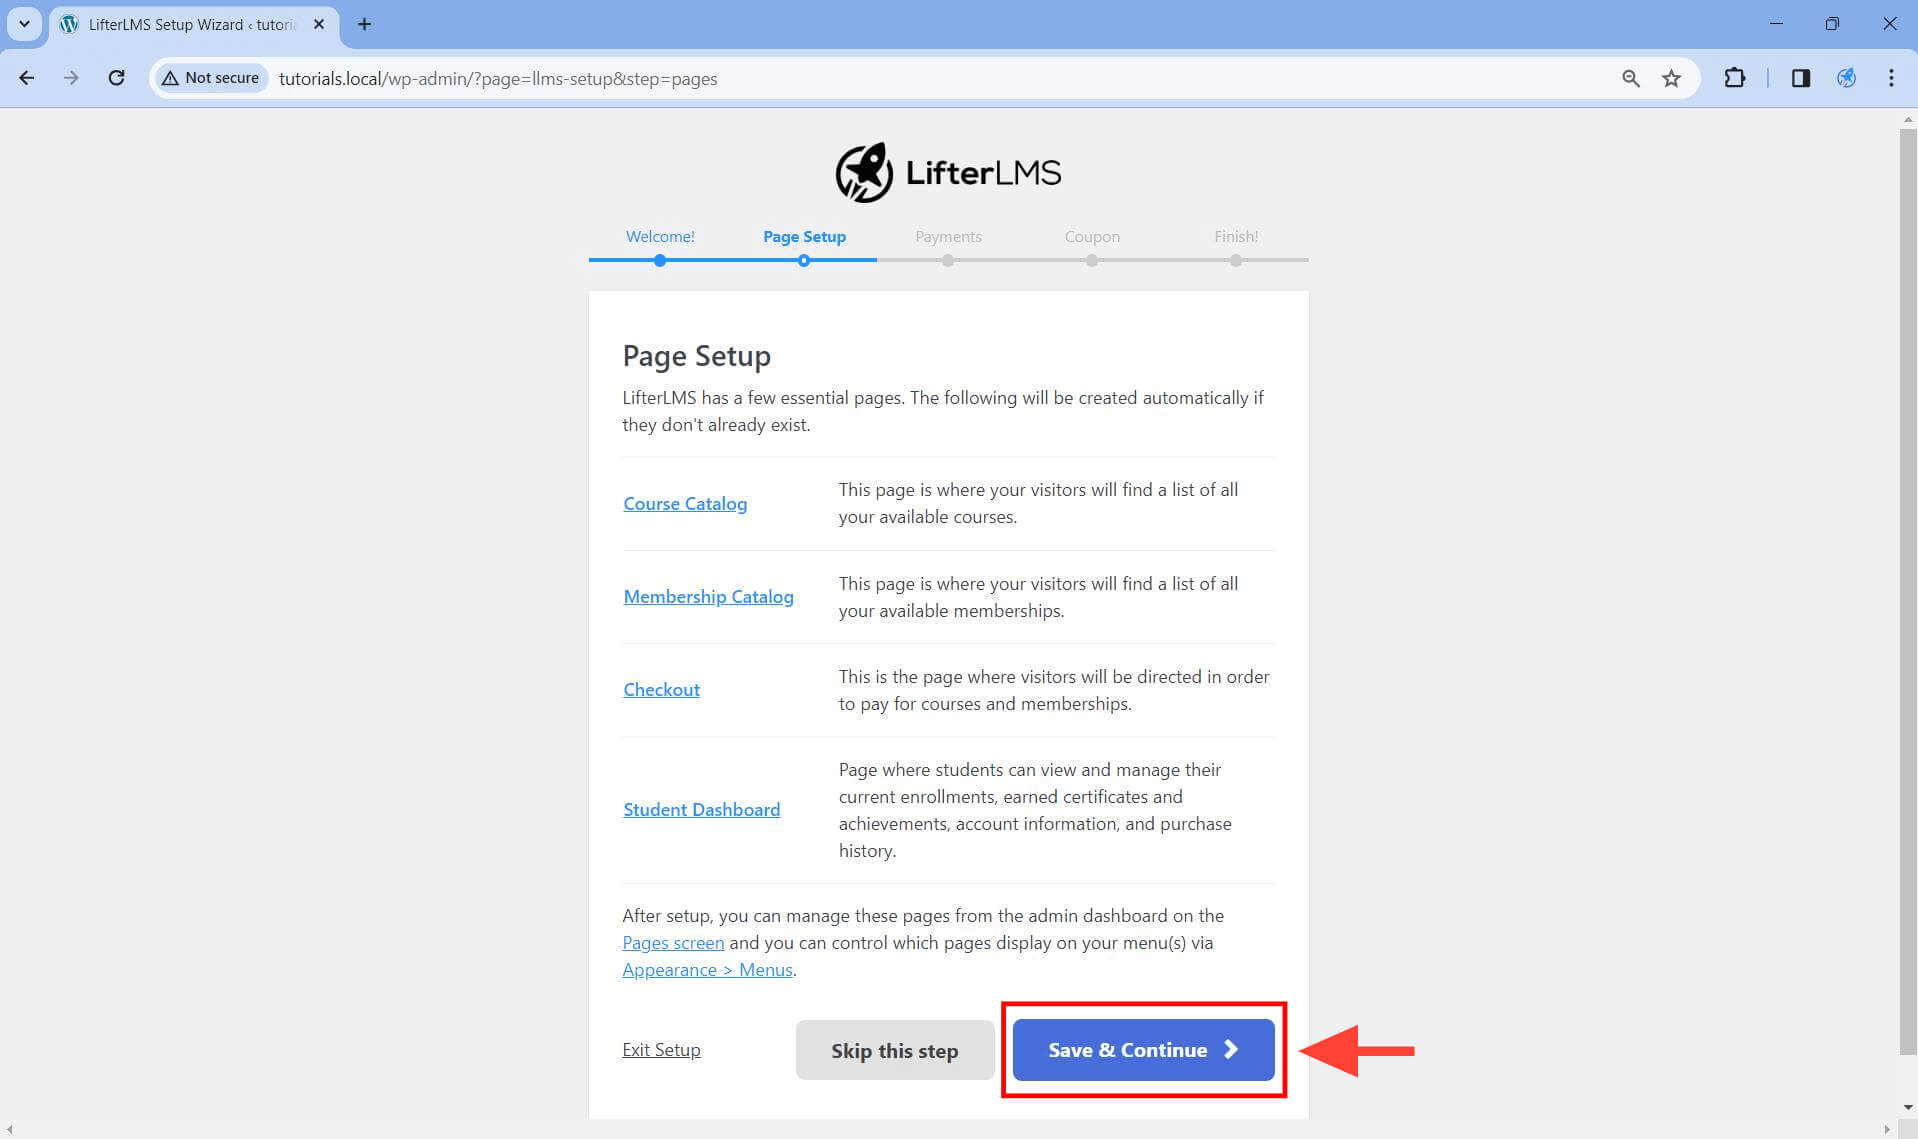
Step 2. In order to complete the LifterLMS initial setup, you must complete the Setup Wizard. At a minimum, you must complete the Page Setup step. This step generates the required LifterLMS pages: course catalog, membership catalog, checkout page, and student dashboard.
If these pages already exist, they will not be re-created. Click on Save & Continue.
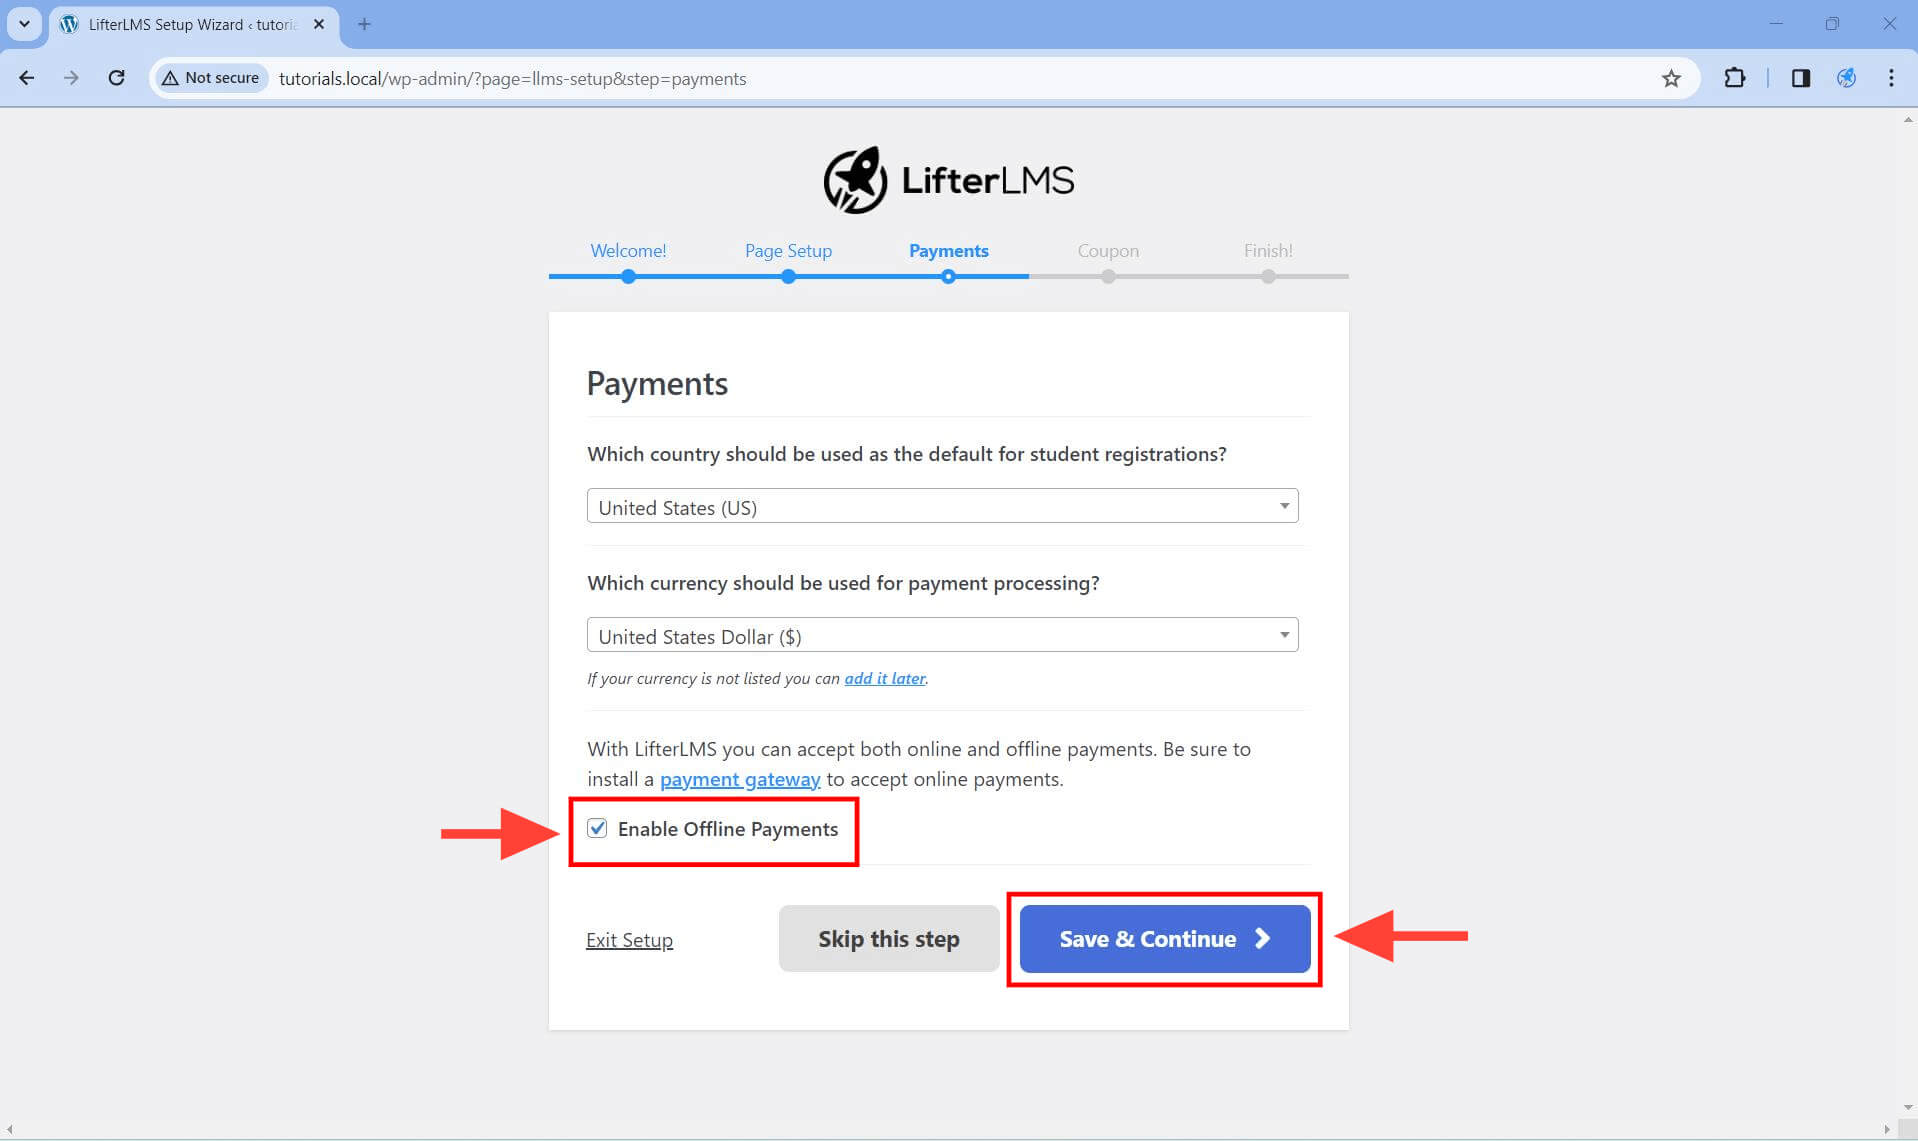
Step 3. On the Payments screen, define your site’s default county, currency, and optionally enable the built-in manual payment gateway. These settings can also be modified later from the LifterLMS > Settings > Checkout screen.
If you plan to accept payments through your site, like credit cards or PayPal, you must install one of the LifterLMS E-commerce Add-ons.
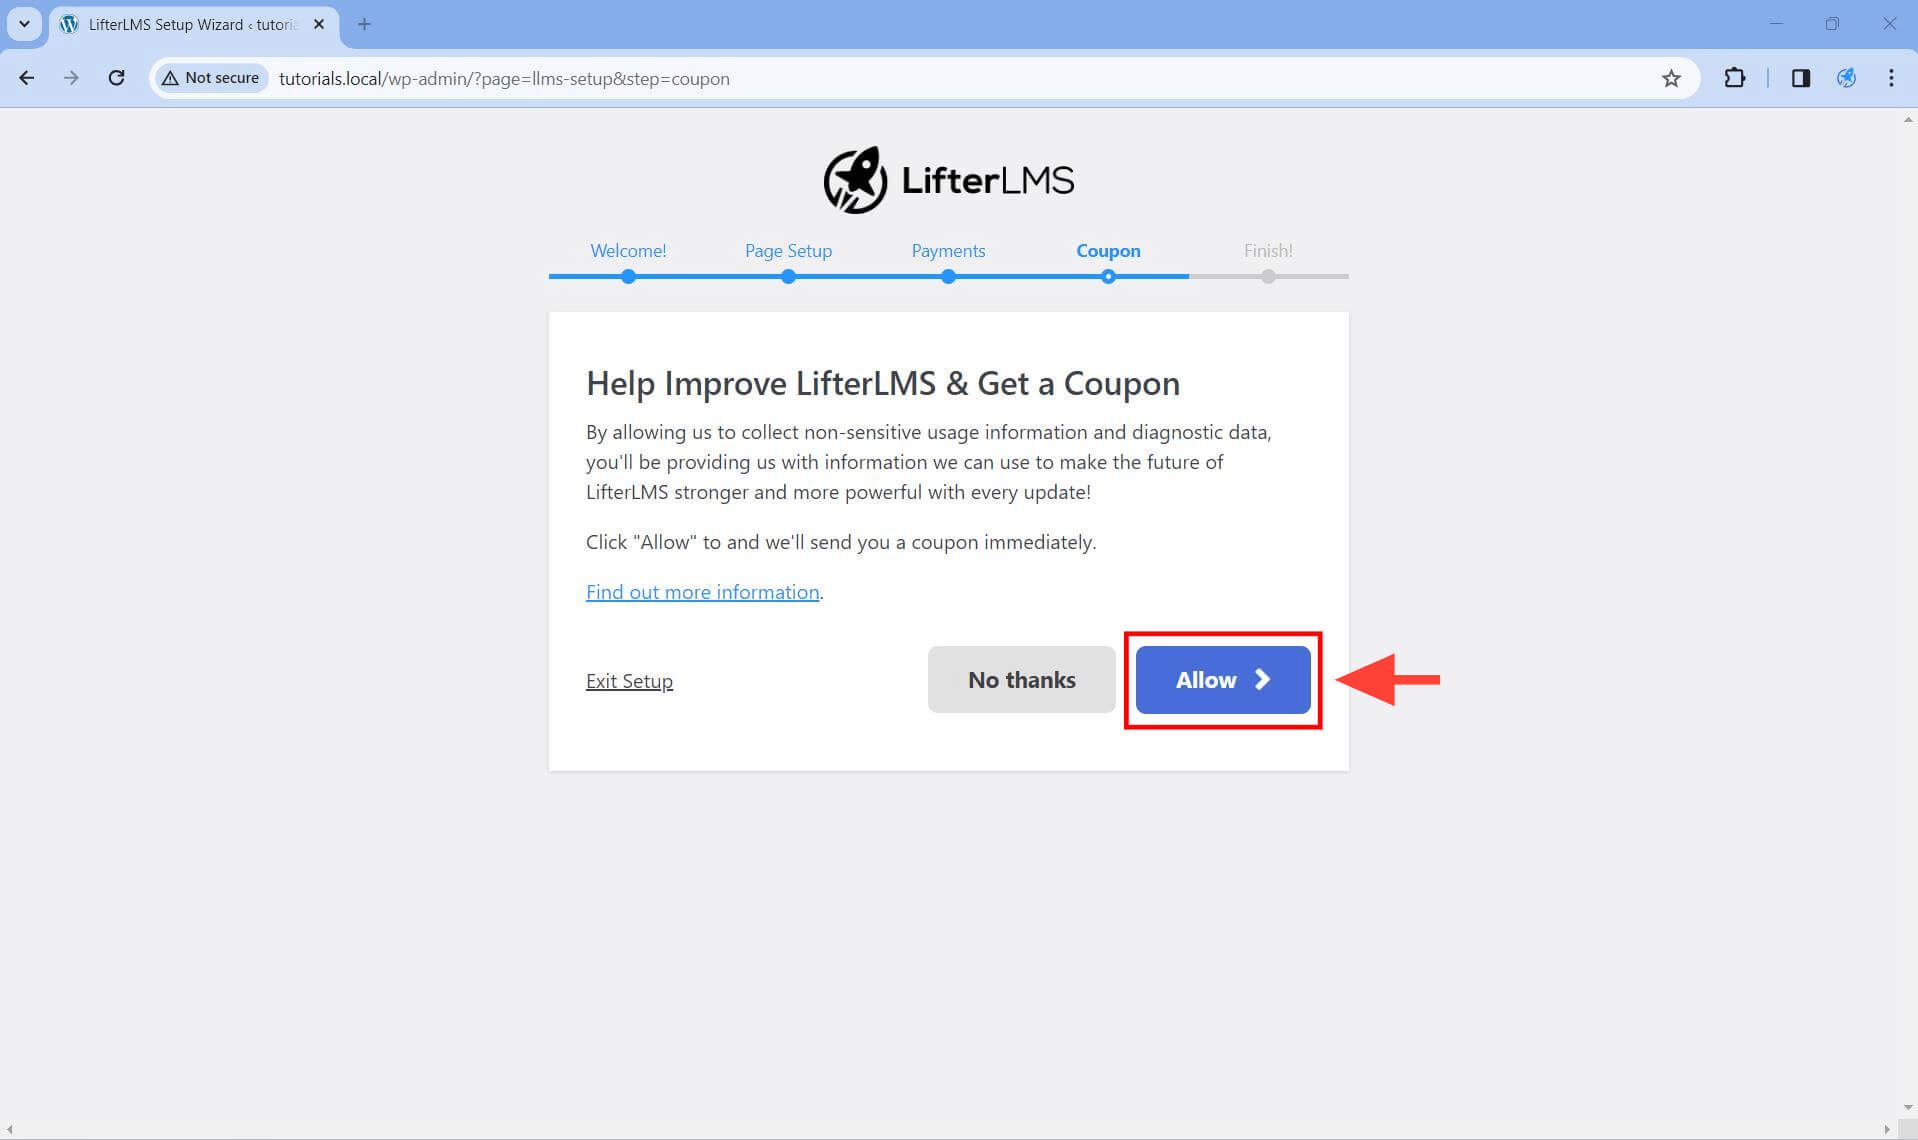
Step 4. On the Coupon screen, click Allow if you would like to send us non-sensitive usage information to support future development of the open source LifterLMS plugin. We only track the information that we need to improve your experience using our plugin.
This is optional, but in exchange for allowing usage tracking on your site, we’ll send you a unique discount for purchasing a bundle or add-on.
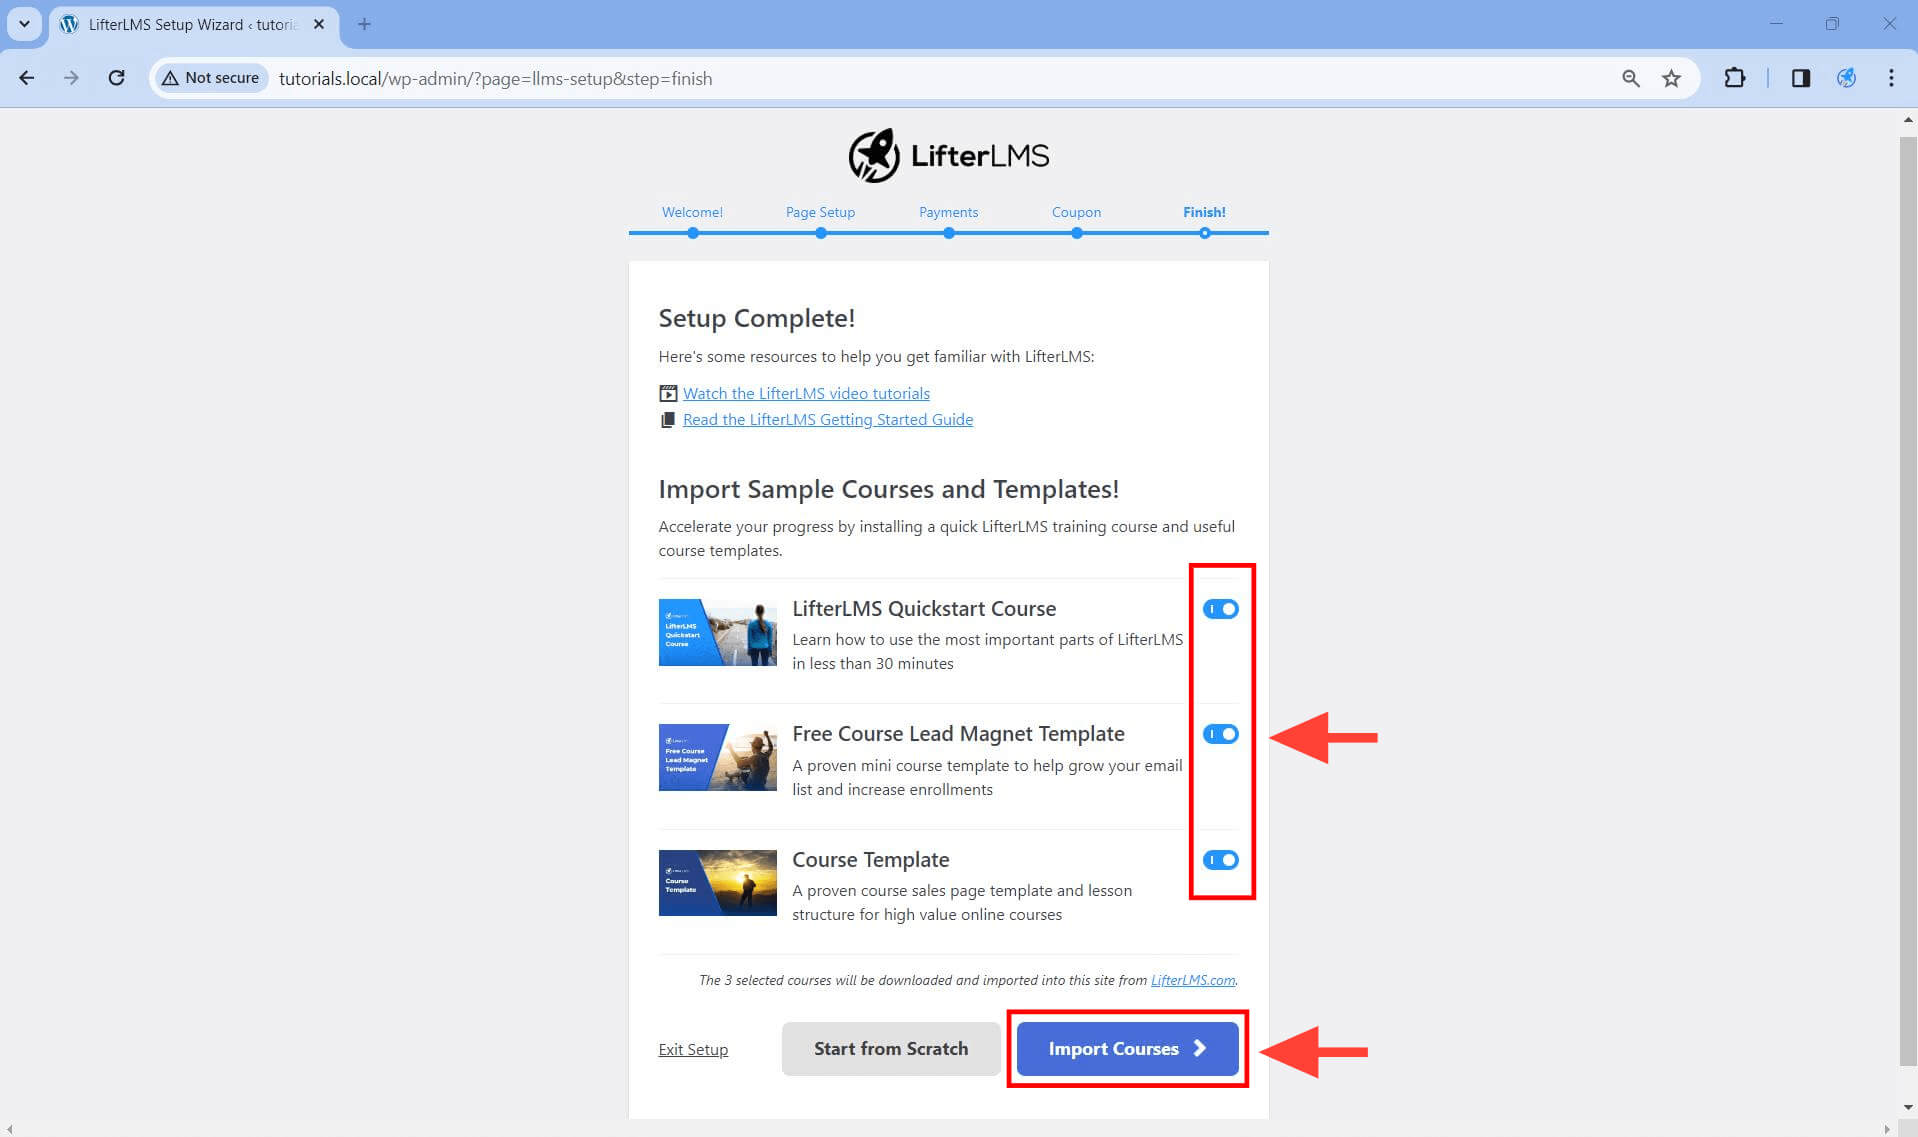
Step 5. In this final screen, you can optionally import some sample courses. These sample courses are designed to kickstart your course building experience. Each course leverages different features of LifterLMS to help you understand how to build your courses and lessons.
The sections below give a quick overview of all the noticeable user interface changes that LifterLMS makes to your WordPress dashboard. This includes the addition of:
- New WordPress admin menu items
- New pages
- New menu items
- New widget areas
- New metabox for your blog posts and regular pages
- New user roles
- New admin toolbar buttons
New WordPress Admin menu items.
Once the plugin is activated, you should see these additional menu items as shown above.
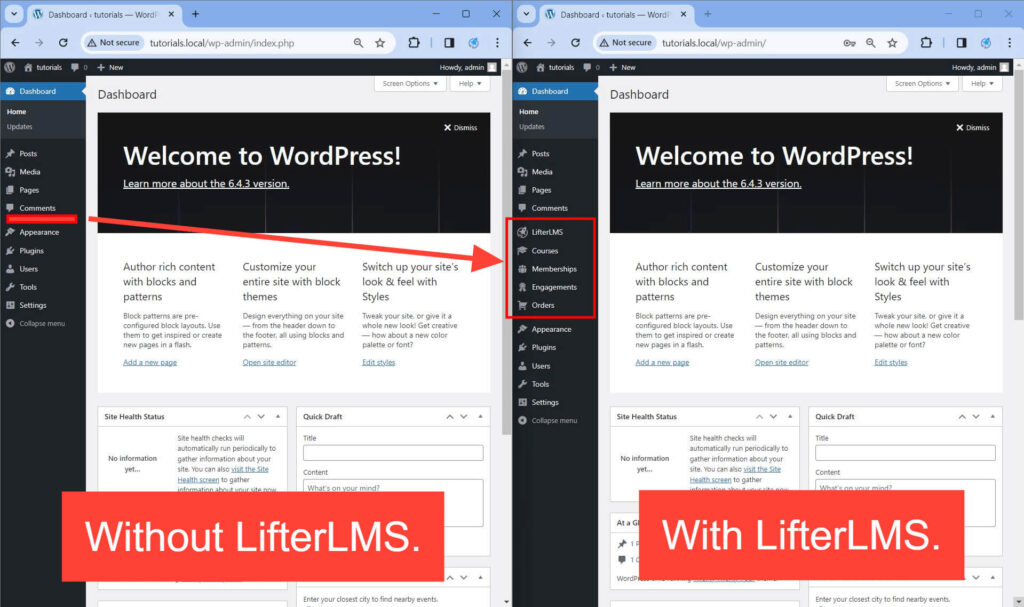
- LifterLMS. This is where you manage all the settings of LifterLMS.
- Courses. This is where you create, edit, and manage all your courses.
- Memberships. This is where you create, edit, and manage all your memberships.
- Engagements. This is where you keep your certificate templates, achievement templates, custom email templates, all your automations (called “engagements”), and where you keep track of all the certificates you awarded to your students.
- Orders. When your students purchase an access plan and enroll in your courses or memberships, all of those enrollments (free or paid) will be recorded as orders in this menu.
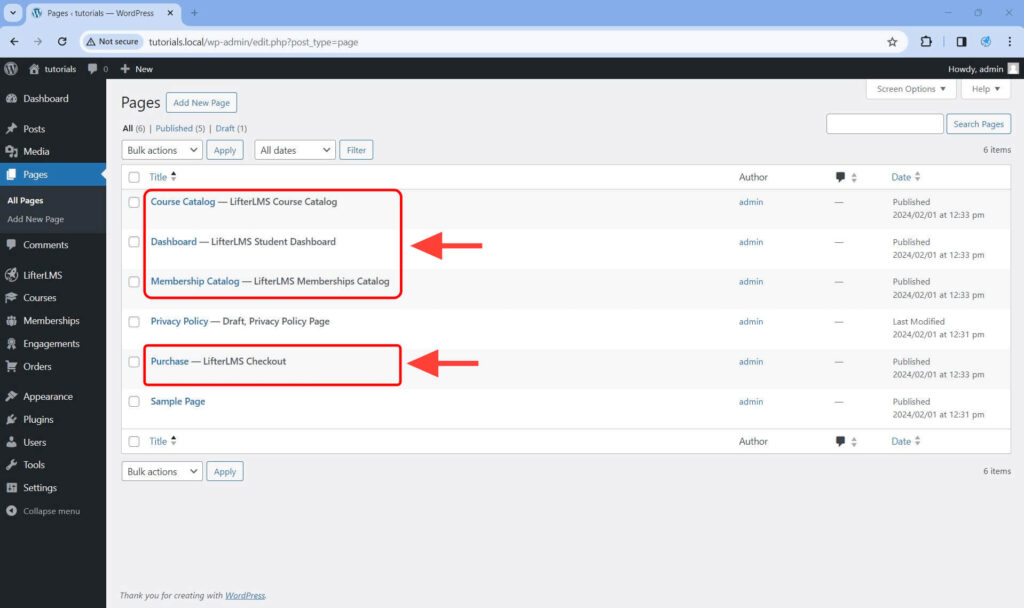
Frontend Pages
LifterLMS adds four required frontend pages, as you can see in the screenshot below. Your most important pages here are the student dashboard page and the checkout page.
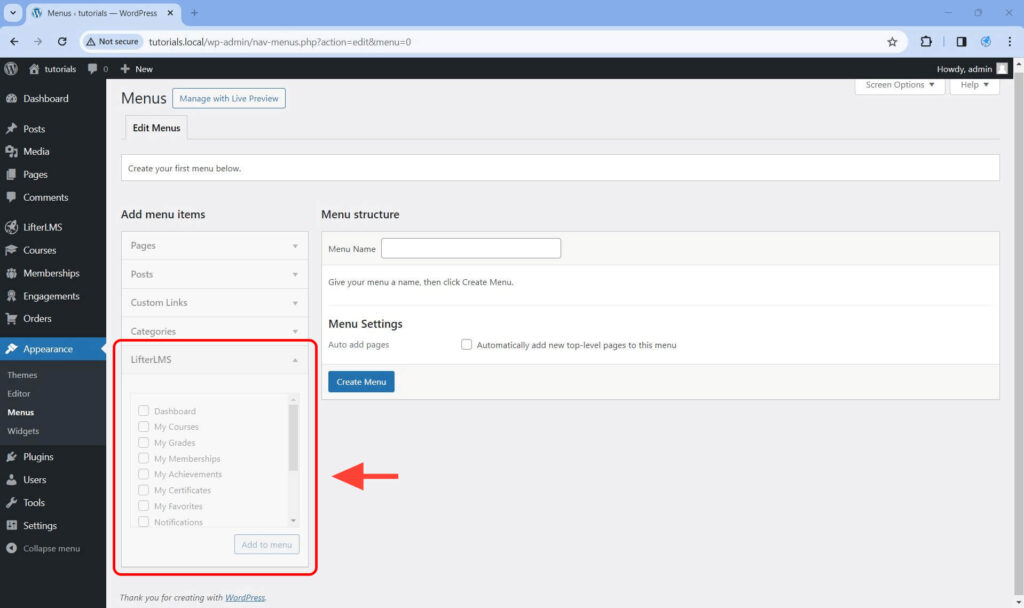
Menu Items
The sidebar menu item links in the student dashboard page are called student dashboard endpoints. These endpoints can also be added as menu items links in your site navigation, as shown below.
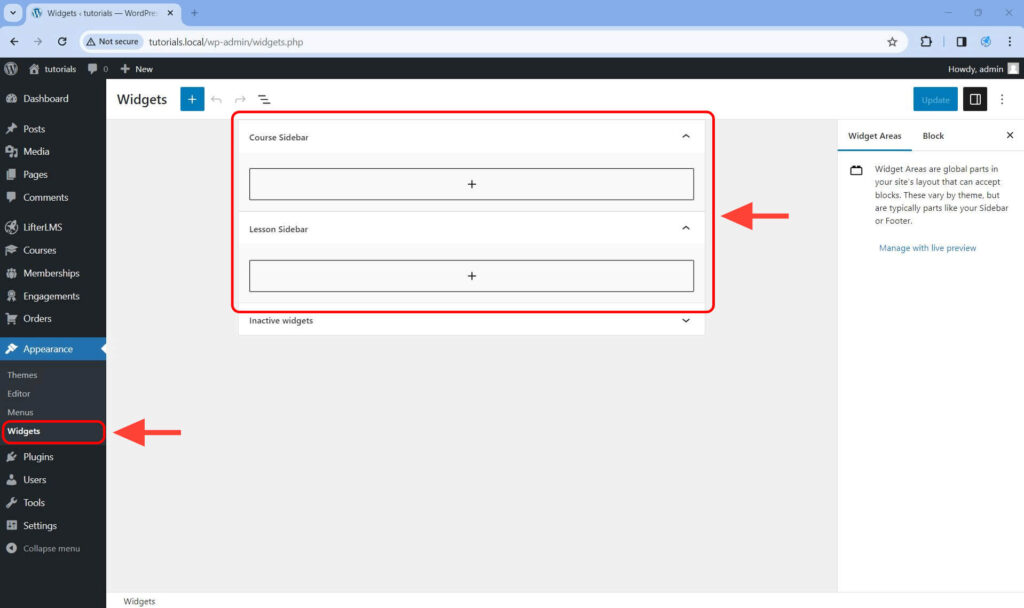
Widget Areas
LifterLMS adds two new widget areas: the Course Sidebar widget area, and the Lesson Sidebar widget area. You can access these by going to Appearance > Widgets from within the WordPress admin
If your theme declares support for LifterLMS Sidebars, these widget areas will automatically be used for the single Courses and Lessons on the frontend of your site.
If your theme does not support our sidebars, check out this guide on how to add sidebar support manually.
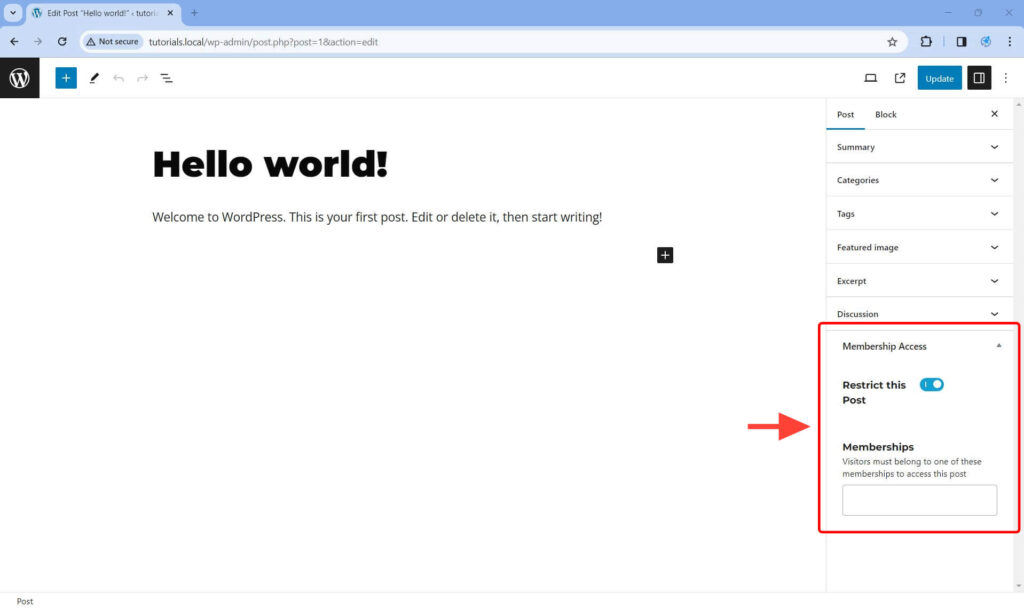
Page and Post Metaboxes
LifterLMS adds a Membership Access metabox to your WordPress posts and pages. You can use this feature to restrict access to your posts and pages only to those students enrolled in a specific membership.
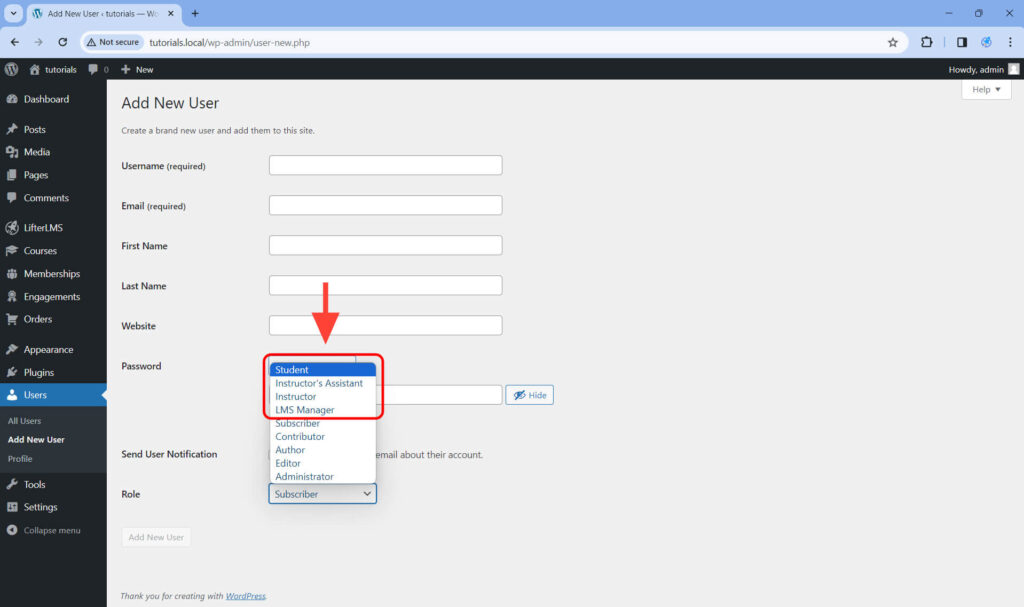
User Roles
LifterLMS creates four roles to help you control admin access in your LifterLMS site: Student, Instructor’s Assistant, Instructor, and LMS Manager. All of the customers that enroll in your courses will be assigned the Student role.
You can use the other roles to assign limited admin access to certain users in your site that help you create or manage course and membership content.
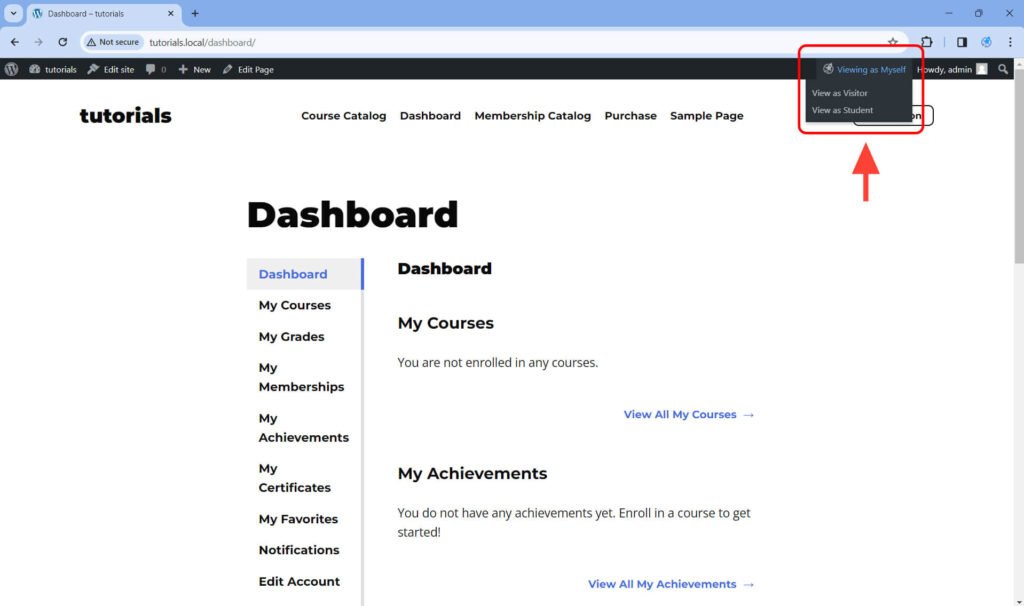
Admin Toolbar Buttons
When creating your lessons, courses and memberships, it can be handy to be able to view content as yourself, as a logged-out site visitor, and as a logged-in student. LifterLMS adds a View as button to the admin toolbar to allow you to do this.
After you’ve completed the initial setup, the next best steps are the learn how to create courses and how to create memberships using LifterLMS.
Then, explore how to award certificates automatically and how to send automated email engagements.
With the free core LifterLMS plugin you can offer free course registrations, or sell courses and memberships manually using the built-in manual payments gateway (e.g., paying by check, bank transfer, etc).
But, most people setting up LifterLMS have a goal of making money by selling online courses and memberships. As a result, the logical next step is to purchase, install, and activate at least one of our payment gateway add-ons.
If you are also selling (or planning to sell) physical items or downloadable products, you may consider using a free plugin called WooCommerce. If you wish to sell your LifterLMS courses or memberships using WooCommerce, you can do that by purchasing the LifterLMS WooCommerce Integration Add-On.
Beyond e-commerce, be sure to explore all the other LifterLMS add-ons available from lifterlms.com/store.


