Getting Started with LifterLMS and Zapier
Events happen on your WordPress website: users register a WordPress account, a student enrolls in a course, a student’s membership access expires, and so on.
Sometimes you’d like to automatically respond to these events. For example, you may want to automatically create a row containing user data in a Google Sheets sheet somewhere once a site visitor registers a WordPress account on your site. What we are describing here is an example of automation.
Get started with the LifterLMS Zapier App now.
We’ll use the terms below throughout the rest of this document:
- In the example above, account registration is an example of an event. This event has information about it.
- When we capture data about that event as soon as that event happens (or after some delay), we call the piece of software “capturing” that event as a trigger. We say that a trigger “happens” when it captures an event ”happen”.
- What we do in response to a trigger “capturing” an event is called the action. In the example above, creating a row in Google Sheets is the action.
The actual event itself is not important when creating an automation: only the starting trigger and sequence of actions. So every time you have a sequence starting with a trigger and followed by one or more actions, you can call that sequence an automation.
Zapier has prepared a quick introduction about automations to help you get started with the basics of automation.
No. It depends on how often you want the trigger to “capture” or “ask for new data”. How often the trigger asks for new data is called the polling interval. This is often controlled by the automation platform you are using — or the pricing tier you are willing to pay for in the same automation platform.
For example, the “trigger” might capture data about an event once every 15 minutes. But the event itself can happen over a hundred times in that same 15 minutes.
This may or may not be important, depending on the context. For example, if the trigger is asking WordPress to give a list of WordPress users with the “student” role, and then someone manually modifies the role of a newly registered student to a non-student role within the same 15 minutes, then the trigger will never capture data about that same student. It is as if the event never happened.
One popular platform to create automations is Zapier. But, creating automations is not limited to Zapier. For example, when you create engagements in LIfterLMS, you are creating automations. When you use a platform like ActiveCampaign, you also get access to powerful automation tools.
This document focuses exclusively on Zapier because of our integration with it through the LifterLMS Zapier app.
Zapier (zapier.com) is a platform that allows you to integrate one website/web application to another website/web application. You can create a free account on Zapier.com. But premium subscriptions are also available, so be sure to checkout their pricing page. Free plans and starter plans in Zapier have a polling interval of at most 15 minutes, while higher plans allow you to customize the polling interval to as little as 1 minute.
From the point of view of this help document, Zapier is just the set of all Zapier apps. As of 2024, there are over 6000 such apps in Zapier. These Zapier apps can be connected to each other, allowing you to create powerful automations.
From the point of view of this help document, a Zapier app is just the set of all triggers and actions made available by a website or web application to the Zapier app.
- For example, the Google Sheets Zapier app can be thought of as the set of all triggers and actions made available by the Google Sheets web application to Zapier.
- Similarly, the LifterLMS Zapier app can be thought of as the set of all triggers and actions made available by the LifterLMS plugin to Zapier.
In the example given above, you are making a connection between two different Zapier apps: the LifterLMS Zapier app and the Google Sheets Zapier app.
But you are not limited to making a connection with just two Zapier apps: in Zapier, you can make a connection between any number of Zapier apps. For example, after creating a row in Google Sheets sheet, you could also send an email via the MailChimp Zapier app in the same automation. In this case, you have one trigger and two actions from two different Zapier apps.
You create automations in Zapier by creating a zap. Every trigger and action that you use inside that zap will come from at least one Zapier app.
We recommend that you follow the official tutorial from Zapier to get a comprehensive introduction in creating your first zap. If you are already logged in to your Zapier account, you can create your zaps from zapier.com/app/zaps.
Once you have followed this tutorial on creating your first zap, you can then follow this section to create your first zap that uses the LifterLMS Zapier app.
In the sample zap below, we’ll automatically enroll a new WordPress user to a LifterLMS course as soon as they register an account on our WordPress site. Then, automatically create a WordPress account for that user on a different WordPress site. In a nutshell, you’ll just follow this three easy steps:
- Create a zap.
- Set up the trigger.
- Set up at least one action.
Create a zap.
Step 1. Access the LifterLMS Zapier App. This screen will prompt you to log in to your Zapier account.
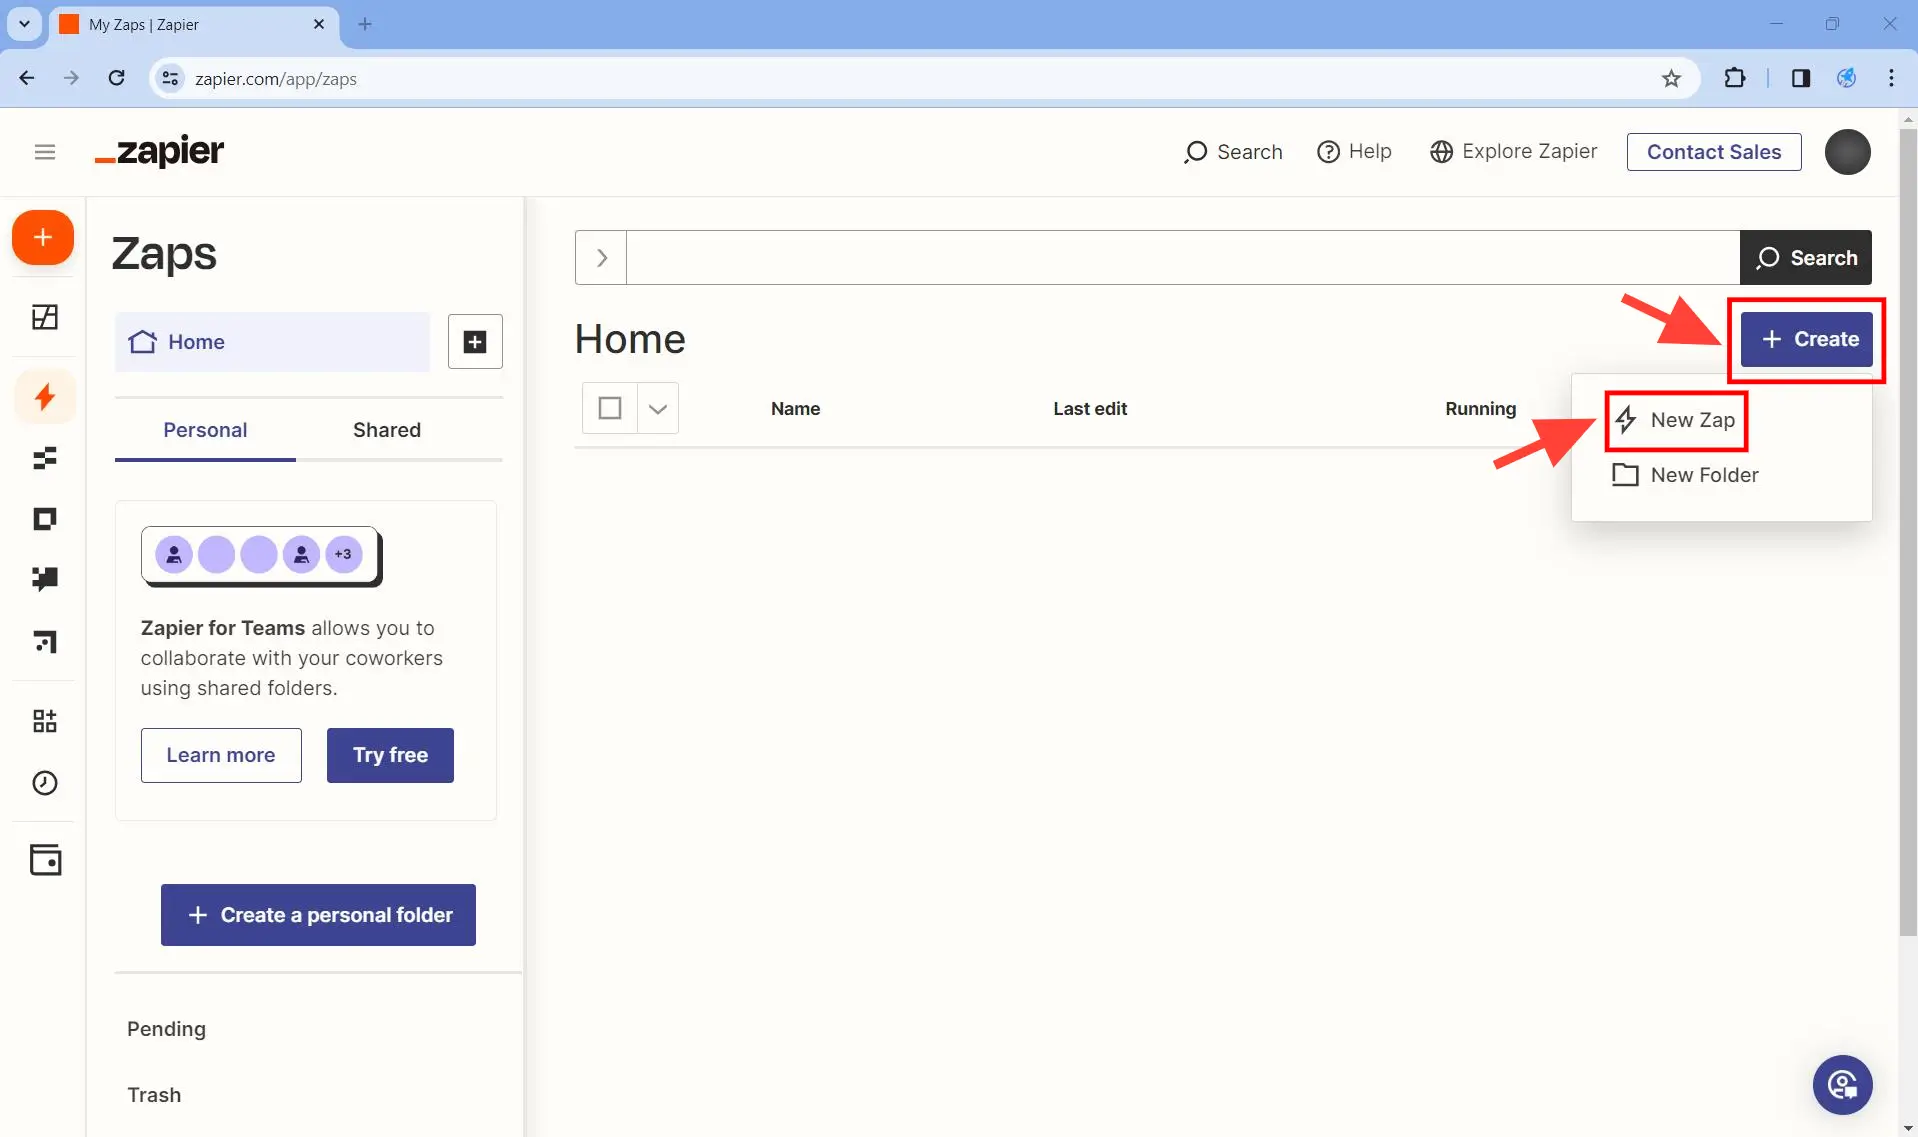
Step 2. Navigate to zapier.com/app/zaps.
Step 3. Click on the + Create > New Zap.
Set up the trigger.
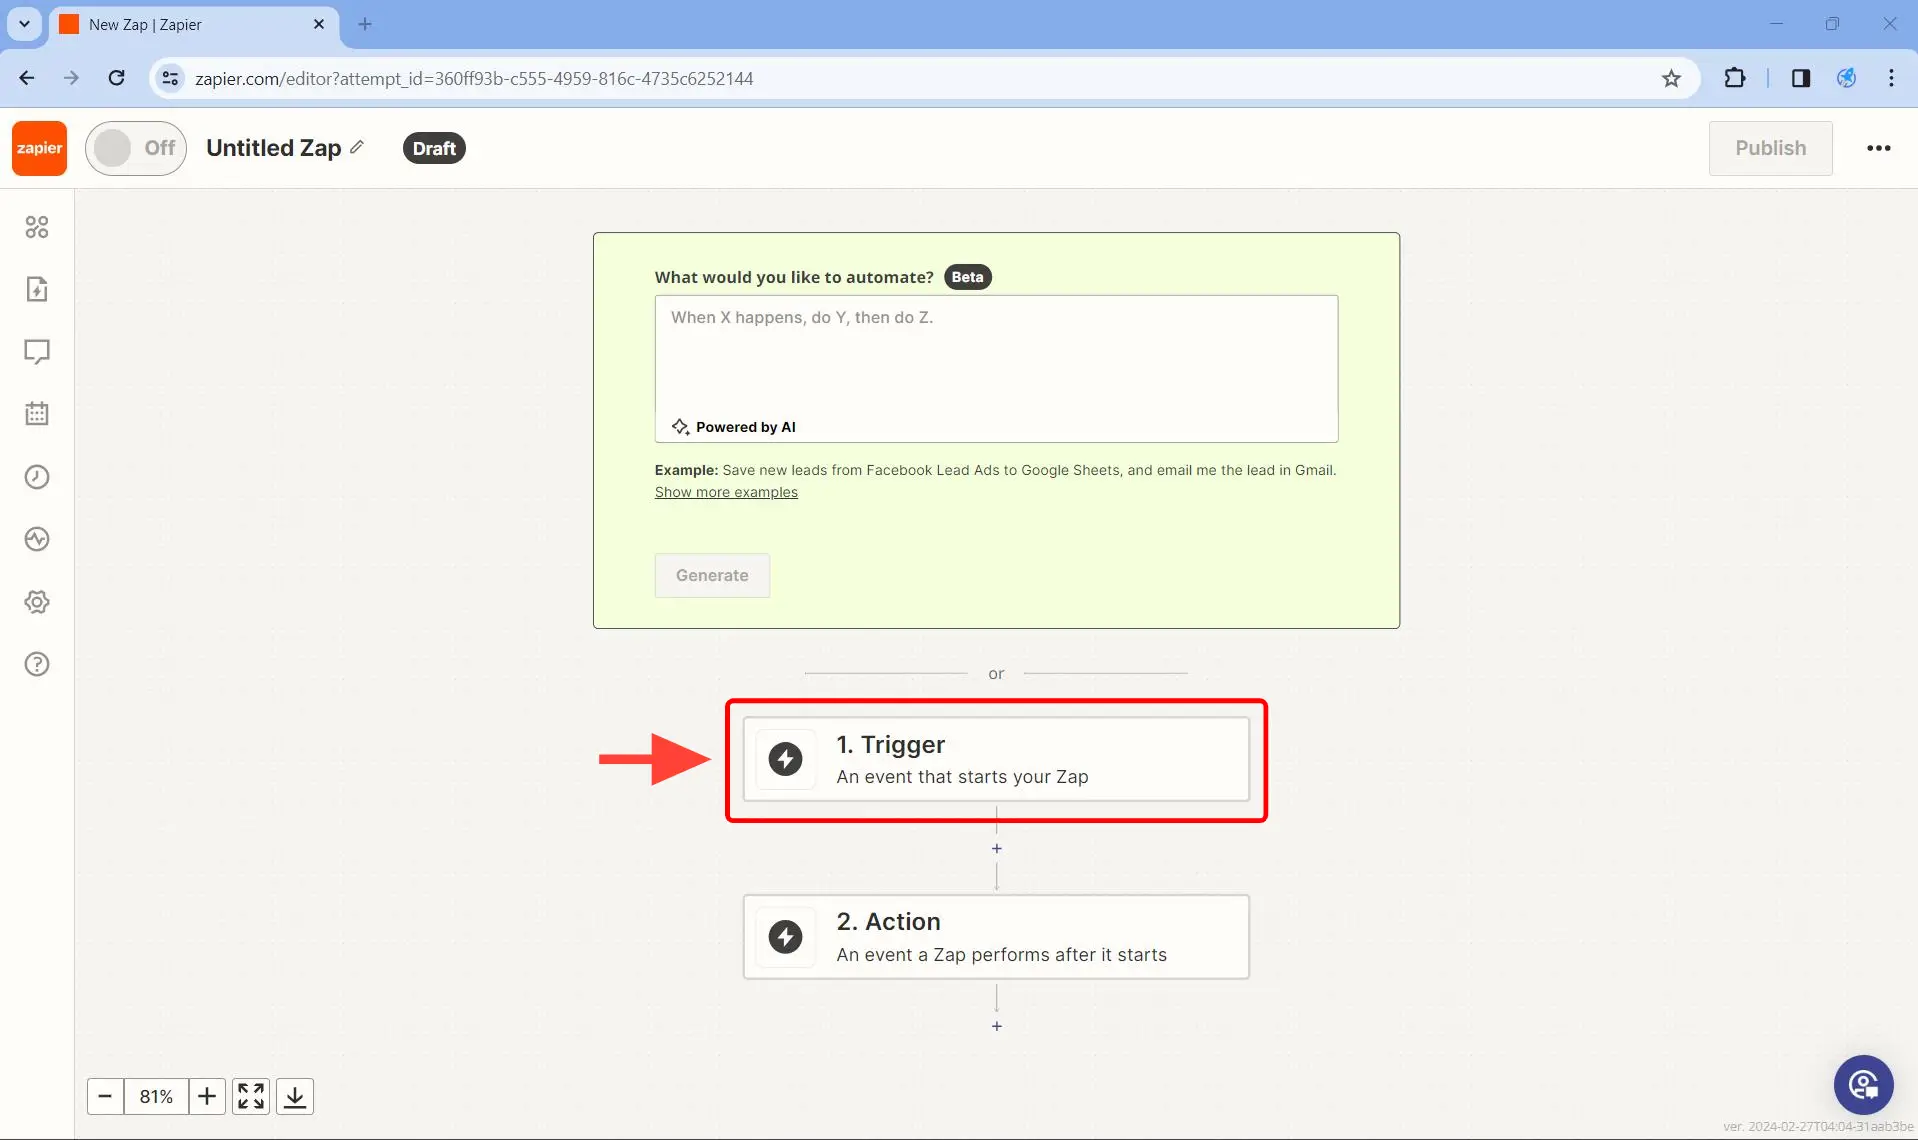
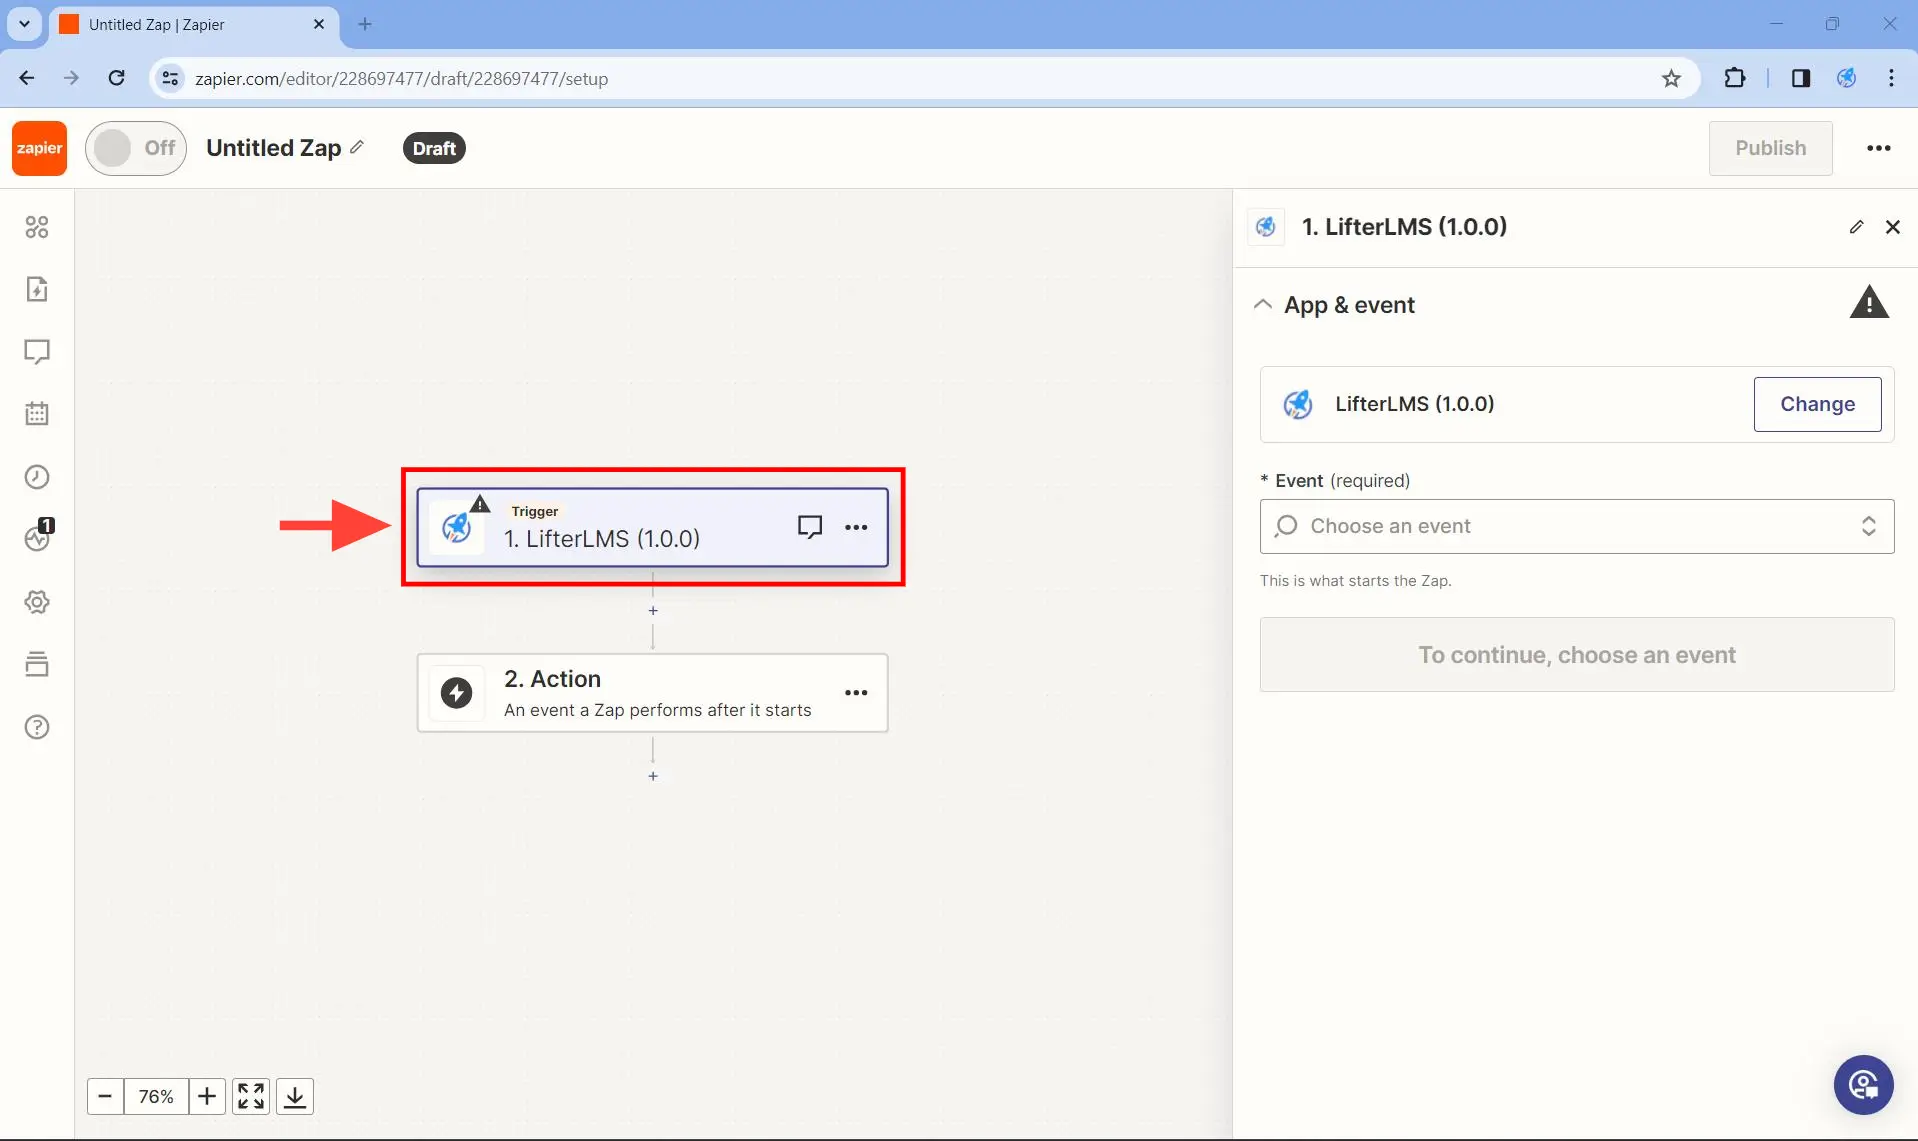
Step 1. Click on 1. Trigger. A search box will appear.
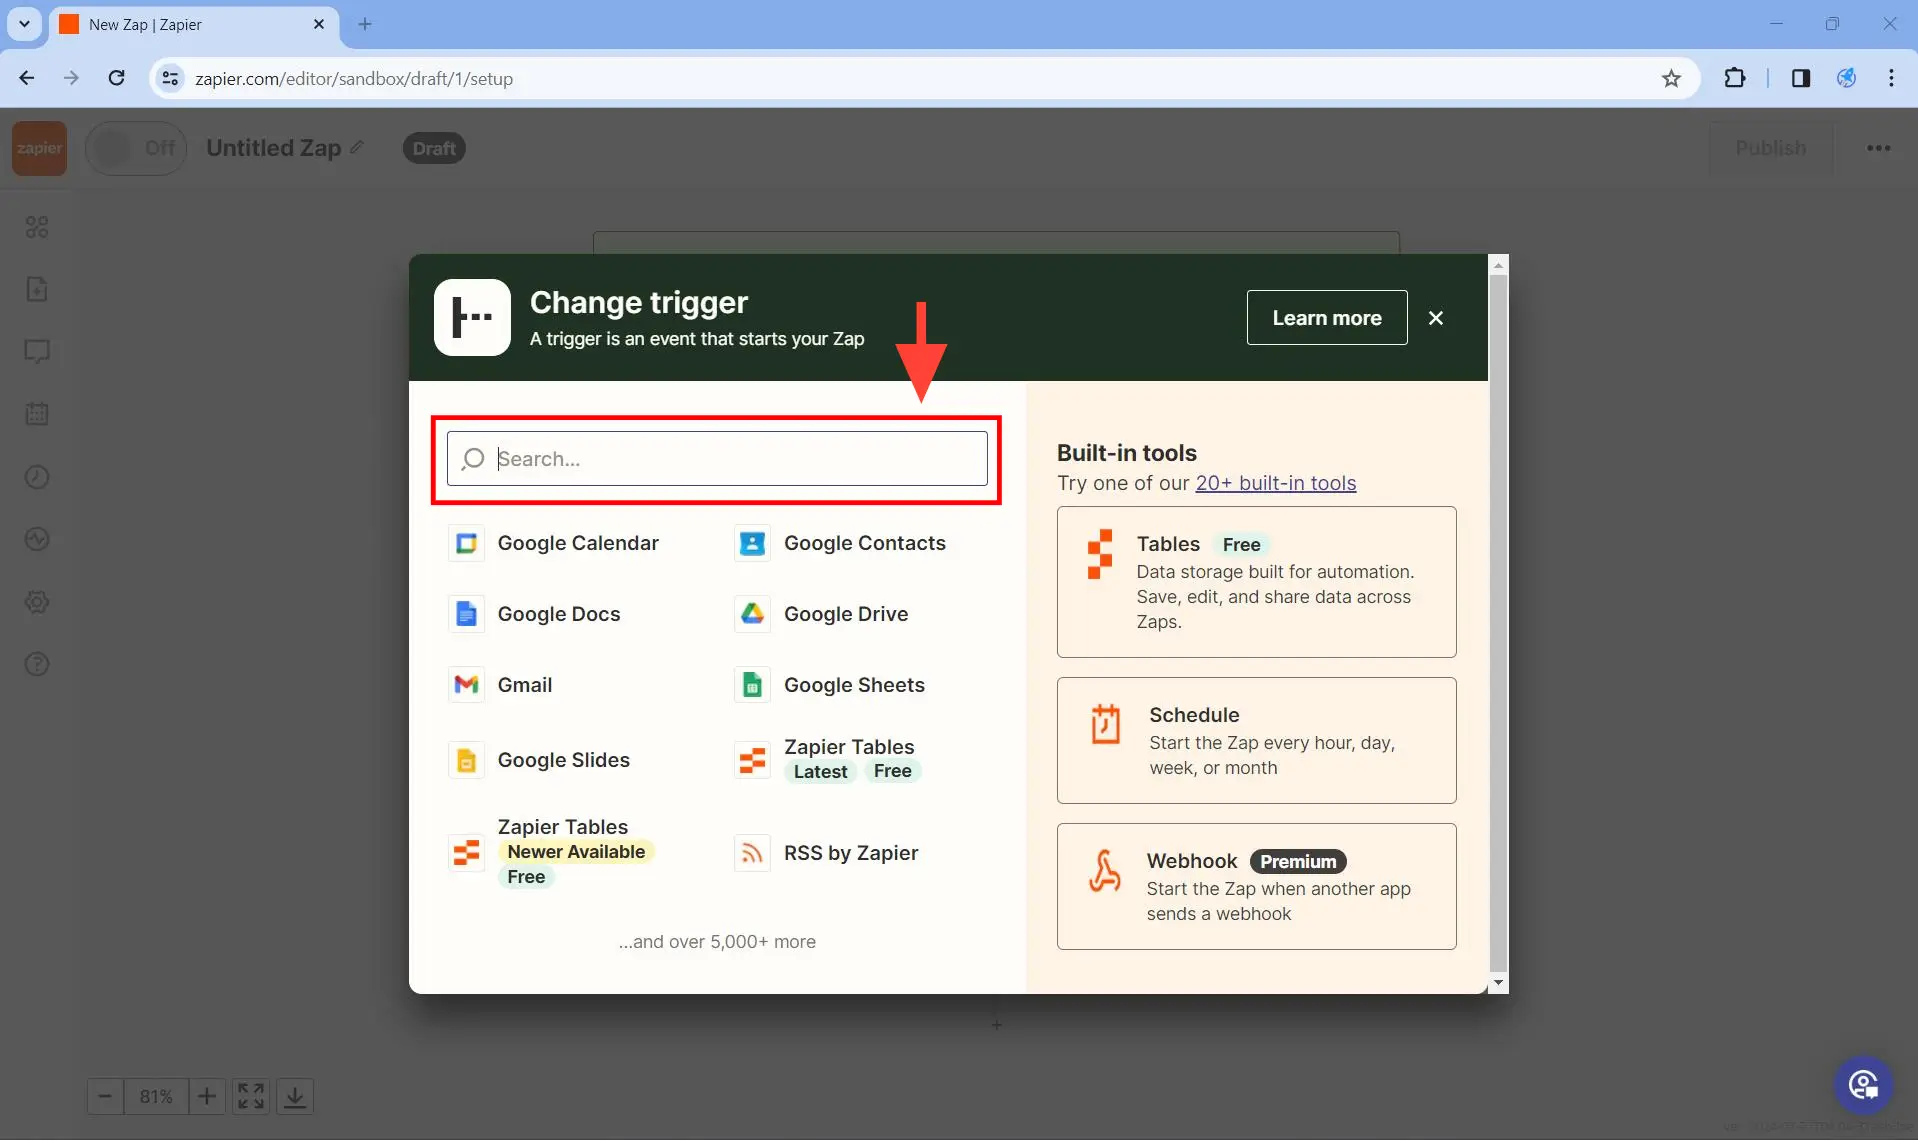
Step 2. In the pop-up that appears, type “LifterLMS” in the search field and click on the LifterLMS Zapier app as shown below.
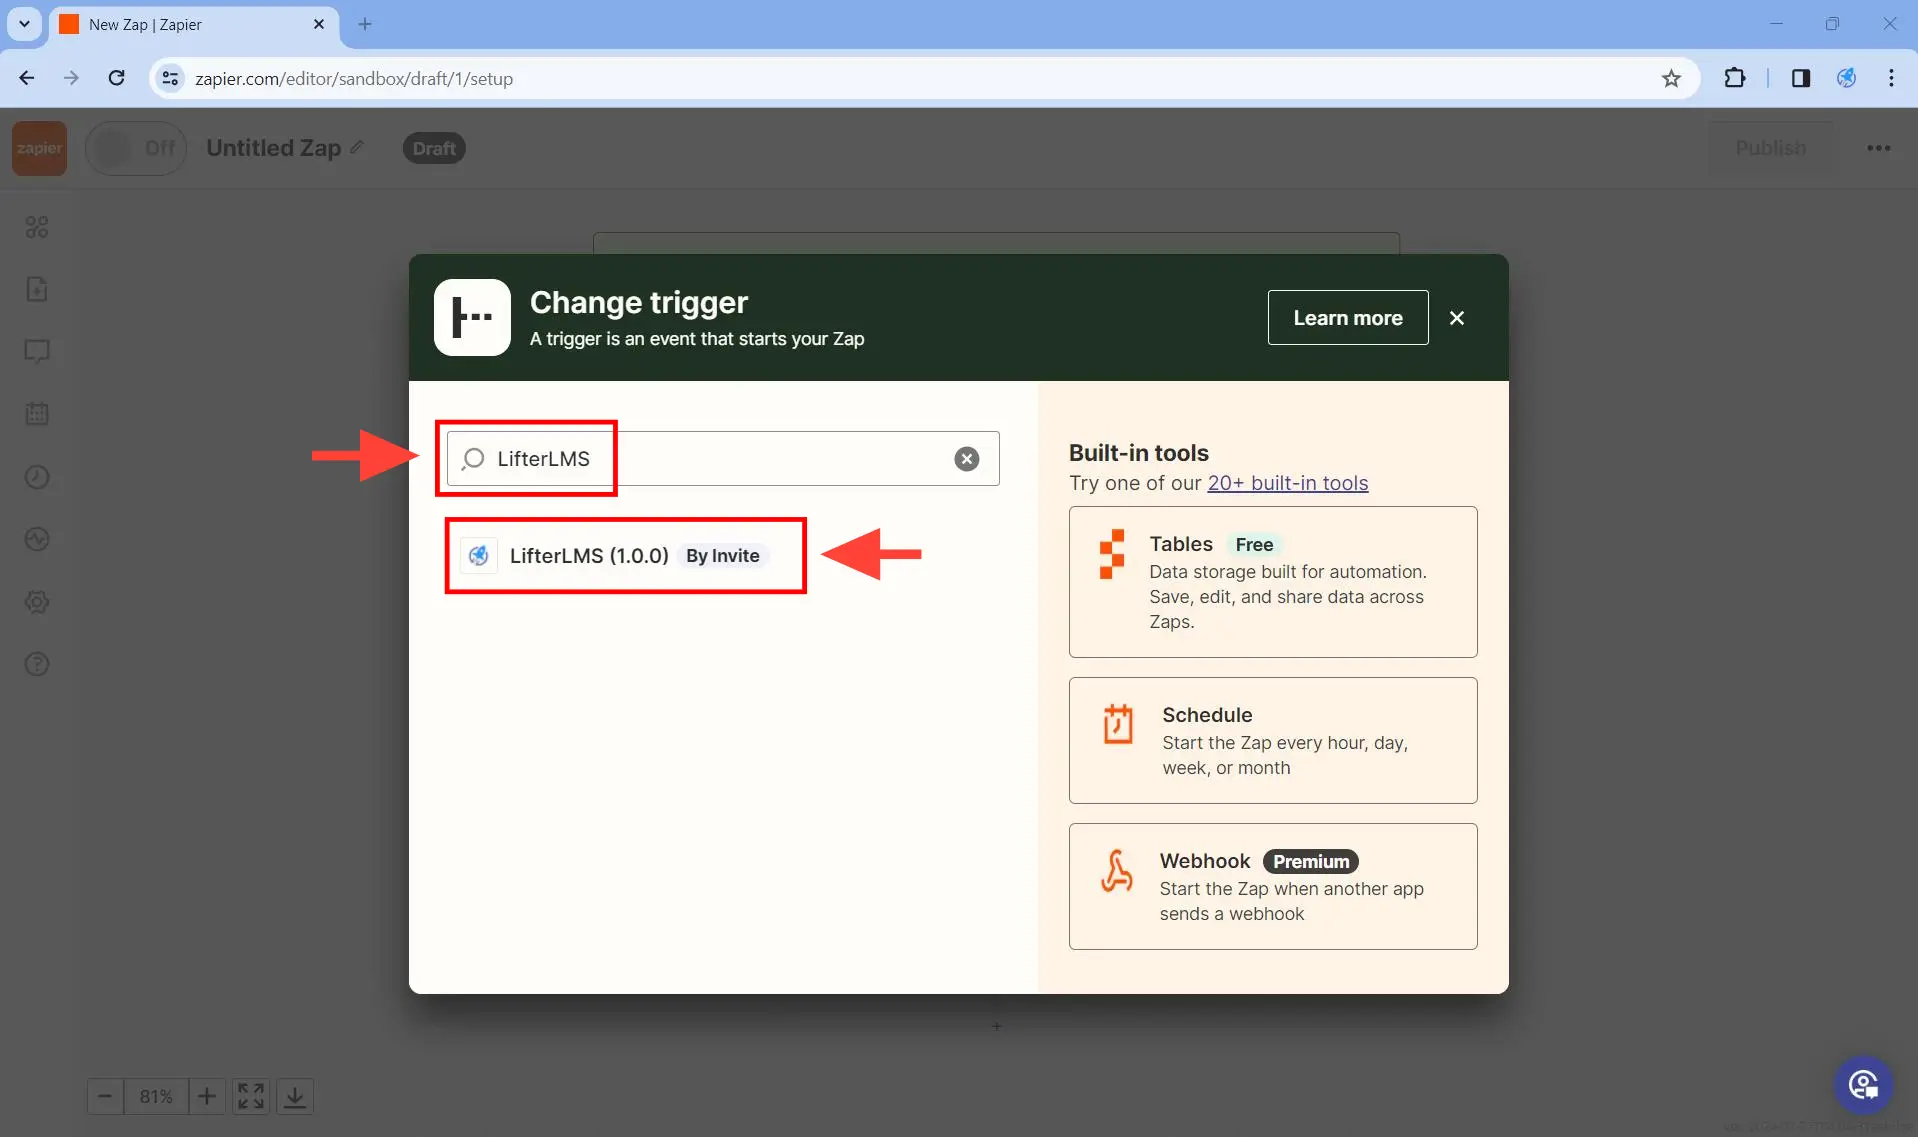
This selects LifterLMS as the triggering app.
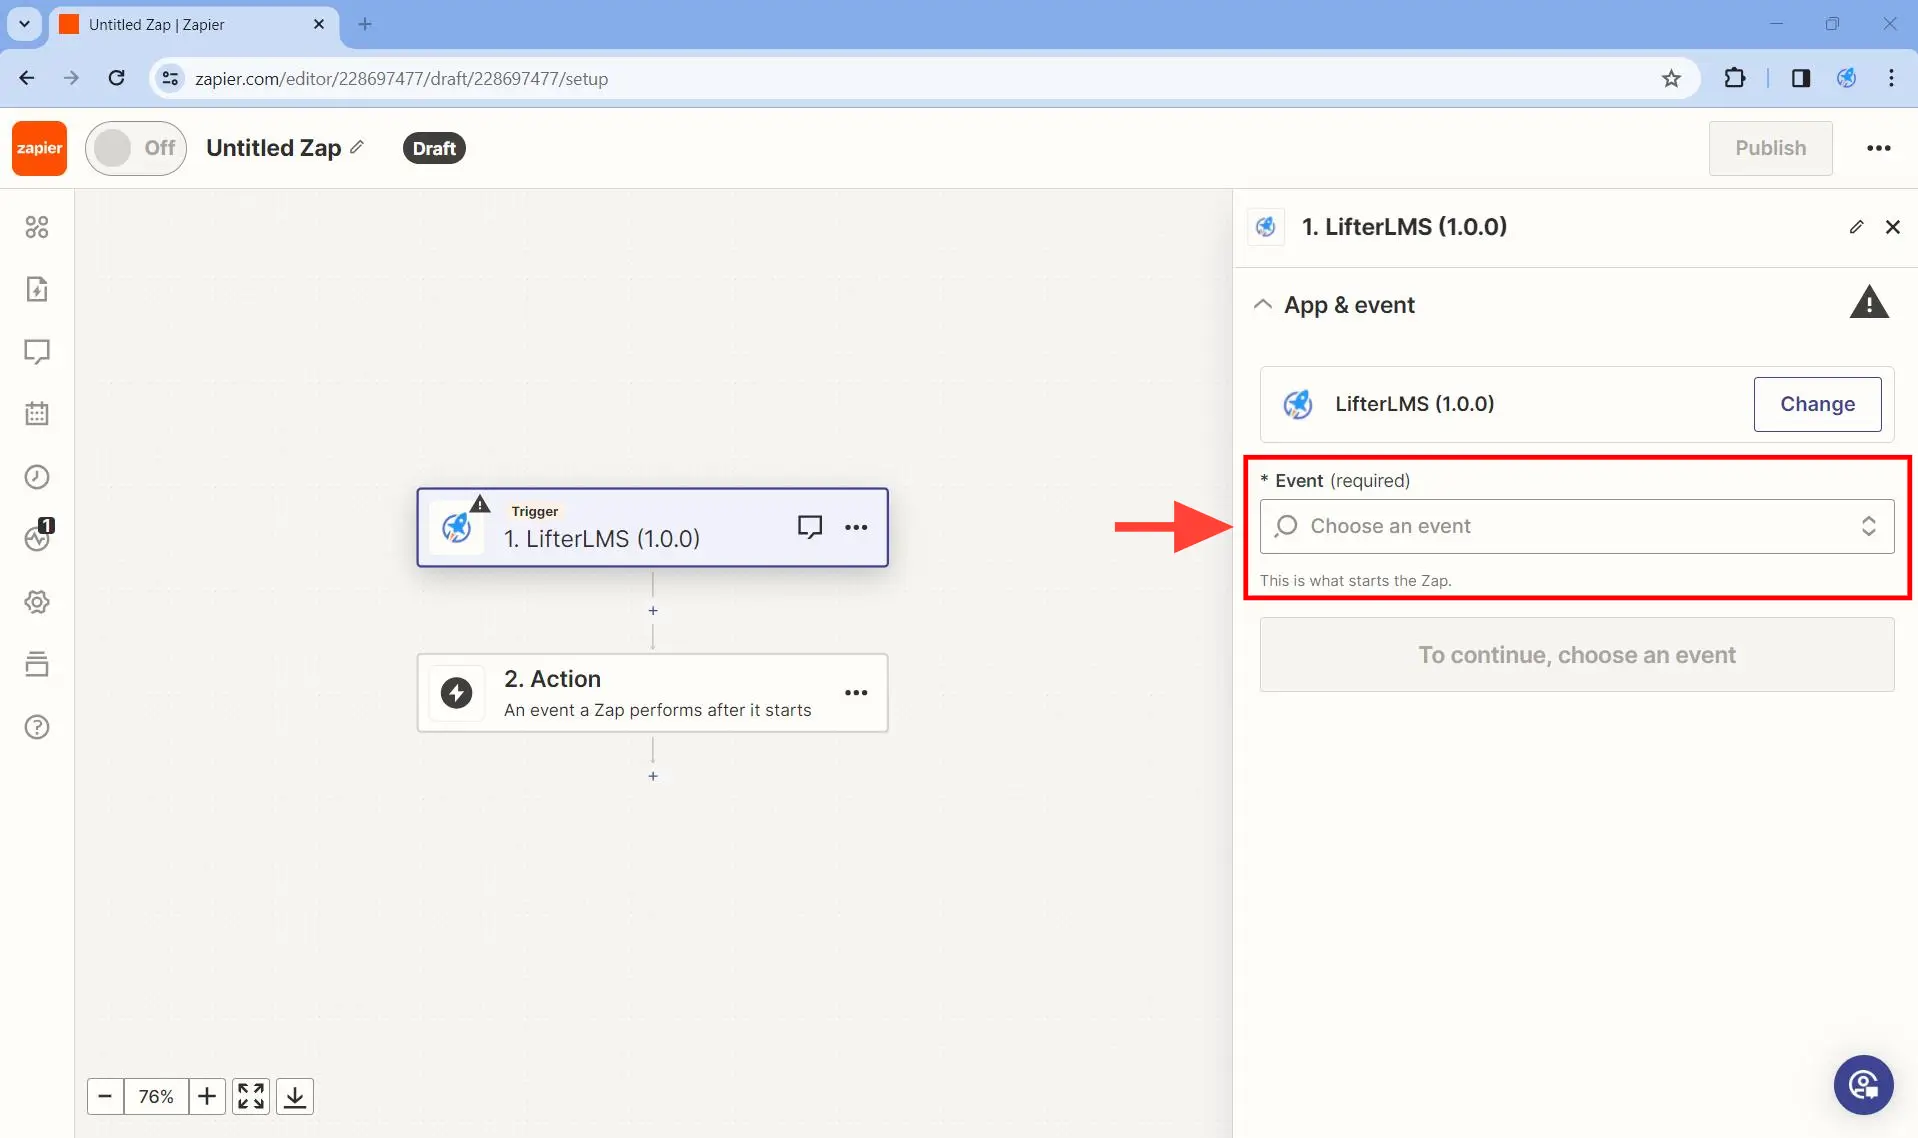
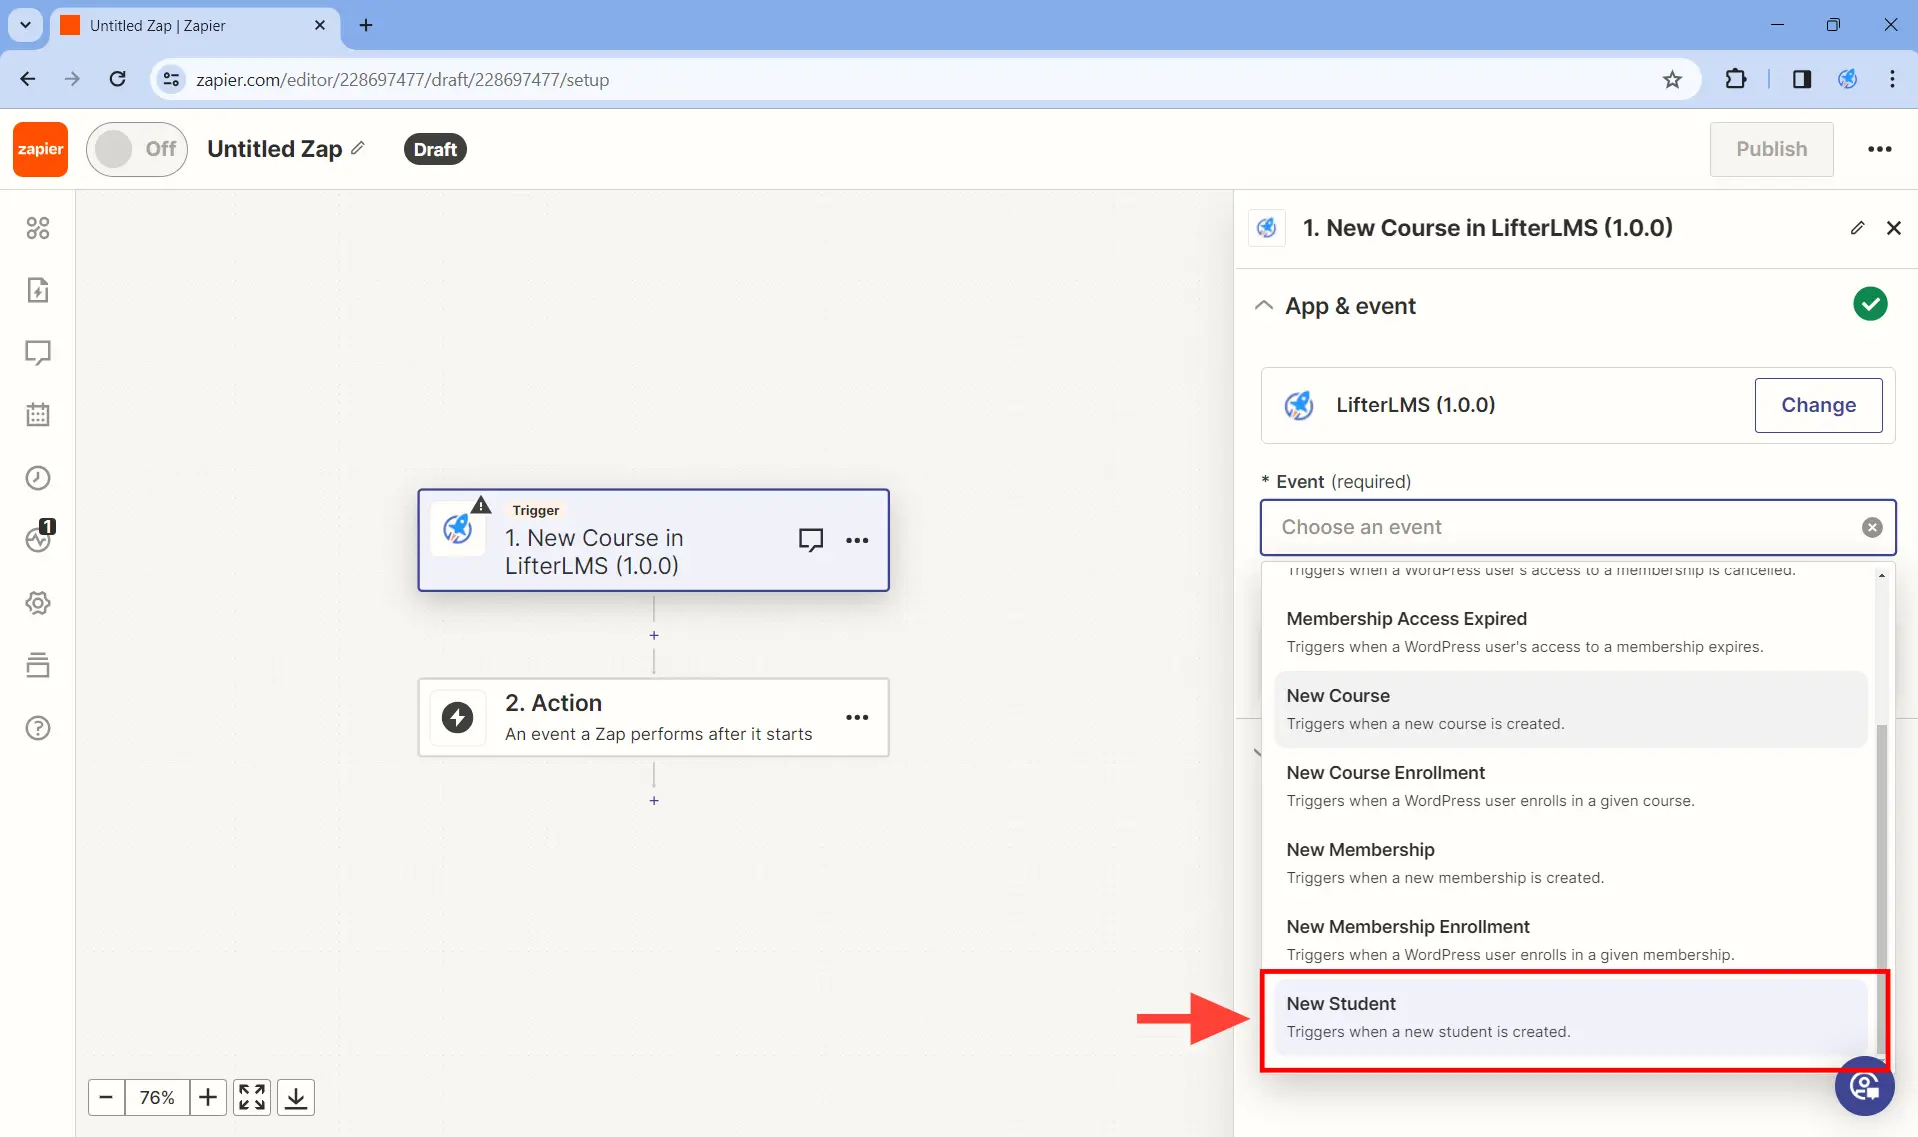
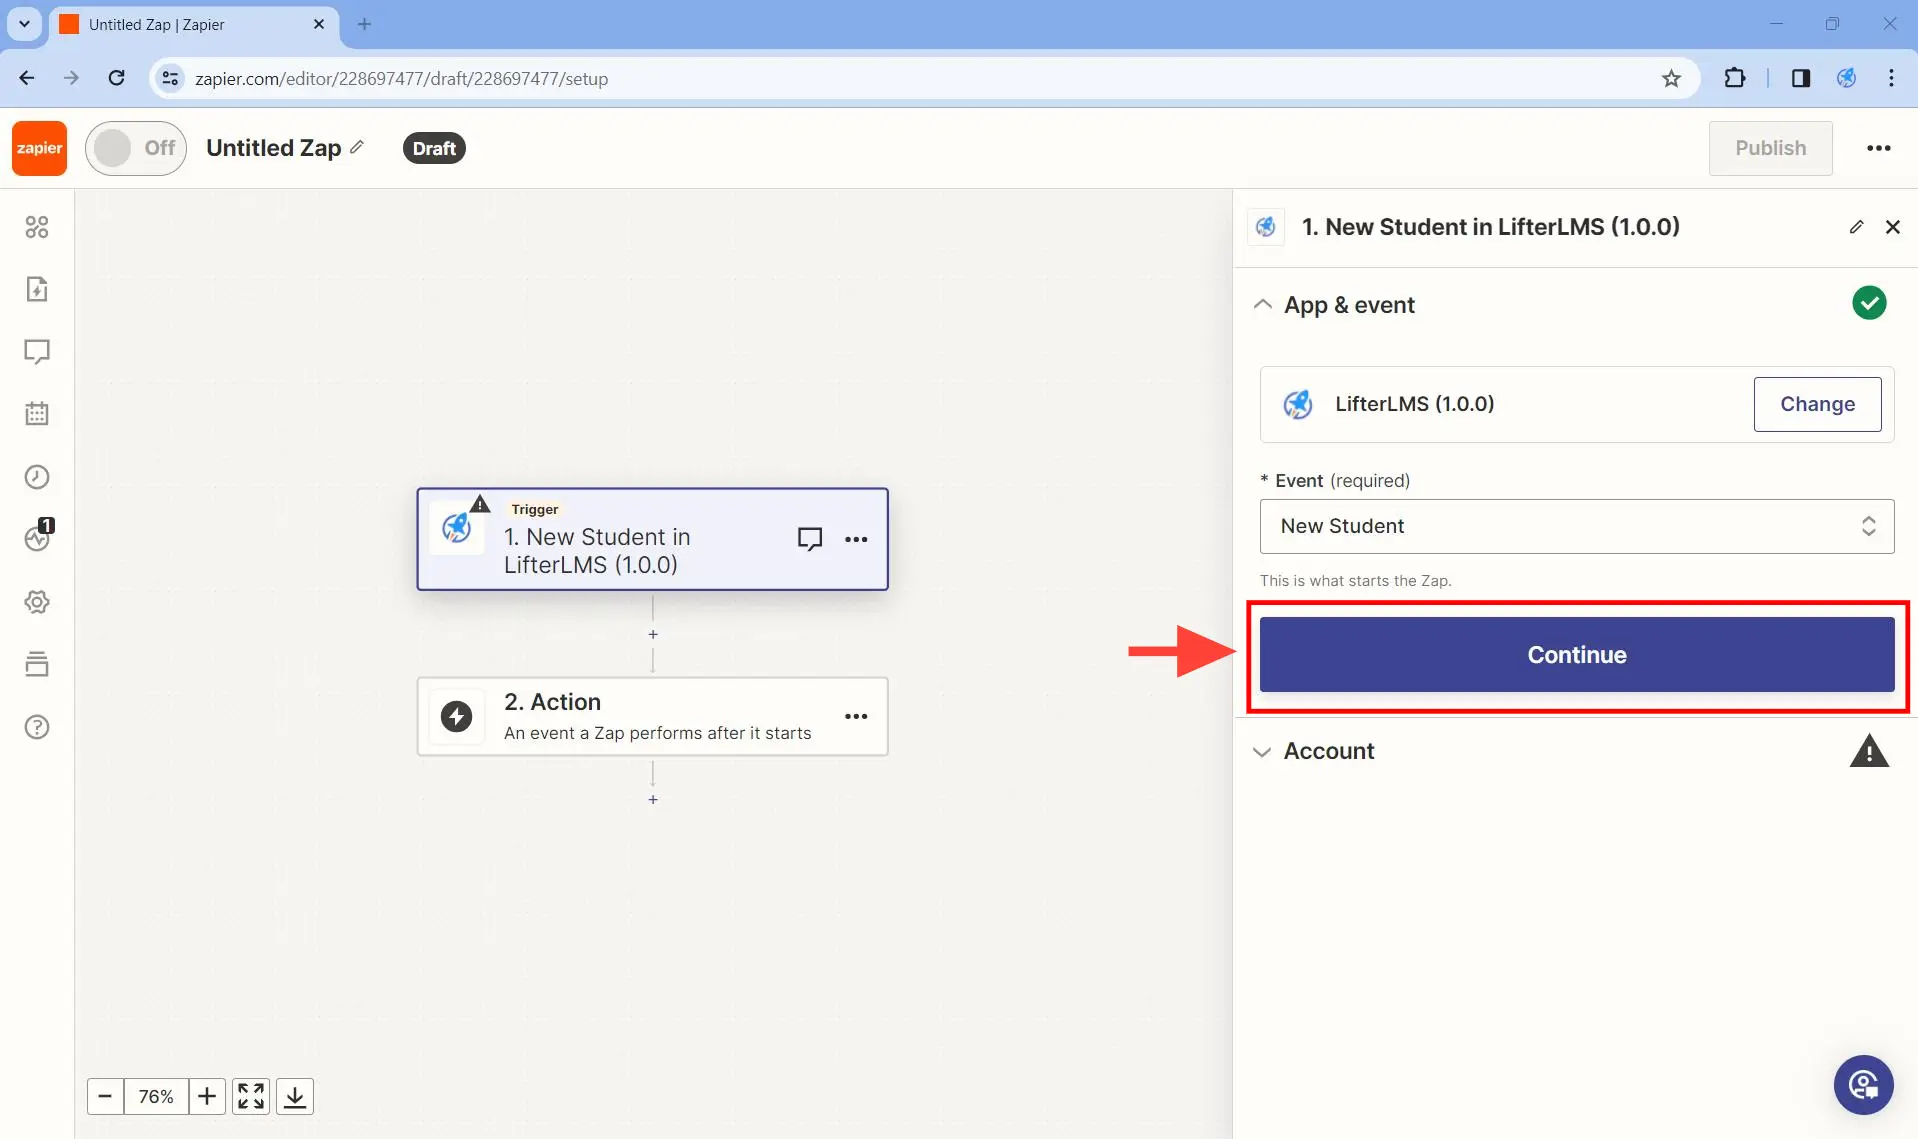
Step 3. Under App & event, set Event to New Student and click on Continue.
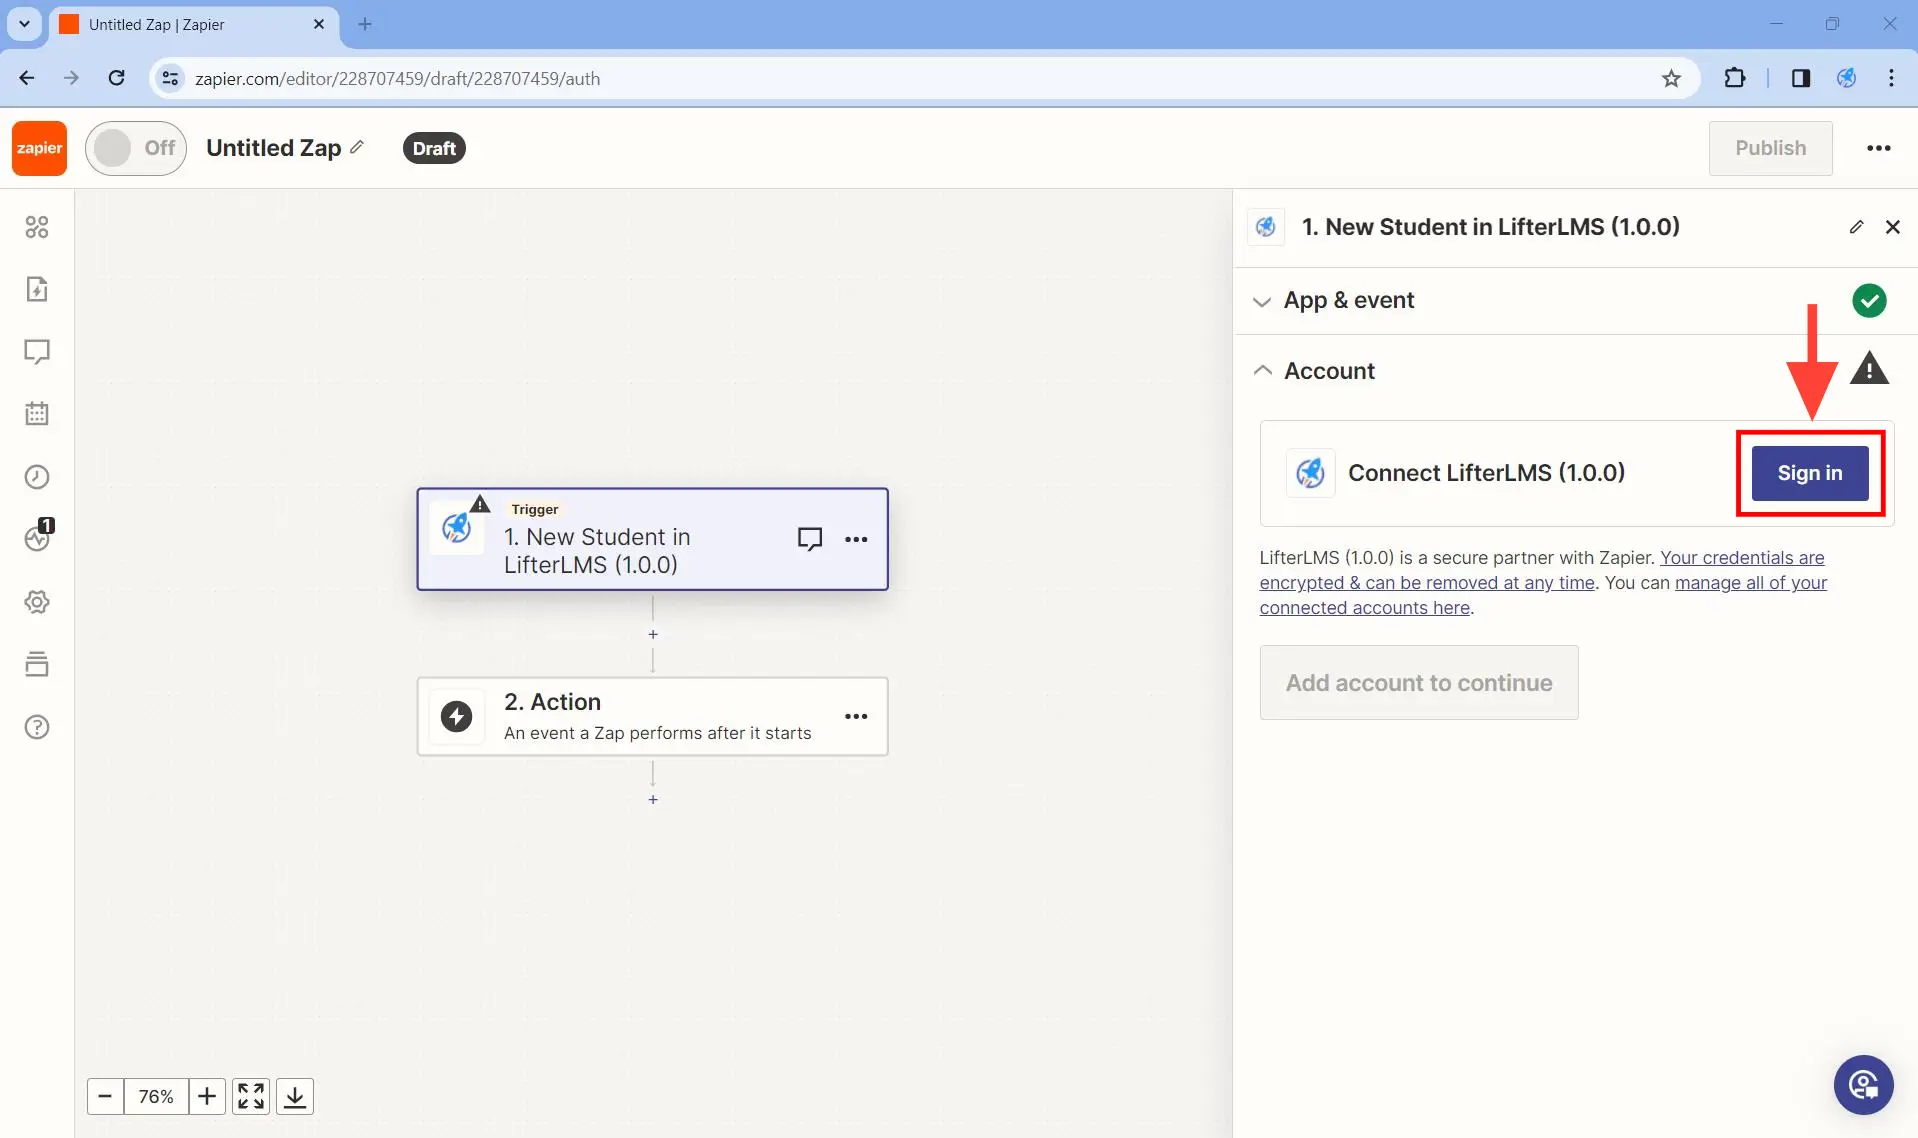
Step 4. Under Account > Connect LifterLMS (1.0.0) click on Sign in. If you have already connected a LifterLMS website before, you will see Change instead of Sign in. If you have connected more than one LifterLMS site, you will see Choose instead of Sign in.
Step 5. In the “Connect an Account” window that opens fill up the Base URL, Consume Key and Consumer Secret.
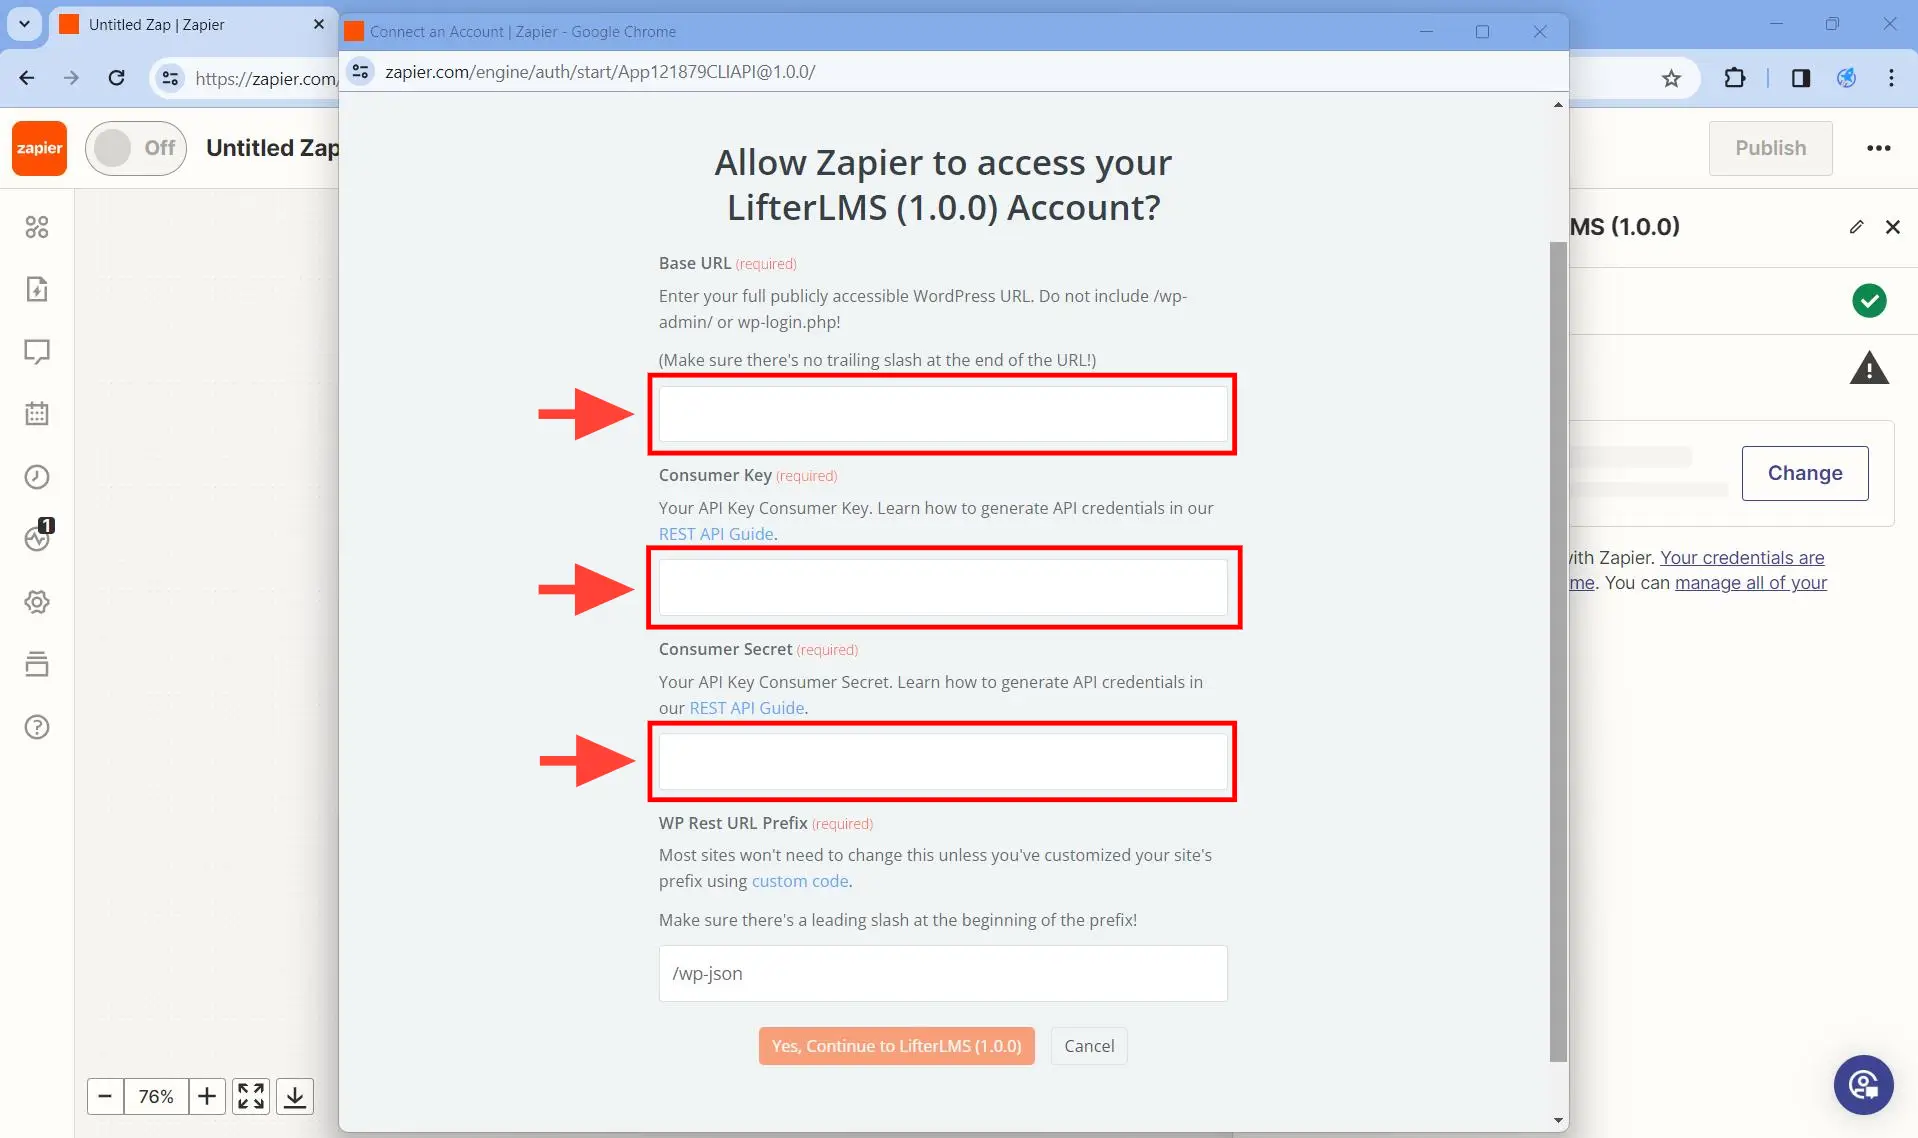
Be sure to follow this tutorial on how to create a Consumer Key and Consumer Secret key. As for the Base URL, it should just be the URL of the home page of your site. So if your WordPress is located at https://www.domain.com, you enter https://www.domain.com and not https://www.domain.com/ (note the forward slash at the end).
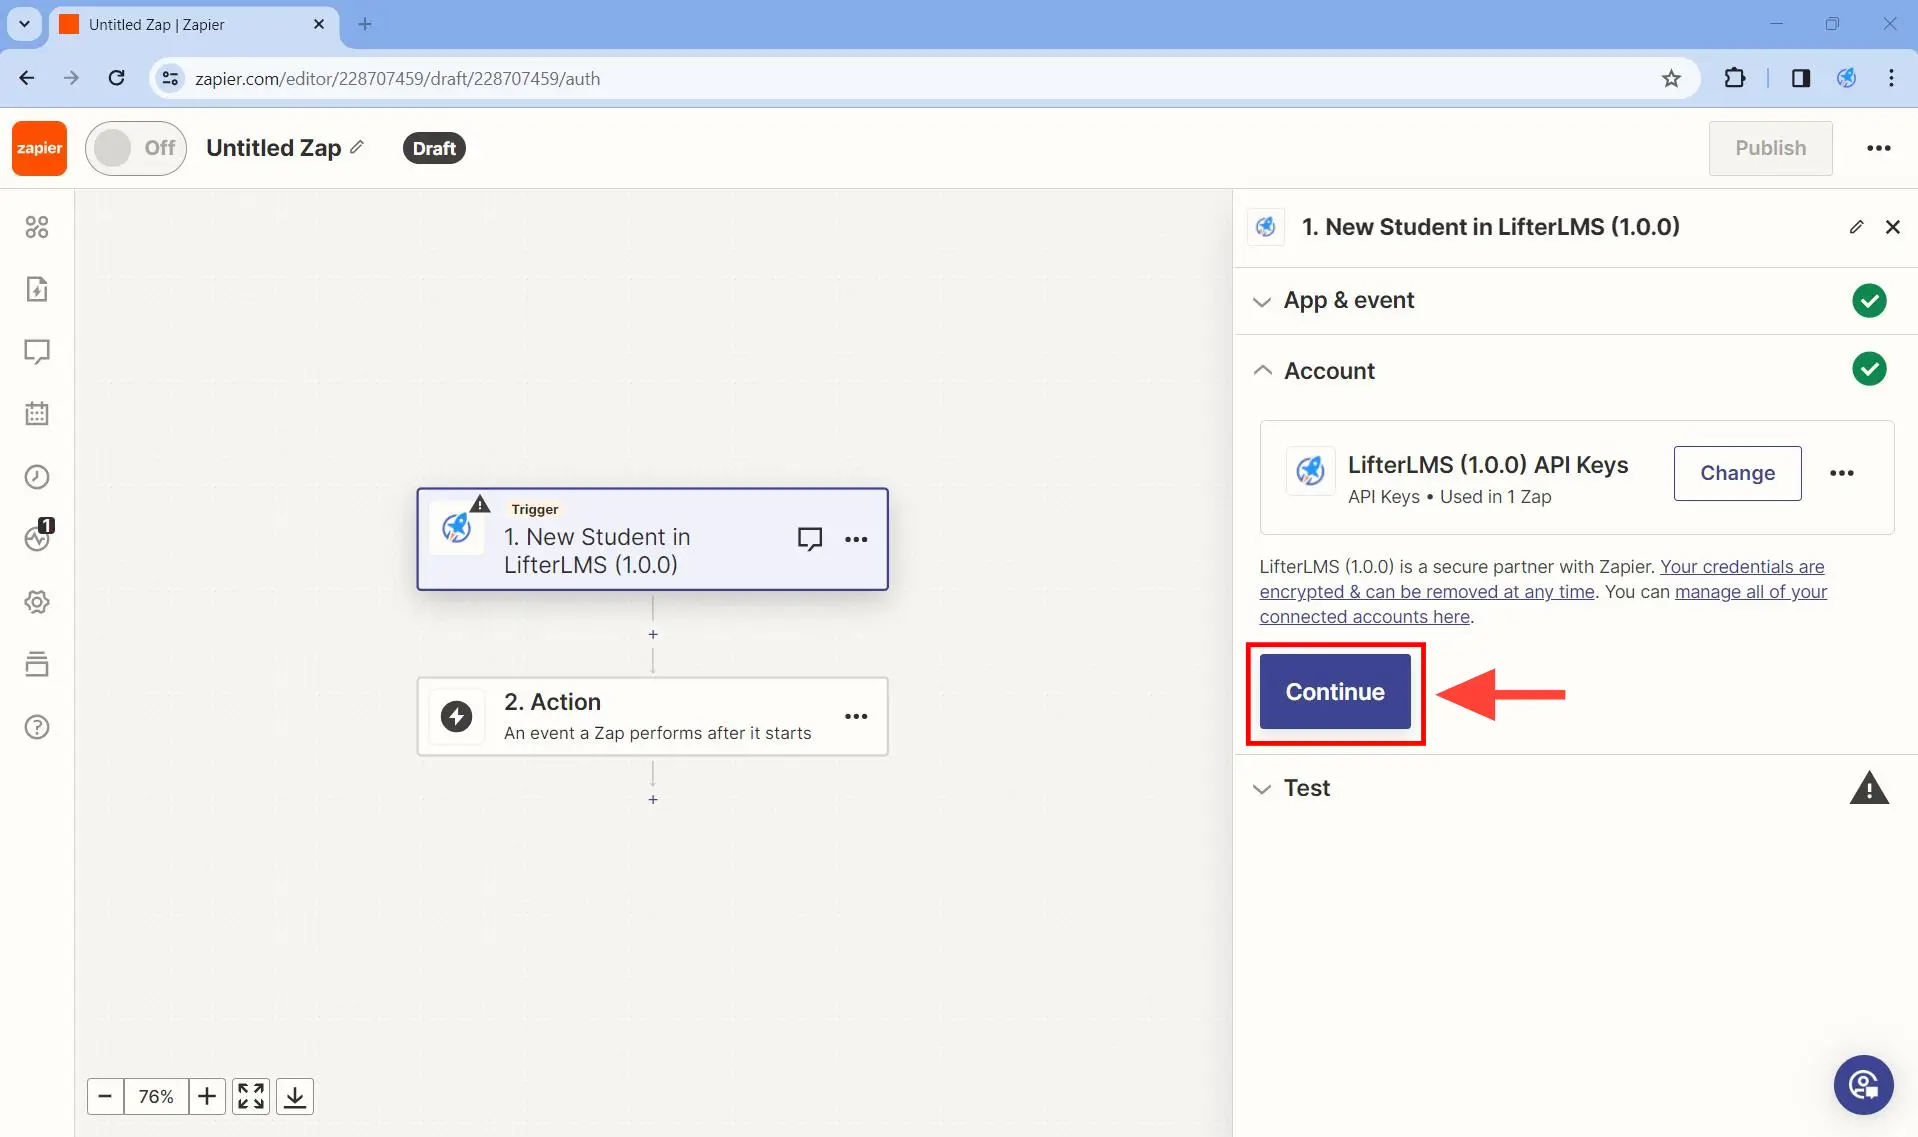
Step 6. Click on the Continue button.
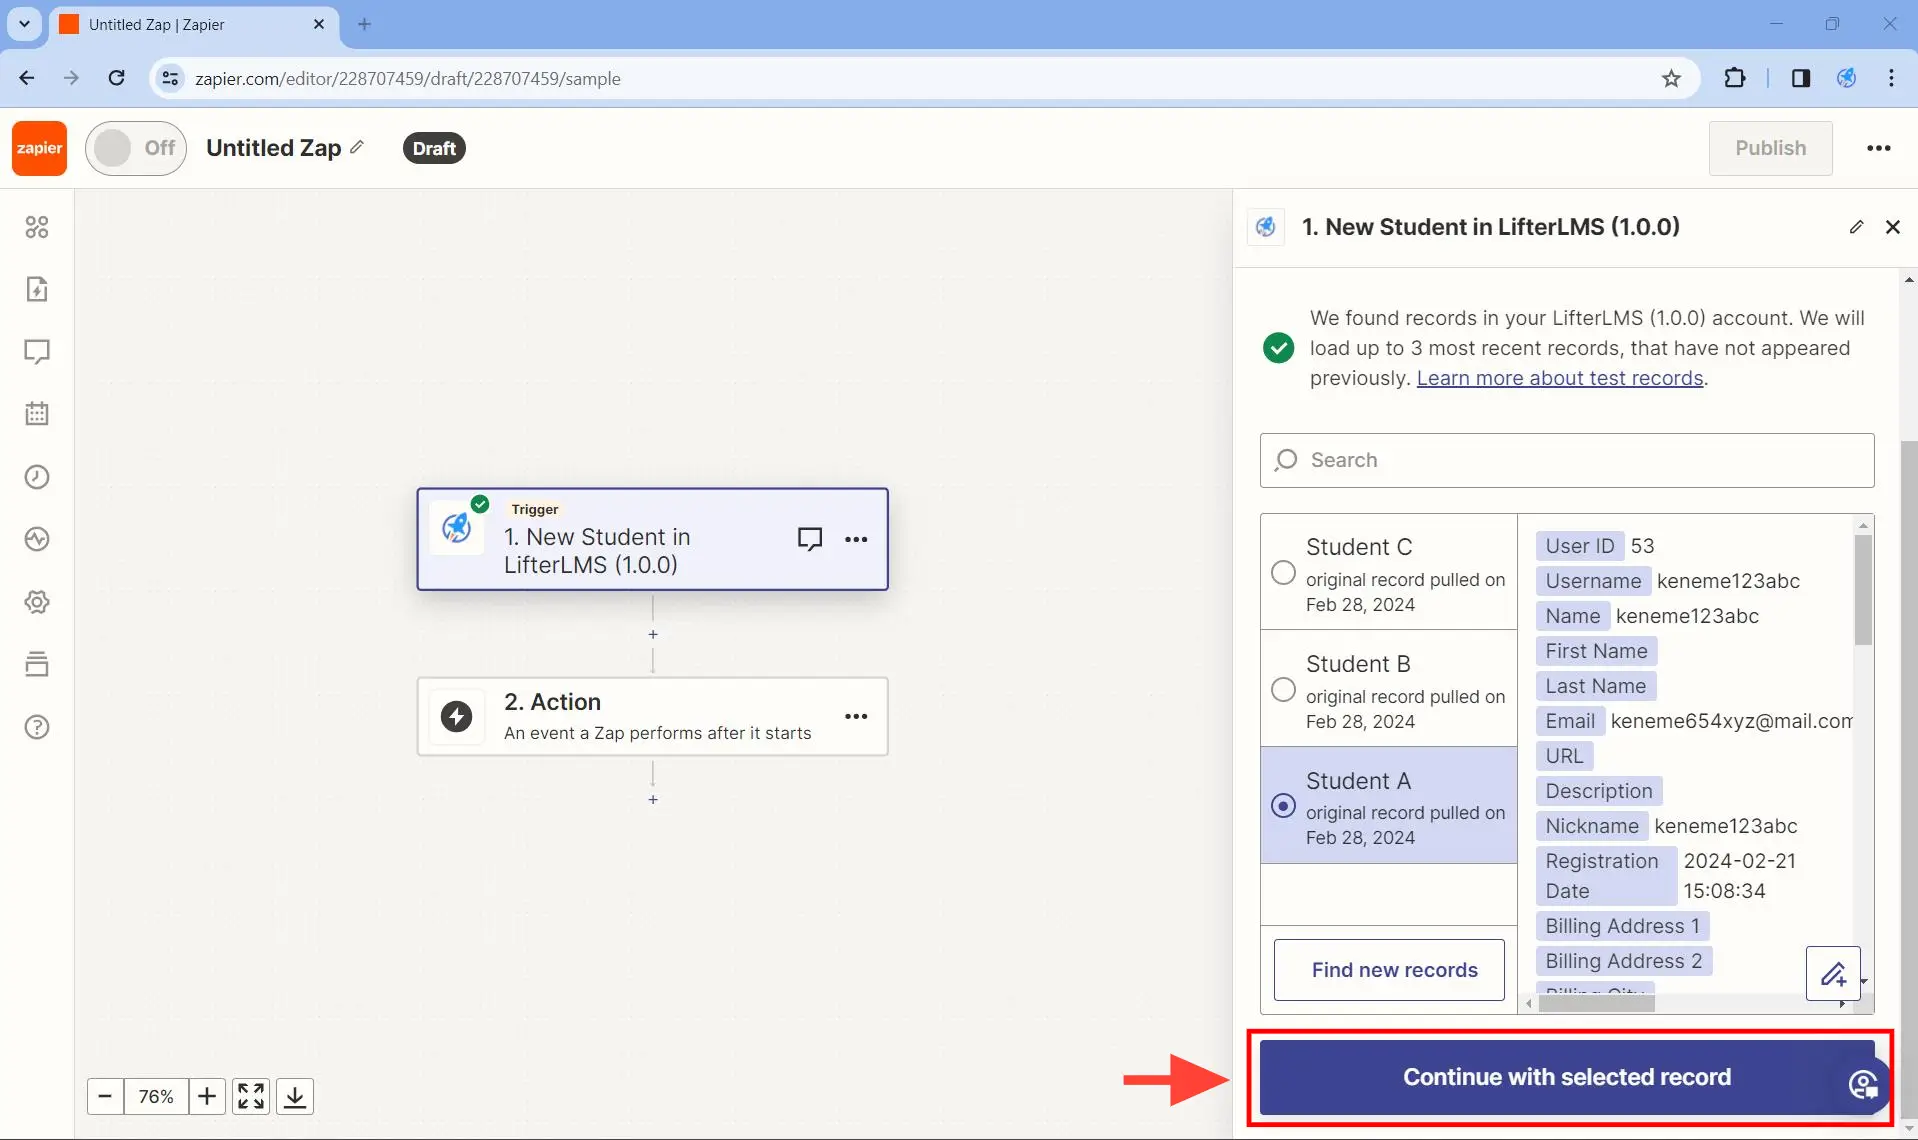
Step 7. Under Test, click on the Test trigger button. This checks if you have WordPress users with the student role on your site.
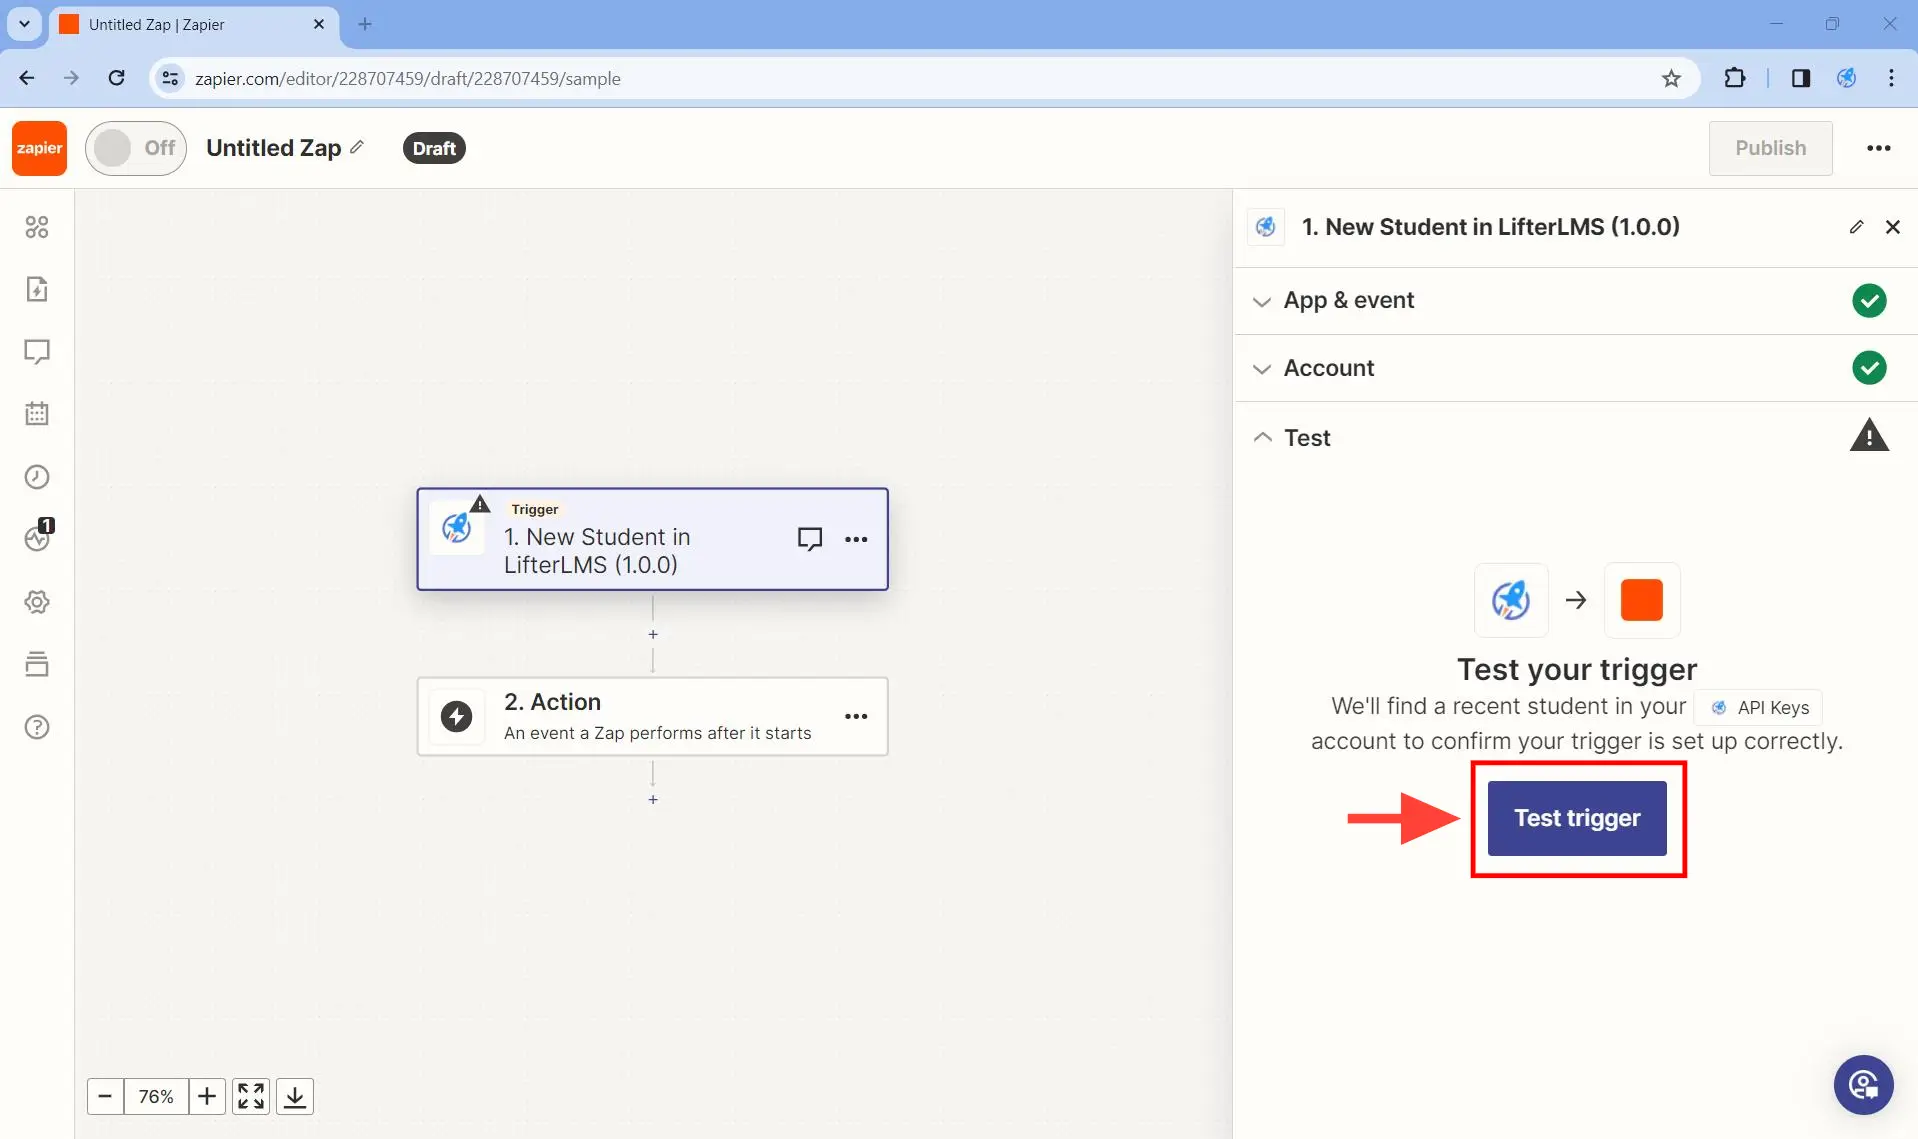
If you do not have students yet, click on the Skip Test button. This will allow you to see what the output data would look like had you received the real student data.
Step 8. Click on the Continue with selected record button.
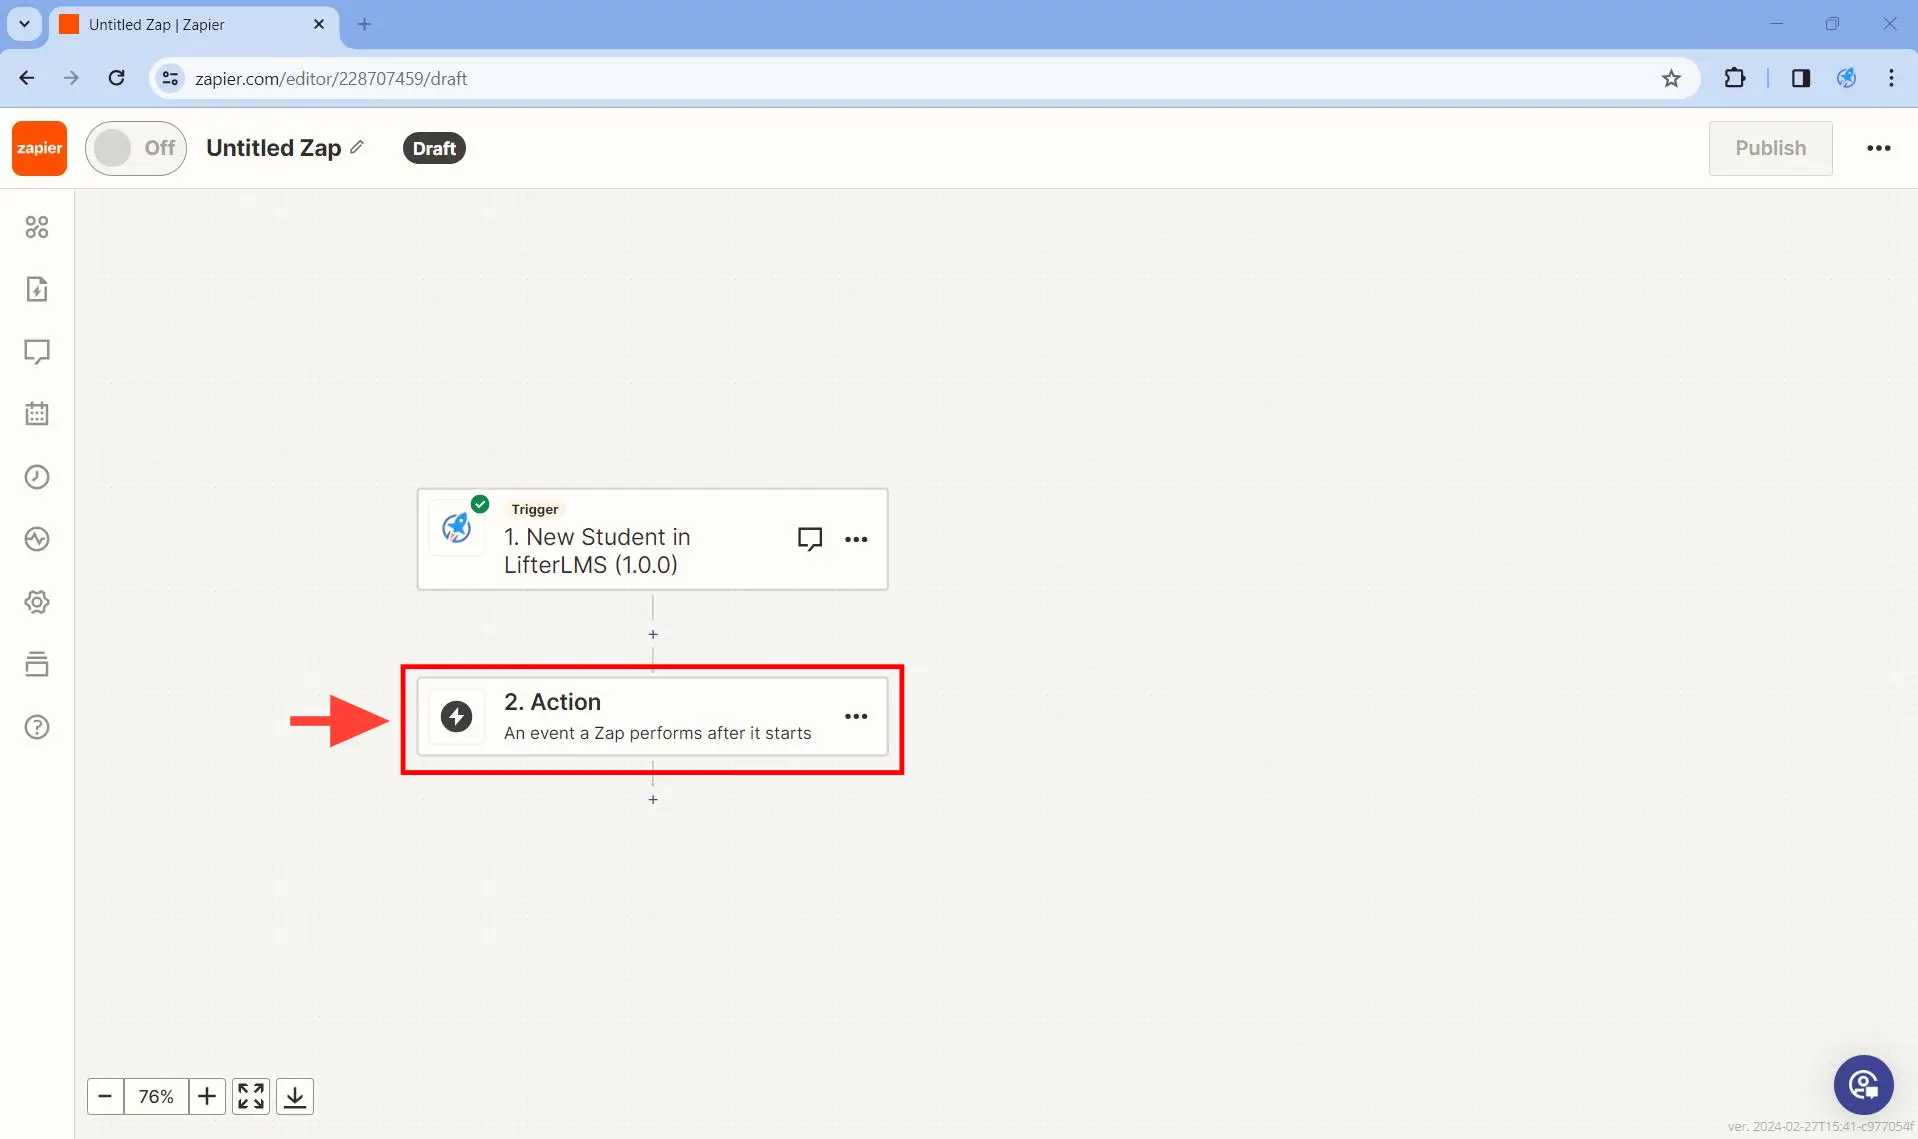
Set up at least one action.
Step 1. Click on 2. Action. A search box will appear.
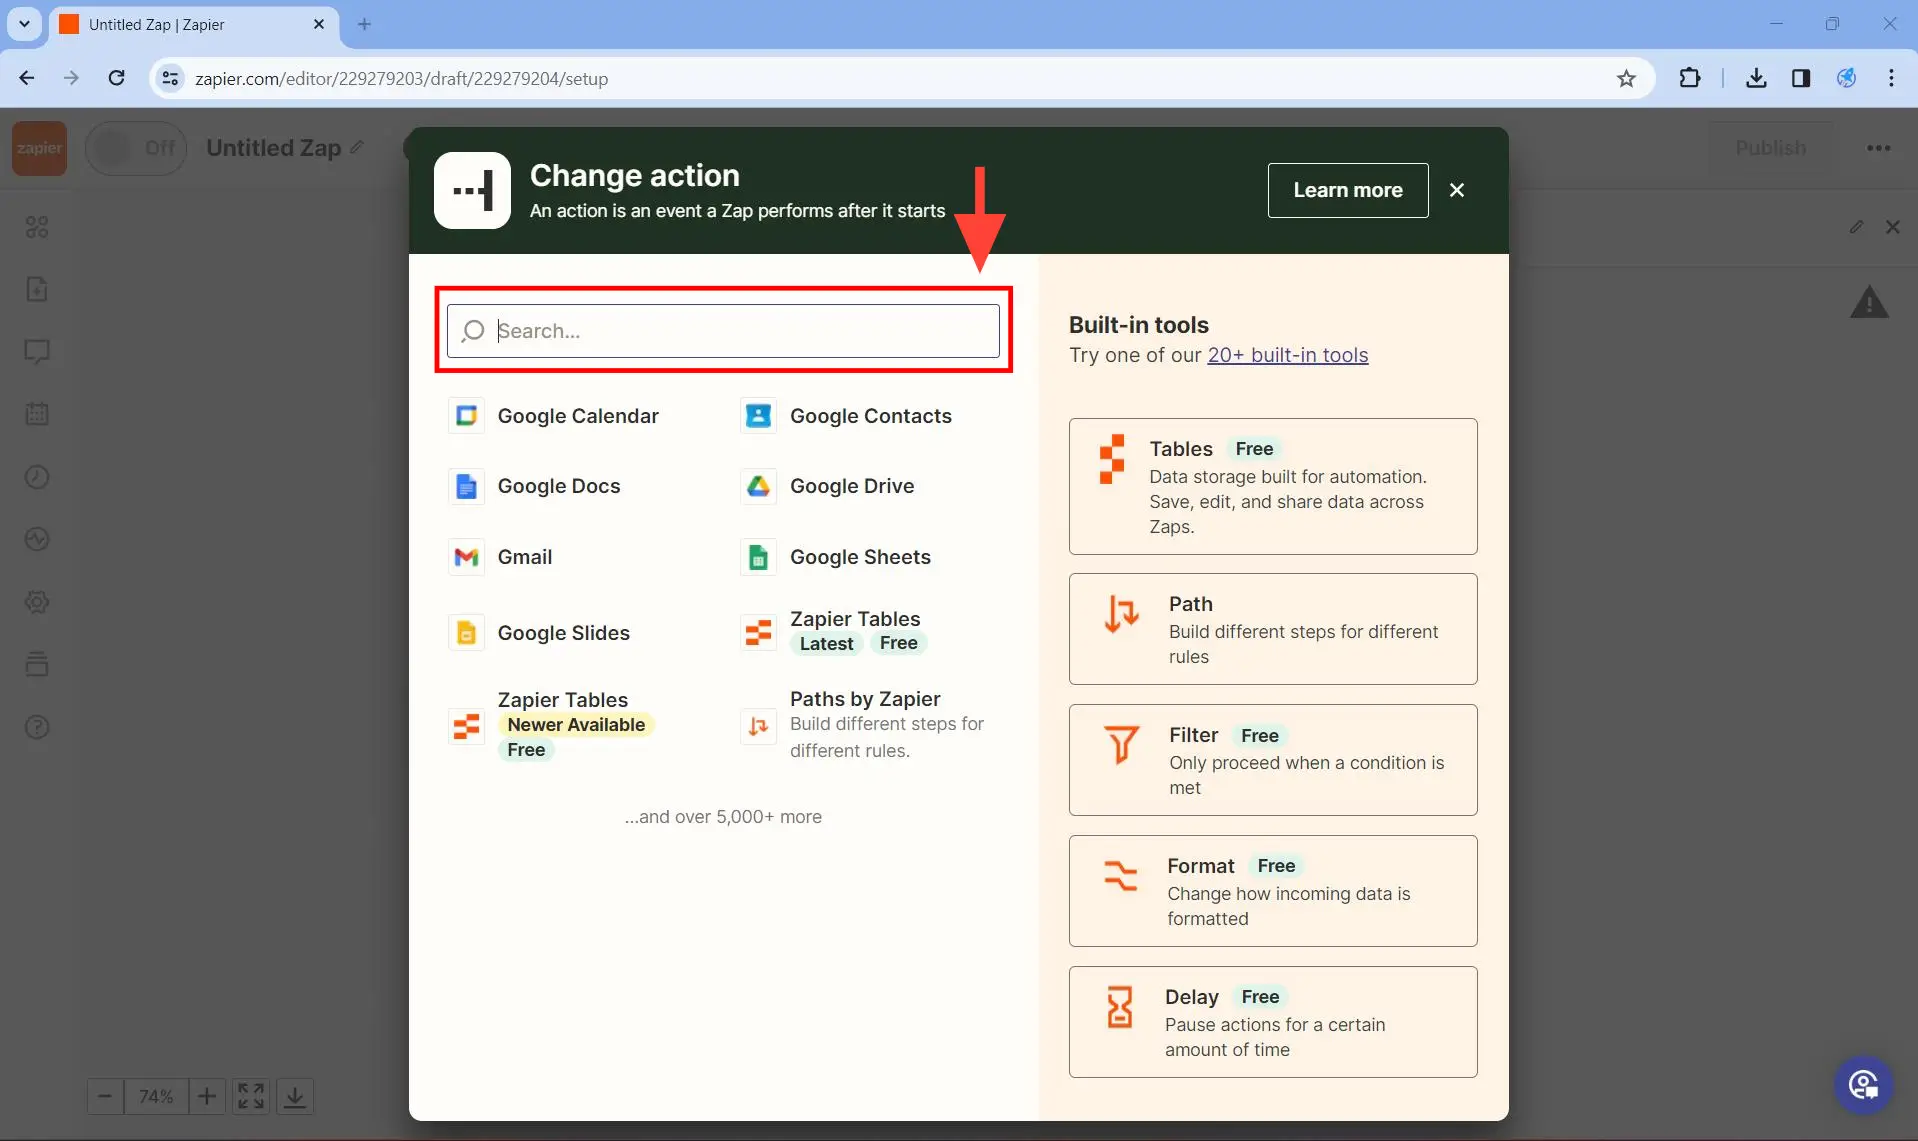
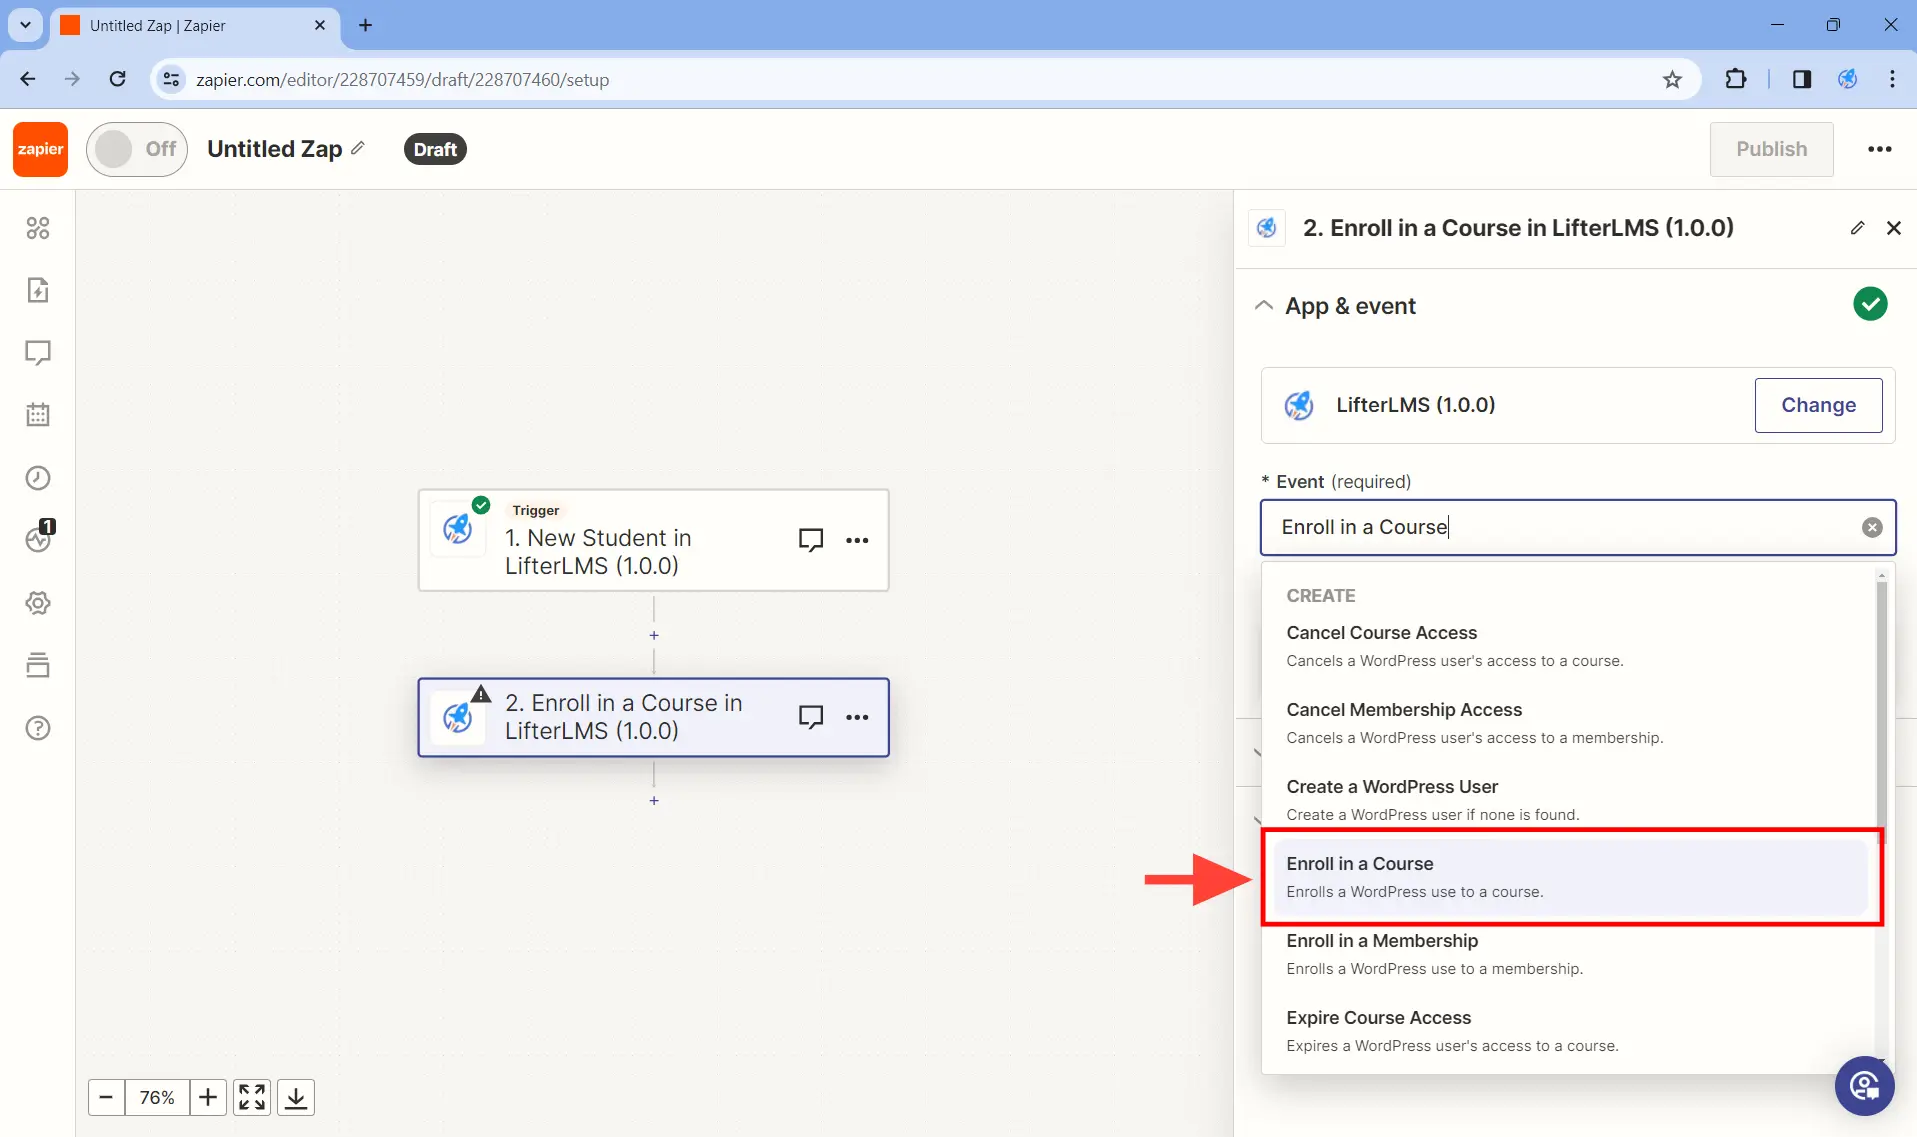
Step 2. In the pop-up that appears, type “LifterLMS” in the search field and click on the LifterLMS Zapier app as shown below.
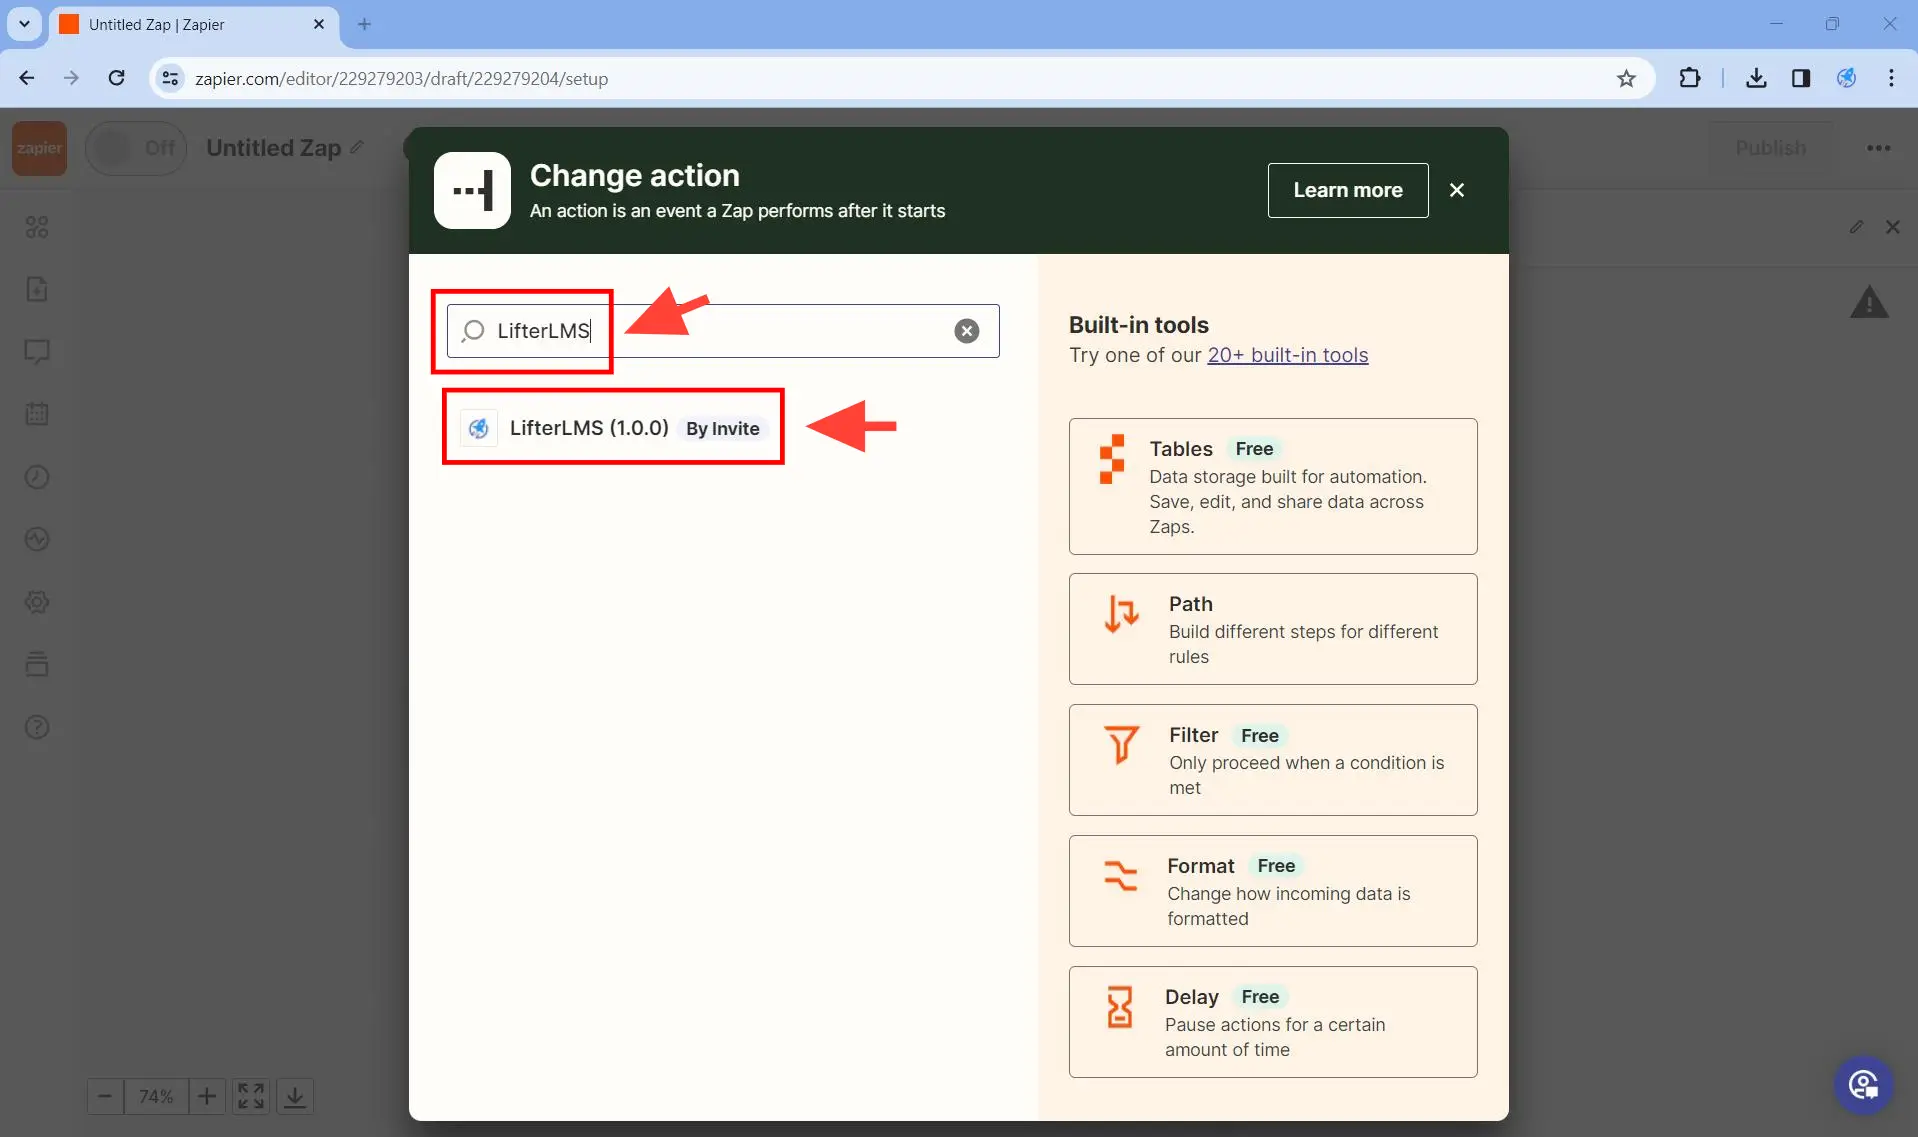
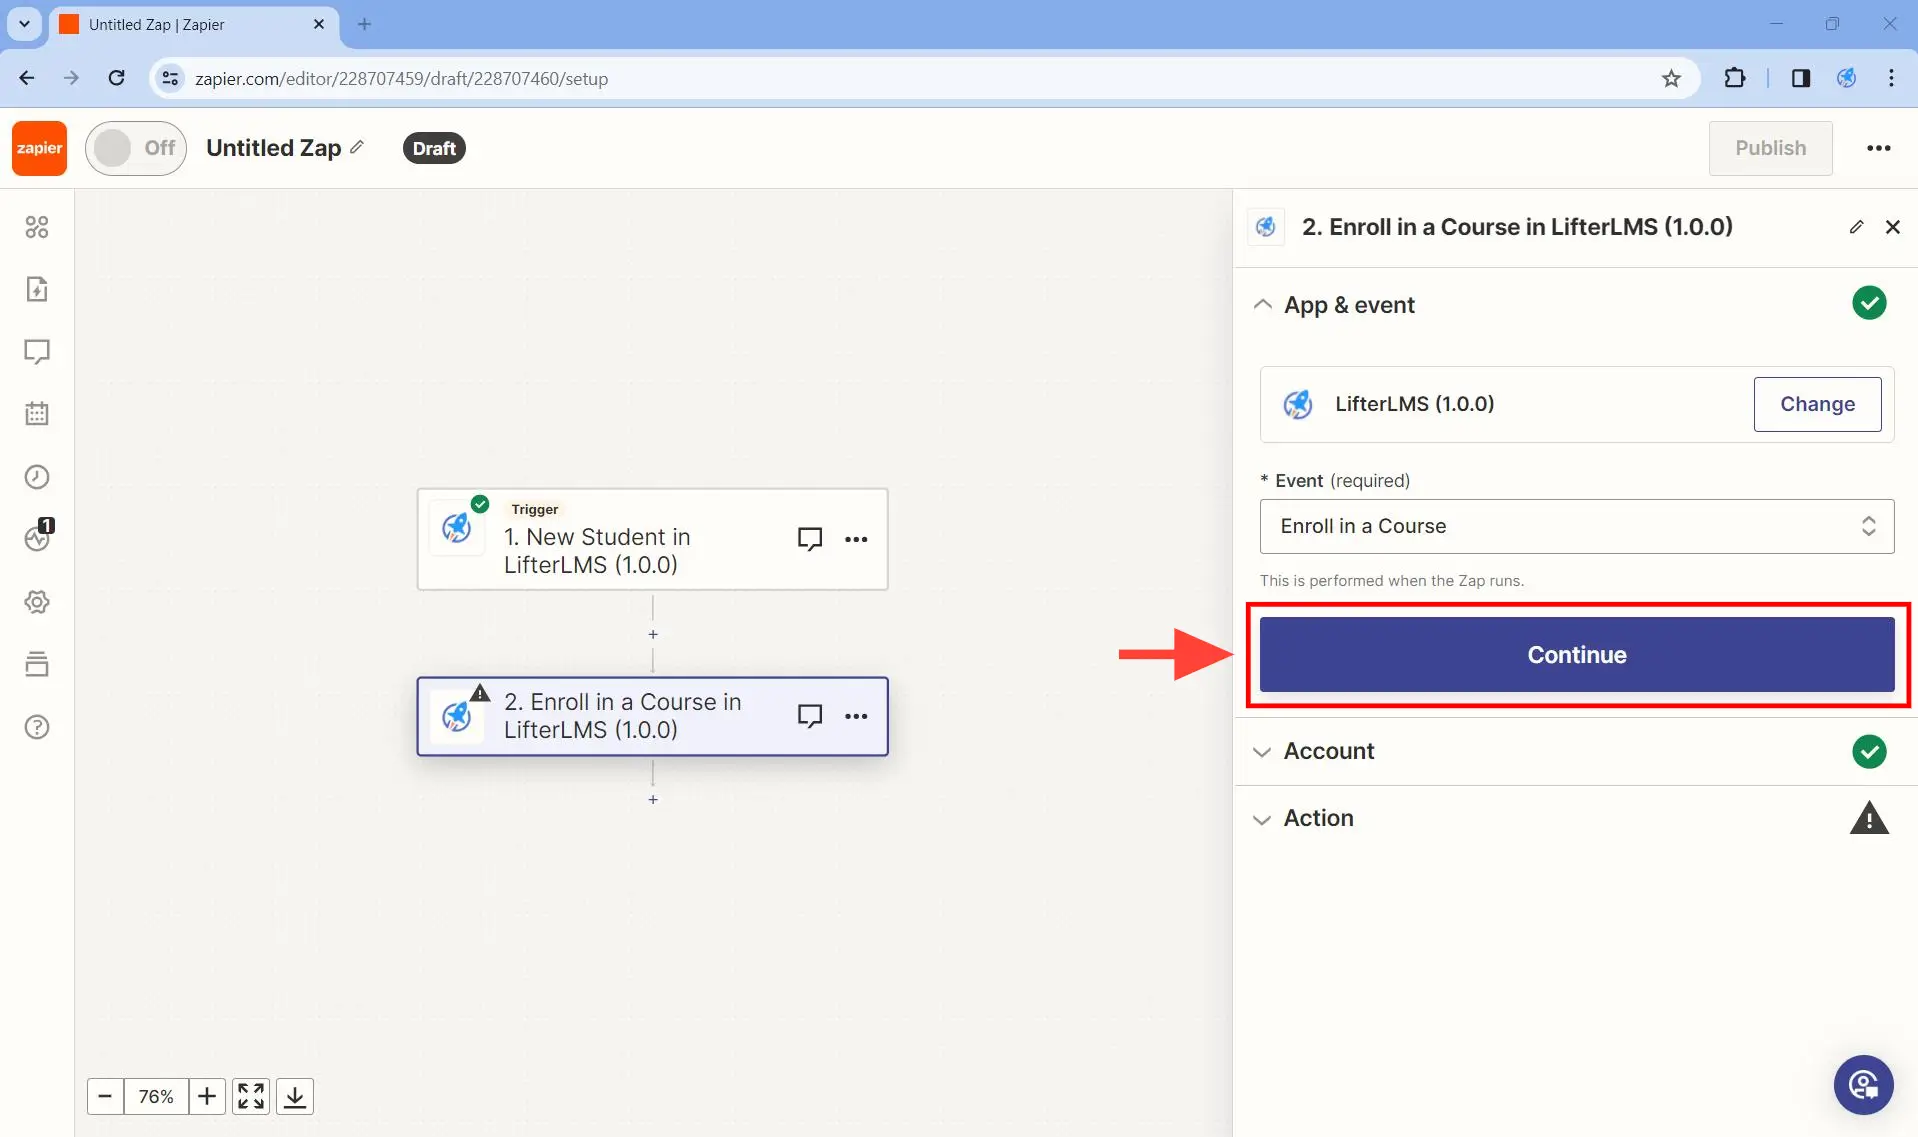
Step 3. Under App & event, set Event to Enroll in a Course and click on Continue.
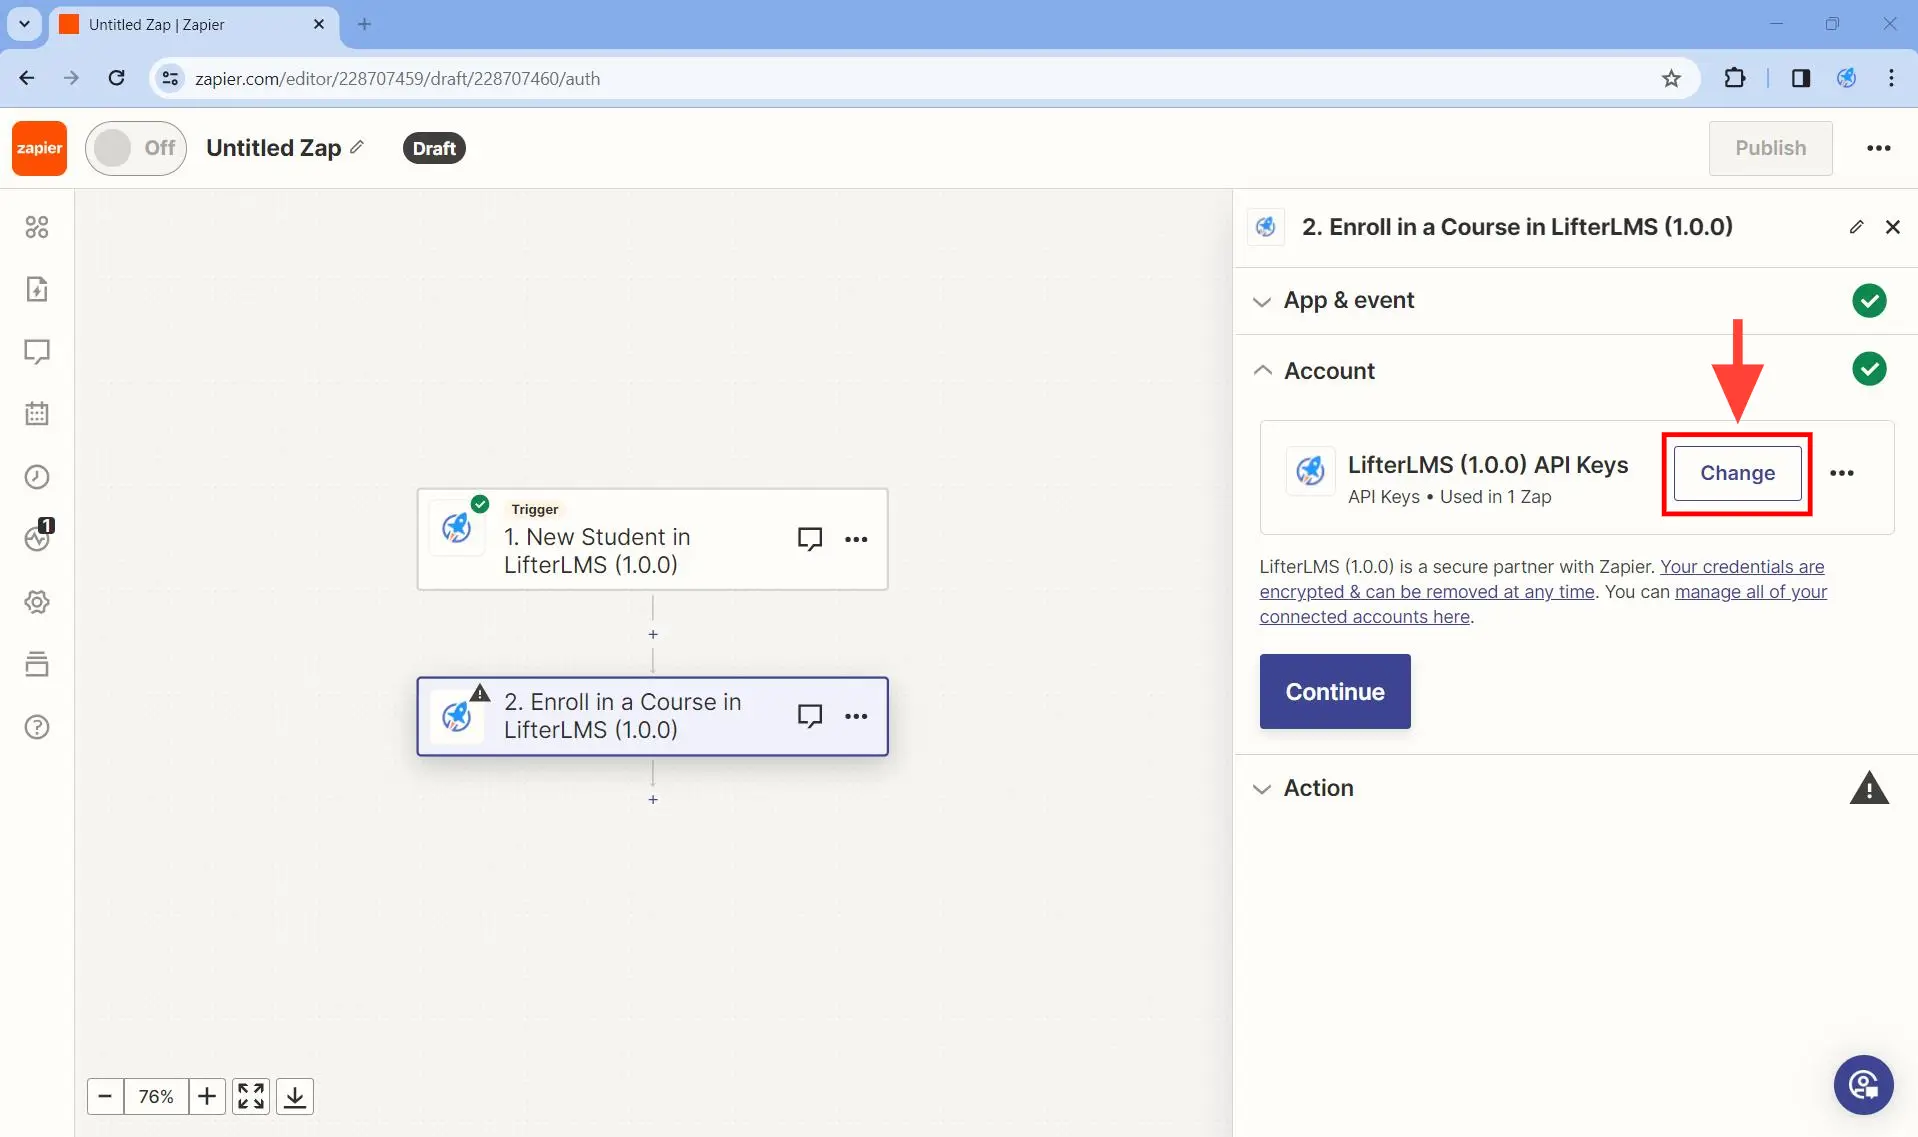
Step 4. Under Account > Connect LifterLMS (1.0.0) click on Continue.
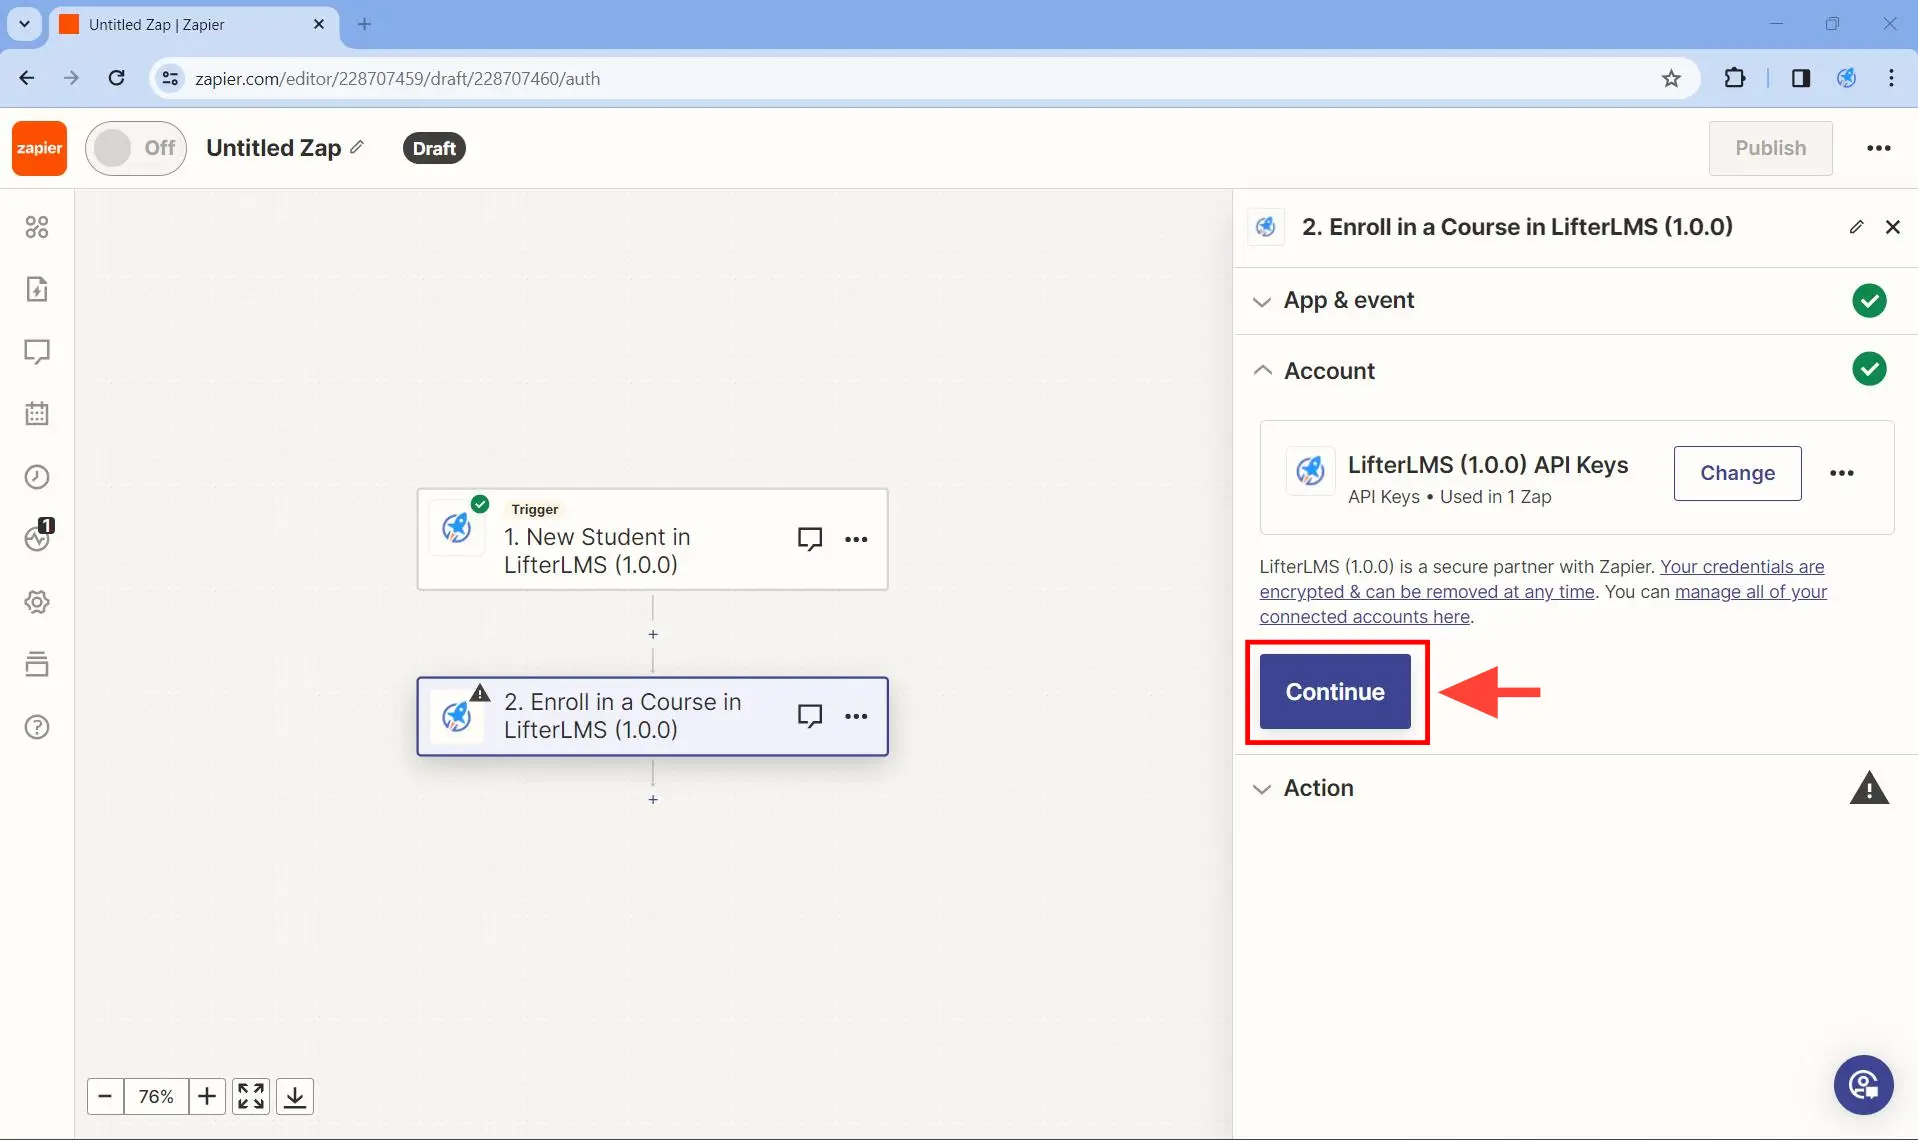
On the other hand, if you want the action to be performed on a different LifterLMS website, click on Change or Choose. If you click on Change, be sure to follow this tutorial on how to create a Consumer Key and Consumer Secret key since you will be asked to provide these.
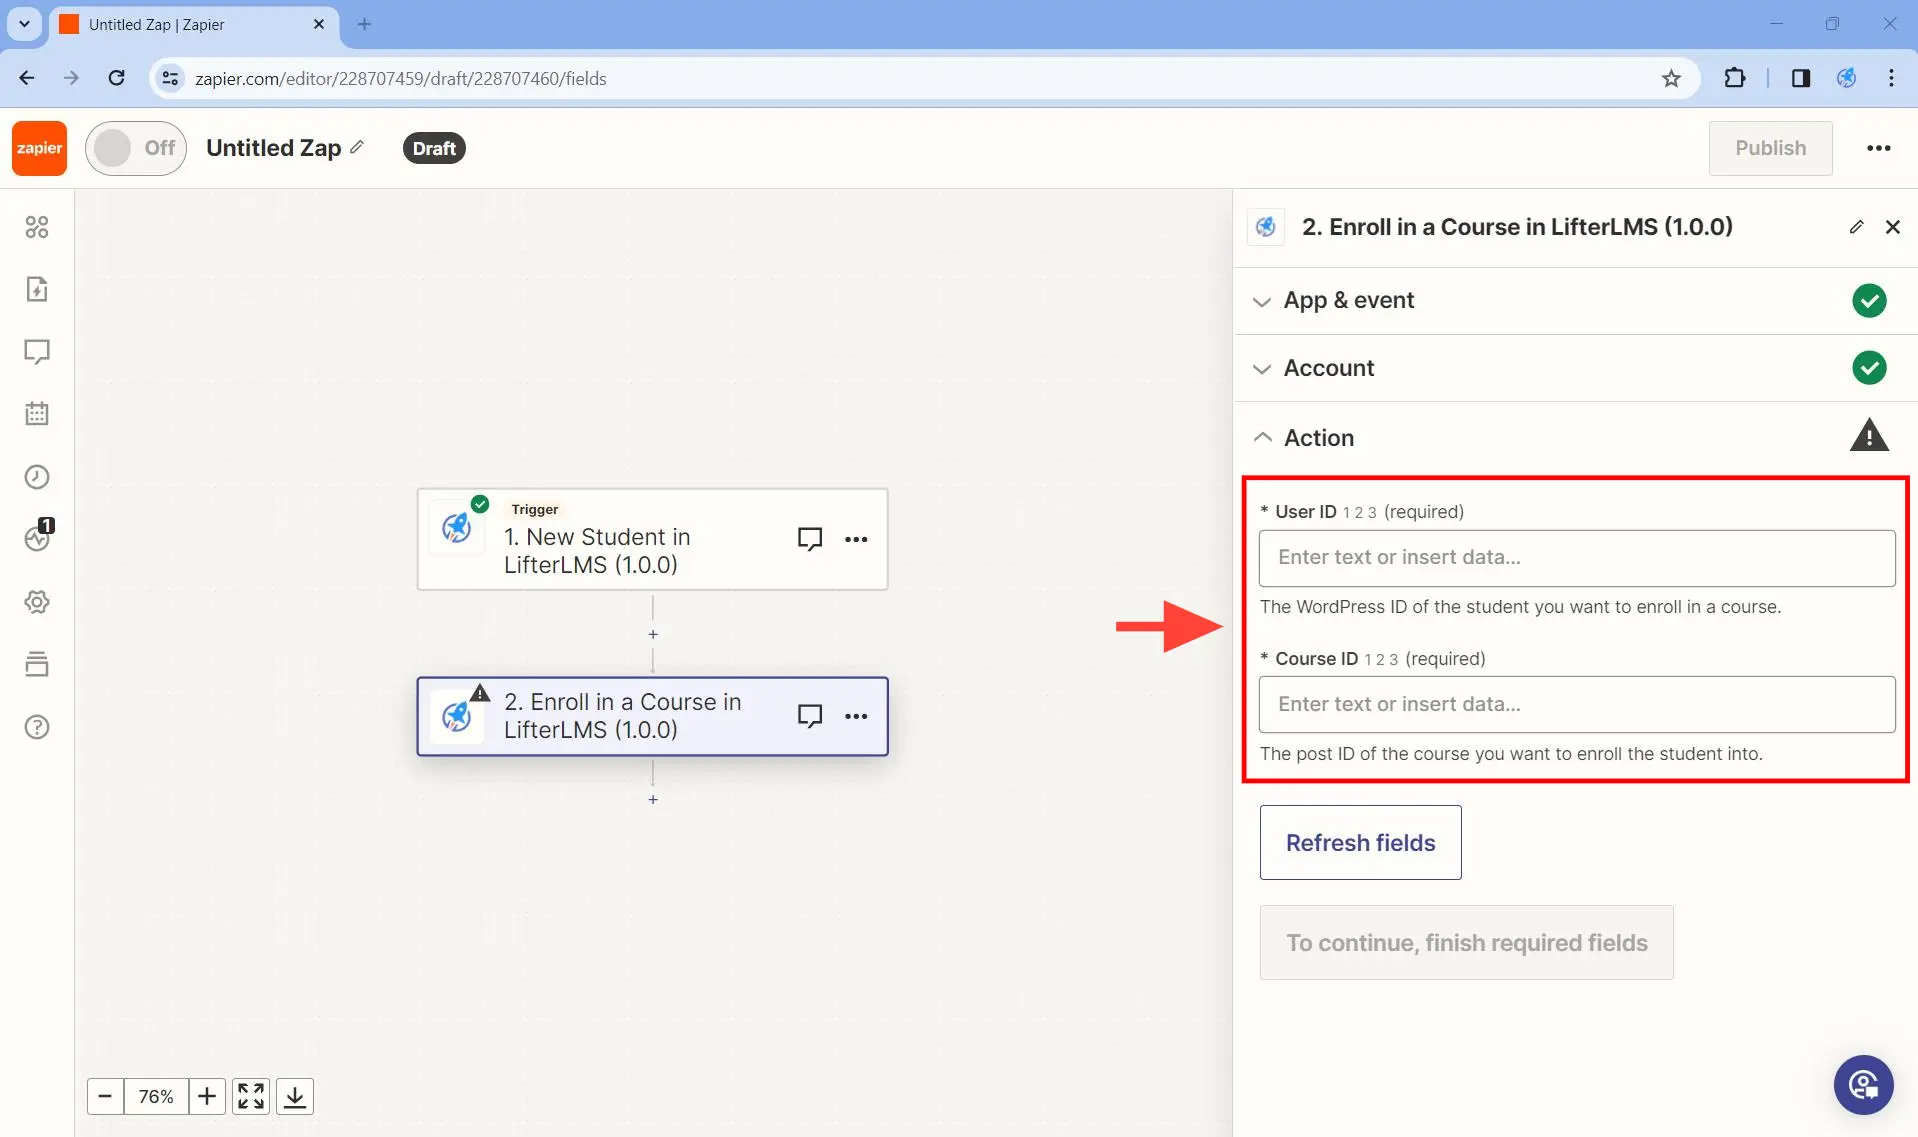
Step 5. In the Action step, you will be asked to provide the User ID of the student to enroll and the Course ID of the course to enroll that student to.
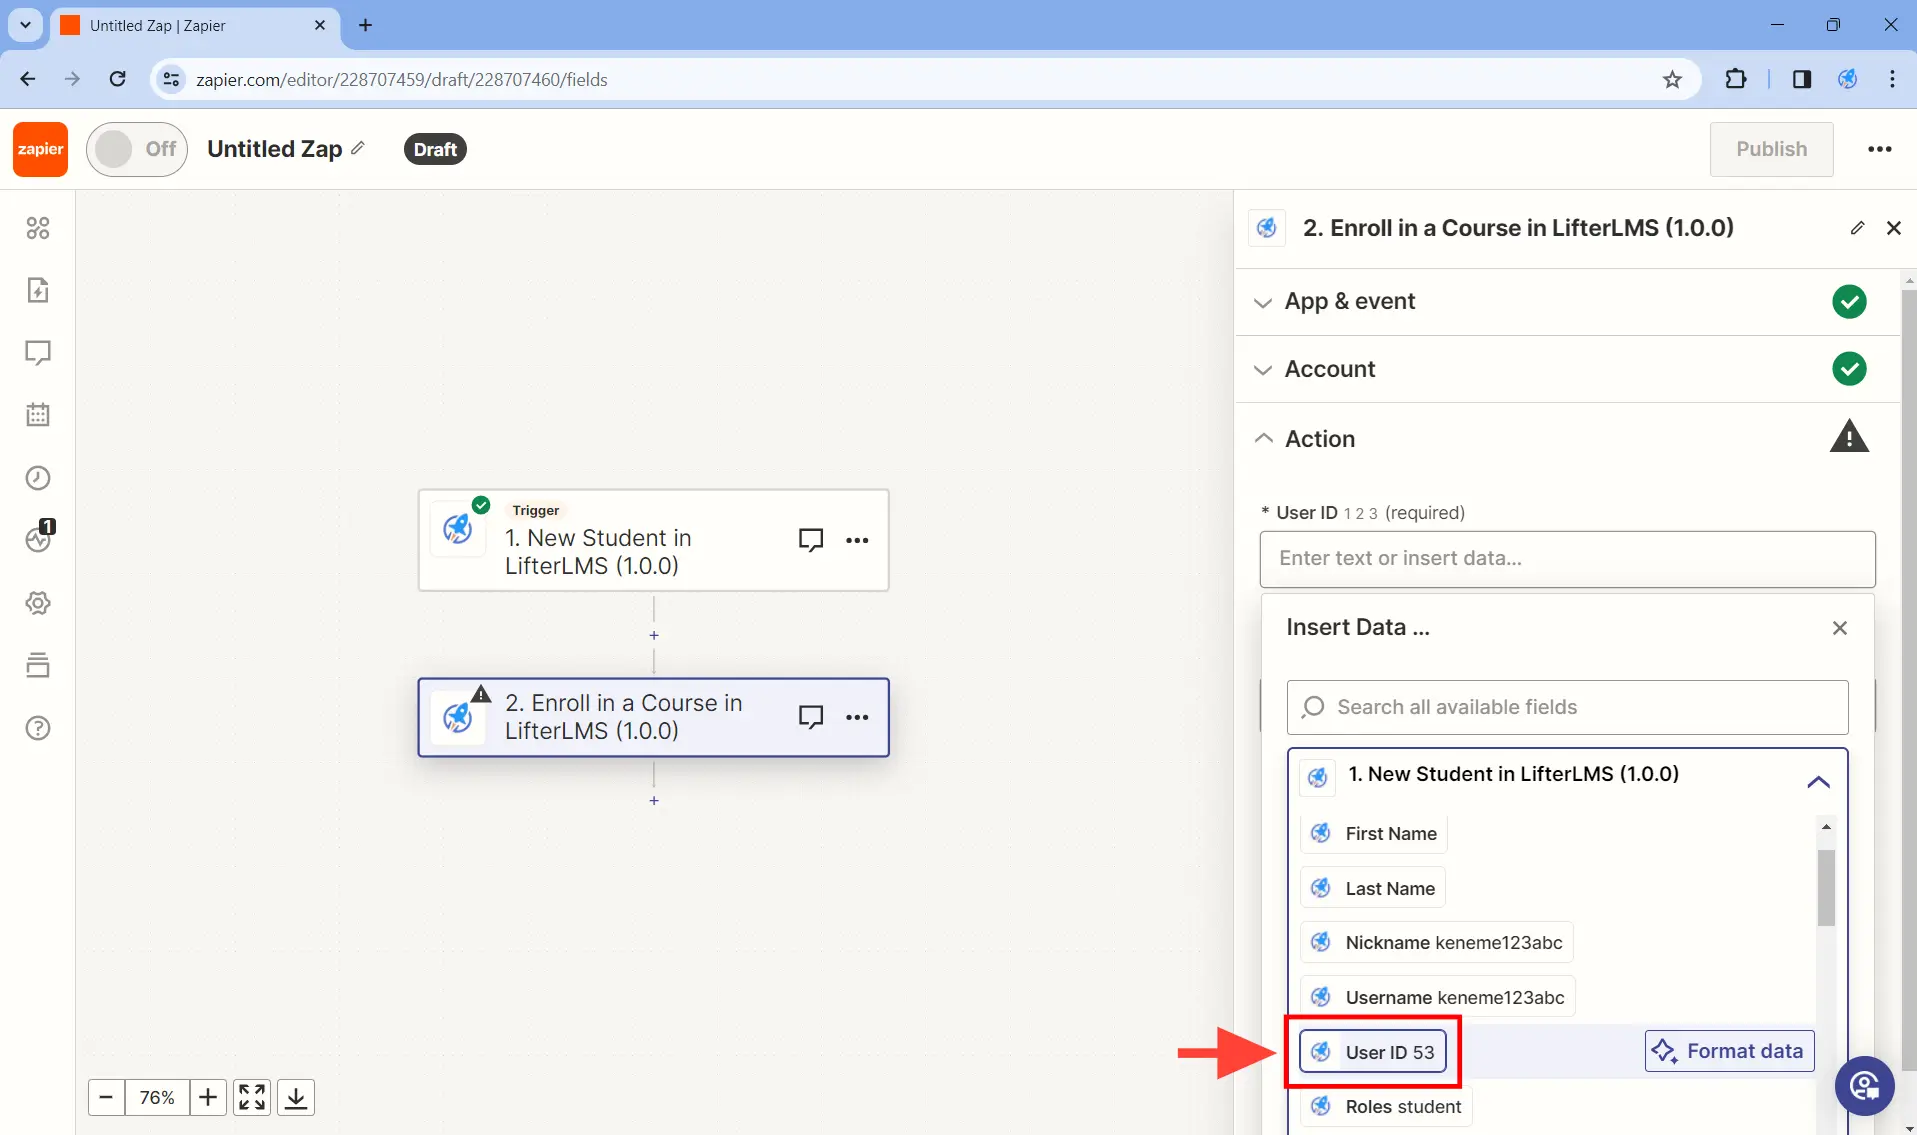
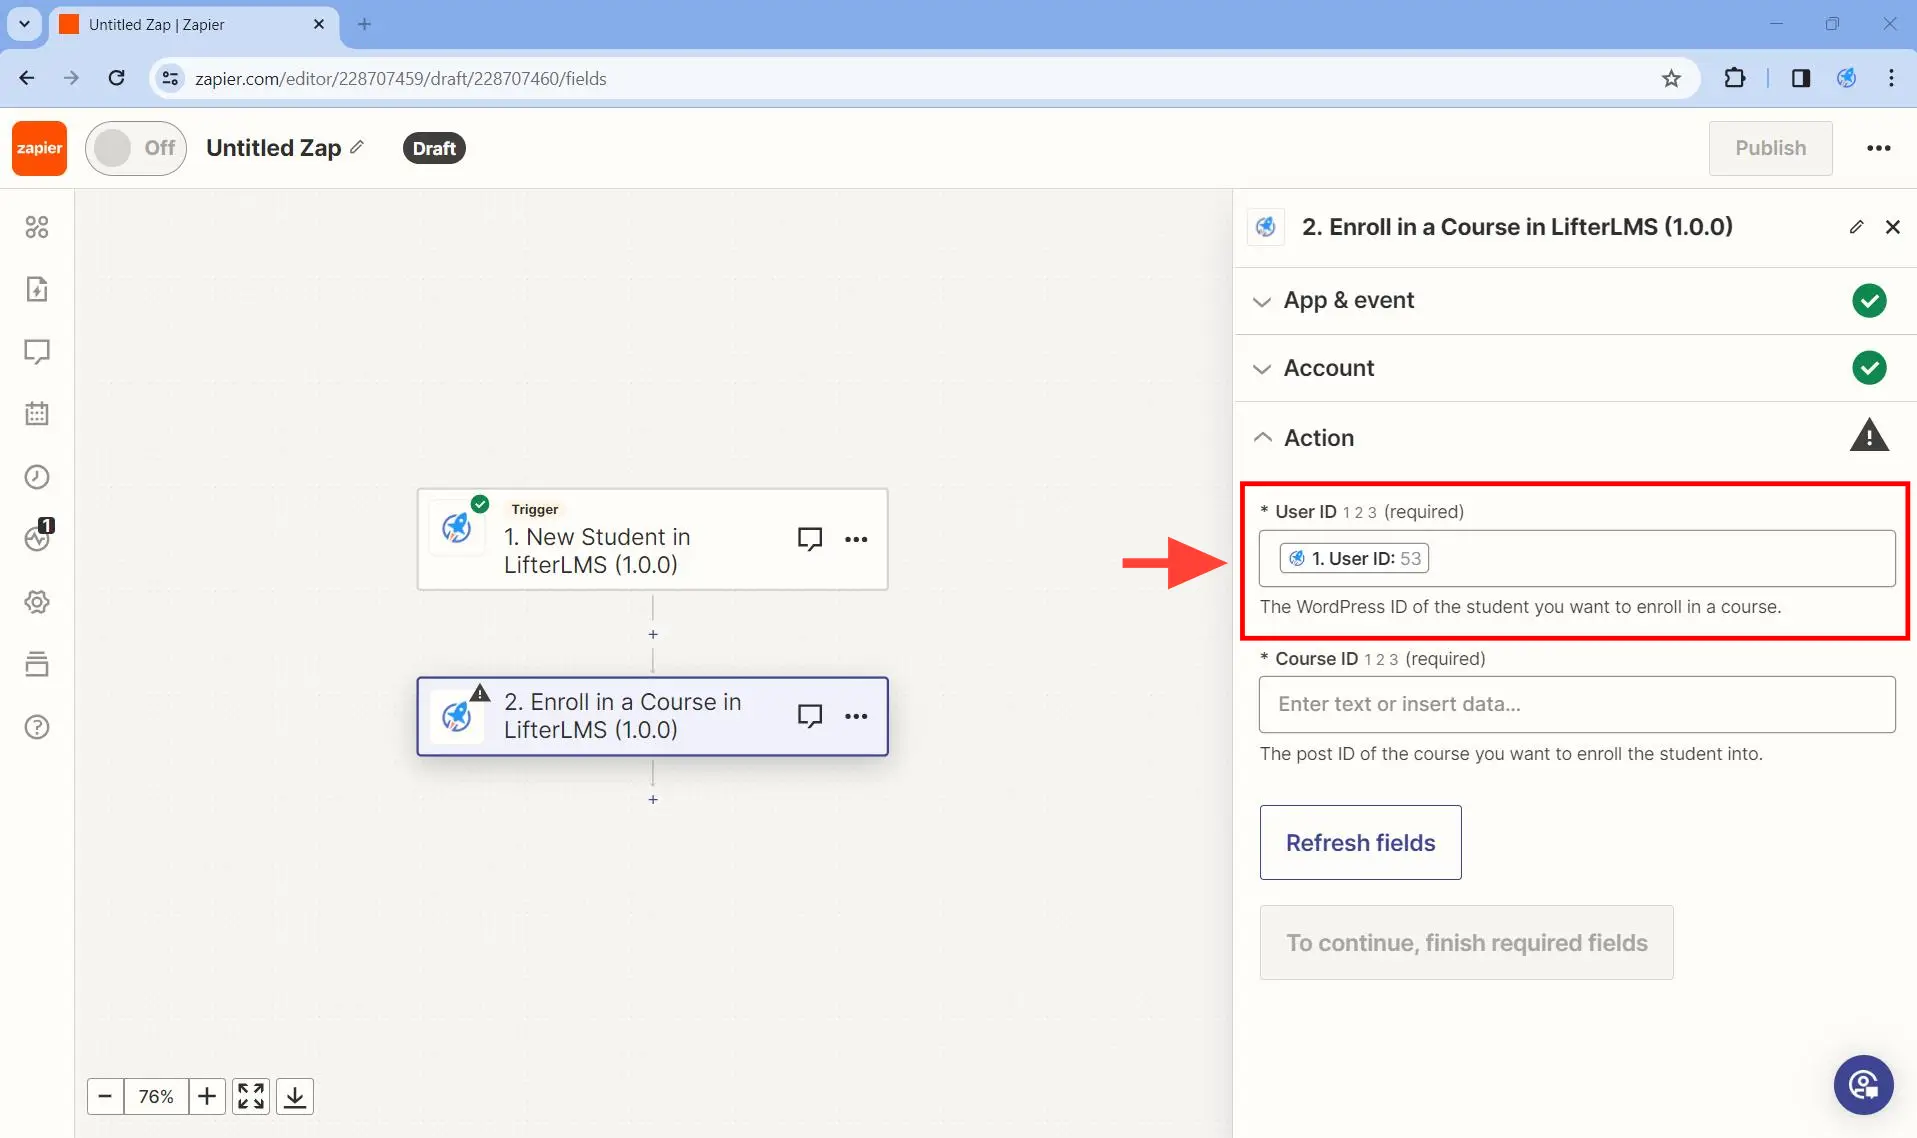
Step 6. Click on User ID to select the User ID collected by the previous trigger.
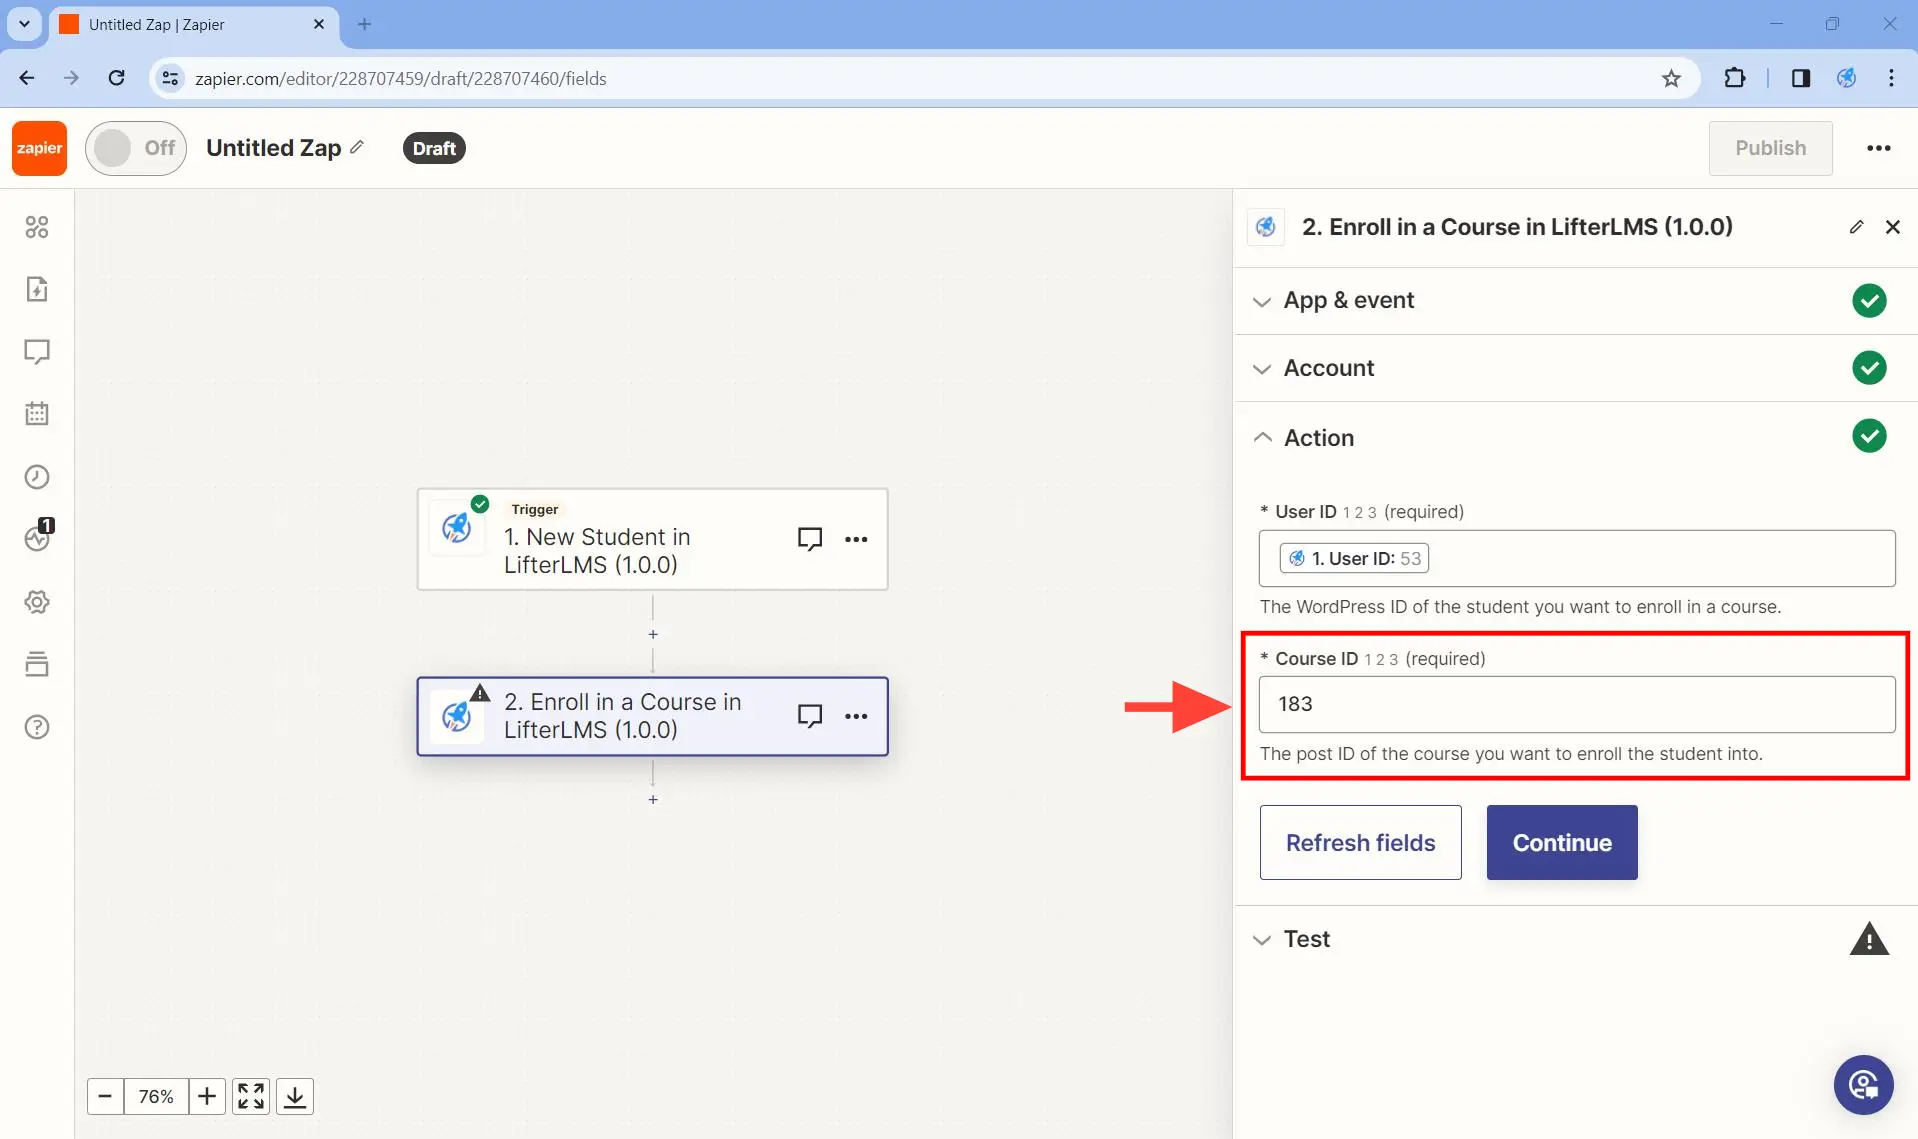
Step 7. In the Course ID field, paste the course ID of the course you would like your students to be automatically enrolled on. Be sure to follow this help document on how to find the course ID of the your LifterLMS courses. Click on the Continue button once you are done.
Step 8. Under Test, click on the Test step button.
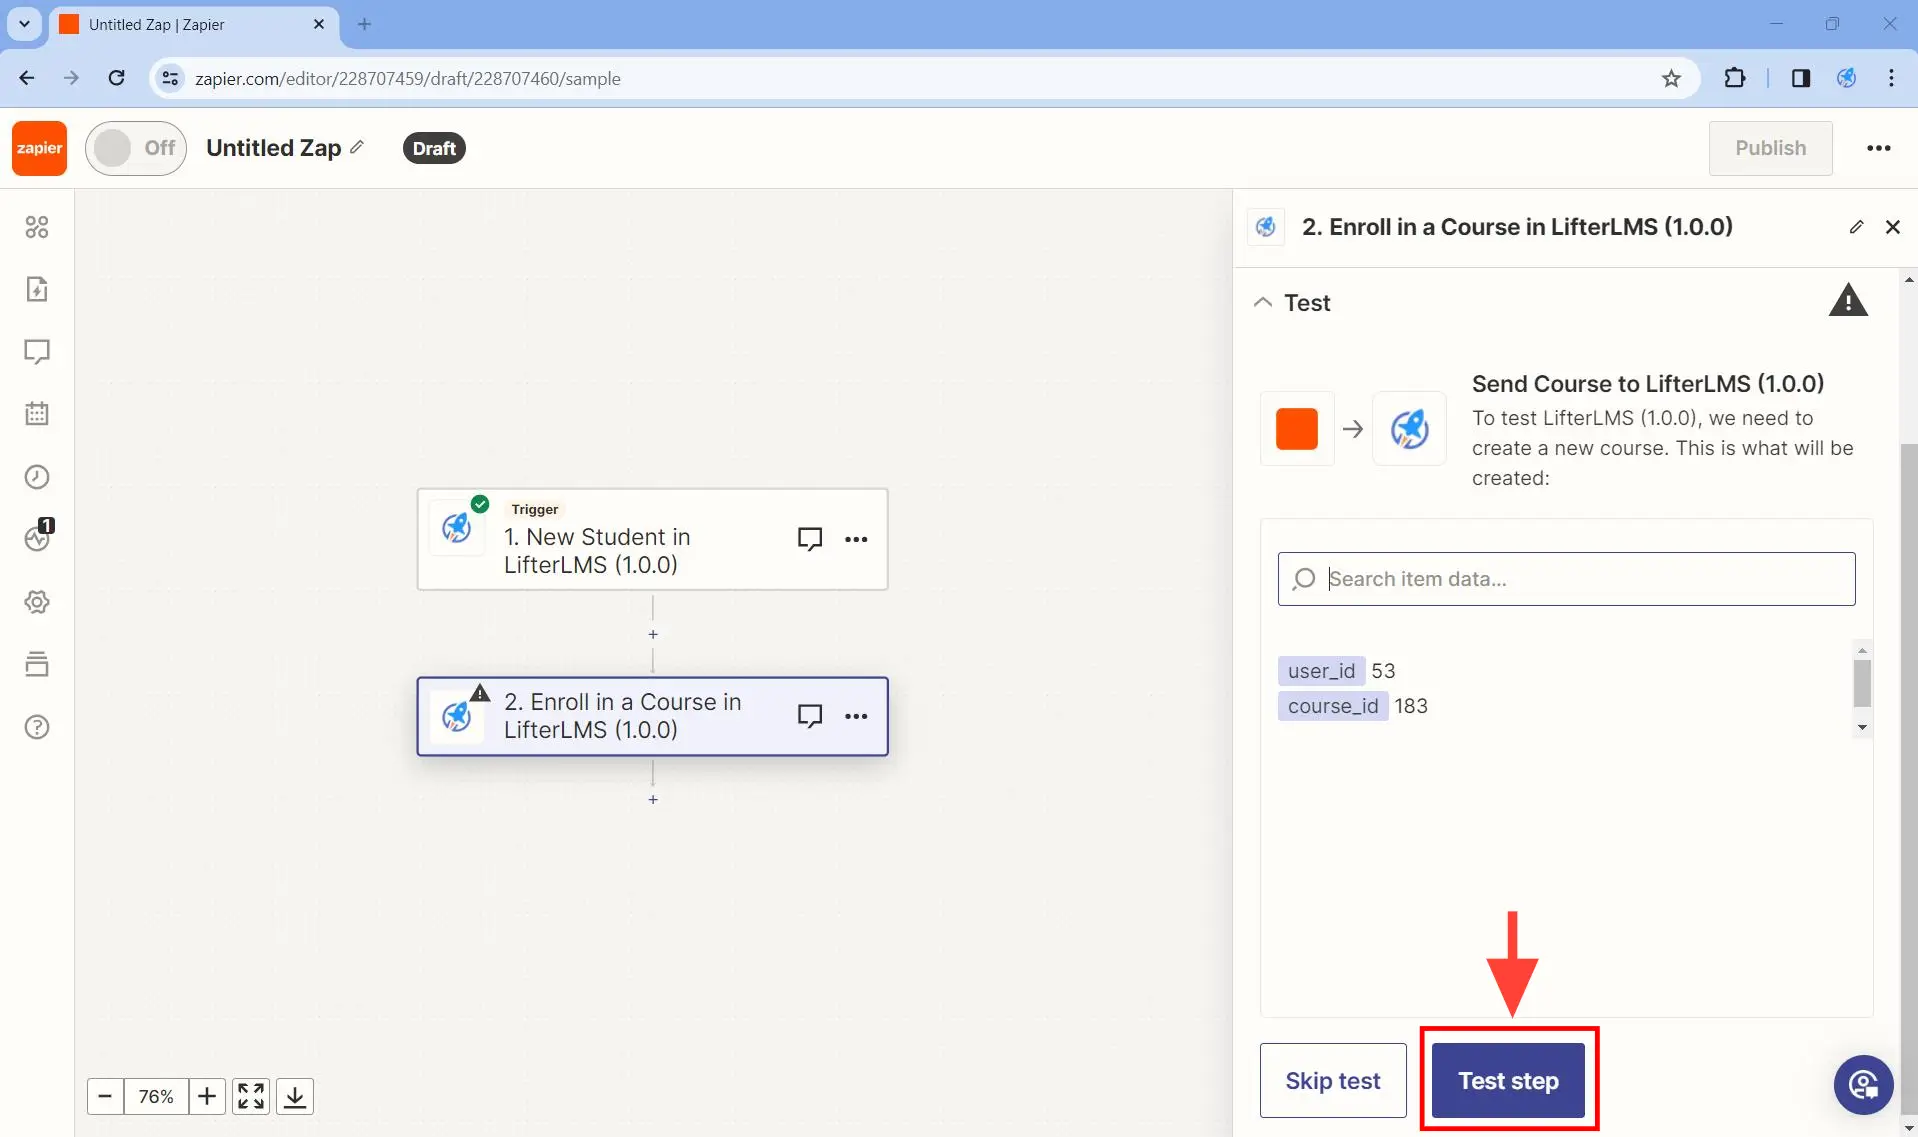
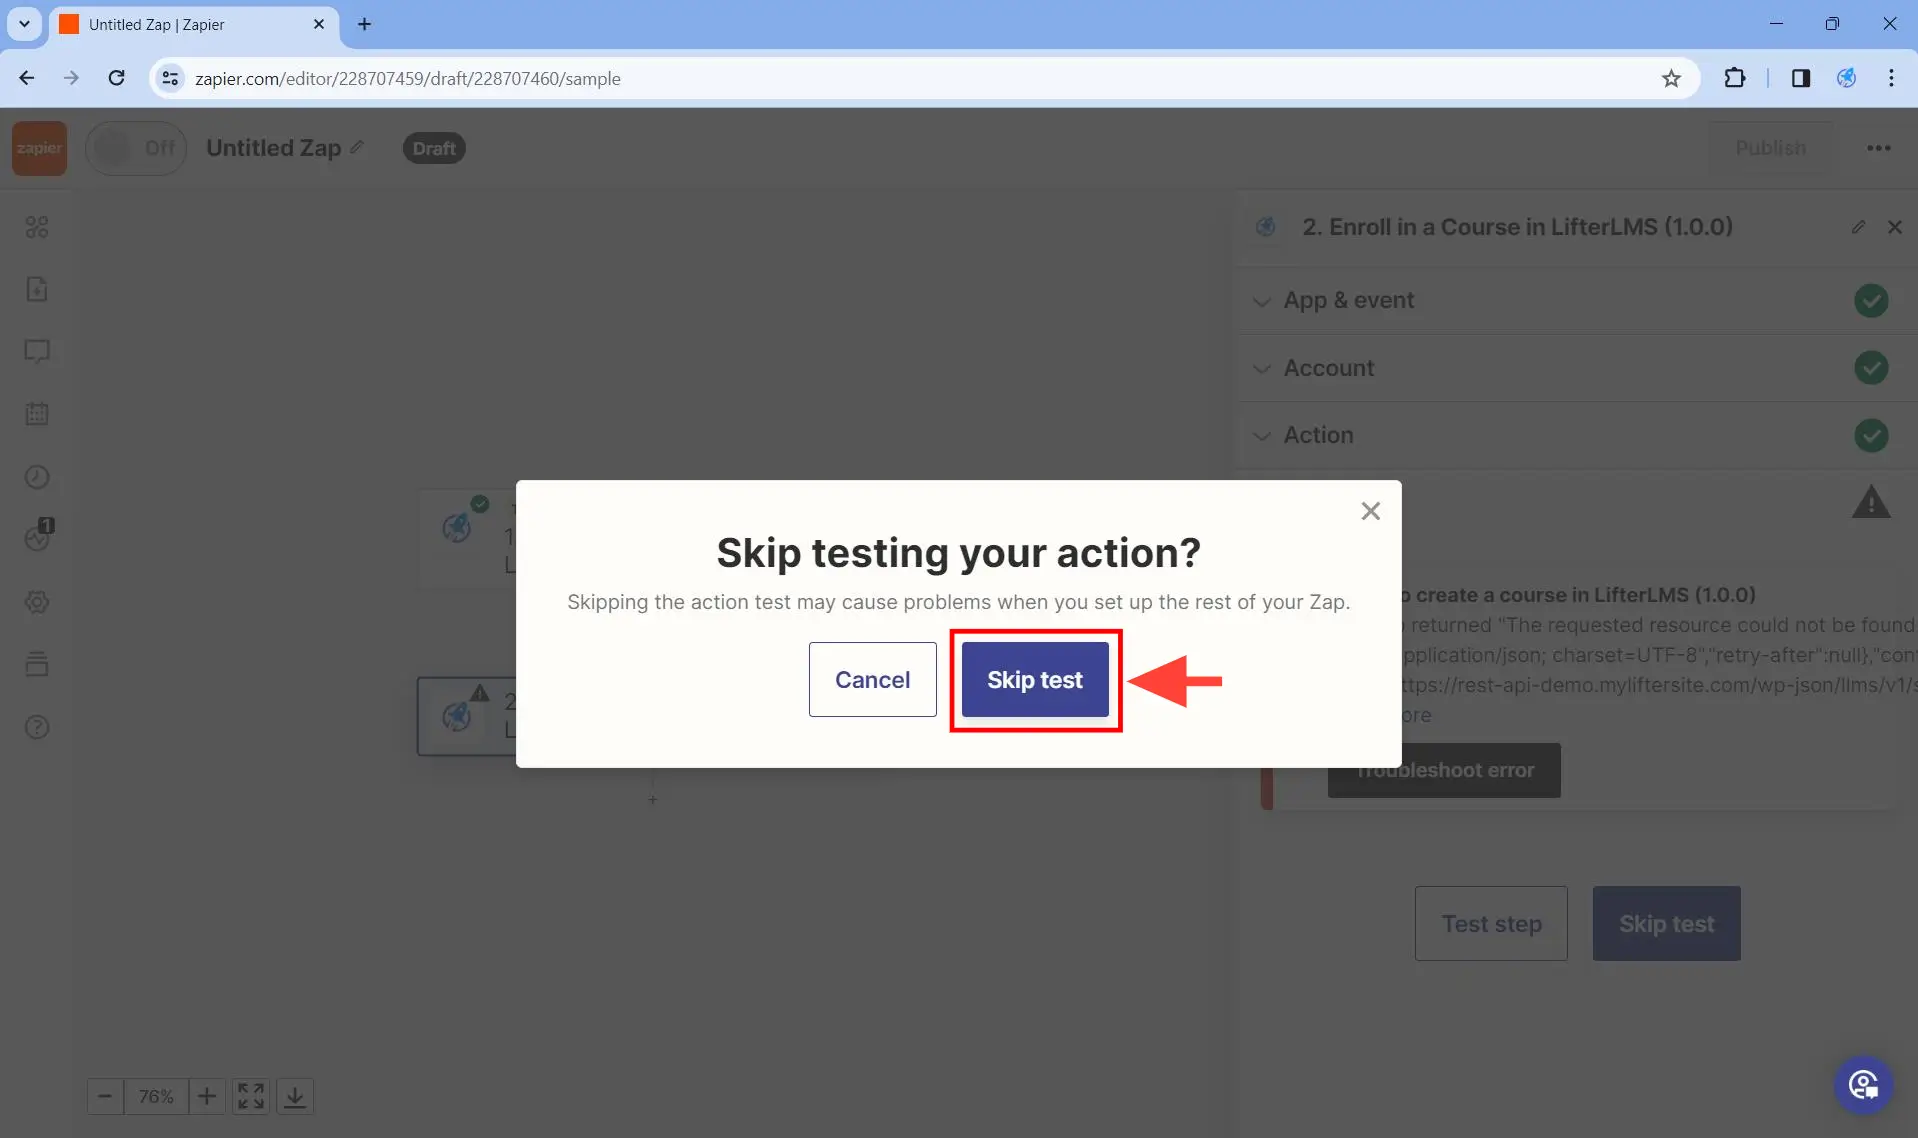
If you do not have any WordPress user on your account, this will result in an error even if the course exists. In this case, you need to click on Skip test. This is totally okay.

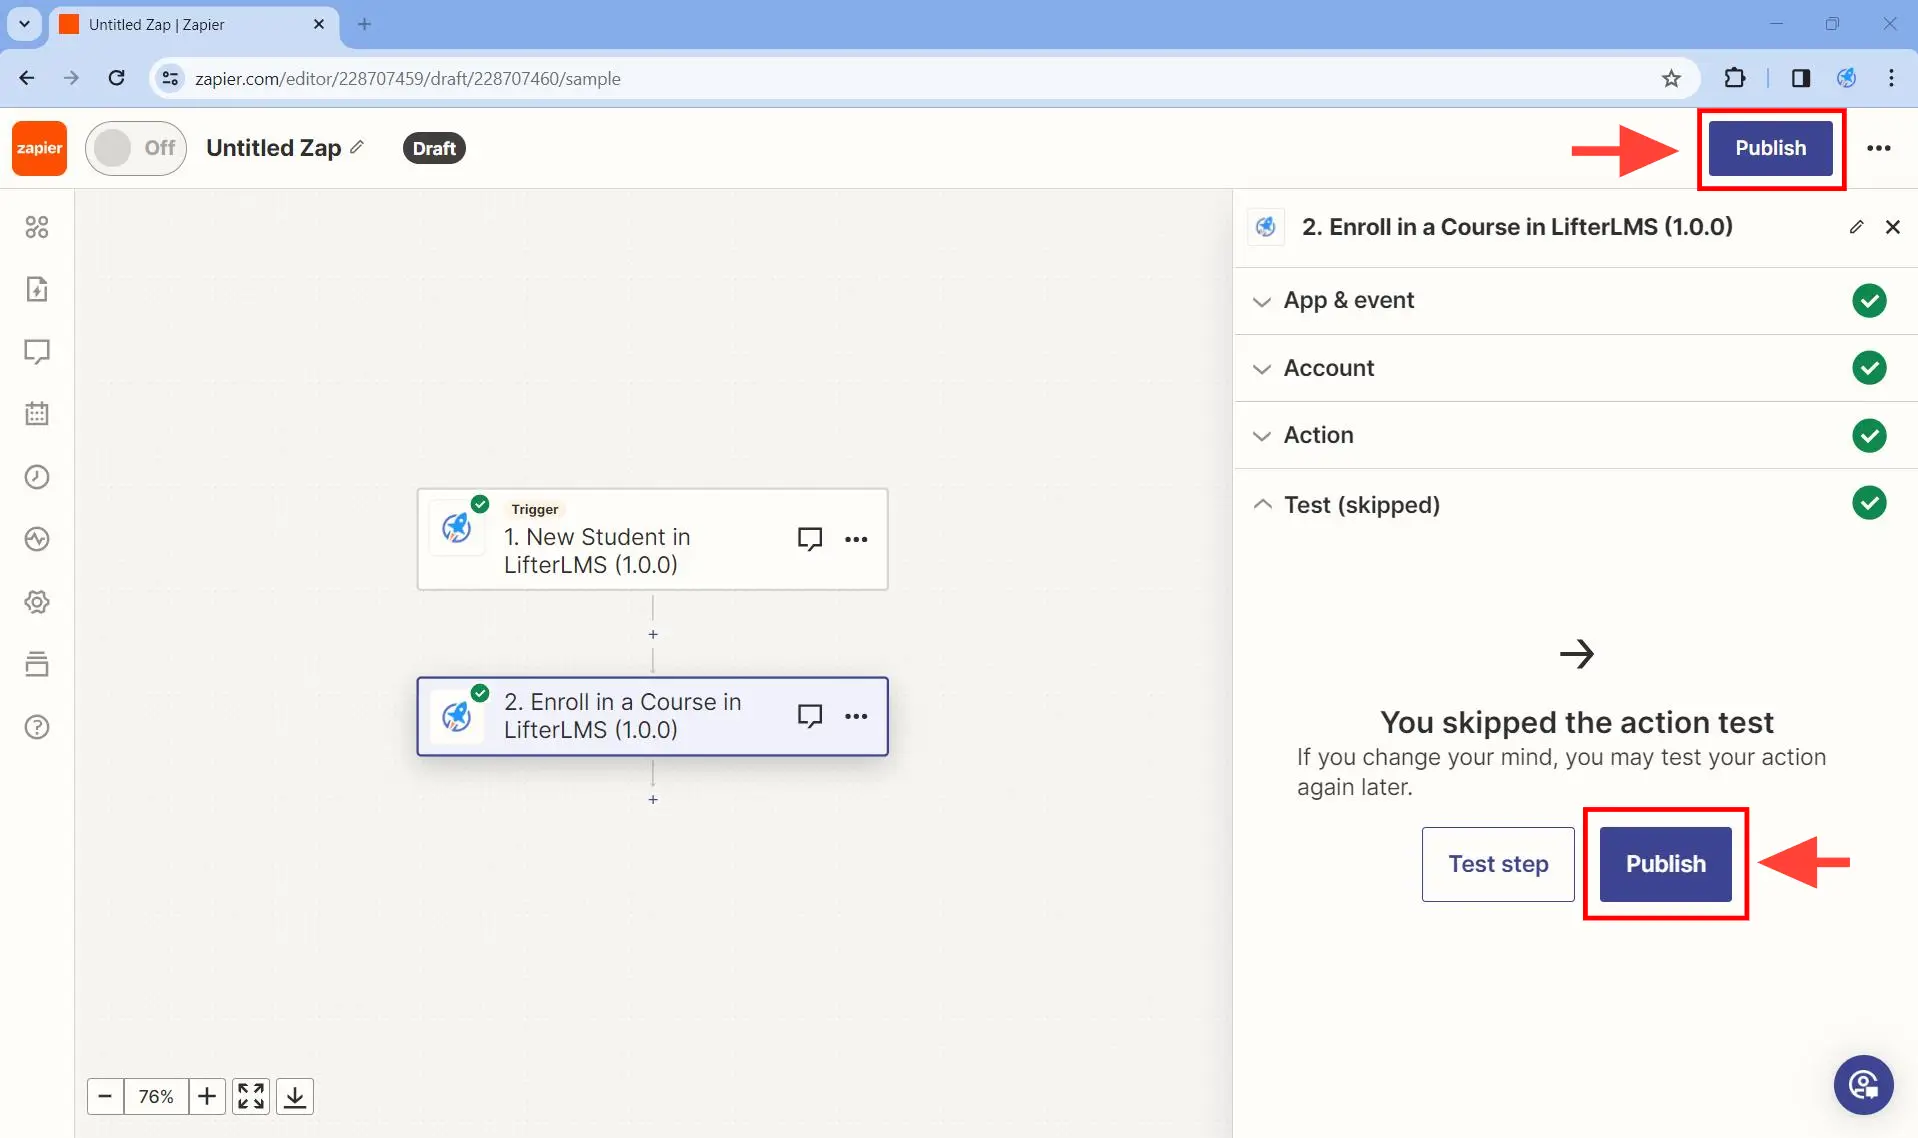
Step 9. Be sure to Publish your zap.
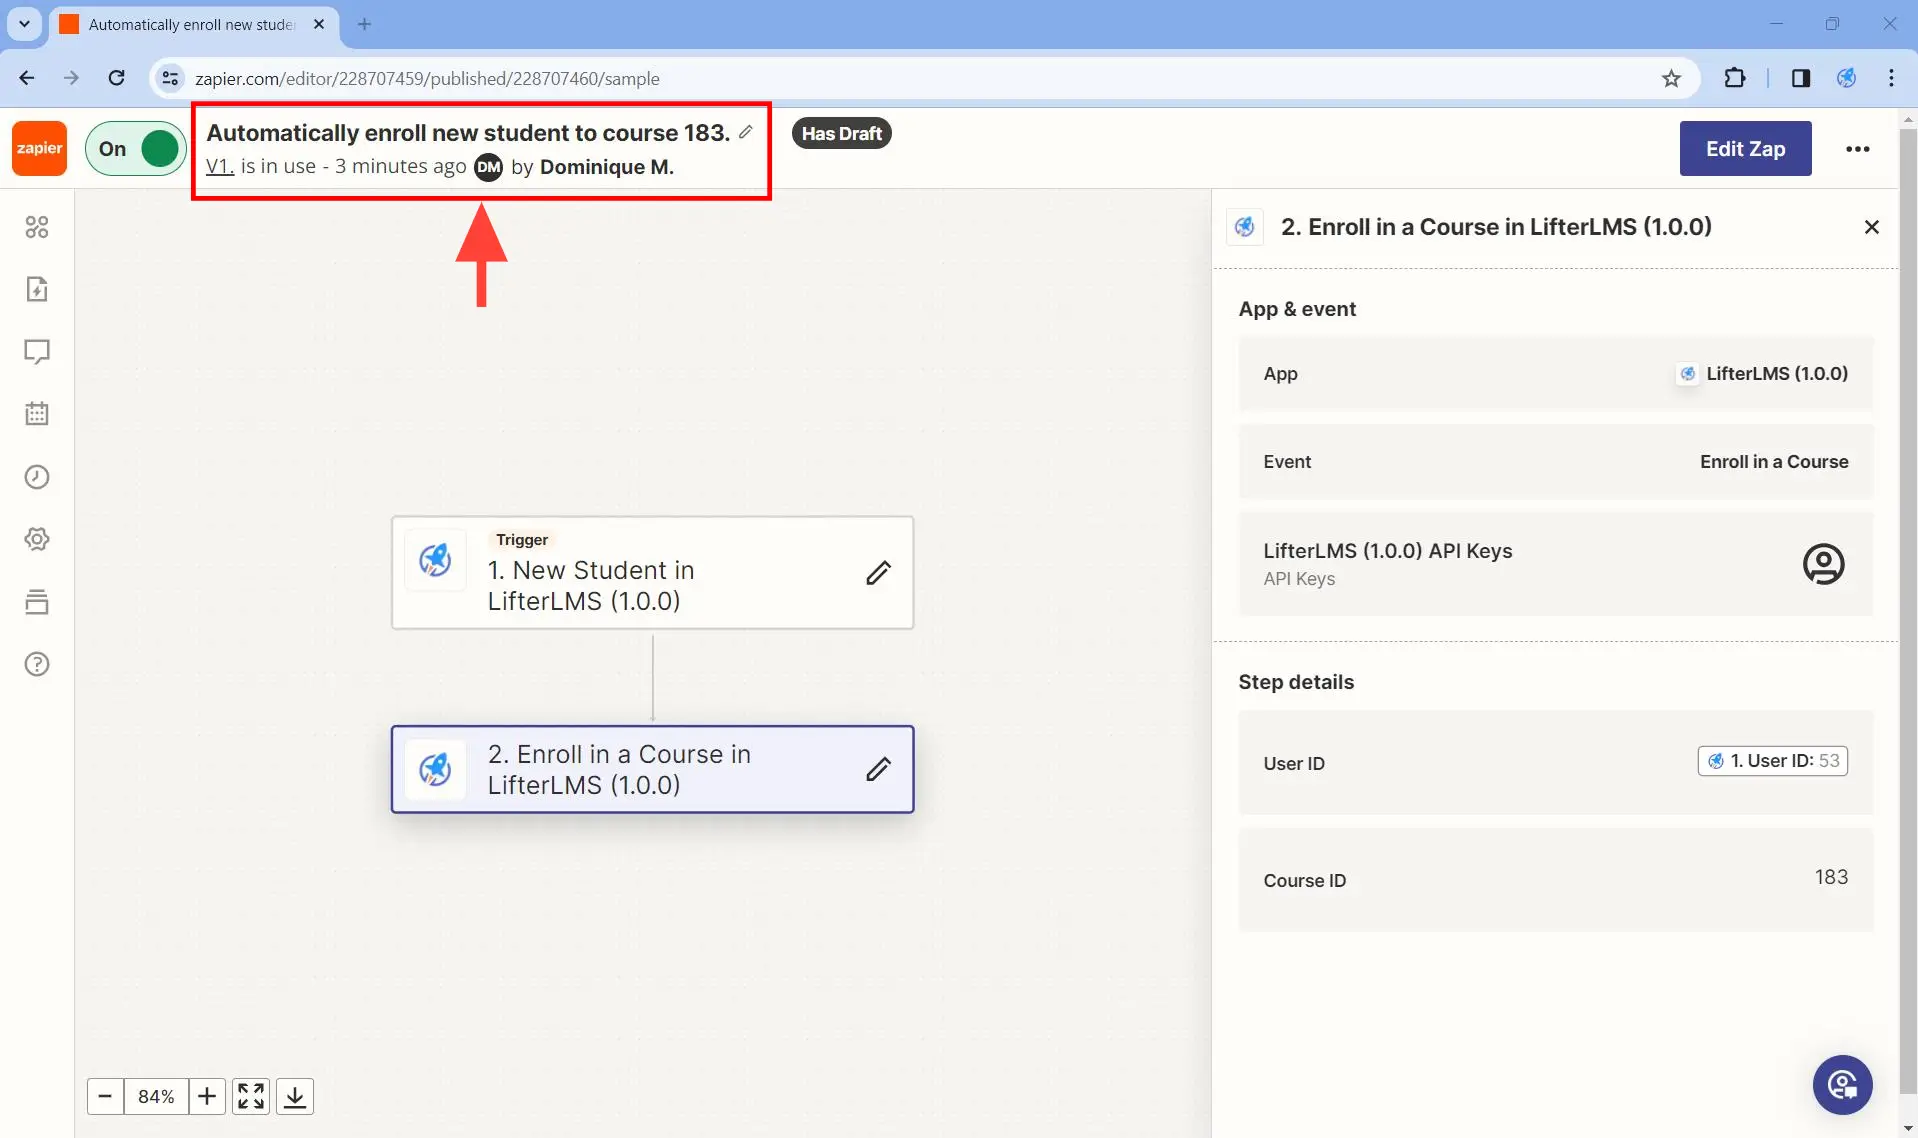
Step 10. Make sure the published zap is turned on.
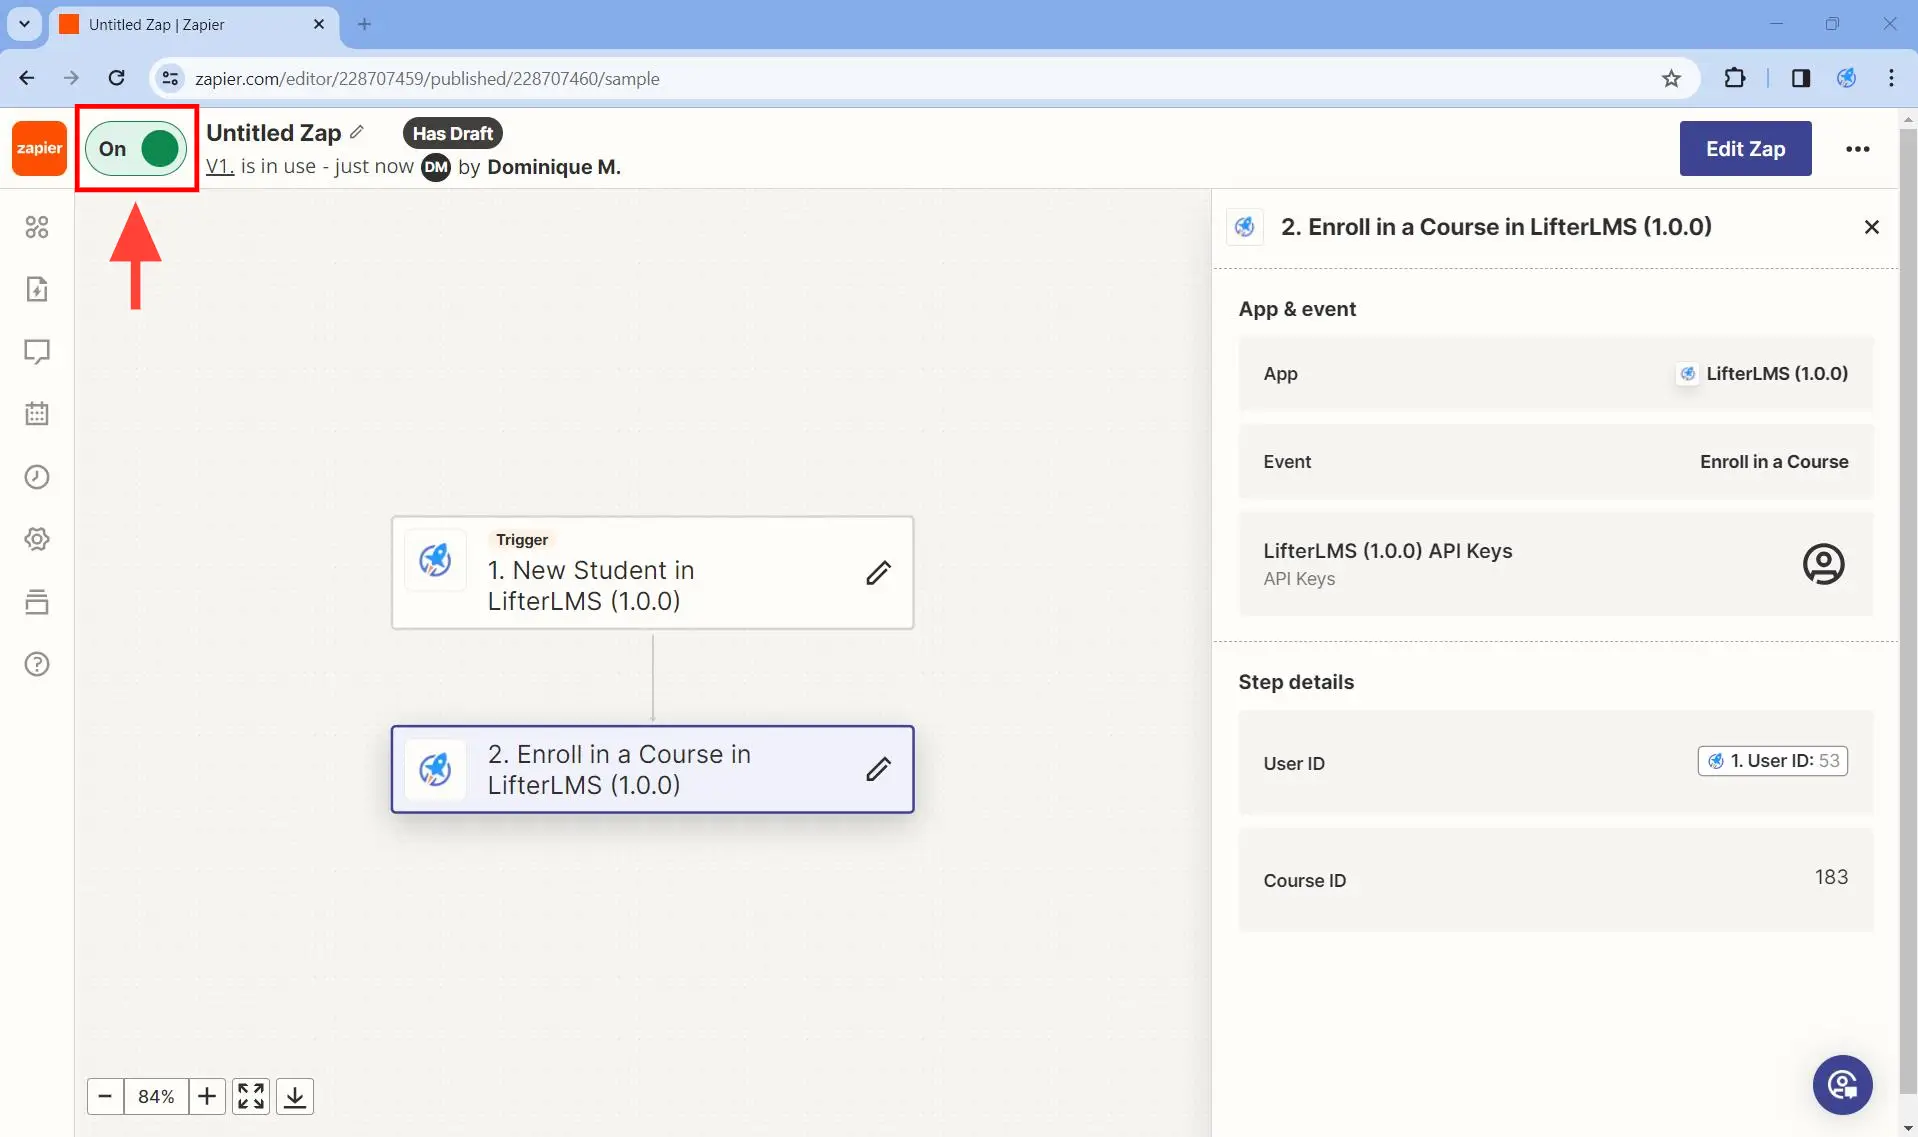
Step 11. Make sure your published zaps have descriptive names for good housekeeping.
- New Student
- New Course
- New Course Enrollment
- Course Access Canceled
- Course Access Expired
- New Membership
- New Membership Enrollment
- Membership Access Canceled
- Membership Access Expired
New Student
This trigger fires when a WordPress user with the “student” role is created.
Basic Usage
Step 1. Create a zap.
Step 2. Select LifterLMS as the trigger.
Step 3. Under App & event > Event, select “New Student”.
| Required Inputs | None. |
| Optional Inputs | None. |
| Output |
|
New Course
This trigger fires when a new course is created.
Basic Usage
Step 1. Create a zap.
Step 2. Select LifterLMS as the trigger.
Step 3. Under App & event > Event, select “New Course”.
| Required Inputs | None. |
| Optional Inputs | None. |
| Output |
|
New Course Enrollment
This trigger fires when a WordPress user enrolls in a given course.
Basic Usage
Step 1. Create a zap.
Step 2. Select LifterLMS as the trigger.
Step 3. Under App & event > Event, select “New Course Enrollment”.
Warning: The zap that you create with this trigger might automatically turn off when the course has no students enrolled on it. To fix this, just manually enroll a test student to the course.
| Required Inputs | Course ID |
| Optional Inputs | None. |
| Output |
|
Course Access Cancelled
This trigger fires when a WordPress user’s access to a course is canceled.
Basic Usage
Step 1. Create a zap.
Step 2. Select LifterLMS as the trigger.
Step 3. Under App & event > Event, select “Course Access Cancelled”.
Warning: The zap that you create with this trigger might automatically turn off when the course has no students enrolled on it or when there are no students whose enrollment status is “cancelled”. To fix this, just manually enroll a test student to the course, and then manually cancel the enrollment.
| Required Inputs | Course ID |
| Optional Inputs | None. |
| Output |
|
Course Access Expired
This trigger fires when a WordPress user’s access to a course expires.
Basic Usage
Step 1. Create a zap.
Step 2. Select LifterLMS as the trigger.
Step 3. Under App & event > Event, select “Course Access Expired”.
Warning: The zap that you create with this trigger might automatically turn off when the course has no students enrolled on it or when there are no students whose enrollment status is “expired”. To fix this, temporarily create a free access plan and enroll on the course using the free access plan. Then change the enrollment status to expired from inside the corresponding order in WordPress Dashboard > Orders. You can delete the free access plan afterwards.
| Required Inputs | Course ID |
| Optional Inputs | None. |
| Output |
|
New Membership
This trigger fires when a new membership is created.
Basic Usage
Step 1. Create a zap.
Step 2. Select LifterLMS as the trigger.
Step 3. Under App & event > Event, select “New Membership”.
| Required Inputs | None. |
| Optional Inputs | None. |
| Output |
|
New Membership Enrollment
This trigger fires when a WordPress user enrolls in a given membership.
Basic Usage
Step 1. Create a zap.
Step 2. Select LifterLMS as the trigger.
Step 3. Under App & event > Event, select “New Membership Enrollment”.
Warning: The zap that you create with this trigger might automatically turn off when the membership has no students enrolled on it. To fix this, just manually enroll a test student to the membership.
| Required Inputs | Membership ID |
| Optional Inputs | None. |
| Output |
|
Membership Access Cancelled
This trigger fires when a WordPress user’s access to a membership is cancelled.
Basic Usage
Step 1. Create a zap.
Step 2. Select LifterLMS as the trigger.
Step 3. Under App & event > Event, select “Membership Access Canceled”.
Warning: The zap that you create with this trigger might automatically turn off when the membership has no students enrolled on it or when there are no students whose enrollment status is “cancelled”. To fix this, just manually enroll a test student to the membership, and then manually cancel the enrollment.
| Required Inputs | Membership ID |
| Optional Inputs | None. |
| Output |
|
Membership Access Expired
This trigger fires when a WordPress user’s access to a membership expires.
Basic Usage
Step 1. Create a zap.
Step 2. Select LifterLMS as the trigger.
Step 3. Under App & event > Event, select “Membership Access Expired”.
Warning: The zap that you create with this trigger might automatically turn off when the membership has no students enrolled on it or when there are no students whose enrollment status is “expired”. To fix this, temporarily create a free access plan and enroll on the membership using the free access plan. Then change the enrollment status to expired from inside the corresponding order in WordPress Dashboard > Orders. You can delete the free access plan afterwards.
| Required Inputs | Membership ID |
| Optional Inputs | None. |
| Output |
|
.pp-doc table tr:first-child td {font-weight: 400;} .pp-doc table, .pp-doc table * {font-size: 1em; } .pp-doc table tr td:first-child { font-weight: 700; }
Currently, there are ten actions available. To learn how to use each of these actions in a zap, checkout the section above on how to create a zap along with the Basic Usage section of each action below.
- Create a WordPress User.
- Retrieve a WordPress User
- Search WordPress User by Username
- Search WordPress User by Email
- Enroll in a Course
- Expire Course Access
- Cancel Course Access
- Enroll in a Membership
- Expire Membership Access
- Cancel Membership Access
Create a WordPress User
This action allows you to create a WordPress user if none is found.
Basic Usage
Step 1. Create a zap.
Step 2. Select LifterLMS as the action.
Step 3. Under Event, select “Create a WordPress User”.
Step 4. Fill in the required field Email using dynamic data as shown in this section above on how to create a zap. Optional fields can be left to their defaults.
| Required Inputs | |
| Optional Inputs |
|
| Output |
|
Retrieve a WordPress User
This action allows you to retrieve a specific WordPress user if you have their WordPress user ID.
Basic Usage
Step 1. Create a zap.
Step 2. Select LifterLMS as the action.
Step 3. Under Event, select “Retrieve a WordPress User”.
Step 4. Fill in the required field User ID using dynamic data as shown in this section above on how to create a zap.
| Required Inputs | User ID |
| Optional Inputs | None. |
| Output |
|
Search WordPress User by Username
This action allows you to retrieve a specific WordPress user if you have their WordPress username.
Basic Usage
Step 1. Create a zap.
Step 2. Select LifterLMS as the action.
Step 3. Under Event, select “Search WordPress User by Username”.
Step 4. Fill in the required field Username using dynamic data as shown in this section above on how to create a zap.
| Required Inputs | Username |
| Optional Inputs | None. |
| Output |
|
Search WordPress User by Email
This action allows you to retrieve a specific WordPress user if you have their WordPress email address. If none is found, you can optionally force a WordPress user to be created with that email address.
Basic Usage
Step 1. Create a zap.
Step 2. Select LifterLMS as the action.
Step 3. Under Event, select “Search WordPress User by Email”.
Step 4. Fill in the required field Email using dynamic data as shown in this section above on how to create a zap.
Step 5. You can leave the optional fields as is, or you can fill them up.
Step 6. Check the box for “Create LifterLMS (1.0.0) User if it doesn’t exist yet?” if you want to create a WordPress account for the user you are searching for when they cannot be found.
| Required Inputs | |
| Optional Inputs |
|
| Output |
|
Enroll in a Course
This action allows you to enroll a specific WordPress user to a specific LifterLMS course.
Basic Usage
Step 1. Create a zap.
Step 2. Select LifterLMS as the action.
Step 3. Under Event, select “Enroll in a Course”.
Step 4. Fill in the required fields User ID and Course ID using dynamic data as shown in this section above on how to create a zap.
| Required Inputs |
|
| Optional Inputs | None. |
| Output |
|
Expire Course Access
This action allows you to set the enrollment status of a specific user to a specific course to “expired”.
Basic Usage
Step 1. Create a zap.
Step 2. Select LifterLMS as the action.
Step 3. Under Event, select “Expire Course Access”.
Step 4. Fill in the required fields User ID and Course ID using dynamic data as shown in this section above on how to create a zap.
| Required Inputs |
|
| Optional Inputs | None. |
| Output |
|
Cancel Course Access
This action allows you to set the enrollment status of a specific user to a specific course to “cancelled”.
Basic Usage
Step 1. Create a zap.
Step 2. Select LifterLMS as the action.
Step 3. Under Event, select “Cancel Course Access”.
Step 4. Fill in the required fields User ID and Course ID using dynamic data as shown in this section above on how to create a zap.
| Required Inputs |
|
| Optional Inputs | None. |
| Output |
|
Enroll in a Membership
This action allows you to enroll a specific WordPress user to a specific LifterLMS membership.
Basic Usage
Step 1. Create a zap.
Step 2. Select LifterLMS as the action.
Step 3. Under Event, select “Enroll in a Membership”.
Step 4. Fill in the required fields User ID and Membership ID using dynamic data as shown in this section above on how to create a zap.
| Required Inputs |
|
| Optional Inputs | None. |
| Output |
|
Expire Membership Access
This action allows you to set the enrollment status of a specific user to a specific membership to “expired”.
Basic Usage
Step 1. Create a zap.
Step 2. Select LifterLMS as the action.
Step 3. Under Event, select “Expire Membership Access”.
Step 4. Fill in the required fields User ID and Membership ID using dynamic data as shown in this section above on how to create a zap.
| Required Inputs |
|
| Optional Inputs | None. |
| Output |
|
Cancel Membership Access
This action allows you to set the enrollment status of a specific user to a specific membership to “cancelled”.
Basic Usage
Step 1. Create a zap.
Step 2. Select LifterLMS as the action.
Step 3. Under Event, select “Cancel Membership Access”.
Step 4. Fill in the required fields User ID and Membership ID using dynamic data as shown in this section above on how to create a zap.
| Required Inputs |
|
| Optional Inputs | None. |
| Output |
|


