Getting Started with LifterLMS and WooCommerce
This Add-On is included in the Earth Bundle, Universe Bundle, and Infinity Bundle plans.
All bundle plans include unlimited priority support, automatic updates, and additional benefits.
When you enable the LifterLMS WooCommerce add-on, WooCommerce takes full control of the checkout process. LifterLMS no longer handles payments directly; instead, it focuses on enrollment after a successful purchase.
Because of this, you cannot use the WooCommerce checkout and the native LifterLMS checkout at the same time. Attempting to run both systems in parallel will lead to issues such as:
- Inconsistent pricing or access plan behaviour
- Duplicate or conflicting checkout flows
- Enrollment is not triggering as expected
You must choose one primary checkout system for your site.
When to use WooCommerce
Use WooCommerce if you need:
- A full shopping cart experience
- Physical and digital product sales alongside courses
- Advanced payment, tax, or coupon handling
- WooCommerce Subscriptions for recurring payments
When to use LifterLMS checkout
Use the native LifterLMS checkout if you want:
- A simpler setup focused only on courses and memberships
- Fewer moving parts and less configuration
- Built-in access plan management without WooCommerce dependencies
Steps to Enable LifterLMS WooCommerce Integration:
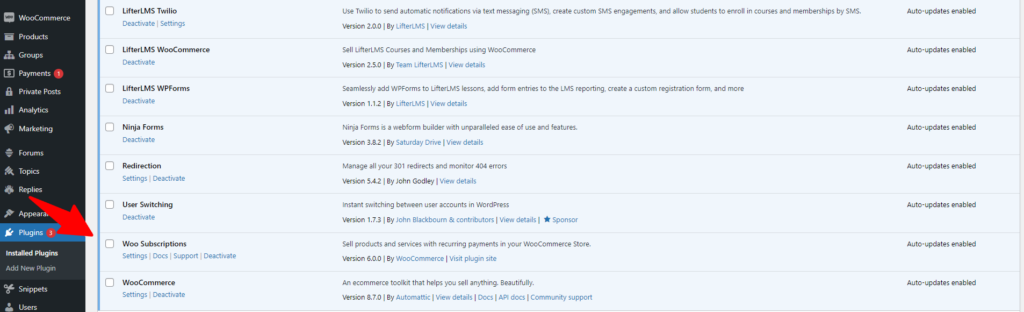
Step 1. Make sure LifterLMS, WooCommerce, and the LifterLMS WooCommerce add-on are installed and activated. Learn more about installing and activating LifterLMS add-ons.
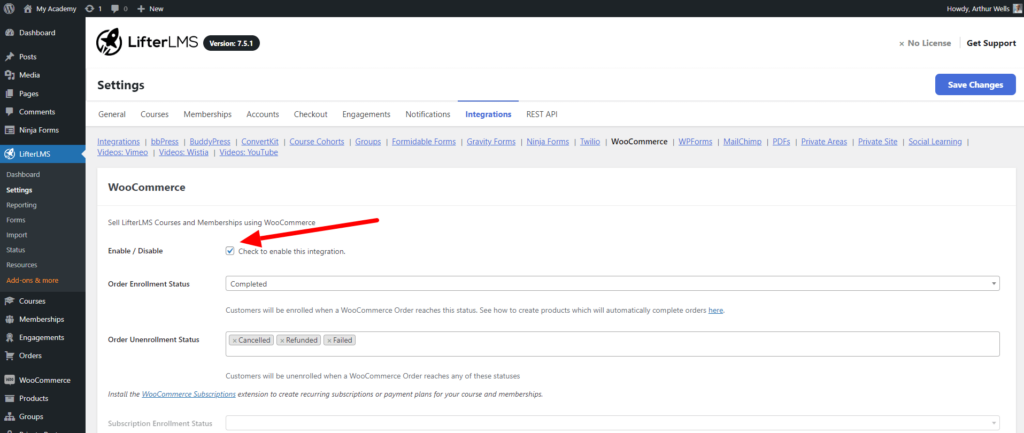
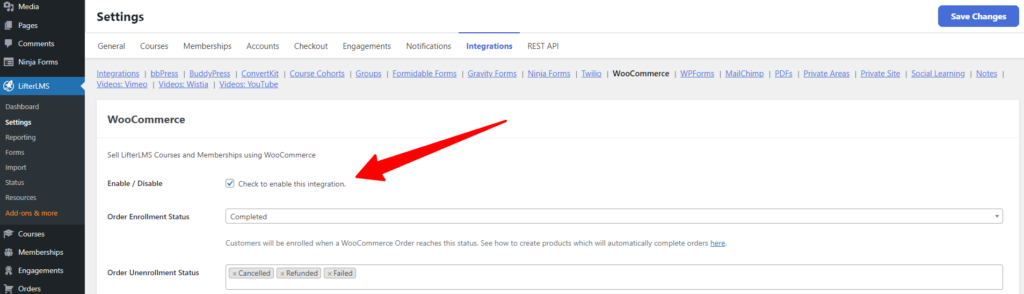
Step 2. Navigate to LifterLMS > Settings.
Step 3. Access the “Integrations” tab.
Step 4. In the integrations table, locate and click on “WooCommerce.”
Step 5. Tick the “Enable WooCommerce” checkbox.
Step 6. Save changes by clicking the Save Changes button.
To enroll users in Courses or Memberships in LifterLMS, it’s essential to create a user account during checkout.
If you’re using WooCommerce for your product sales, deactivate the WooCommerce “Guest Checkout” features. This ensures that, after a WooCommerce purchase, a registered user is available for LifterLMS to enroll in the courses or memberships purchased.
Follow these steps to disable Guest Checkout:
Step 1. On your WordPress admin panel, go to WooCommerce > Settings.
Step 2. Navigate to the “Accounts and Privacy” tab.
Step 3. Locate the option that reads “Allow customers to place orders without an account” and uncheck the checkbox.
Step 4. Click Save at the bottom of the screen.
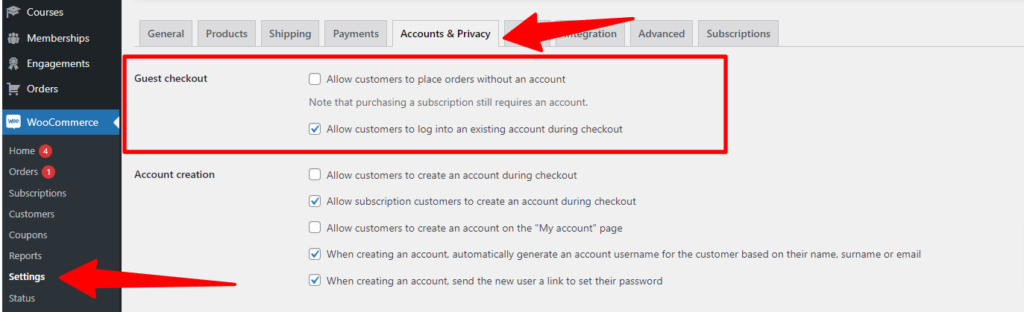
Note: Be sure you have also enabled users to log in to their accounts at checkout and register an account at checkout on this settings page.
To facilitate the sale of courses and memberships, associate your course or membership access plans with a corresponding WooCommerce product.
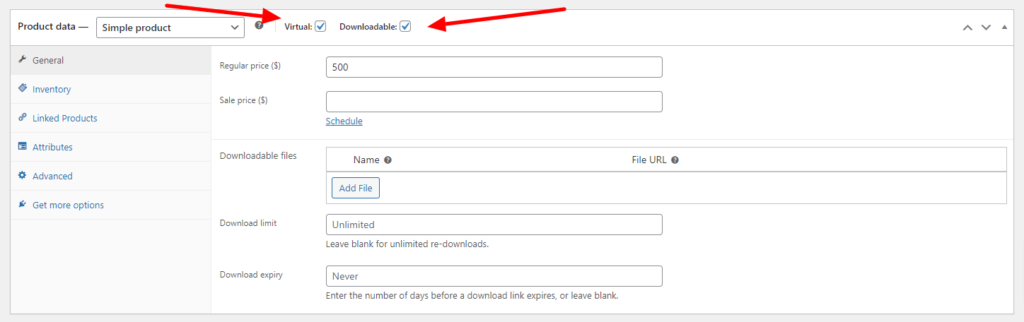
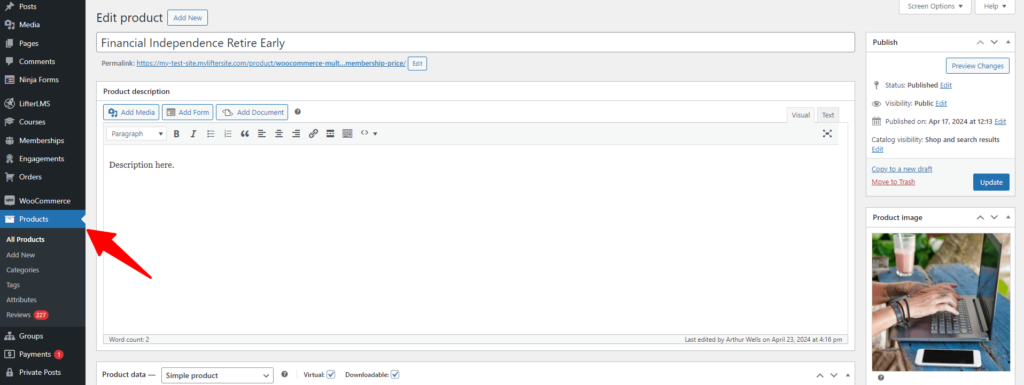
Step 1. Start by creating your product in WooCommerce.
Step 2. Mark your product as “virtual” and “downloadable” to ensure instant order completion on successful purchases.
Step 3. Navigate to your LifterLMS course or membership.
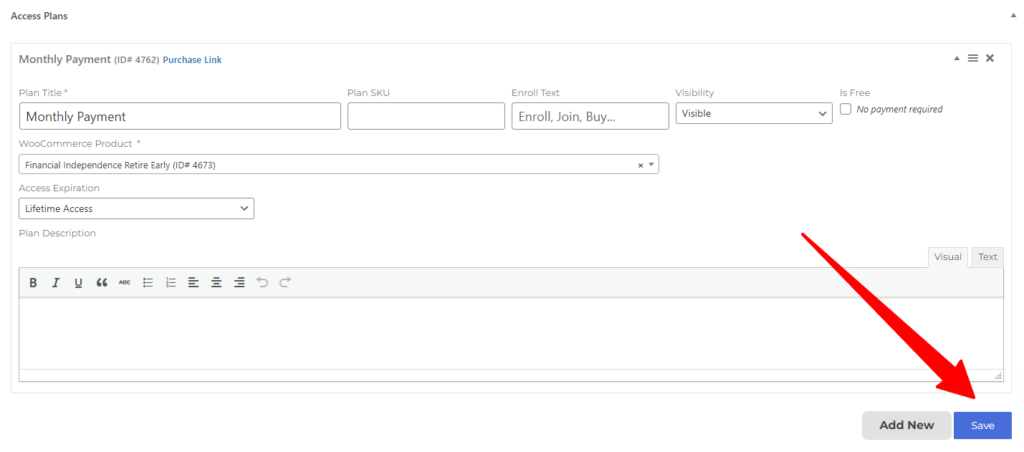
Step 4. Either create a new access plan or use an existing one (learn more about access plans here).
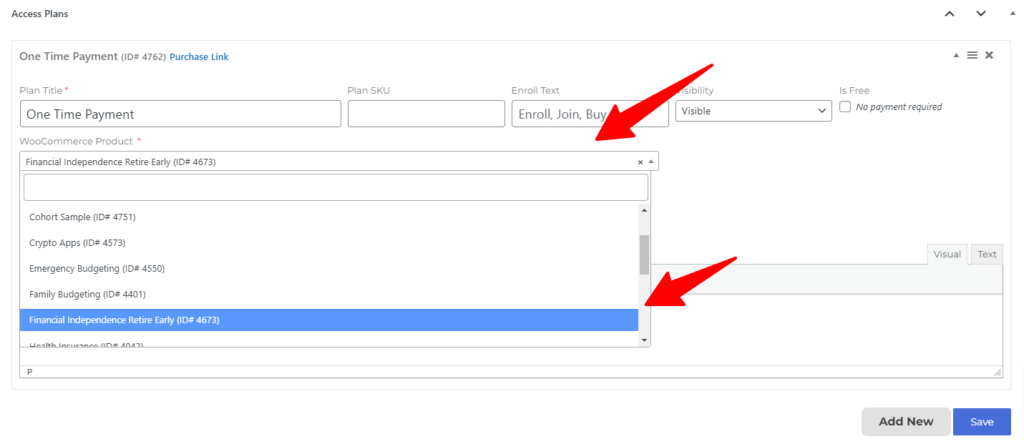
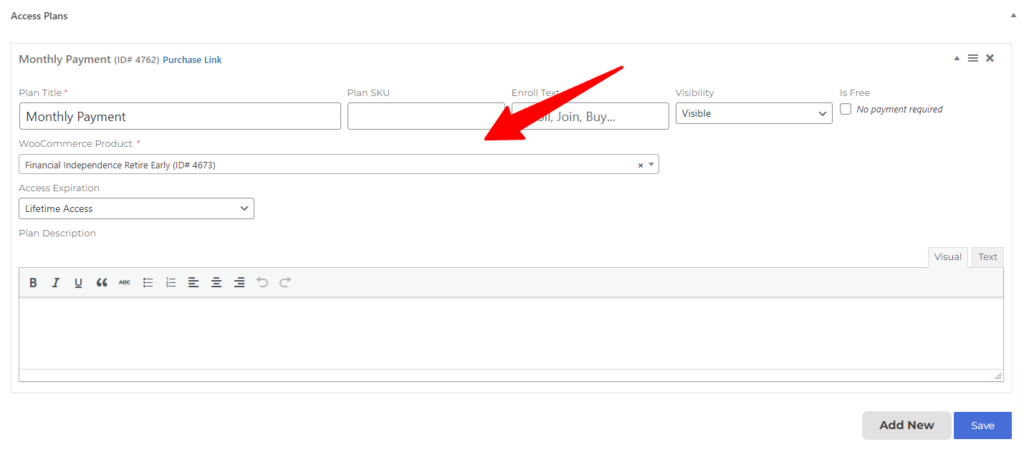
Step 5. Instead of specifying a price, as you would with LifterLMS native payment gateways like Stripe or PayPal, choose a WooCommerce product (or product variation) to determine the access plan’s price and associate this course or membership with a specific WooCommerce product.
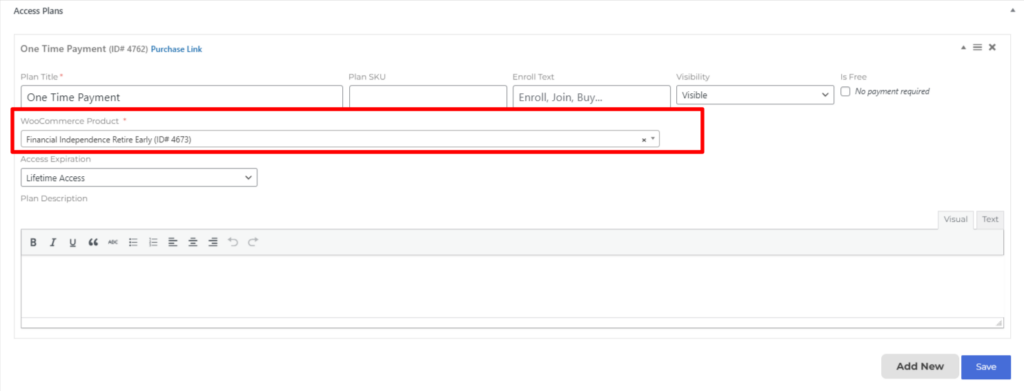
Step 6. You can select a WooCommerce product or a single product variation for the access plan.
Step 7. The pricing table presented to your students will showcase pricing and subscription details sourced from the associated WooCommerce product.

Step 8. When clicked, the purchase button adds the item to the user’s cart if a simple product or a product variation is chosen. For variable products, the buy button redirects customers to the product page, where they can select their preferred variation.
Step 9. Upon successful purchase of the linked product, students will be automatically enrolled in the corresponding course or membership.
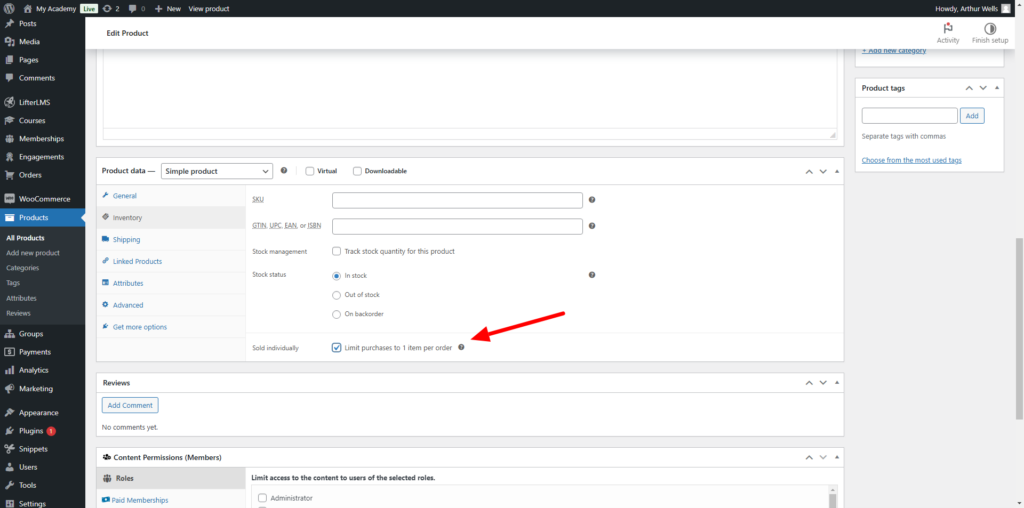
Note: In addition to configuring the WooCommerce integration, please check the “Sold Individually” option under the “Inventory” tab of the associated WooCommerce product.
Enabling “Sold Individually” means customers can add only one instance of the product to their cart at a time. Without this option checked, users can accidentally add the same course product multiple times, which is likely not the intended behavior when enrolling in a course.
To enable this:
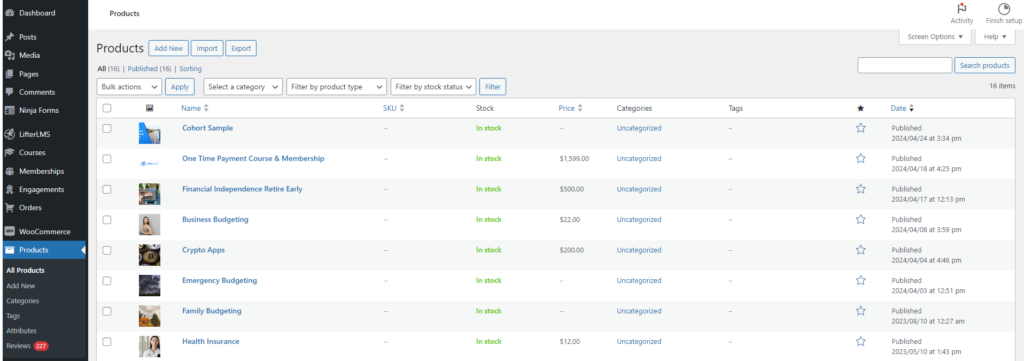
Step 1. Go to WooCommerce > Products and edit the course product.
Step 2. Navigate to the “Inventory” tab.
Step 3. Click the “Sold Individually” checkbox.
Step 4. Click Update to save the changes.
Combine multiple courses and memberships into a single WooCommerce product to create a bundle of courses and/or memberships.
Upon purchasing the product, customers will be automatically enrolled in all the courses and memberships linked to that specific product.
Here is how you can build multiple courses within memberships into a single WooCommerce product.
Follow these steps:
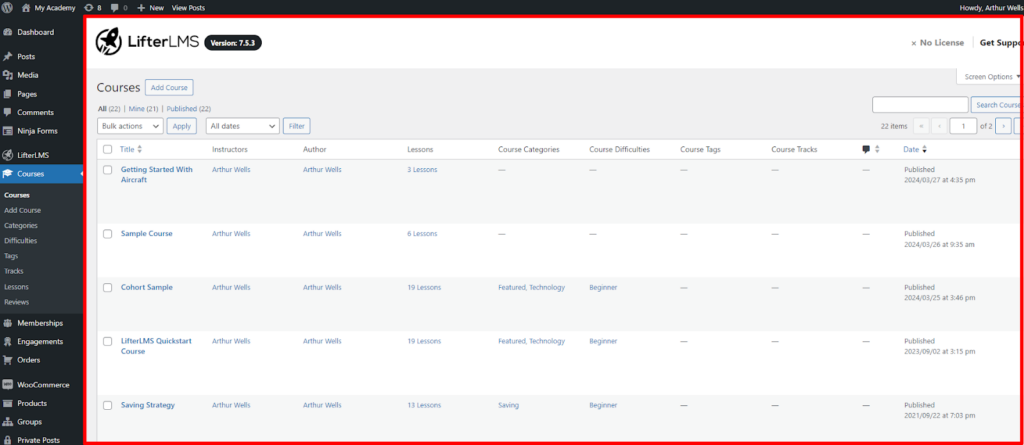
Step 1. Create Multiple Courses Or Memberships.
Step 2. Create a WooCommerce Product.
Step 3. Associate the product with the Courses or Memberships and
configure the sales page.
Be sure to click the save button below the access plan info.
Note: You have the option to assign the same product created in WooCommerce to multiple courses or memberships that you have created.
When a student purchases the specific WooCommerce product, all associated courses and memberships will be added to their account.
Step 4. Update or Publish the Course or Membership Sales Page in LifterLMS.
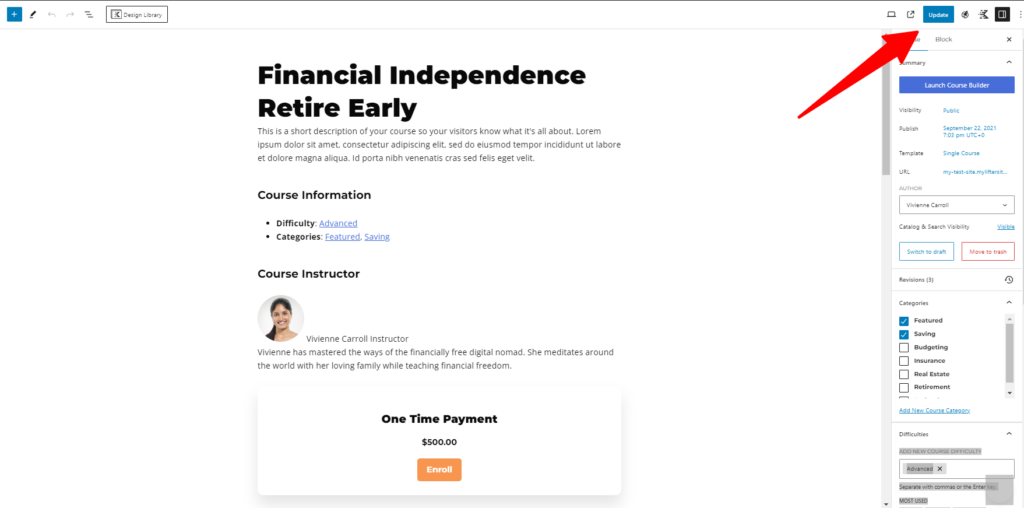
By following these steps, students will be automatically enrolled in all courses and/or memberships linked to the specific product upon purchase, granting them access to the bundled content.
With LifterLMS WooCommerce, you can determine when students should be enrolled in (and removed from) courses and memberships, aligning with the WooCommerce order status of the associated WooCommerce order.
Default Enrollment Trigger
The default enrollment trigger in LifterLMS is the “completed” status. Ensure that WooCommerce orders auto-complete by following these steps: WooCommerce Automatic Order Completion.
Alternative Enrollment Trigger Options
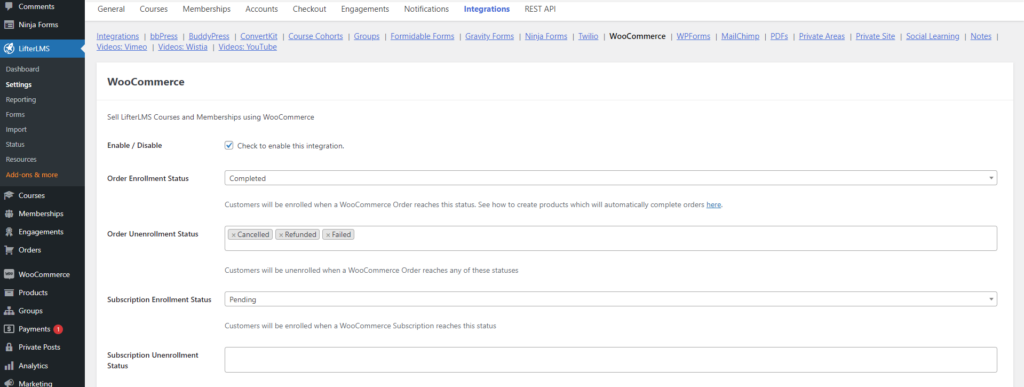
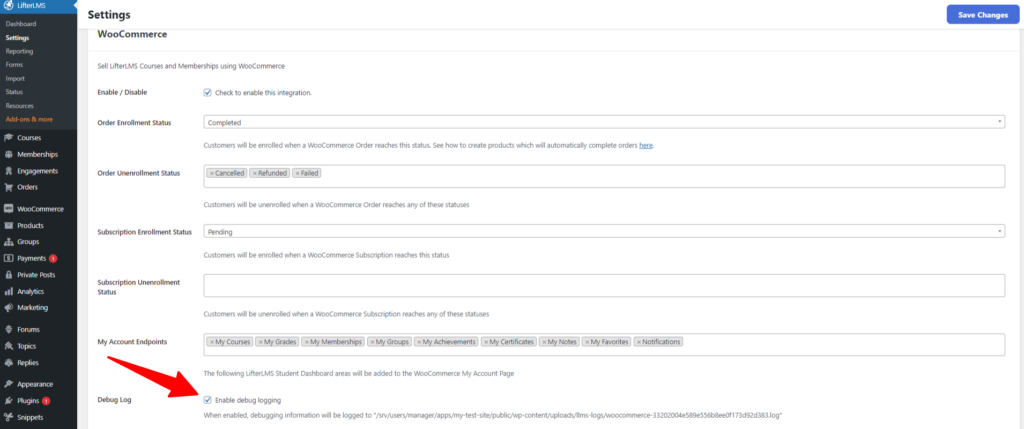
If you prefer an alternative enrollment trigger, visit LifterLMS > Settings > Integrations > WooCommerce to configure enrollment settings.
Below are the available order statuses.
Order Enrollment Status
Select the WooCommerce order statuses that trigger automatic enrollment. We recommend choosing “completed” to ensure students are enrolled only after payment verification.

Order Unenrollment Status(es)
Choose WooCommerce order statuses that trigger unenrollment. We recommend selecting “Canceled,” “Refunded,” and “Failed.”

Subscription Configuration (If Using WooCommerce Subscriptions)
With Woo Subscriptions, you can create and manage products requiring recurring payments. Woo Subscriptions lets you offer a variety of subscription options for physical or virtual products and services.
Subscription Enrollment Status
Specify the WooCommerce subscription status that triggers automatic enrollment. We recommend selecting “Active.”

Subscription Unenrollment Status(es)
Choose WooCommerce subscription statuses that trigger unenrollment. We recommend selecting “On Hold,” “Canceled,” and “Expired.”

Follow these steps on how you can set up recurring payments with LifterLMS and WooCommerce Subscriptions:
Step 1. Make sure WooCommerce Subscriptions is installed and activated on your WordPress site.
Step 2. Navigate to the WooCommerce product dashboard and select the desired product.
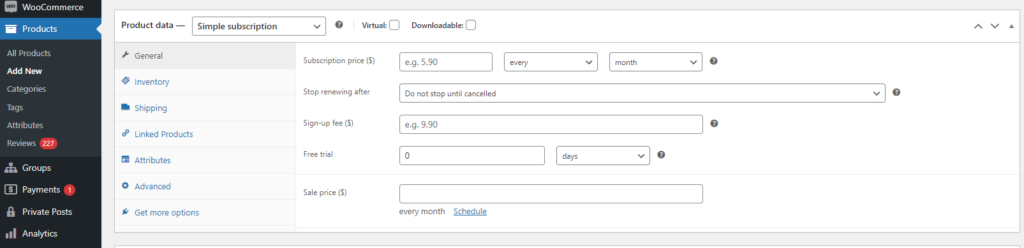
Step 3. Under “Product Data,” choose “Simple Subscription” or “Variable Subscription.”
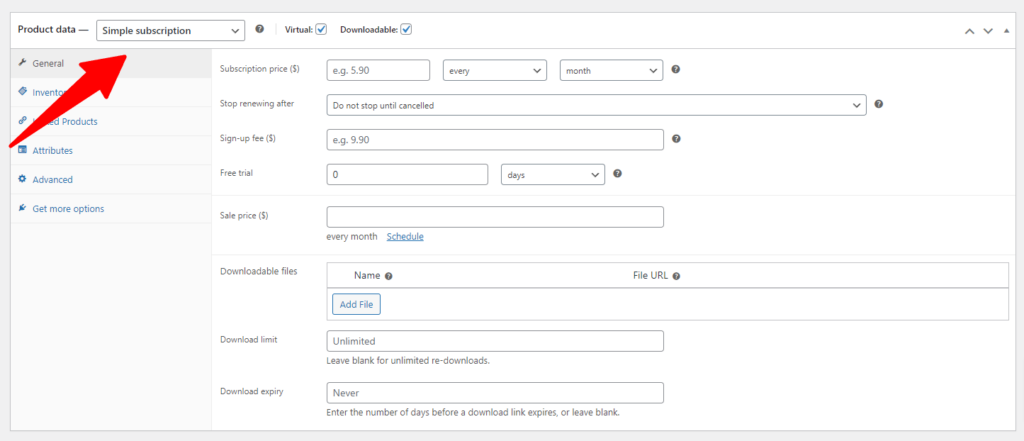
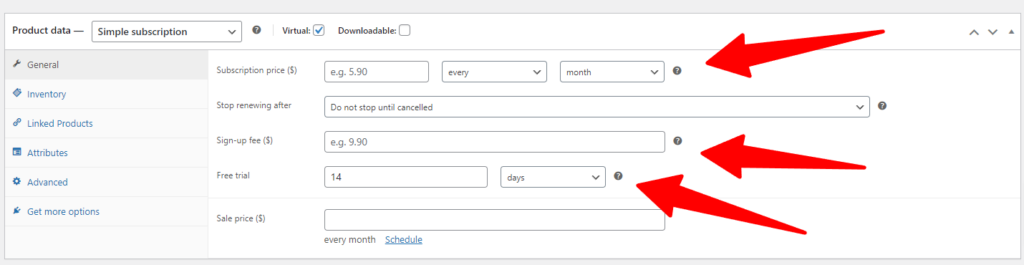
Step 4. Set subscription details like price, sign-up fee, and free trial period.
Step 5. Ensure WooCommerce Integration is enabled in the LifterLMS dashboard by navigating to Settings > Integration.
Step 6. Select the WooCommerce Subscription product with your LifterLMS course.

Step 7. Save the changes, and your recurring payment setup with LifterLMS and WooCommerce Subscriptions is complete.
A Members Only product is exclusively available for purchase by logged-in users who belong to a specific LifterLMS Membership.
When a non-member views a WooCommerce product labeled Members Only, they will see a link prompting them to explore and purchase the required Membership before they can buy the Members Only product.
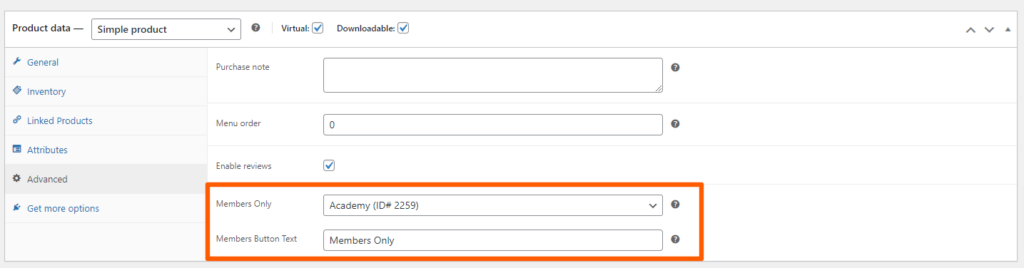
To designate a product as Members Only:
Step 1. Navigate to the “Advanced” tab under “Product Data” on the WooCommerce product.
Step 2. Look for the “Members Only” select box and choose a LifterLMS Membership.
Step 3. Customize the text displayed on the Members Only button using the “Members Button Text” option.
For variable products:
Step 1. Access the Members Only settings for each variation individually.
Step 2. Set unique membership requirements for each product variation.

When using the LifterLMS WooCommerce add-on, be aware of WooCommerce’s dedicated account pages and login features (WooCommerce Pages).
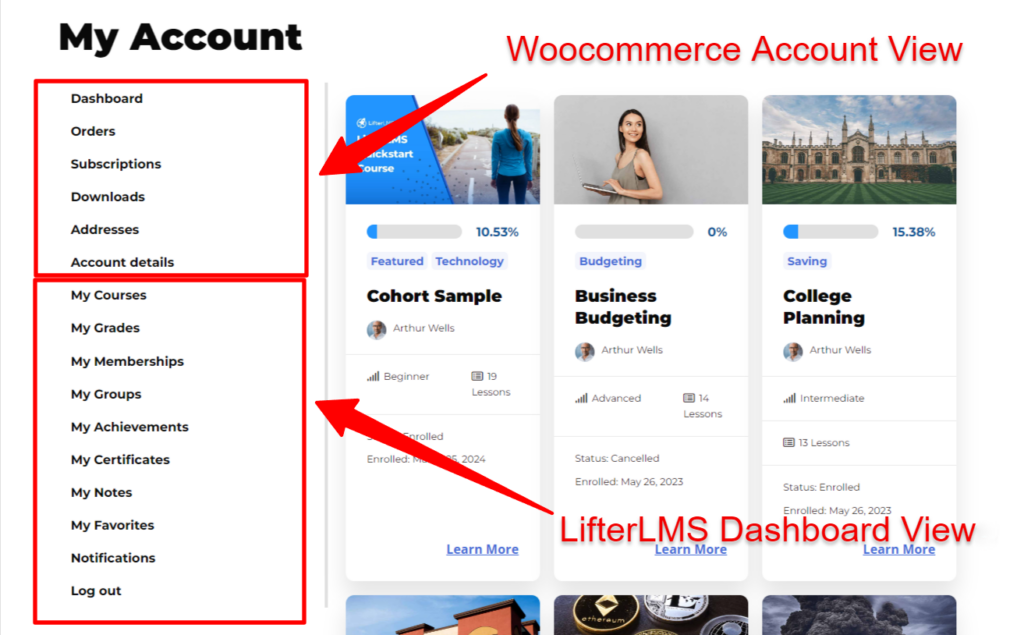
The default WooCommerce “My Account” page displays customer information, including their account details and order history.
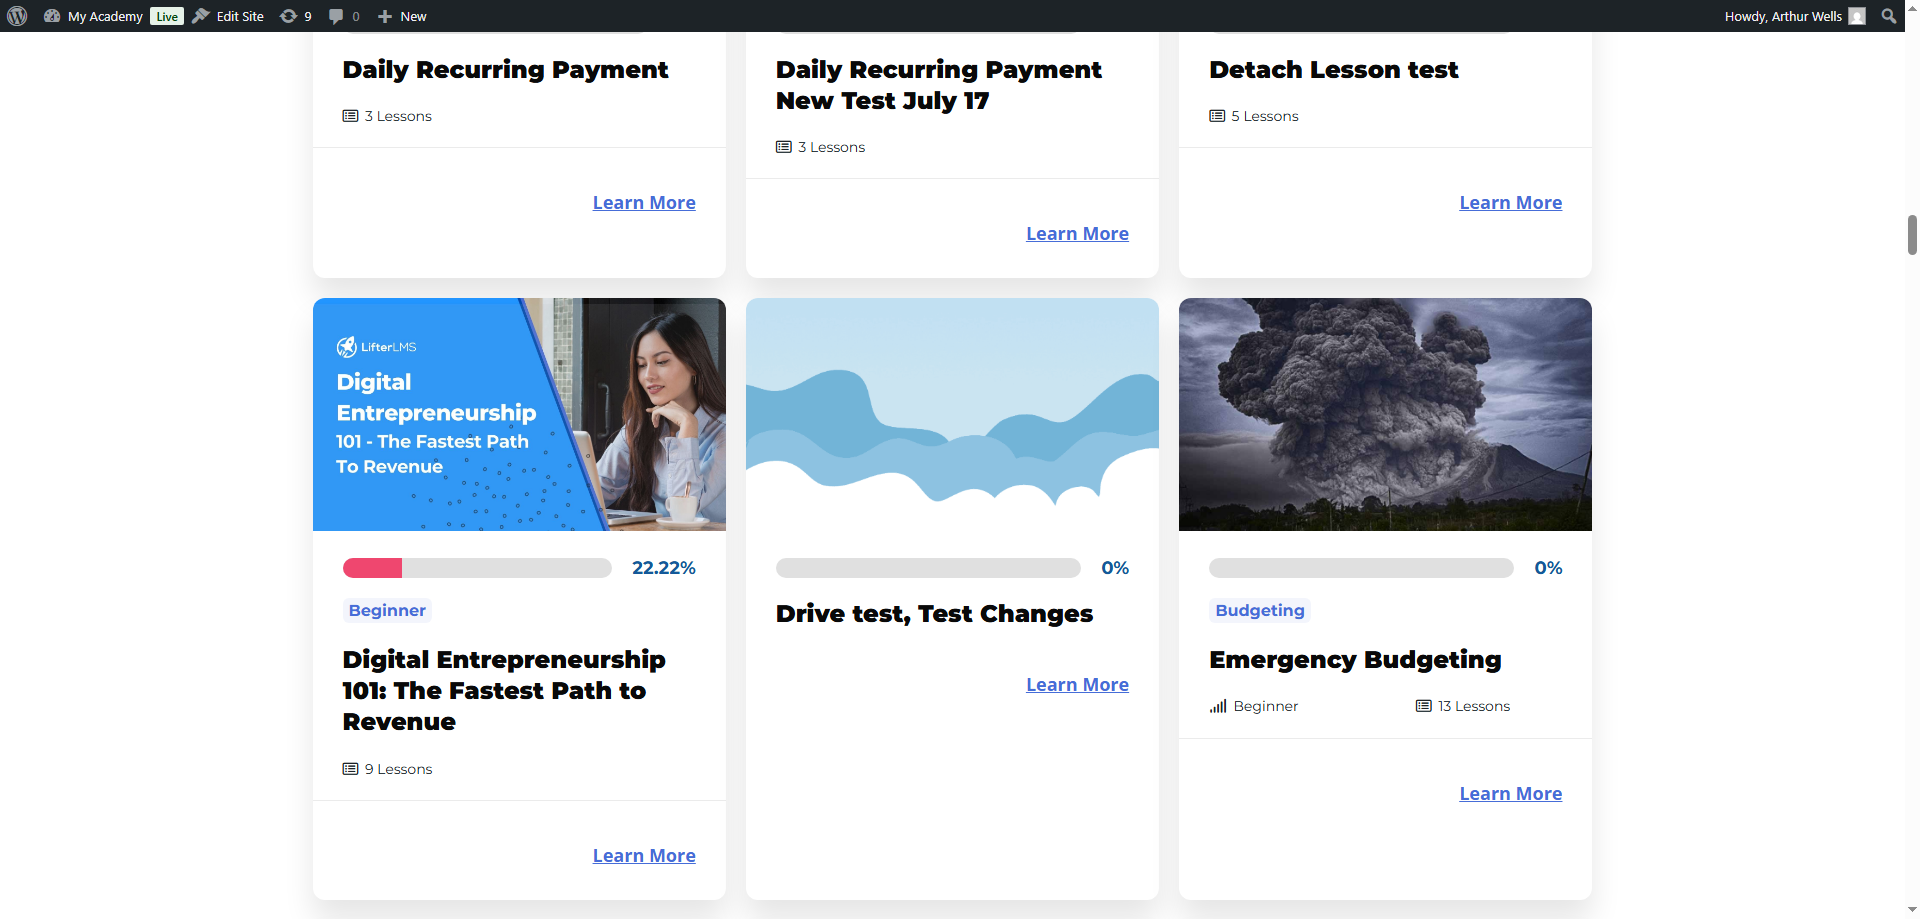
With the LifterLMS WooCommerce add-on, the LifterLMS student dashboard information is integrated into the WooCommerce account page, as illustrated below.
Displaying WooCommerce Pages Using Shortcodes (Optional)
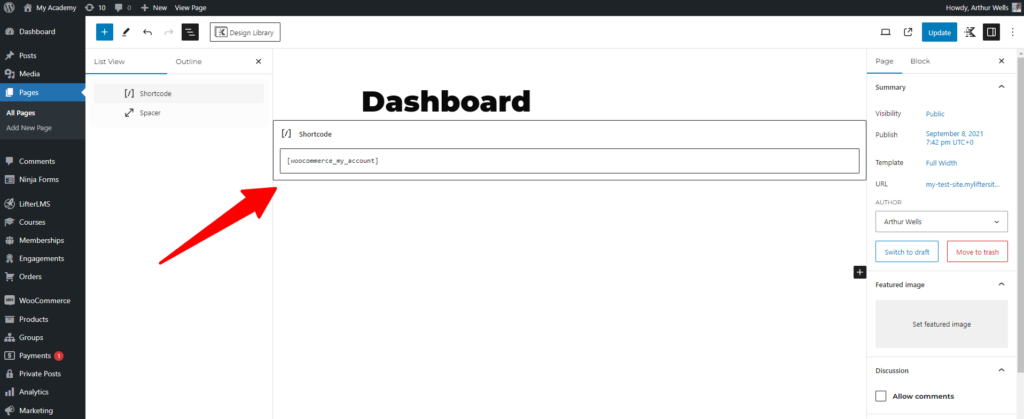
The WooCommerce account page is accessible at yourwebsite.com/my-account/.
If you wish to personalize the dashboard by adjusting LifterLMS options, refer to this guide.
For logged-in users, their account page will display their personalized dashboard combining WooCommerce and LifterLMS information, as depicted in the image above.
However, for visitors who are not logged in, the account page presents a convenient login form.
In some setups, you may want to hide WooCommerce shop or product pages entirely and use LifterLMS course pages as your primary sales pages.
WooCommerce does not include a built-in setting to redirect shop or product pages to external URLs or LifterLMS course pages.
Using a dedicated redirection plugin lets you control visitor behavior without modifying theme files or interfering with the checkout or enrollment process.
When you link a LifterLMS course to a WooCommerce product through an access plan, WordPress creates two public-facing pages:
- A WooCommerce shop or product page, used for checkout
- A LifterLMS course page, typically used as the main sales page
Many site owners prefer to use the LifterLMS course page as their primary sales page, avoiding exposing the WooCommerce shop or product pages in search results or navigation menus.
In these cases, you can set up a redirect so visitors always land on the course page, while WooCommerce continues to handle checkout and enrollment in the background.
The steps below use the free Redirection plugin, which provides a simple and reliable way to manage redirects without affecting purchases or enrollment.
- Install the plugin
- Go to Plugins > Add New
- Search for “Redirection”
- Click Install Now, then Activate
- Open Redirection
- Go to Tools > Redirection
- Complete the setup wizard if prompted

- Create a redirect rule.
- Select “Add New”
- In “Source URL”, enter the shop page or archive URL (for example: /shop/)

-
- In “Target URL”, enter the page where you want visitors to go (for example: your main course catalog or a specific course page)
- Save and test
- Click Add Redirect
- Visit the old shop URL to confirm it redirects correctly
Tip: To prevent the WooCommerce shop page from appearing in search results, you can also set it to noindex using an SEO plugin, such as Yoast or Rank Math.
This approach is commonly used when the LifterLMS course page serves as the primary sales page, and the WooCommerce product page exists solely to support checkout and plan enrollment.
Some site owners want students to view only the main LifterLMS course page, even though WooCommerce still requires a product page for checkout and enrollment. You can redirect each WooCommerce product page to its corresponding course page so visitors always see the main course sales page first.
Here’s how to set up a redirect for a single product:
- Create a new rule in Redirection
- Go to Tools > Redirection > Add New
- Add your URLs
- In “Source URL”, enter the WooCommerce product page URL.
Example: /product/financial-independence-retire-early/ - In “Target URL”, enter the matching LifterLMS course page.
Example: /courses/financial-independence-retire-early/
- In “Source URL”, enter the WooCommerce product page URL.
- Save and test
- Click Add Redirect
- Visit the old product URL to confirm it redirects to the course page
You can repeat this process for each product tied to a course access plan.
Important: Redirecting a WooCommerce product page does not affect enrollment. WooCommerce continues to process purchases, and LifterLMS enrolls students as normal.
If you decide to stop using WooCommerce, you must disable the integration.
To turn off the WooCommerce integration:
- Navigate to LifterLMS > Settings in your WordPress dashboard.
- Click on the “Integrations” tab at the top of the screen.
- Click on the “WooCommerce” link in the integrations list.
- Uncheck the box next to “Check to enable this integration” to disable the feature.
- Click the Save Changes button.
- Review and reconfigure your access plans, then test checkout

Enabling the Debug Log feature lets you capture and log debugging information for your WordPress site. This can be invaluable for troubleshooting, identifying errors, and diagnosing technical issues. Debug logging helps developers pinpoint and resolve tech issues more effectively.
To activate Debug Logging in LifterLMS, follow these steps:
Step 1. Go to LifterLMS > Settings > Integrations.
Step 2. Find the “LifterLMS WooCommerce Settings” box.
Step 3. Tick the “Enable debug logging” box.
Step 4. Click Save.
Below this setting, you’ll find the complete path to the log file on your server. This file captures valuable information for troubleshooting issues related to the add-on.
How to Test Your WooCommerce Integration
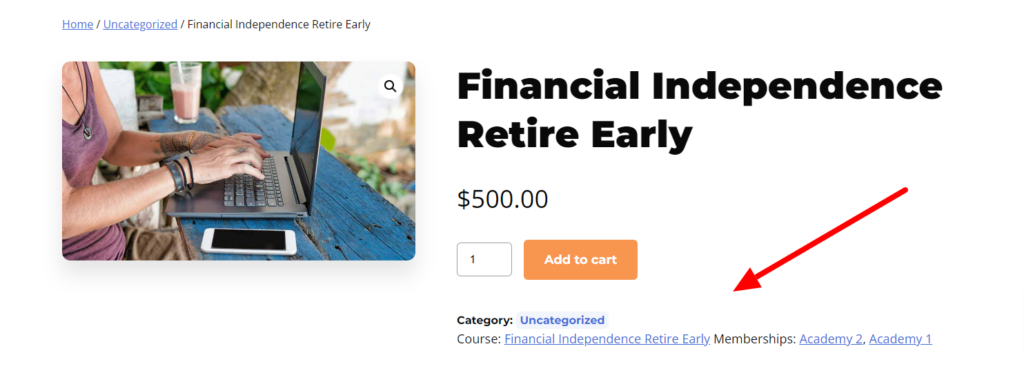
Step 1. Ensure that after creating your product in WooCommerce, it is correctly displayed on the associated access plan of your course or membership.
![]()
Step 2. Navigate to your shop page to confirm that your product is visible.
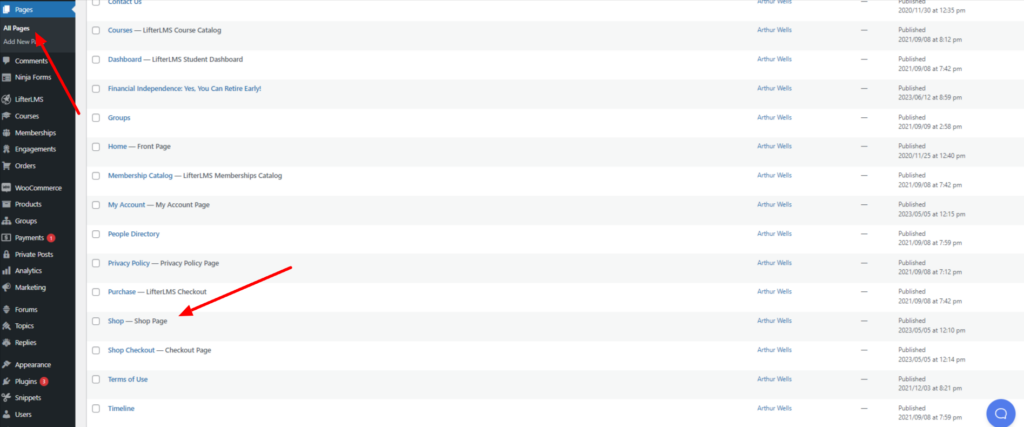
Step 3. Search for the product associated with your course or membership on the WooCommerce Shop Page.
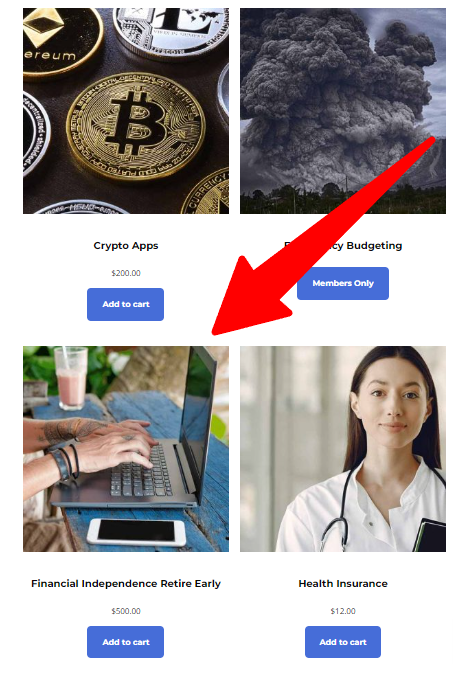
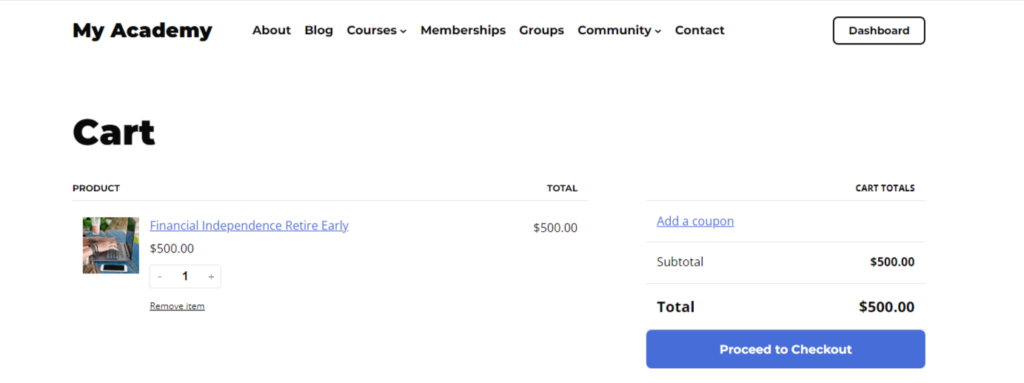
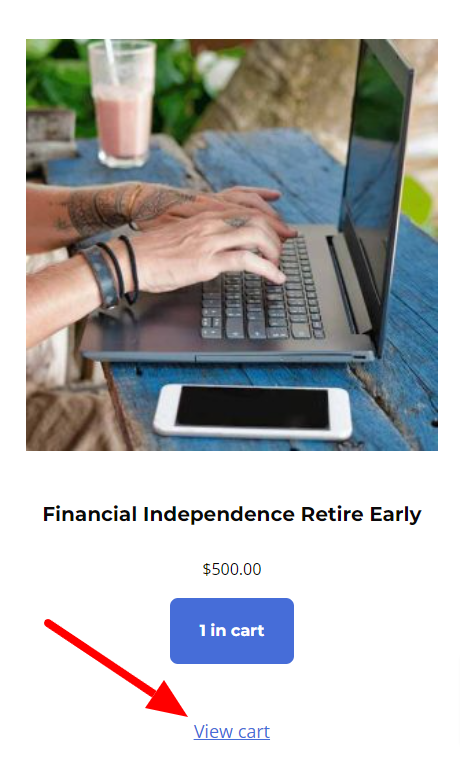
Step 4. Test the functionality by adding the product to your cart.

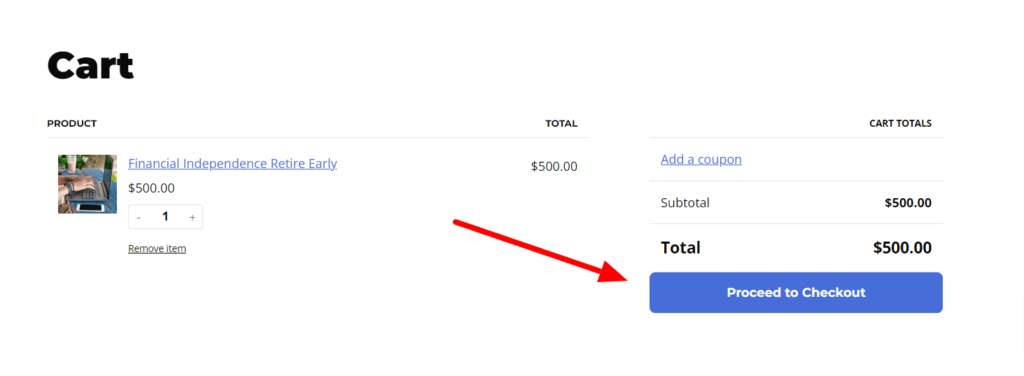
Step 5. Proceed to the cart page to review the selected product and ensure it reflects accurately.
Step 6. Select a product in the cart to view its details, including pricing, associated courses or memberships, and other product details.
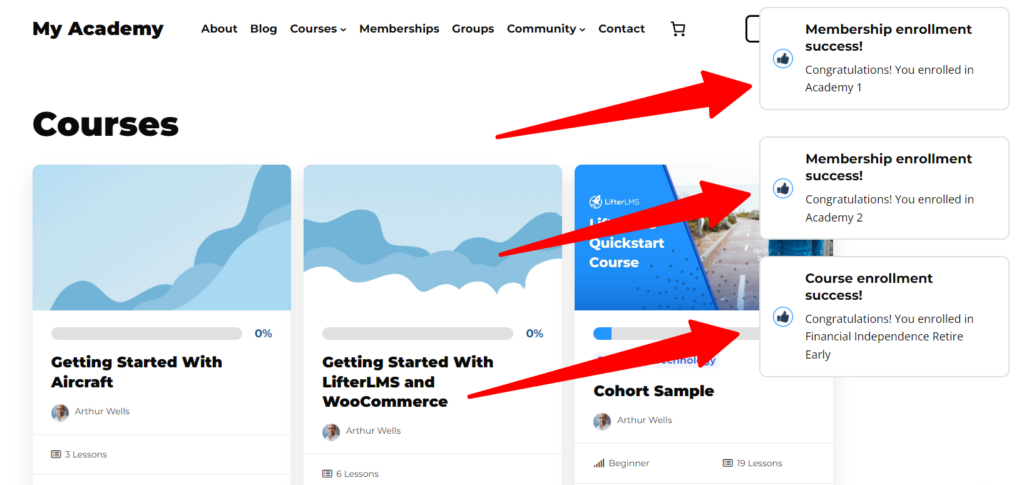
Step 7. Click the checkout process to assess the flow and functionality of payment and order placement.
Step 8. Upon successfully completing the checkout process, verify that you receive a notification confirming your enrollment in the associated courses or membership.
If you want to automatically generate a username and password from the email collected at checkout, see the guide here:
Additionally, the following guides may also be useful:
This Add-On is included in the Earth Bundle, Universe Bundle, and Infinity Bundle plans.
All bundle plans include unlimited priority support, automatic updates, and additional benefits.


