
How to Produce Continuing Education Reports in LifterLMS
Licensing boards, accreditation bodies, and professional associations require detailed records before they award continuing education units (CEUs) or hours to your students. Whether you train nurses, attorneys, accountants, engineers, or pharmacists, accreditation audits require verifiable data that proves an active professional completed an approved course.
Real-world training academies, such as the pharmacy training provider featured in the LifterLMS Podcast on Running a Pharmacy Continuing Education Business, rely on clean data collection to maintain their accreditation.
This documentation teaches you how to collect the necessary licensing data, configure your course credits, issue formal PDF certificates, and generate continuing education reports from LifterLMS.
Licensing boards and accreditation bodies may require professional license numbers, contact details, assessment scores, and other information when reviewing continuing education records. Requirements vary by profession and licensing authority.
The table below shows where you can find or collect these details in LifterLMS and WordPress.
| Board Requirement | Data Source | Storage Location |
|---|---|---|
| Attendee First & Last Name | Student User Account | WordPress User Profile |
| Email Address | Student User Account | WordPress User Profile |
| Street Address, City, State, Zip, Country | Registration / Checkout | LifterLMS User Meta |
| Phone Number | Registration / Checkout | LifterLMS User Meta |
| License Number / Board ID | Custom Registration Field | Custom User Meta via LifterLMS Custom Fields |
| Course Name | Course Settings | Course Title Post Object |
| Instructor of Record | Course Settings | LifterLMS Course Instructor Assignment |
| Approved CE Hours / Credits | Course Settings | Continuing Education Add-on Post Meta |
| Completion Date | Student Course Record | LifterLMS > Reporting > Courses > Students |
| Assessment / Quiz Score | LifterLMS Quiz Attempt | LifterLMS Quiz Attempt Log |
| Certificate Number / PDF | LifterLMS Certificate | LifterLMS PDF Certificate Record |
A core WordPress user registration doesn’t include professional licensing fields by default. To capture this data during checkout and registration, you’ll need to install and activate the LifterLMS Custom Fields add-on.
The LifterLMS Custom Fields add-on integrates directly into the WordPress block editor form builder. You can create custom fields for license numbers, state of licensure, and national provider numbers. You can also turn these inputs into reusable blocks if you manage multiple forms across your site.
To add a license number field to your registration form:
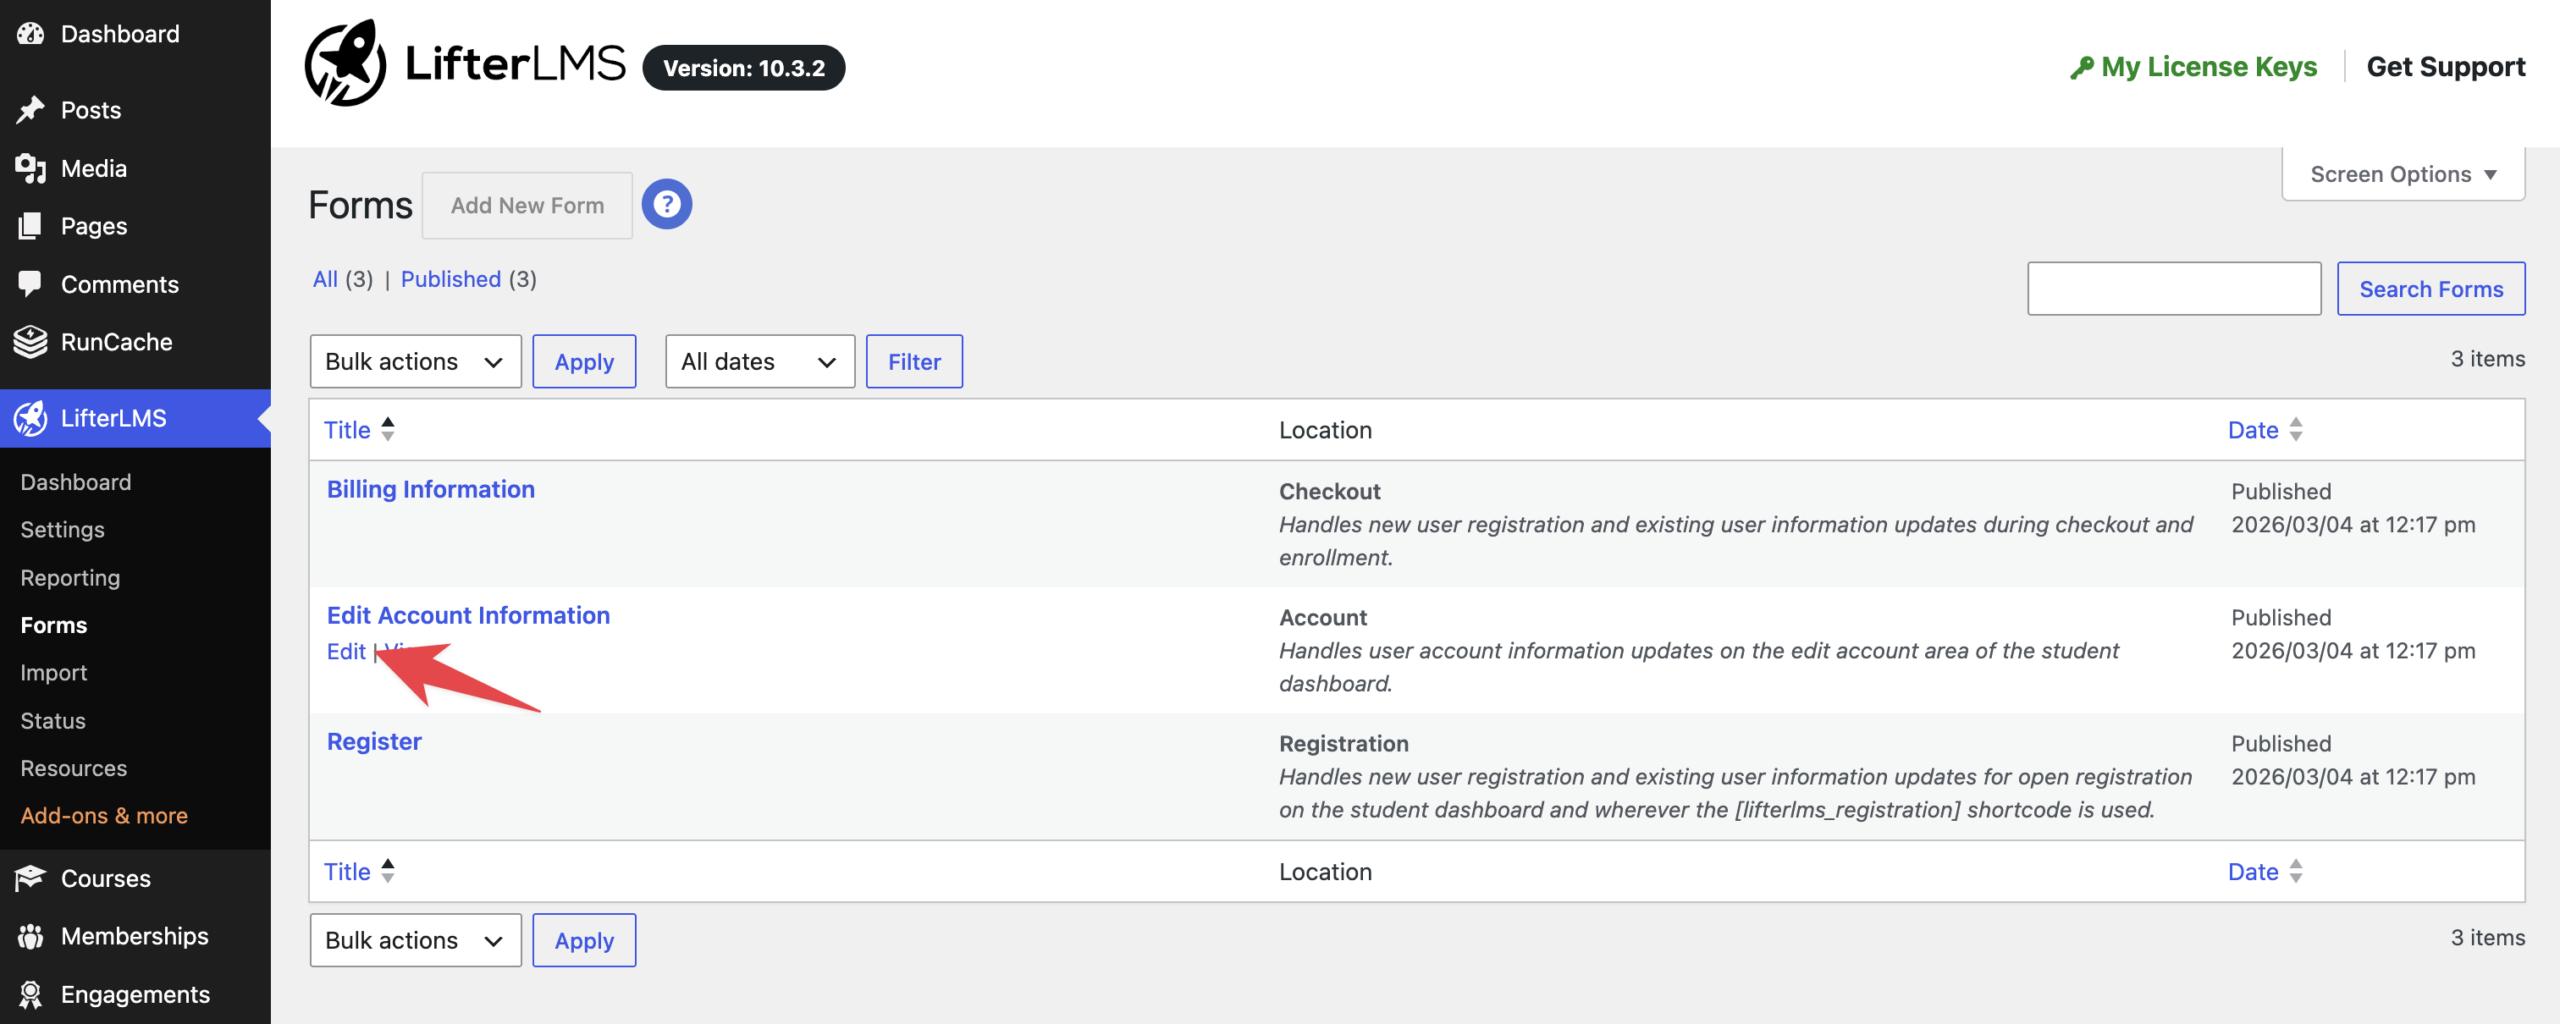
- Navigate to LifterLMS > Forms.
- Hover over the Account Information form and click Edit.
- Scroll through your form layout to decide where the field belongs.
- Click the Add Block plus icon in the block editor and select the text input field block.
- Drag the block into your desired location in the form.
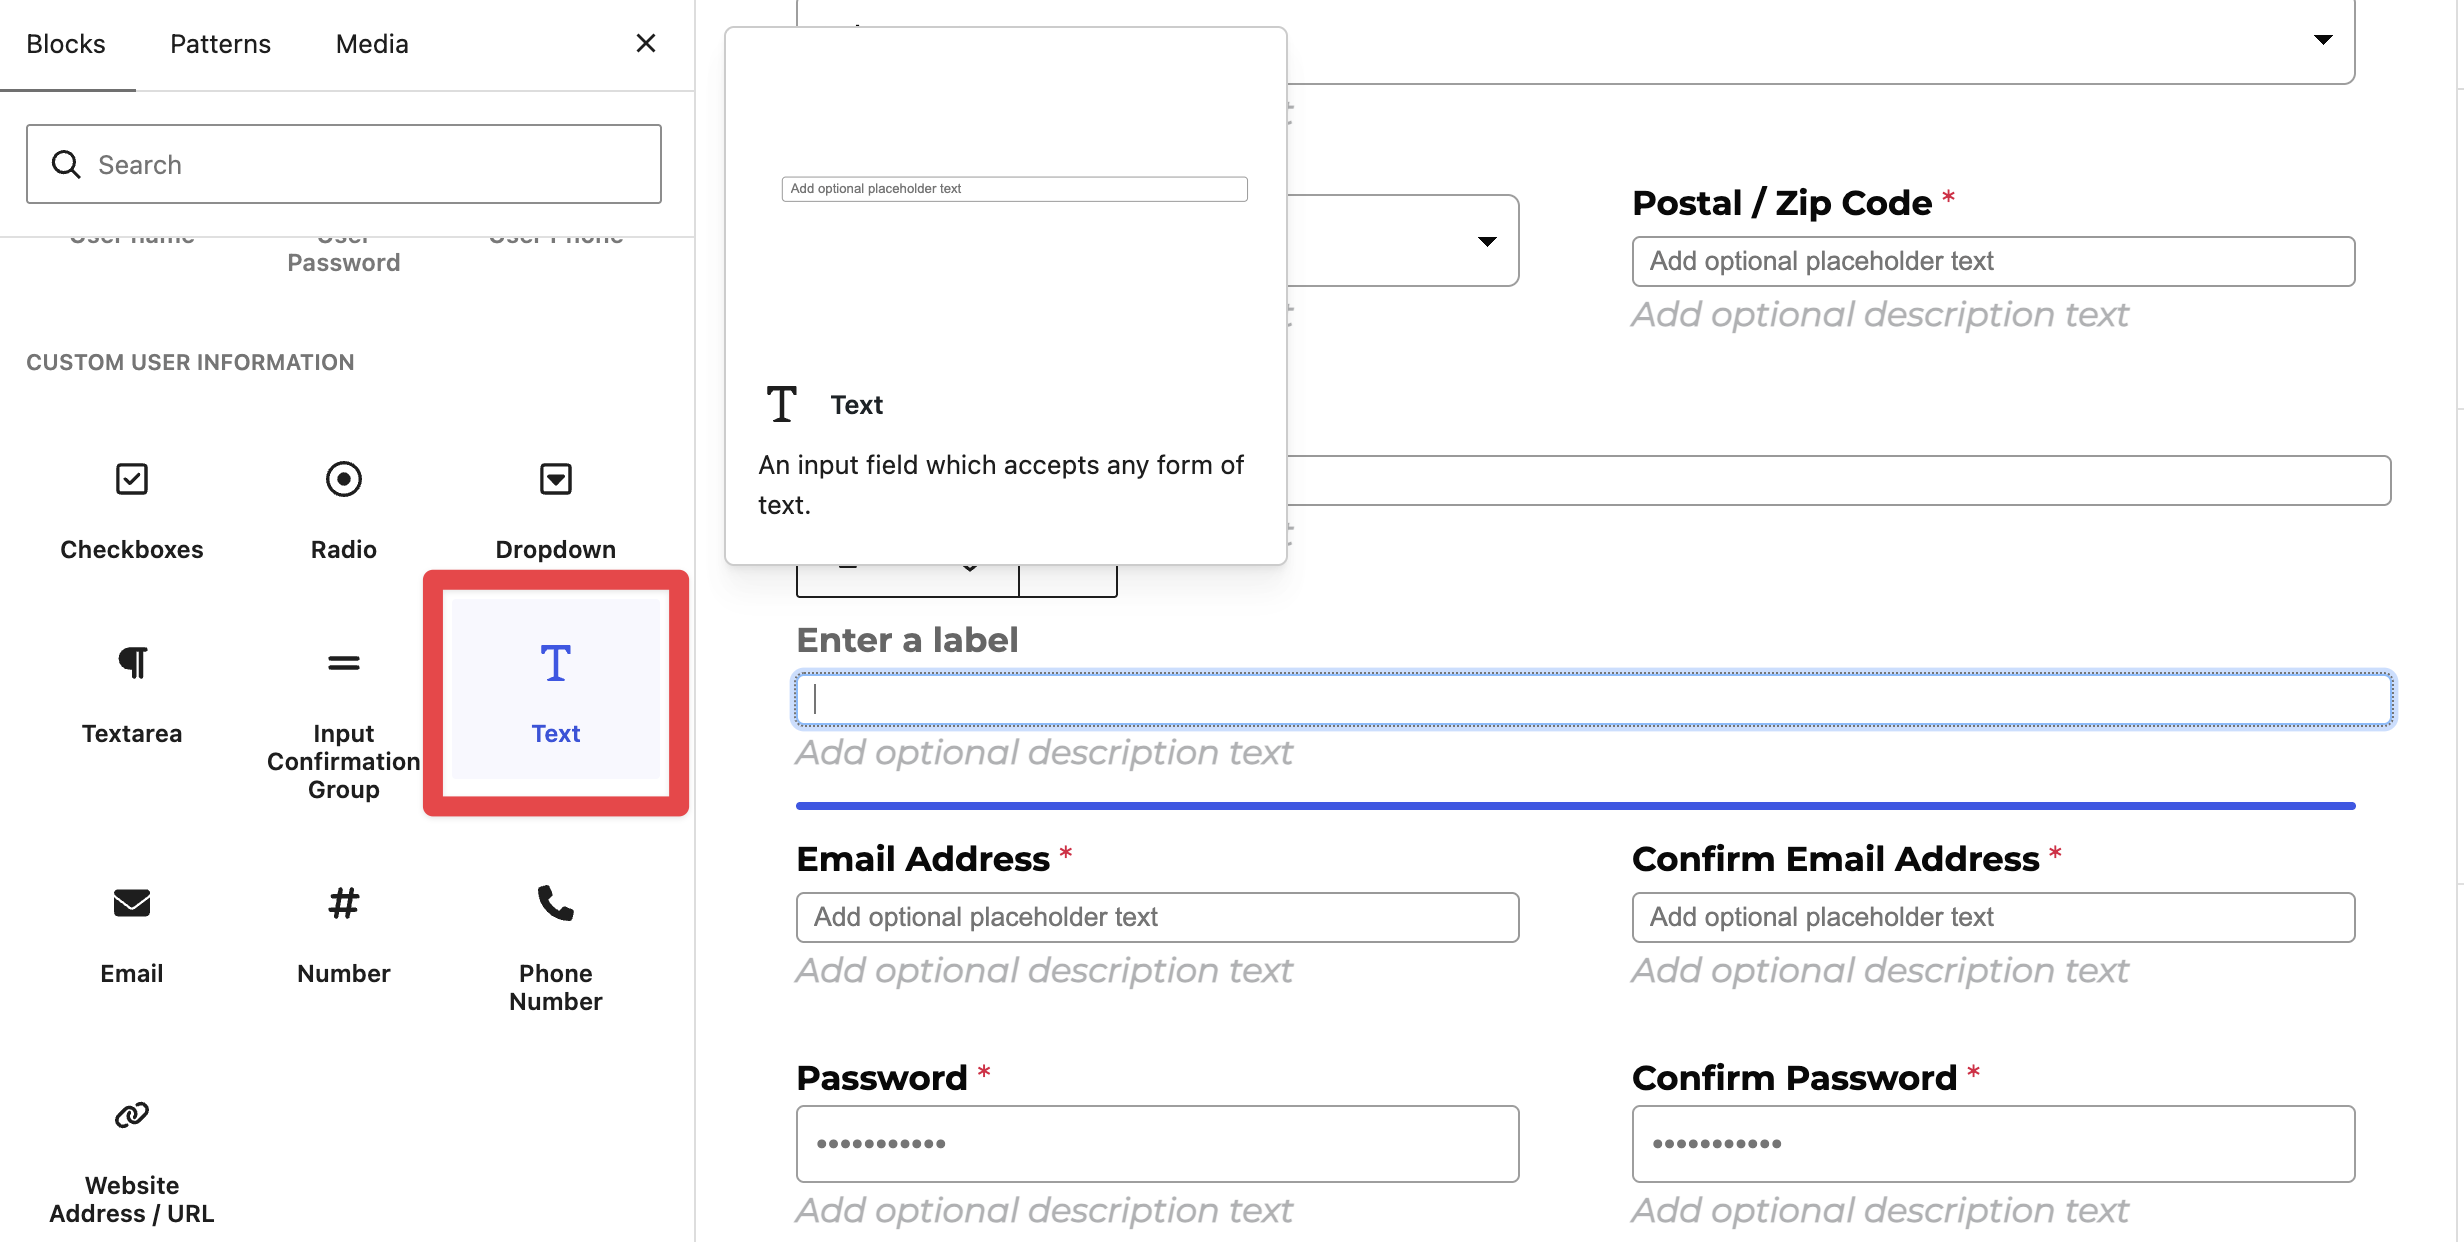
- Click on the “Enter a Label” field to provide a descriptive name for this field. For example, you can use “Professional License Number”.
- Click the block to open the “Block Settings” sidebar on the right and enter a unique identifier in the “User Meta Key” setting, such as ce_license_number.
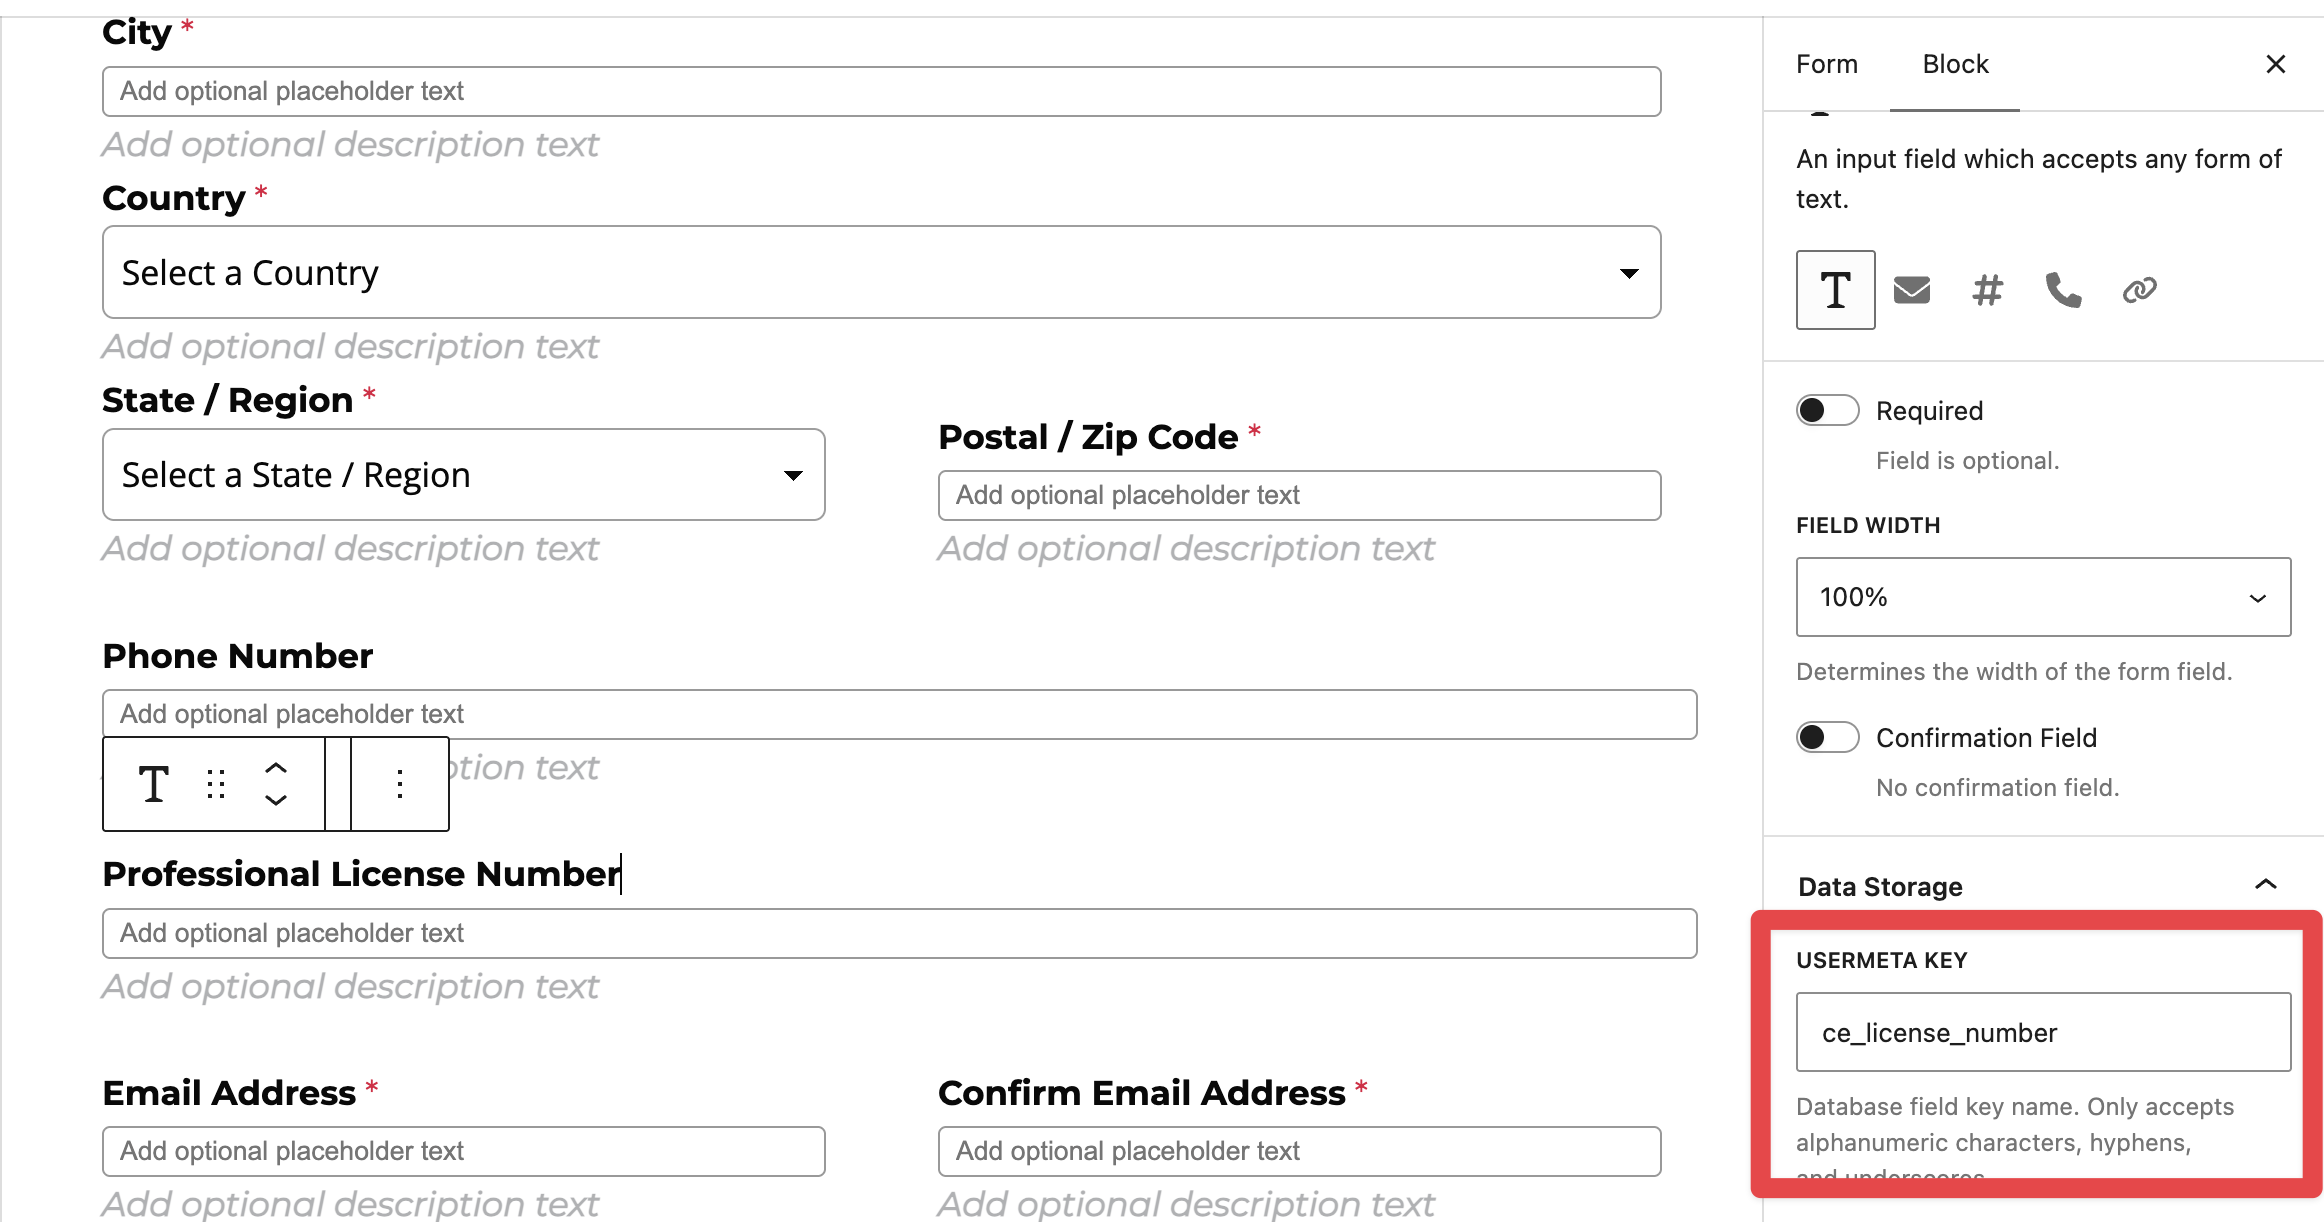
- Click the Save button in the upper right corner to save your form.
For a detailed step-by-step guide with comprehensive configuration options, refer to the Getting Started with LifterLMS Custom Fields Documentation.
Accreditation boards require proof of approved credit hours associated with every course. The LifterLMS Continuing Education Add-On provides dedicated controls to define credit types, assign credit hours, and display CE tracking dashboards for your learners.
You can learn more about its setup and benefits in the guide on simplifying CEU tracking with the Continuing Education Add-On.
To configure CE hours for an accredited course:
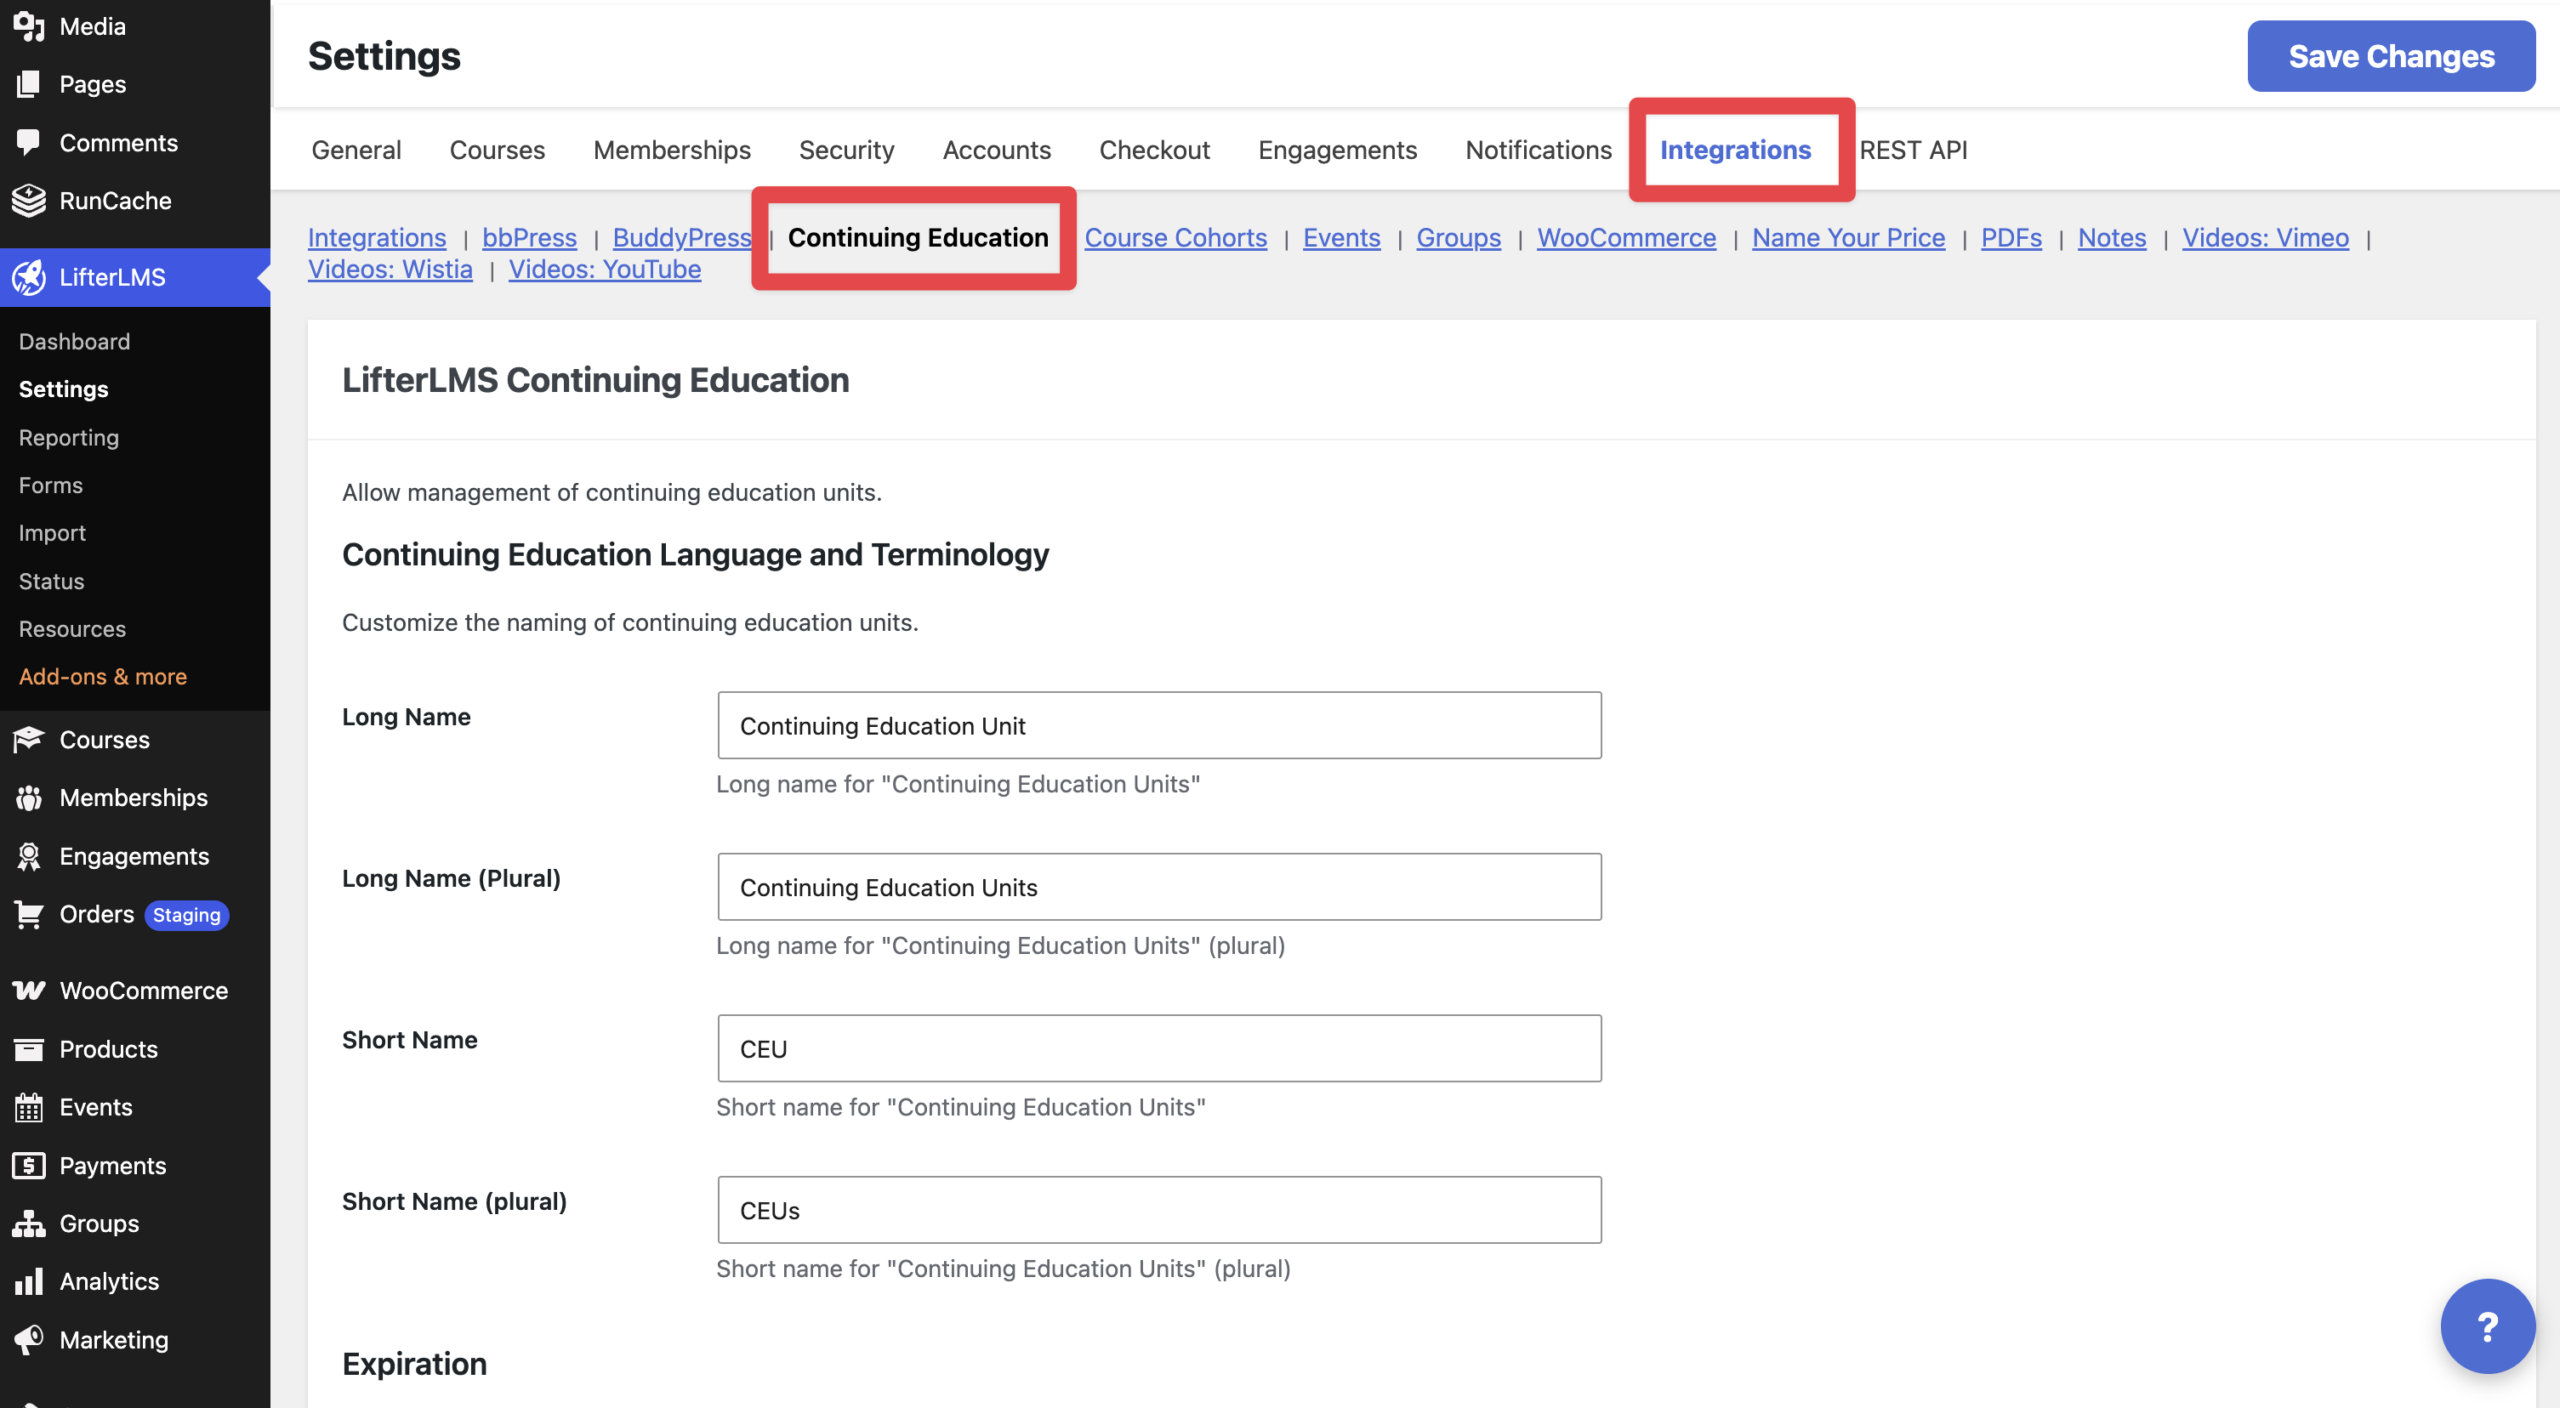
- Navigate to LifterLMS > Settings.
- Under the Integrations tab, click the “Continuing Education” tab to define your global credit types (for example, “CEU”, “CLE”, “CPE”, or “Contact Hours”).
- Click Save Changes.
- Navigate to Courses in your WordPress dashboard and click Edit on the course you are configuring.
- Scroll down to the “Course Options” meta box and click the General tab within the course settings.
- On this screen, you can configure the “Continuing Education Units” field. Enter your desired value in the provided text field.
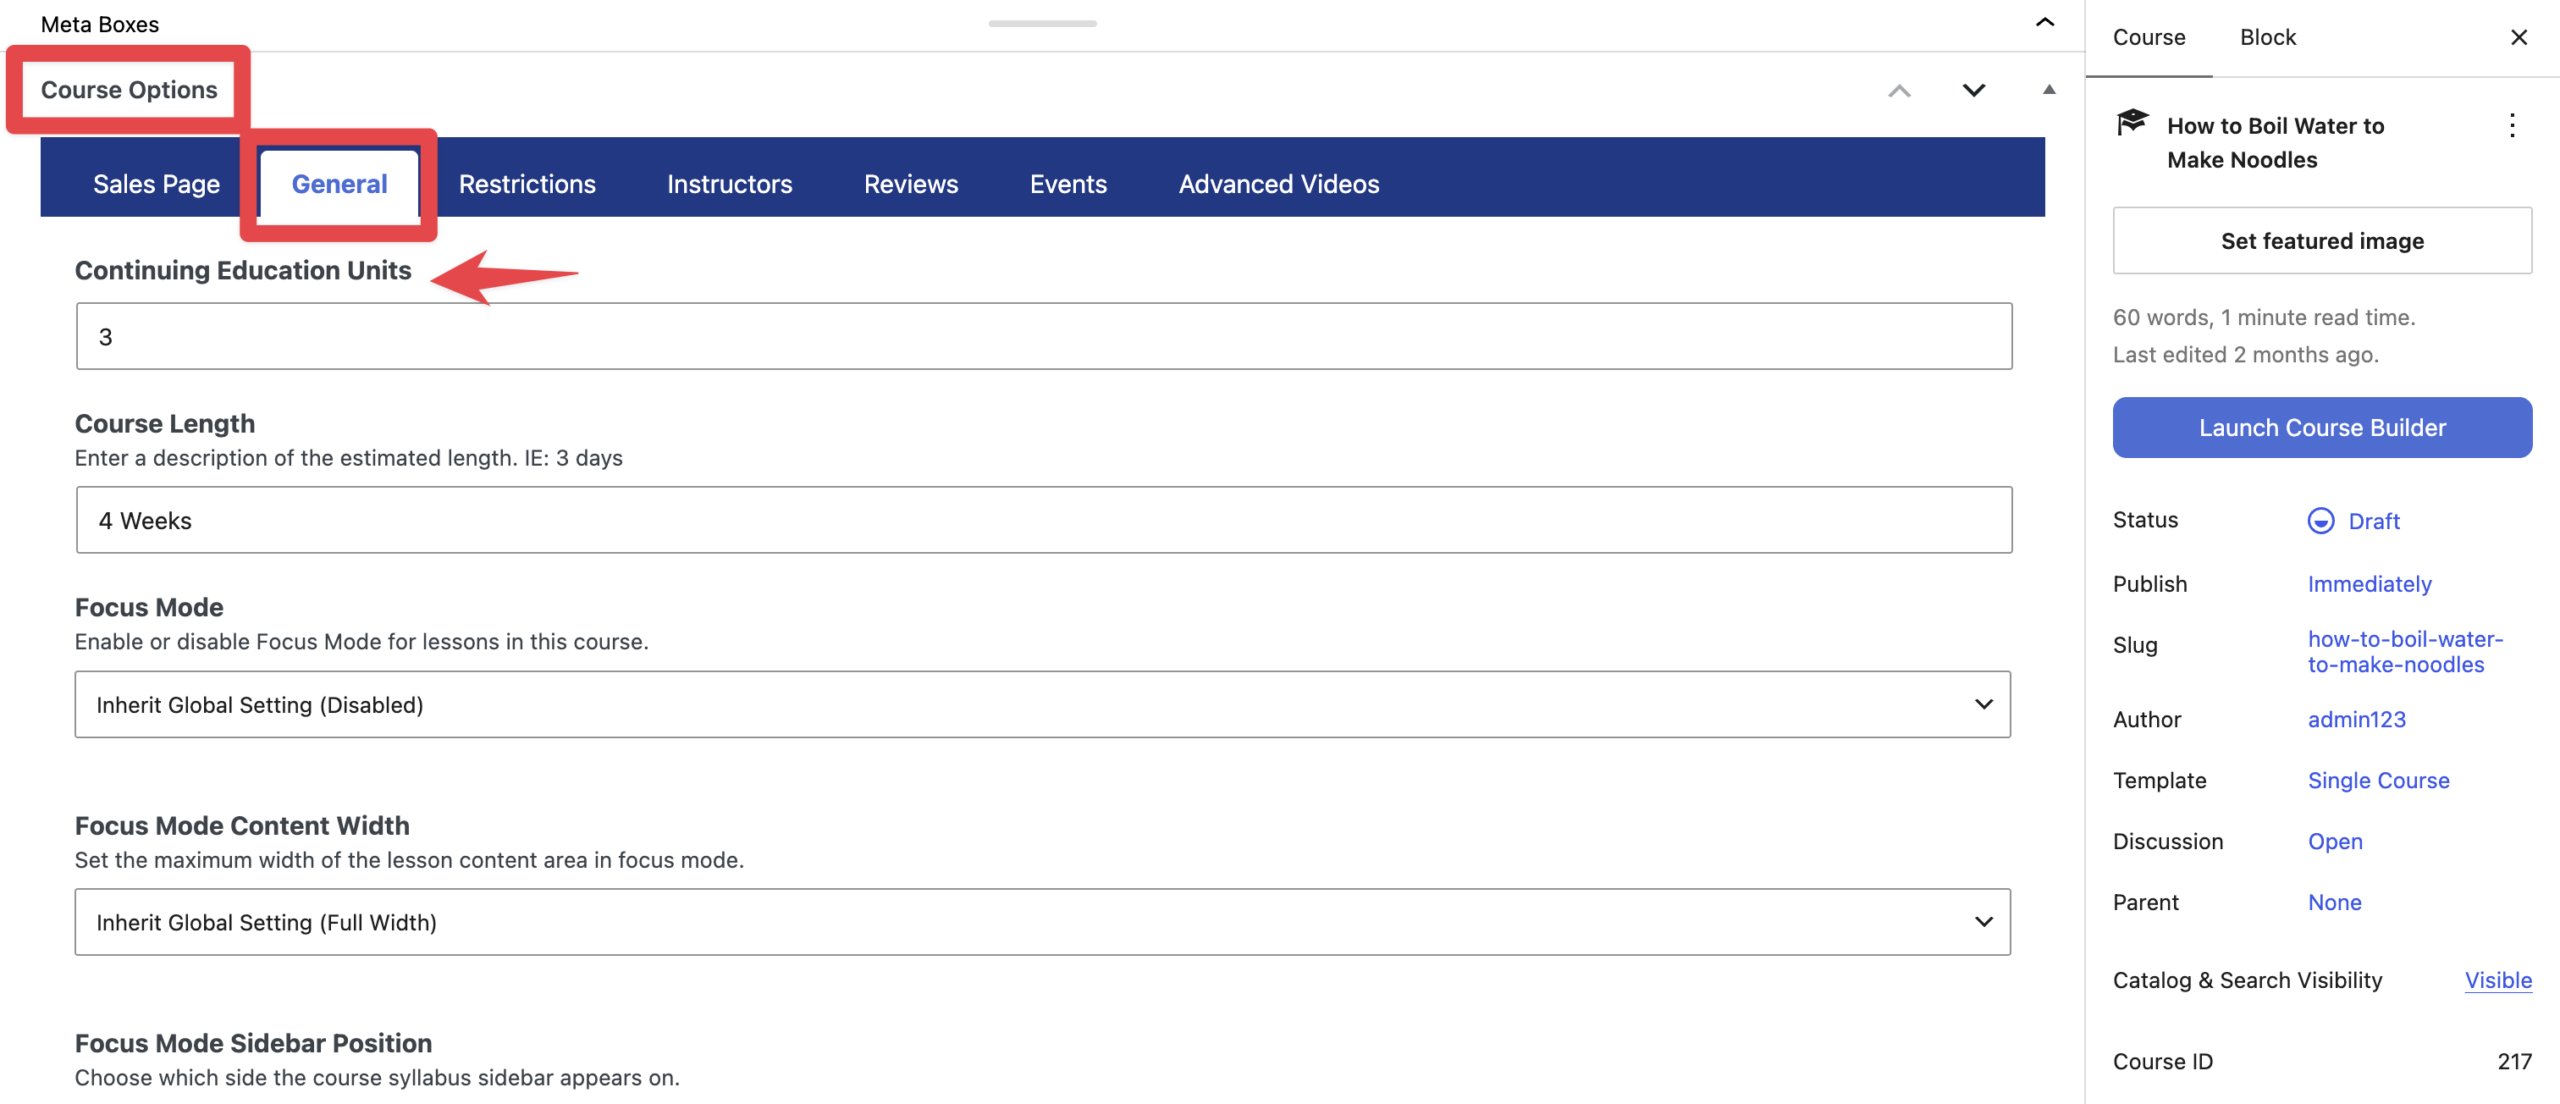
- After making all the necessary changes, save your course.
For complete setup instructions, review the Getting Started with Continuing Education Documentation.
Many continuing education boards enforce a minimum passing score before a student can earn credits. You can enforce these standards using LifterLMS quizzes or the LifterLMS Advanced Quizzes add-on.
To establish a passing threshold:
- Navigate to Courses in your WordPress dashboard, hover over the course that you want to edit, and click the Builder button.
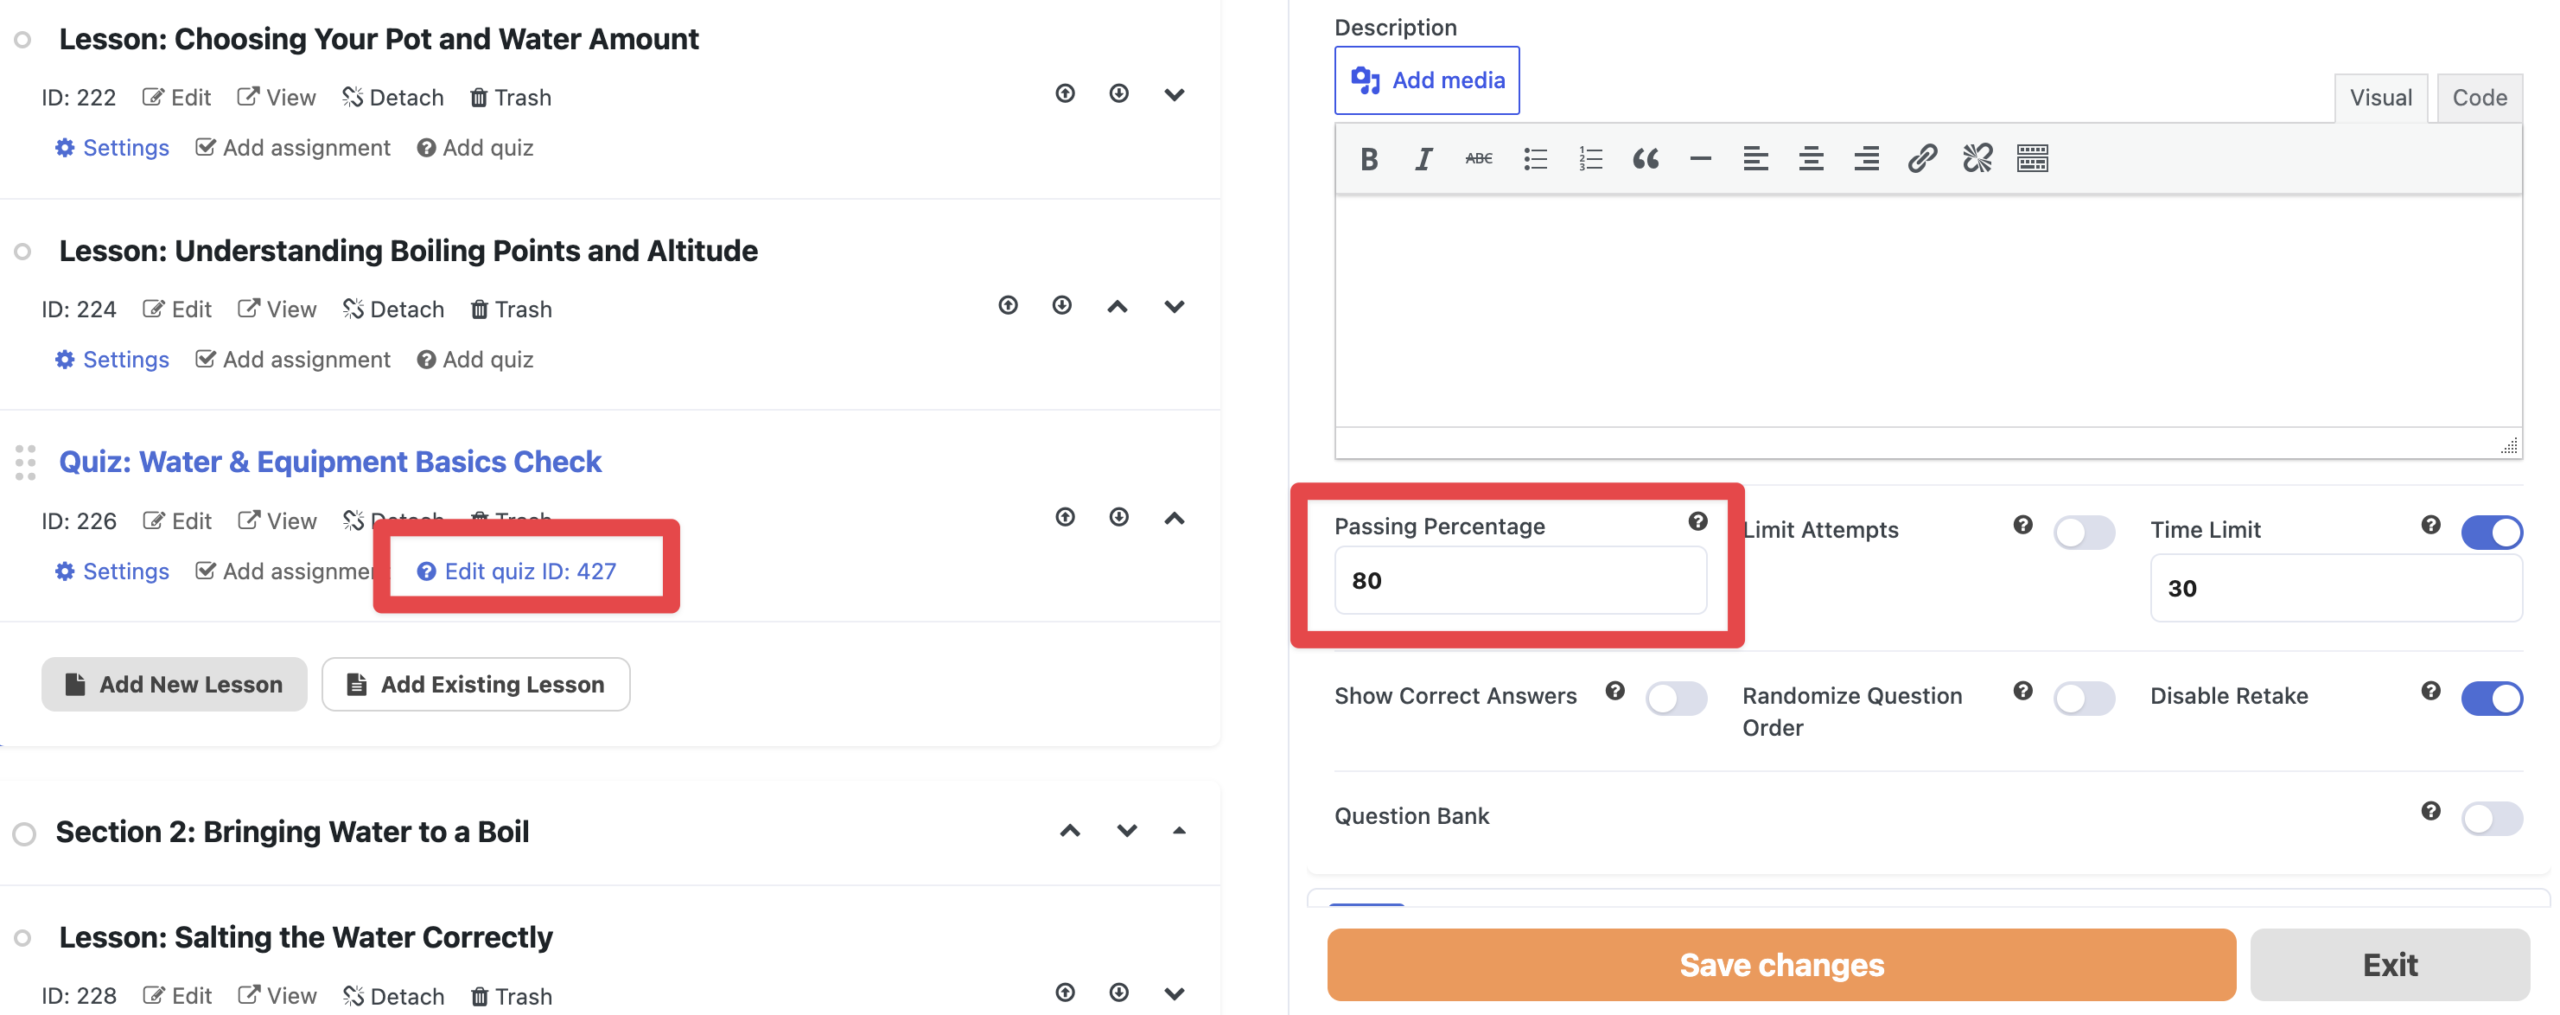
- Add a quiz to your final lesson or click the Edit Quiz button under an existing quiz to edit it.
- Locate the “Passing Percentage” field in the quiz settings sidebar and enter the minimum score required by your board (such as 80).
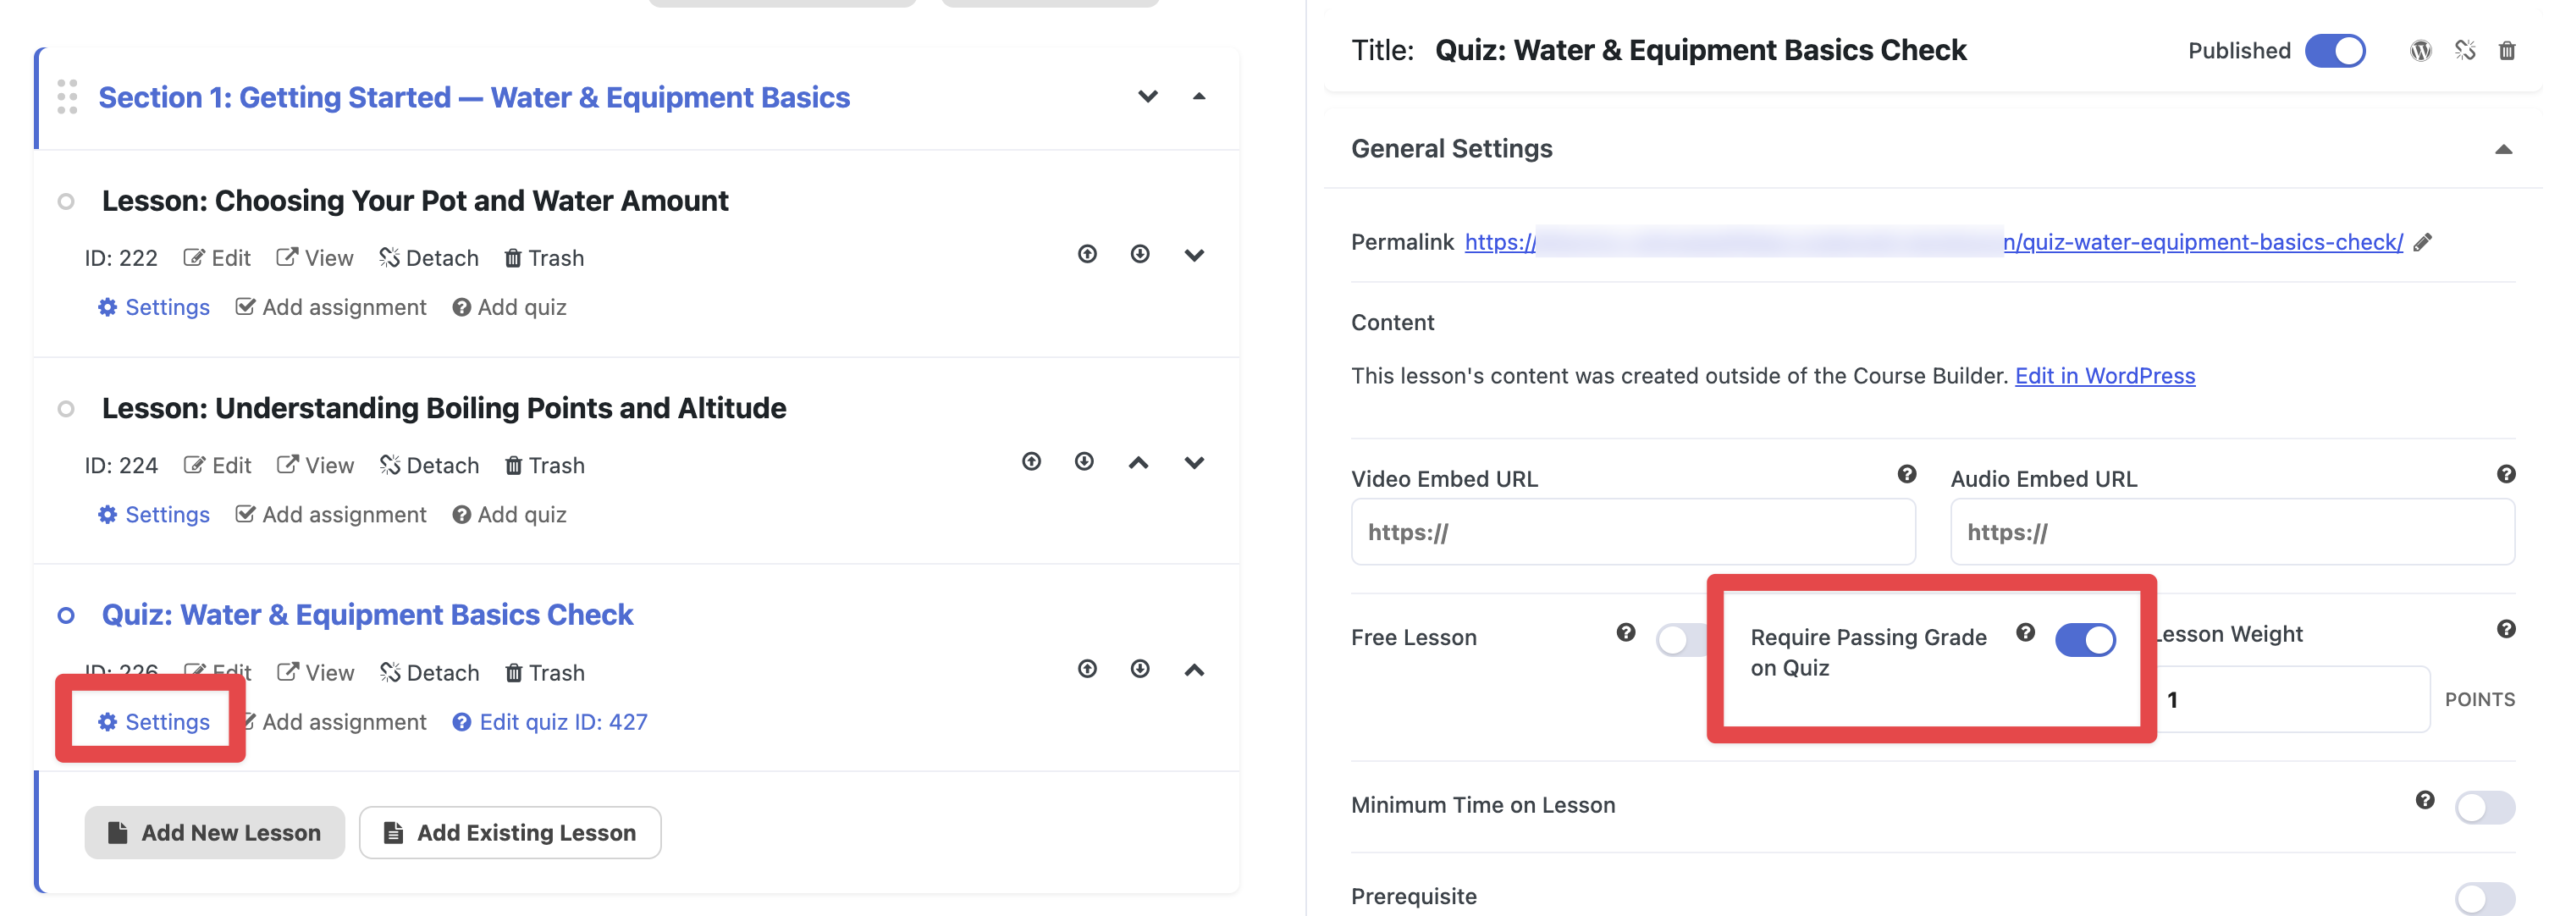
- Click the Settings button under the lesson, then toggle the switch next to “require a passing grade on Quiz” to ensure this lesson is marked complete only after the student passes the quiz.
- Click Save Changes inside the Course Builder.
Accreditation boards frequently ask students to upload an official certificate of completion bearing an issue date, license number, and CE hours. The LifterLMS PDFs add-on converts standard LifterLMS certificates into downloadable, printable, and shareable PDF documents.
To configure downloadable PDF certificates:
- Install and activate the LifterLMS PDFs add-on.
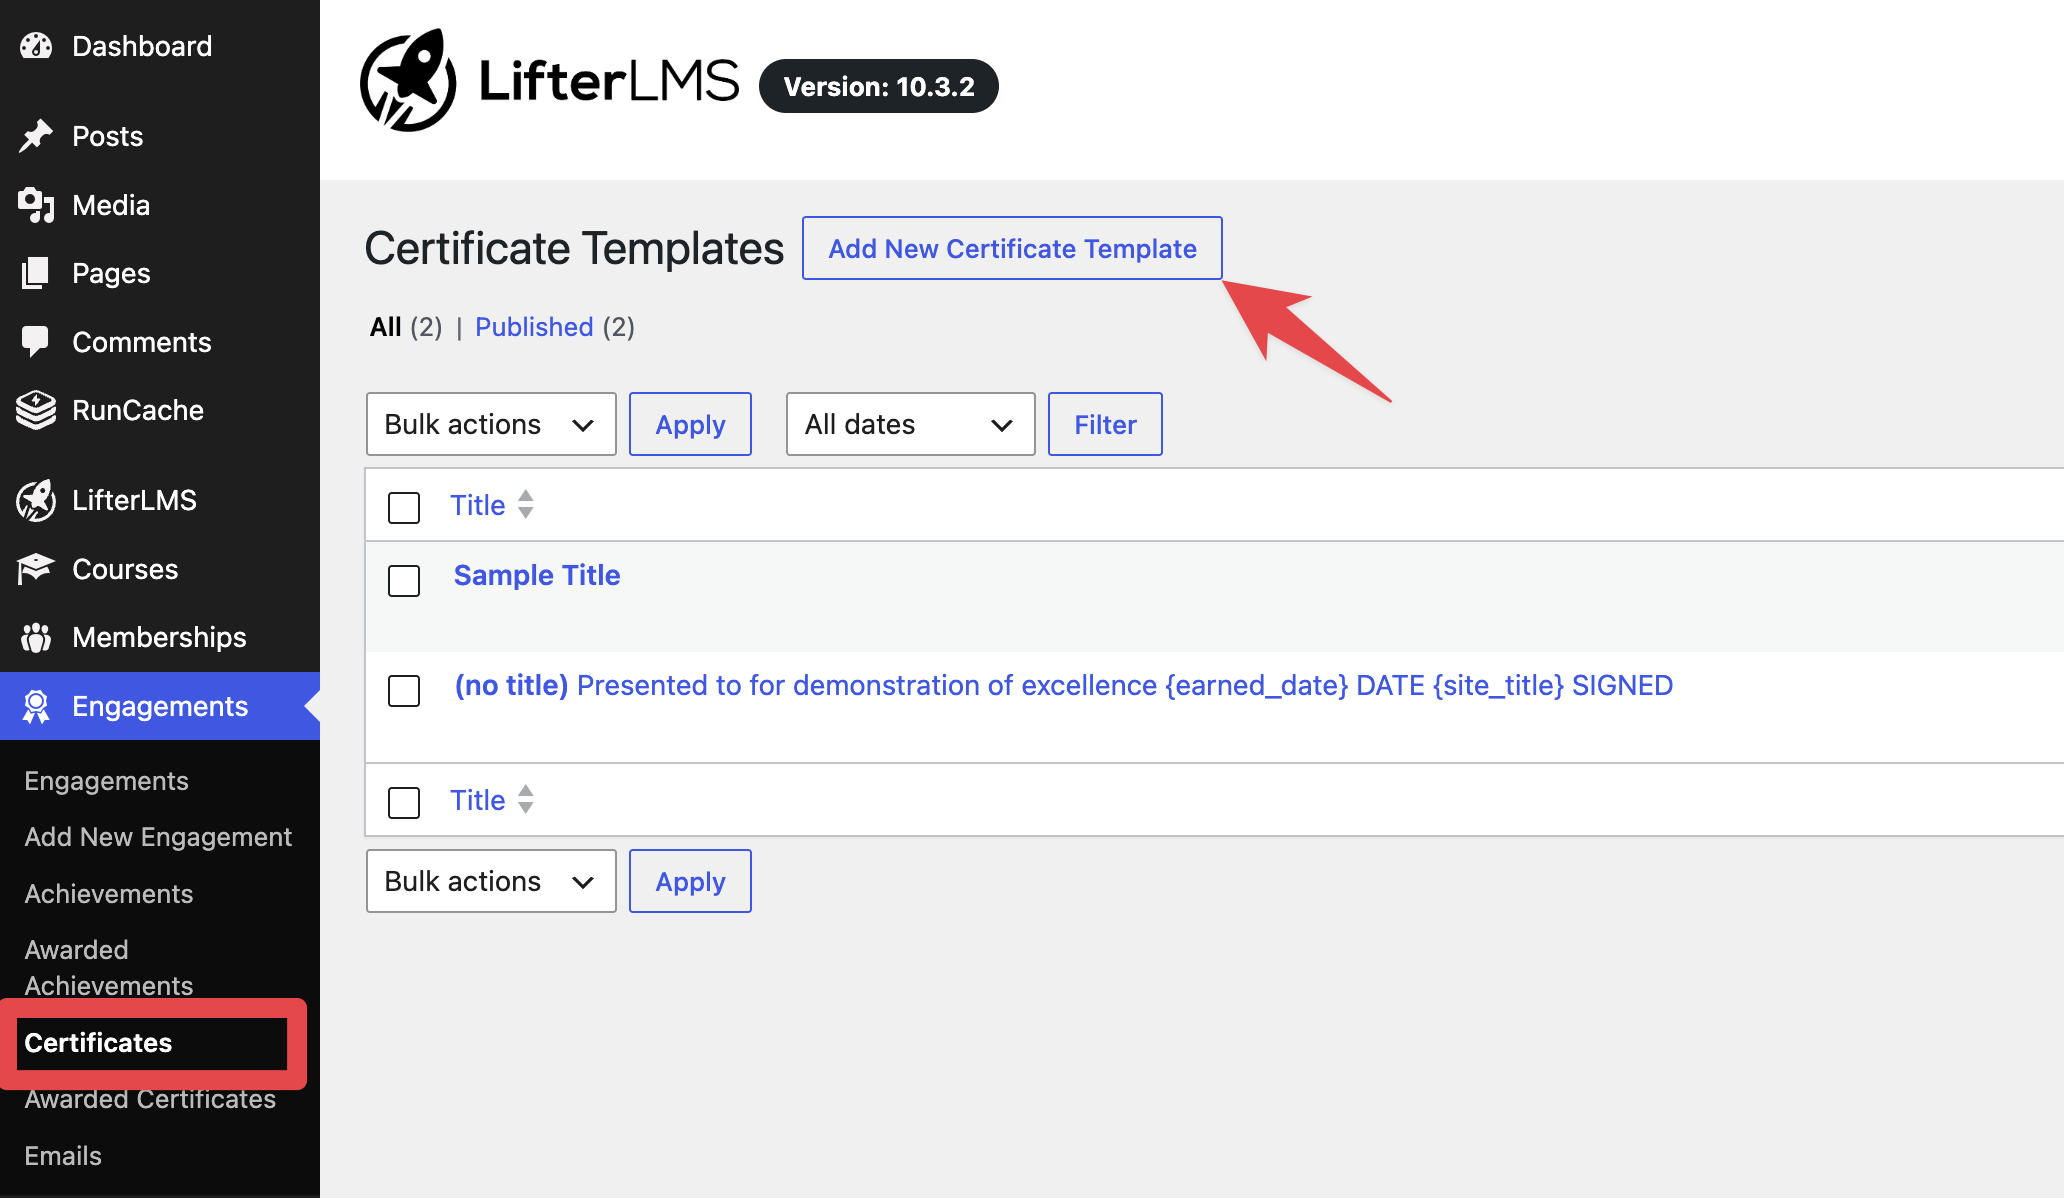
- Navigate to Engagements > Certificates.
- Click Add New Certificate Template or click Edit on an existing certificate template.
- Use LifterLMS merge codes and shortcodes to display student and course information, such as the student name, course title, and completion date.
To display the professional license number collected in Step 1, use the following shortcode:[llms-user ce_license_number]This retrieves the value stored against the student’s account, provided you usedce_license_numberas the User Meta Key when creating the field. For more information, see our guides on finding LifterLMS Custom Fields shortcodes and creating a certificate. If you also want to display CE credits on certificates, refer to the Continuing Education documentation for the relevant merge codes and their availability in your installed version. - After you have configured the certificate, click Publish to save the template.
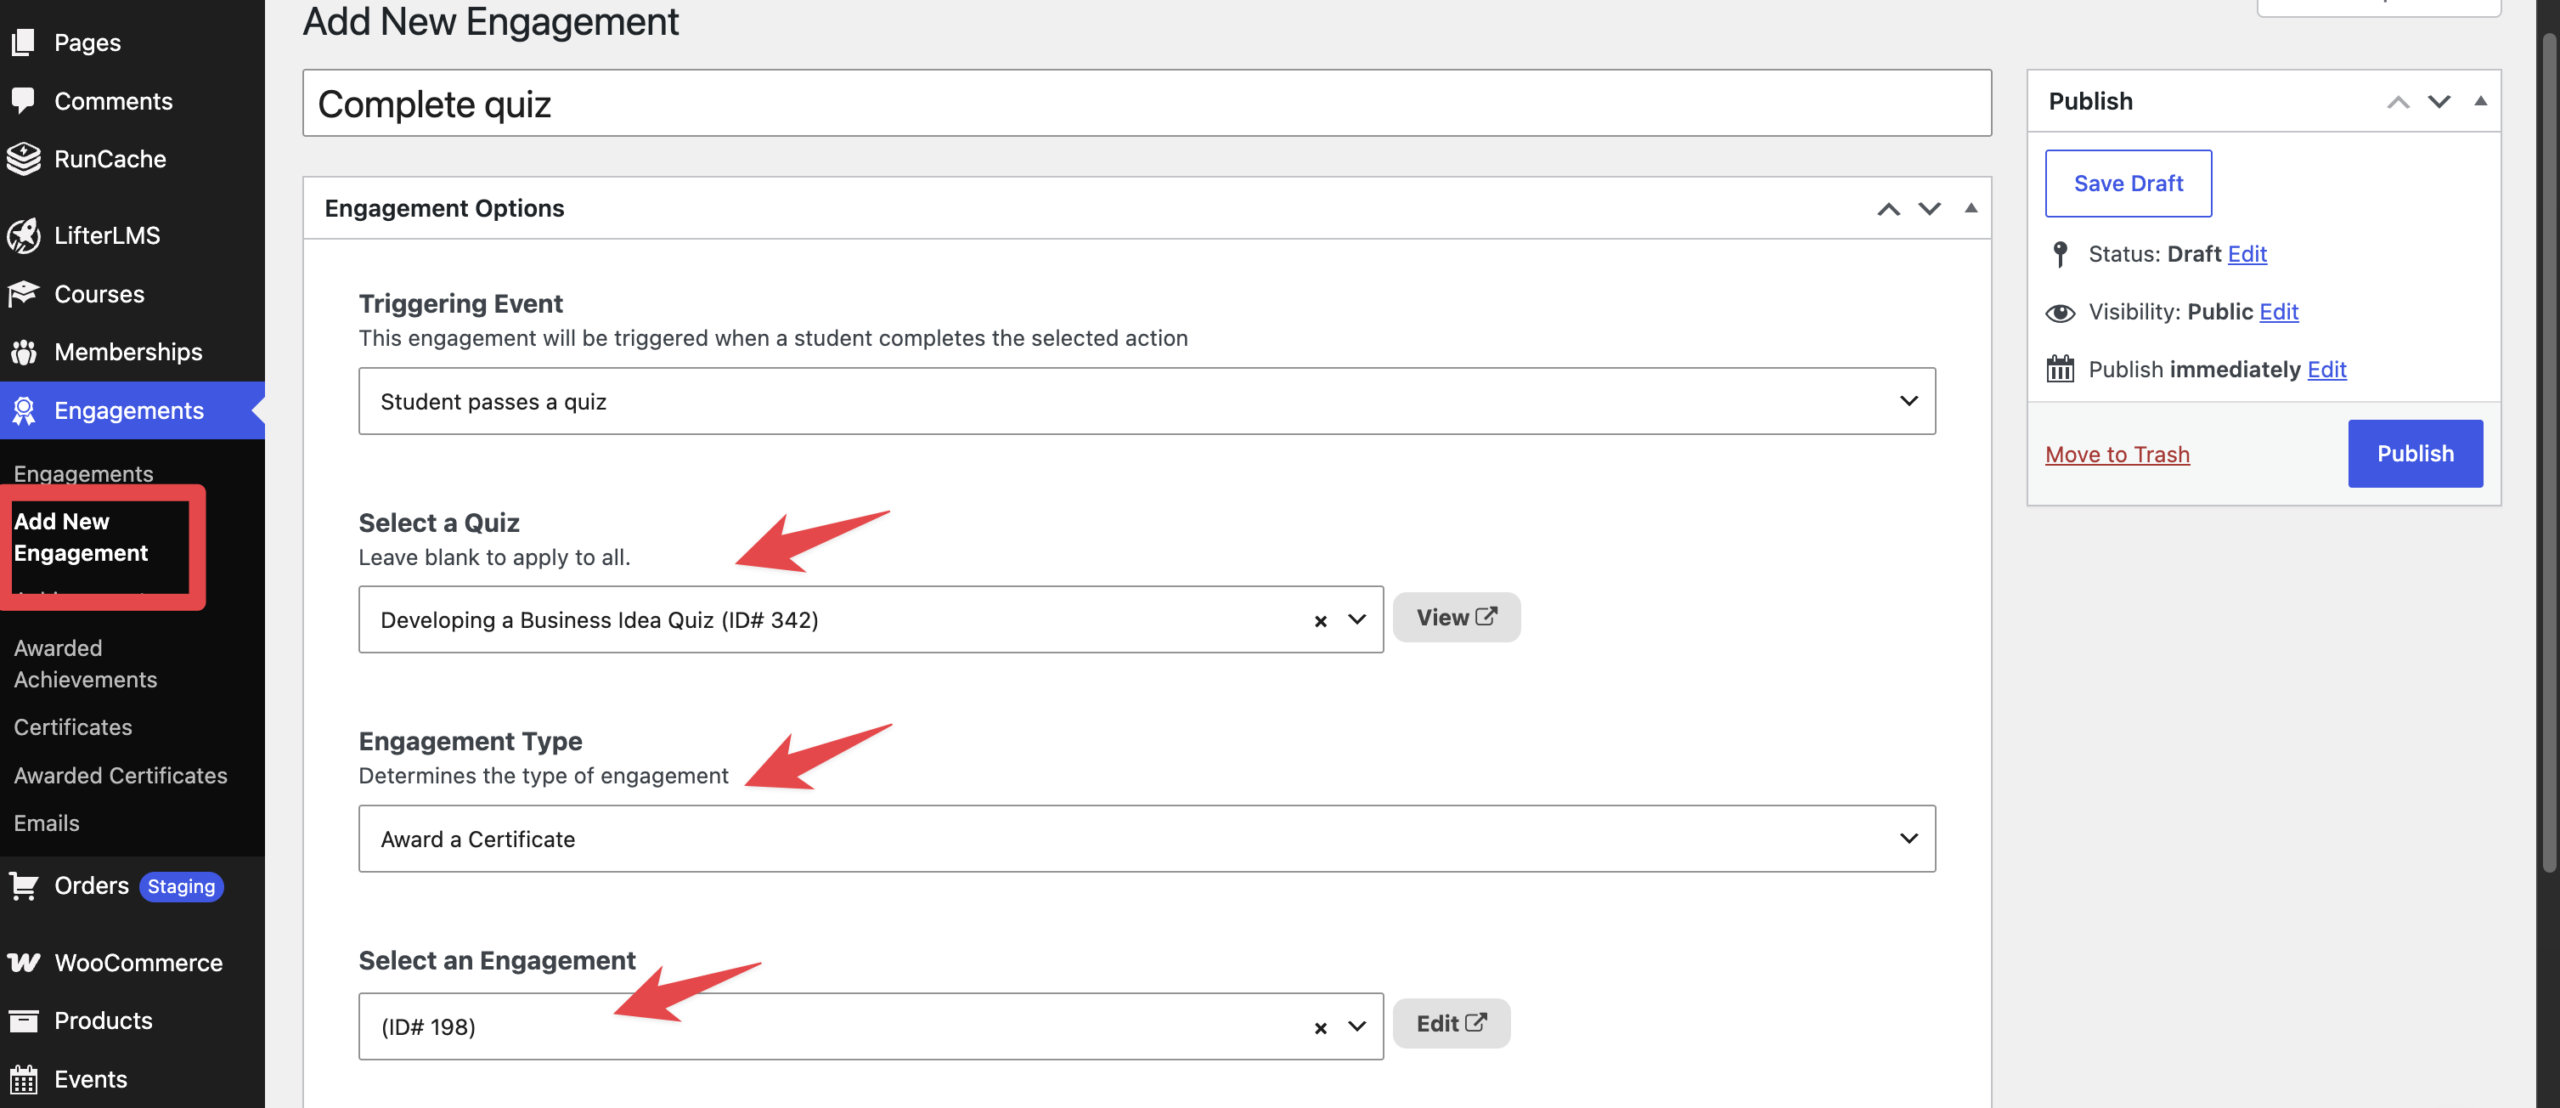
- Finally, navigate to Engagements > Add New Engagement. On this screen, you can configure the settings to automatically award a certificate based on certain events. For example, you can configure LifterLMS to award the certificate to a student after they complete a certain quiz.
Additionally, you can follow the steps in “How Do I Make My Certificates Shareable PDFs” to enable public verification URLs, allowing other visitors to verify certificate authenticity online.
LifterLMS includes built-in reporting screens that track enrollment, grades, and completion records. You can export this data into CSV files, inject your custom license fields directly into reporting tables, and fulfill data requests.
Standard Course and Student Exports
- Navigate to LifterLMS > Reporting.
- Click the “Courses” tab to select your course, and then click the “Students” sub-tab to see the roster.
- Review the enrolled learners, their progress, and completion dates.
- Click Export to download the Course Roster CSV file.
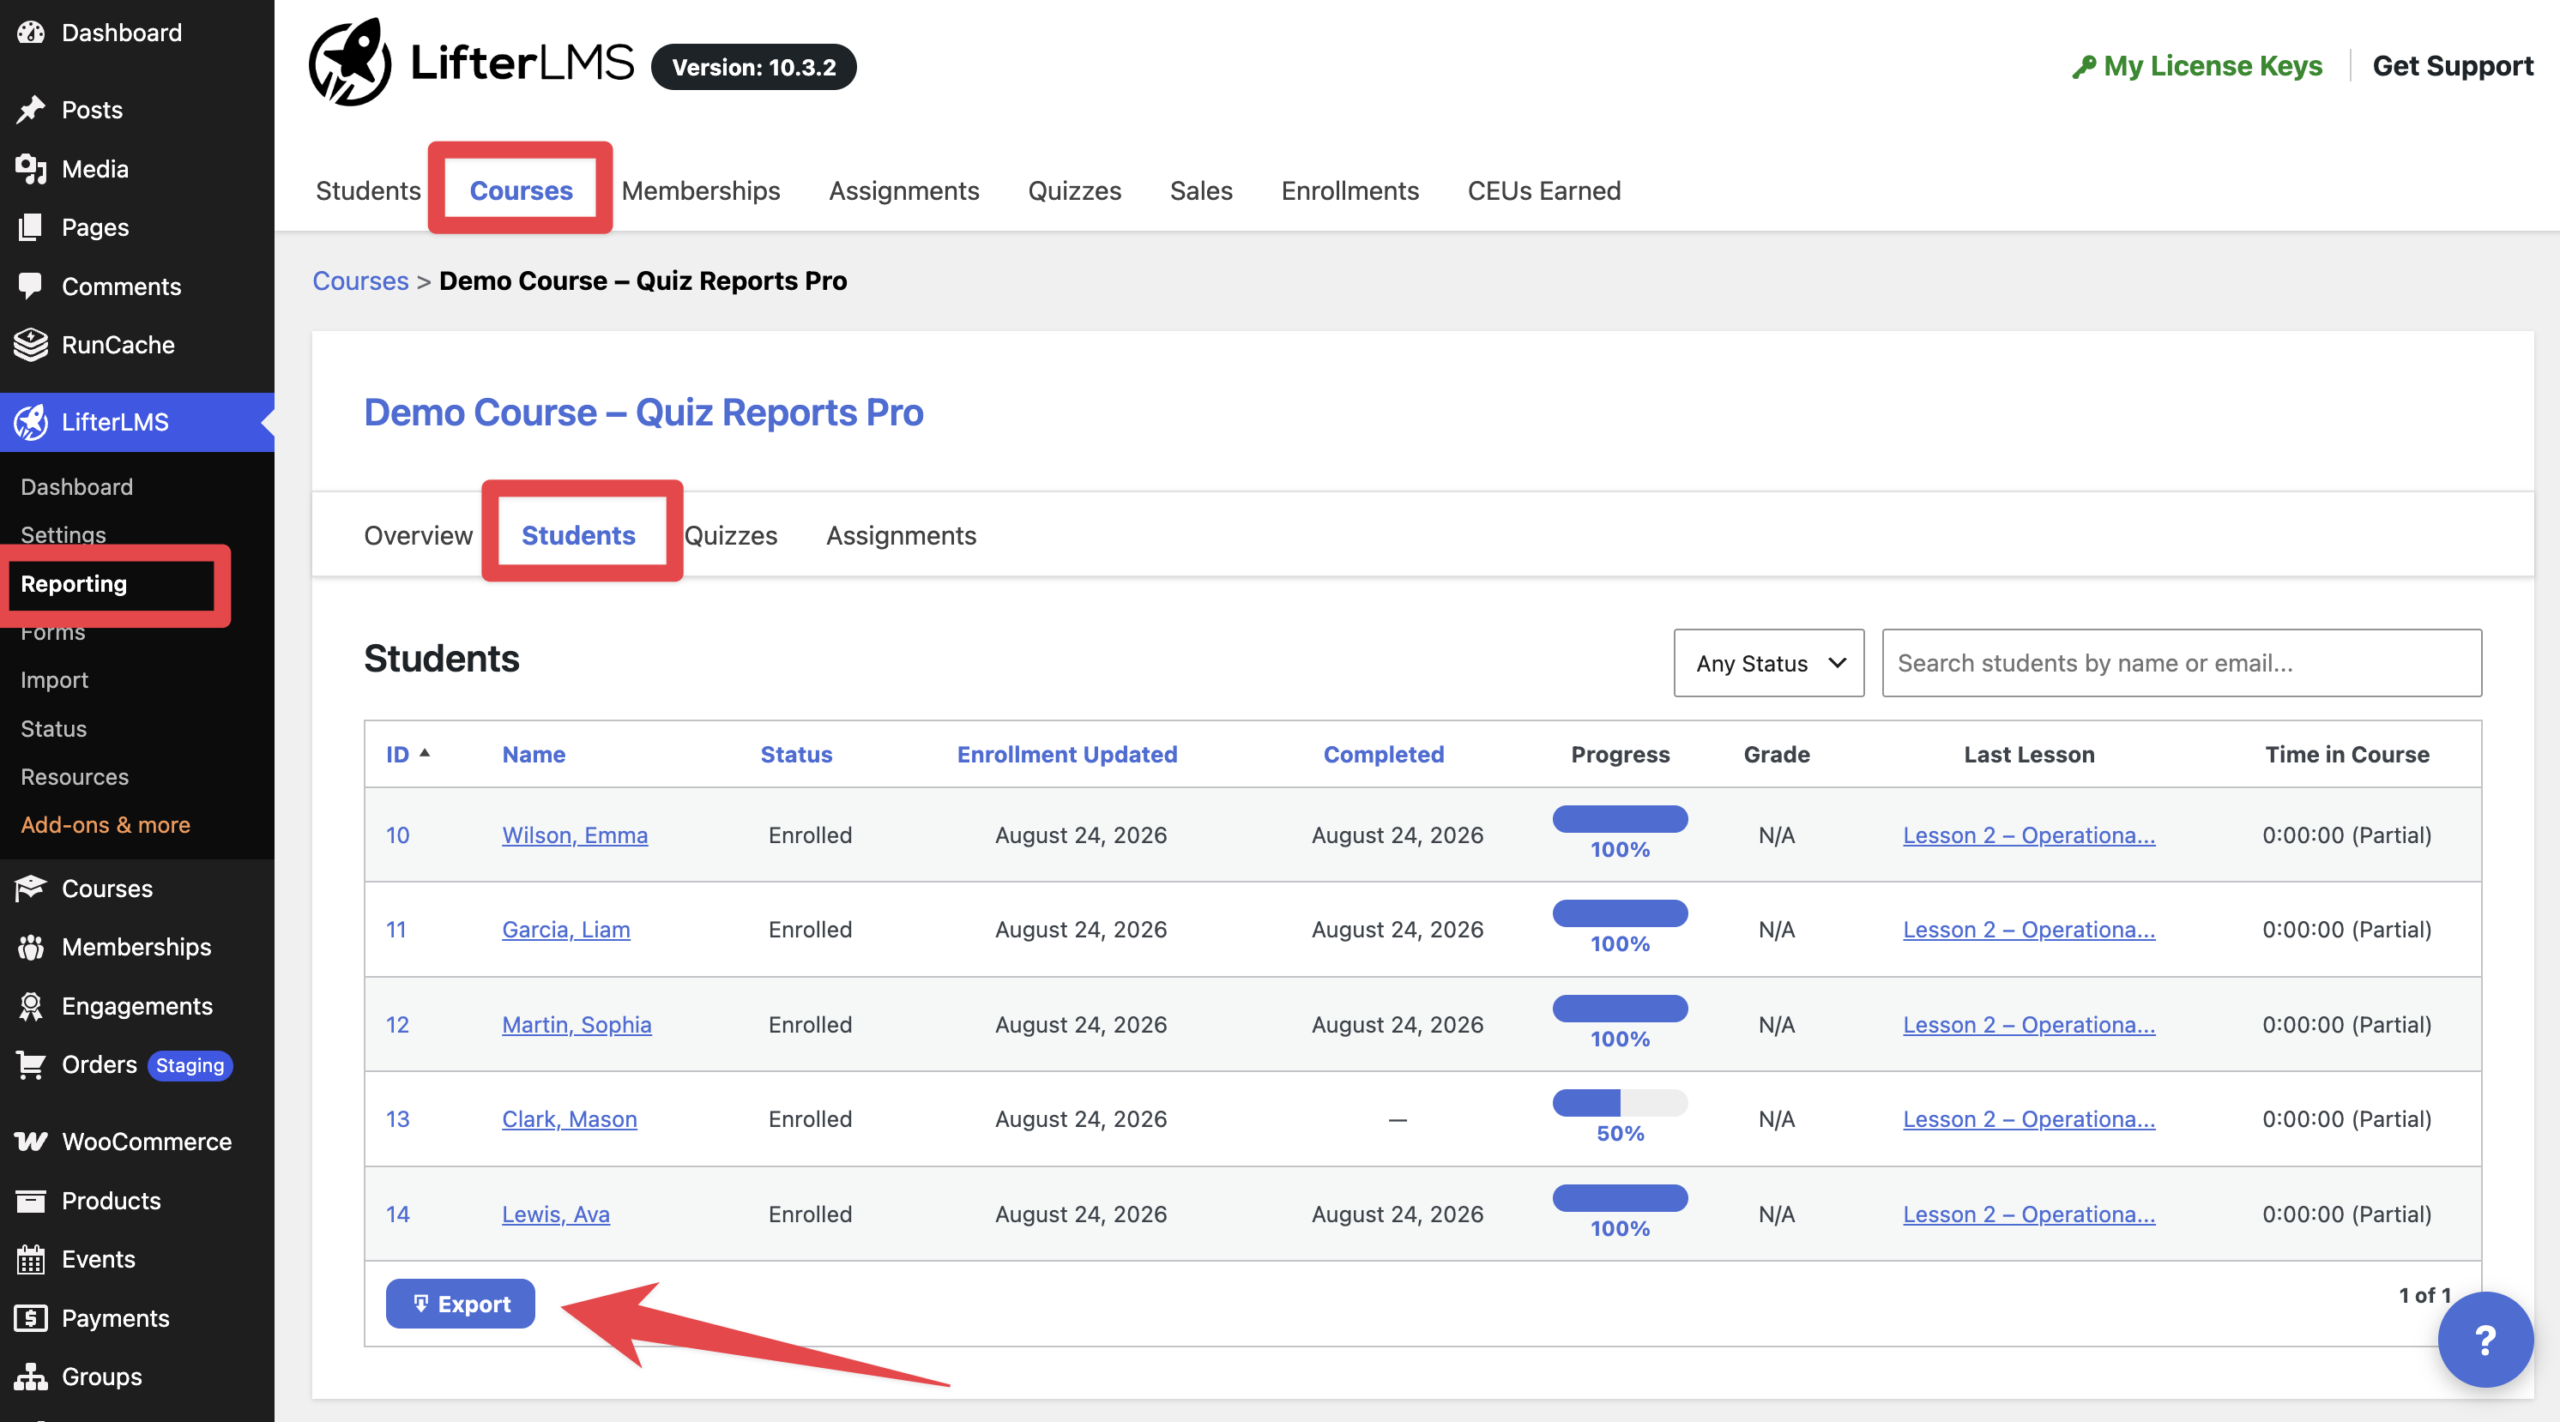
Here is an example of the Course Roster CSV downloaded from the previous step. This export includes enrolment status, completion dates, progress, and the overall course grade. The Grade column does not necessarily represent the score achieved on a particular quiz.
| id | Last Name | First Name | Status | Enrollment Updated | Completed | Progress | Grade | Time in Course | |
| 1 | abc | def | 123@example.com | Enrolled | June 29, 2026 | — | 11.11% | N/A | 0:00:18 (Partial) |
| 3 | abc | efg | 345@example.com | Cancelled | March 6, 2026 | — | 0% | N/A | 0:00:00 (Partial) |
| 4 | abc | pqr | 567@example.com | Enrolled | August 13, 2026 | — | 33.33% | 45.84% | 0:10:26 (Partial) |
- Alternatively, you can navigate to the top-level “Students” tab on the reporting dashboard to view details about all the students across all courses.
- Click Export to download the Master Student Directory CSV file, which contains student contact details and registration information.
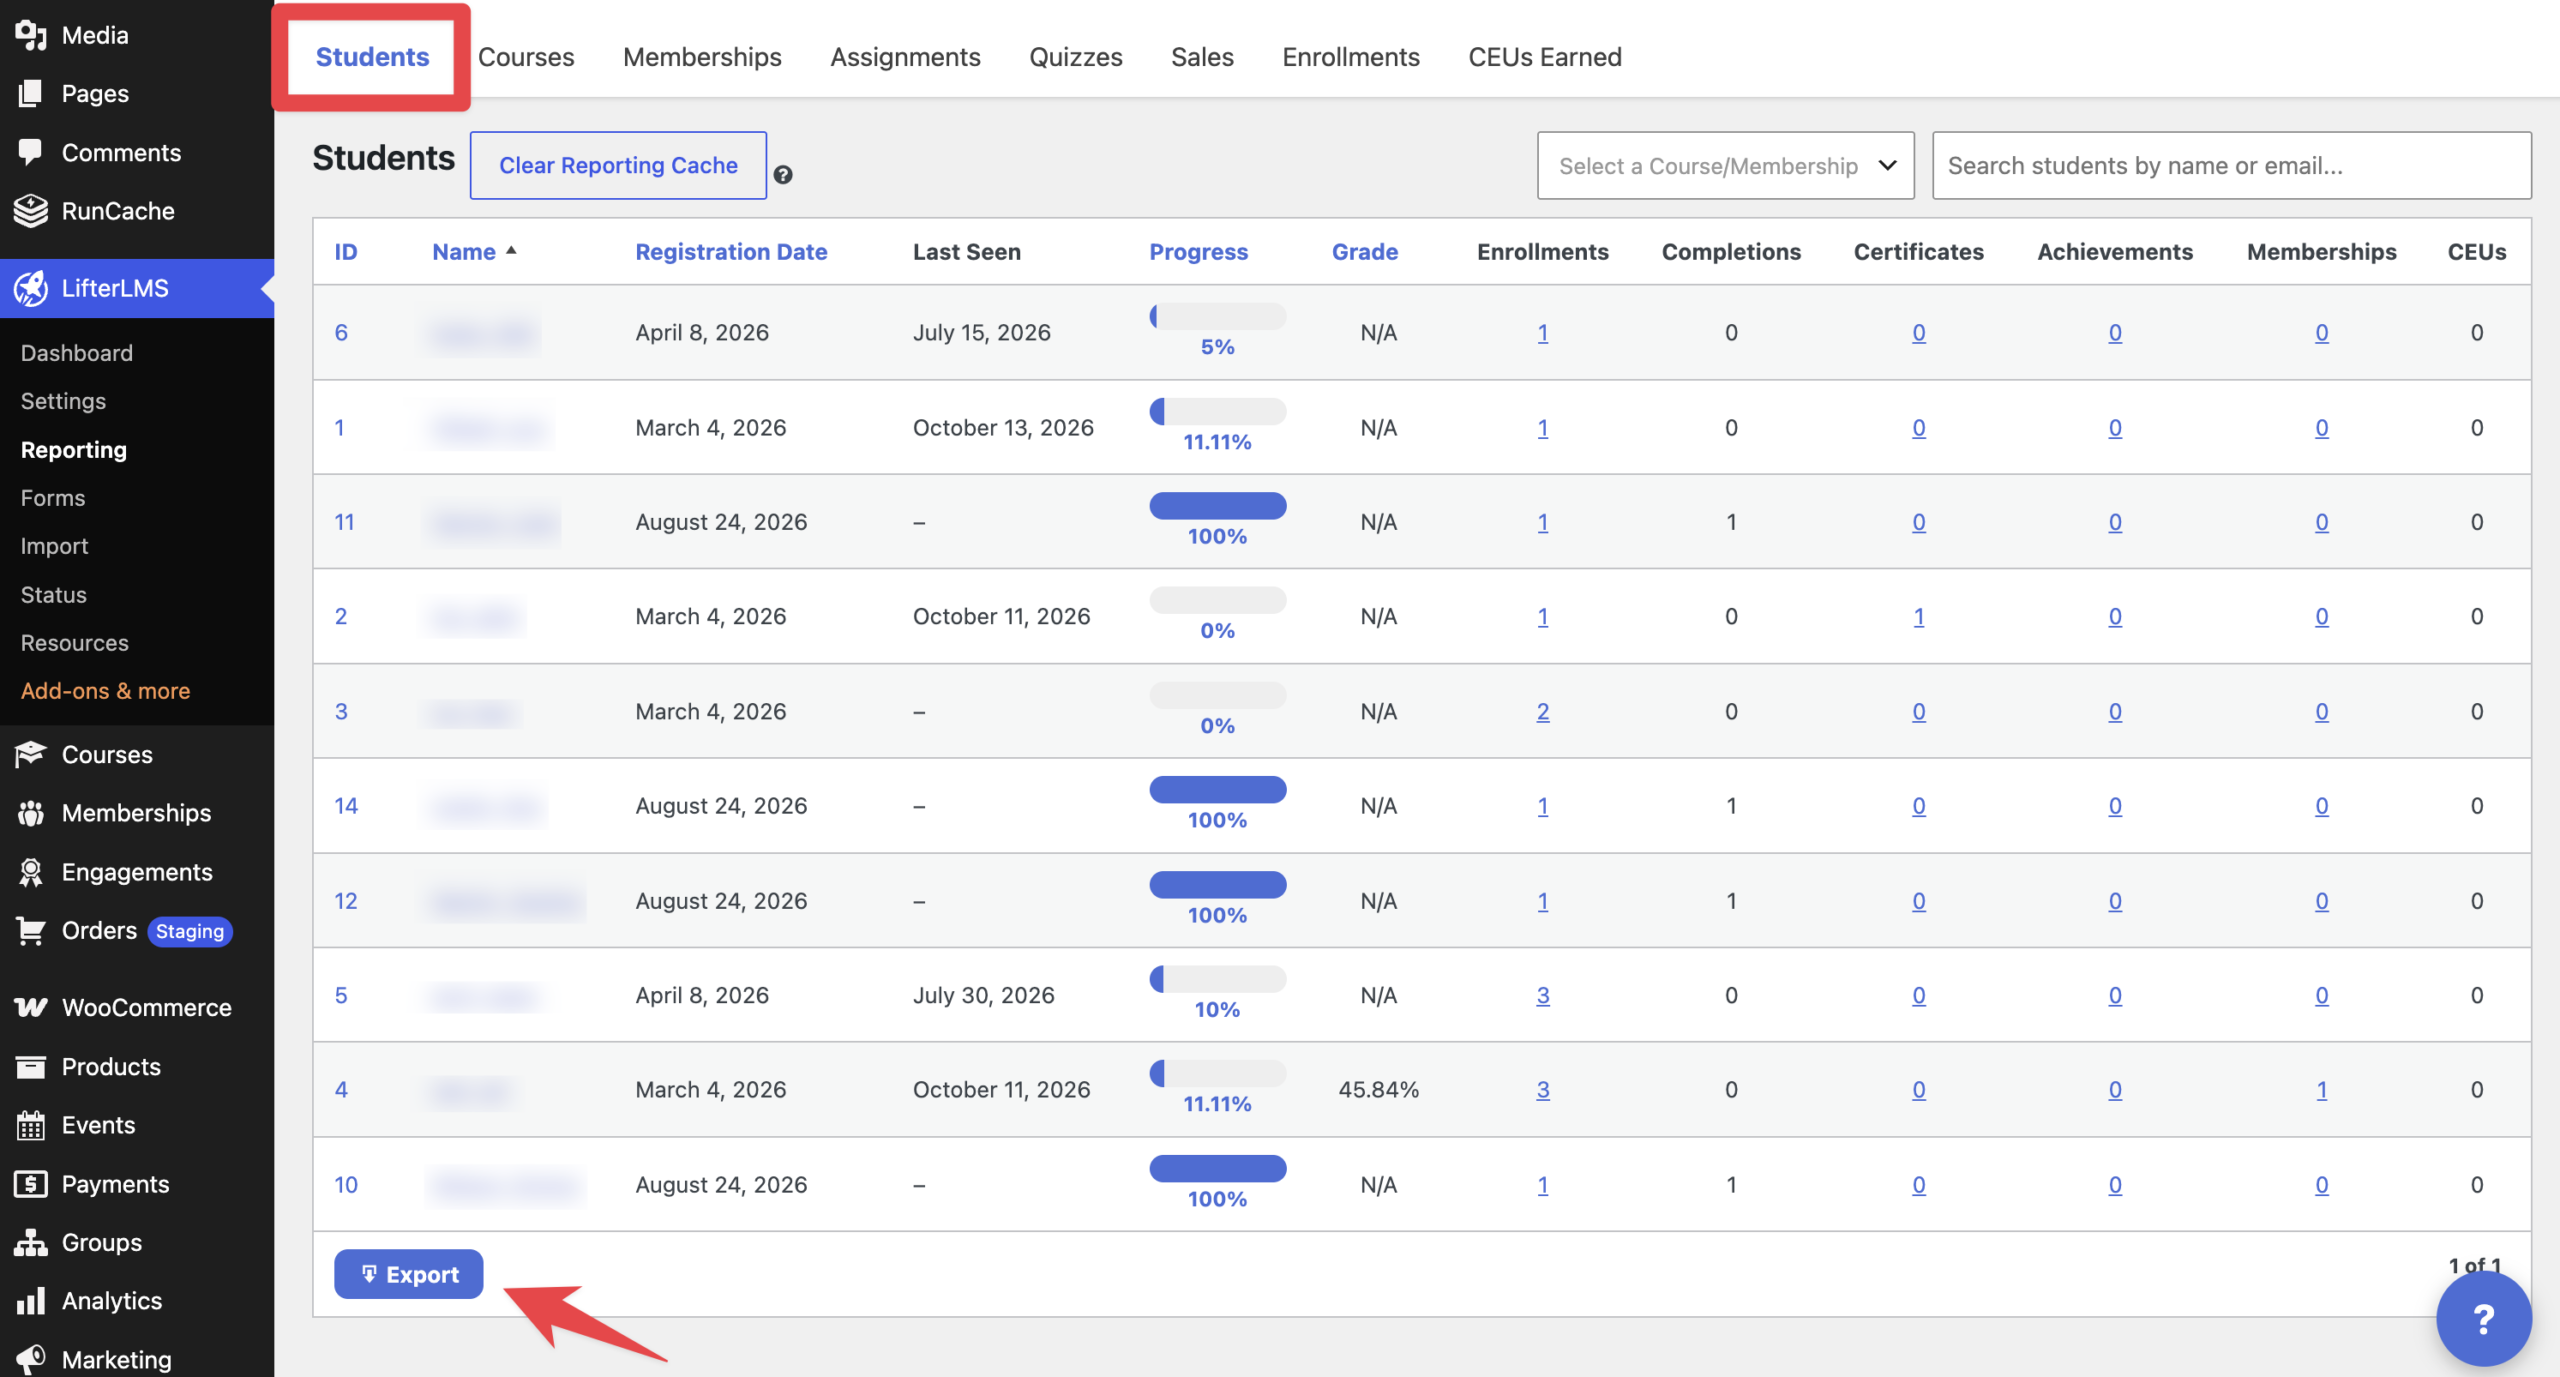
Here is an example of the CSV generated from the previous step:
| id | Last Name | First Name | Registration Date | Last Seen | Progress | Grade | Billing Address 1 | Billing Address 2 | Billing City | Billing State | Billing Zip | Billing Country | Phone | Courses (Enrolled) | Courses (Canceled) | Courses (Expired) | Memberships (Enrolled) | Memberships (Canceled) | Memberships (Expired) | |
| 6 | abcd@example.com | ab | cd | April 8, 2026 | July 15, 2026 | 5% | N/A | City1 | AL | 11001 | US | LifterLMS Quickstart Course | ||||||||
| 1 | admin@example.com | ad | min | March 4, 2026 | October 26, 2026 | 11.11% | N/A | City2 | AL | 110001 | US | Digital Entrepreneurship 101: The Fastest Path to Revenue | ||||||||
| 11 | demo@example.com | demo | demo | August 24, 2026 | – | 100% | N/A | Demo Course – Quiz Reports Pro |
The Master Student Directory CSV contains registration and contact information, including billing country, where these details have been collected. It does not include the completion date for each individual course or the student’s professional license number by default.
To add custom fields such as professional license numbers, follow the instructions in the next section.
Exporting Earned Continuing Education Credits
If you have the Continuing Education add-on installed, you can also view and export records of the CE credits your students have earned.
- Navigate to LifterLMS > Reporting.
- Click the CEUs Earned tab.
- Review the available records, including the student, earned date, and expiry date.
- Click Export to download the report as a CSV file.
This report provides a record of earned continuing education credits. You can use it alongside the standard course and student exports when preparing a report for a licensing board.
For more information, see the Continuing Education documentation.
Adding Custom Columns Directly to Reporting Tables and Export Files
By default, the standard reporting export outputs default account and course fields. If you want custom fields (such as your ce_license_number) to appear directly as columns inside the LifterLMS reporting table and in the downloadable CSV file, use the developer hooks provided by LifterLMS.
Our guide on adding custom columns to reporting tables and export files includes a working PHP example for displaying custom user fields in the Students reporting table and CSV export. To adapt it for the professional license number field created earlier:
- Open your child theme’s functions.php file or use a code snippets plugin.
- Hook into llms_table_get_students_columns to define the header for your custom column (for example, “License Number”).
- Hook into llms_table_get_data_students to pull the ce_license_number value from user meta and output it into the table row and the exported CSV.
- Set ‘exportable’ => true in your column definition array.
- Save your code snippet.
Once this snippet is active, your custom license numbers will now appear in the WordPress dashboard table and in the CSV export.
Student Data Audits and Privacy Compliance
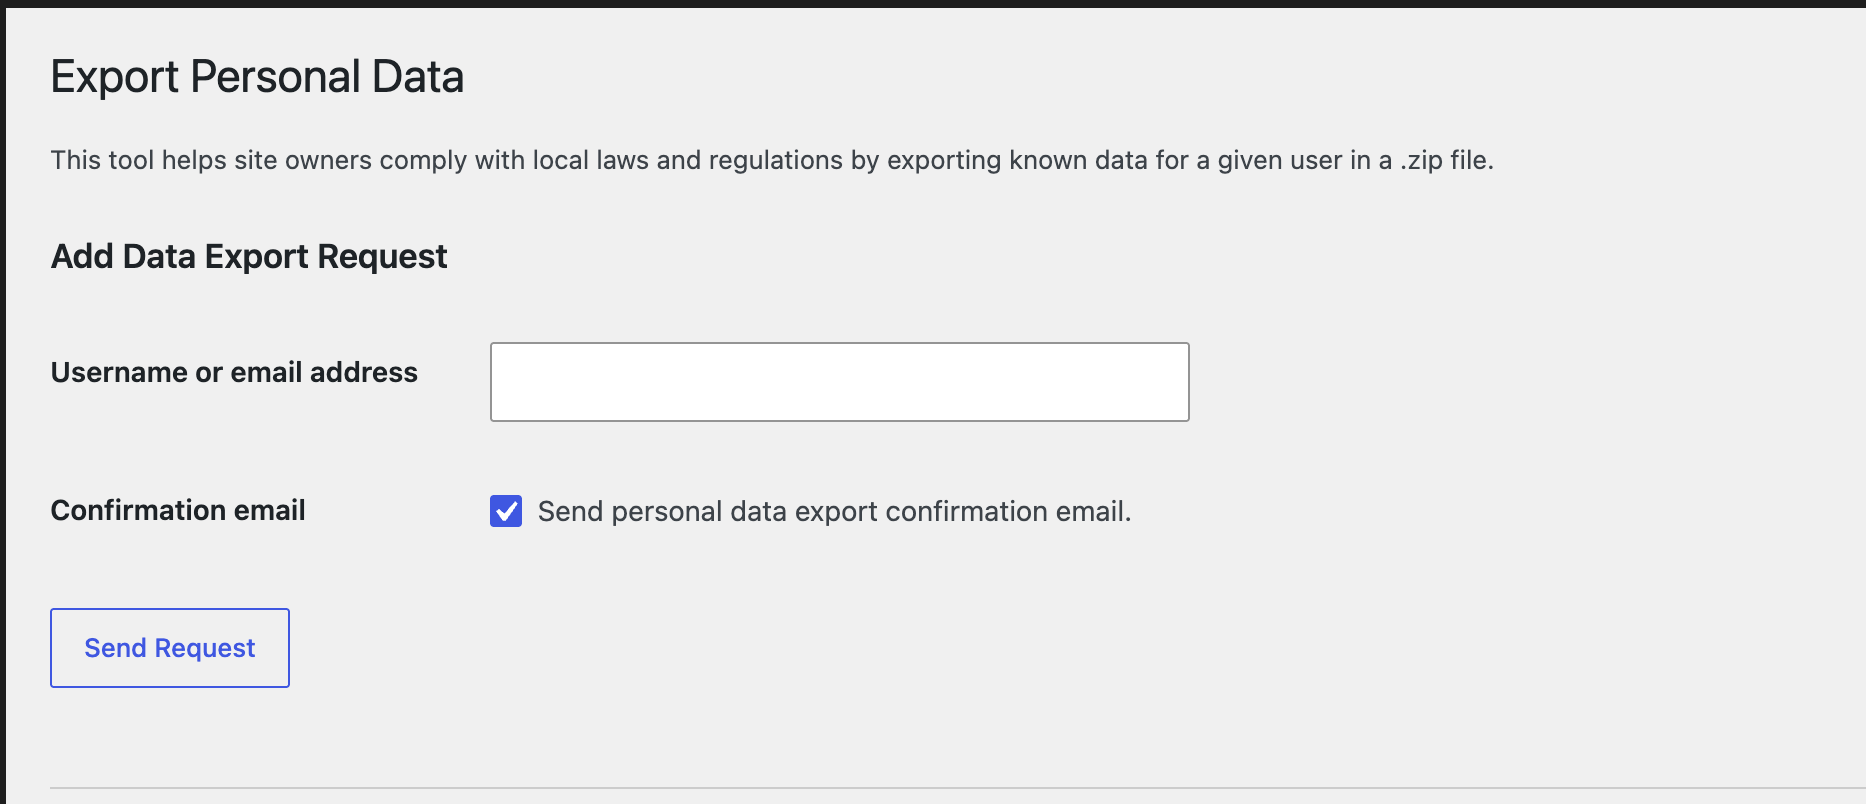
If an individual licensee or an auditor requests a comprehensive record of an individual’s personal data, LifterLMS integrates with the native WordPress privacy tools. Refer to the documentation on Student Data Export and Erasure to generate a unified personal data file under Tools > Export Personal Data.
What the Standard Reports Do Not Include
LifterLMS provides several reporting and export options, but the standard course and student CSV exports don’t contain every field a licensing board might request.
Depending on your reporting requirements, you may need to collect or combine additional information:
- Instructor: The standard Course Roster CSV does not include the assigned instructor. You can obtain this information from the course settings and add it to your report.
- Continuing education credits: The standard course and student exports do not include earned CE credits. The Continuing Education add-on provides separate reporting for awarded credits.
- Individual quiz scores: The Grade column in the Course Roster CSV represents the overall course grade, not necessarily the result of a specific quiz. If your licensing board requires an assessment score, retrieve the relevant quiz attempt from the quiz reporting screens.
- Professional license numbers: These are not standard LifterLMS account fields. You can collect them using Custom Fields and include them in the Students export using the custom reporting method described above.
- Missing contact details: The Students export includes fields for addresses, country, and phone numbers, but these may be empty if the information was not collected during registration or checkout.
If your licensing board requires all these details in a single CSV, you will need to combine the relevant records, configure an automation that can retrieve the required information, or create a custom reporting solution.
The next section explains these options.
When an accrediting board requires every data point (student identity, full physical address, license number, course name, instructor, and completion score) in a single spreadsheet, choose one of these methods:
Method A: Spreadsheet Matching (XLOOKUP)
If you prepare continuing education reports periodically, such as monthly or quarterly, you can combine the relevant records using Microsoft Excel or Google Sheets.
- From LifterLMS > Reporting > Courses, select the relevant course, open the Students tab, and download the Course Roster CSV. This provides student IDs, enrolment details, completion dates, progress, and overall course grades.
- Open LifterLMS > Reporting > Students and download the Master Student Directory CSV. This contains student contact information and any custom fields you have configured for export.
- If you use the Continuing Education add-on, open the CEUs Earned reporting tab and export the available credit records.
- If your licensing board requires an individual assessment score, open LifterLMS > Reporting > Quizzes and locate the relevant student’s quiz attempt. Check which attempt and score your licensing board requires.
- Open the Course Roster CSV in Excel or Google Sheets. Use this as the starting point for your report.
- Use an XLOOKUP or VLOOKUP formula to match each student to the Master Student Directory using their WordPress user ID. Bring across the required contact information and professional license number. Where possible, use the user ID rather than the student’s name to avoid mismatching records.
- Add the required assessment scores, assigned course instructor, and CE credit information from their respective records. Match each value to the correct student and course. Depending on the available export fields, some information may need to be entered manually or retrieved through a custom query.
- Arrange the data into the column structure shown in the downloadable sample CSV below.
- Check the completed spreadsheet for missing information, incorrect scores, duplicate records, and mismatched student details.
- Save the completed report as a CSV file in the format required by your licensing board.
For larger volumes of reporting data, you may prefer to create a custom reporting solution rather than combining the files manually each time.
Method B: Live Logging with Uncanny Automator or Zapier
If you regularly submit continuing education reports, you may want to record course completions in a spreadsheet automatically.
Tools such as Uncanny Automator can connect LifterLMS events to other services, including Google Sheets. For more advanced reporting requirements, you can also develop a custom solution using the LifterLMS REST API.
To set up a basic course-completion workflow with Uncanny Automator:
- Install and activate Uncanny Automator.
- Create a recipe using the LifterLMS course-completion trigger.
- Add a Google Sheets action to create a new row in a spreadsheet.
- Map the data available from your trigger and connected actions to the appropriate columns.
- Run a test completion and check that the expected information appears in Google Sheets.
The standard course-completion trigger does not necessarily include all the fields required for continuing education reporting.
For example, retrieving an individual quiz score, earned CE credits, the assigned instructor, or a custom professional license number may require additional actions, custom development, or API requests.
Before relying on an automated report, confirm that your workflow can retrieve all the information required by your licensing board. Test it against completed student records and check that every field contains the correct value.
For more information, see the LifterLMS Podcast on Uncanny Automator and the LifterLMS REST API documentation.