Using the Course Builder
The course builder lets you manage the structure and outline of your courses. This structure or outline is what is displayed as the course syllabus on the front end of your LifterLMS courses.
From the course builder, you can create new sections and lessons, manage the order in which they are listed, and edit their titles. You can also delete lessons and sections from the course builder. The course builder is also where you create quizzes for your students. If the LifterLMS Assignments add-on is installed and activated, the course builder is also where you can create assignments for your students.
To help you find information about the course builder as fast as possible, this document follows the high-level organization below:
- A brief history of the course builder
- A quick 12-minute video demonstration of the course builder
- How to access, save changes, and exit the course builder
- How to create, reorder, expand, collapse, and delete sections
- How to create, edit, clone, attach, detach, and delete lessons
- How to edit lesson settings
- How to create quizzes
- How to create assignments
There are three ways to access the course builder.
- Use the course builder link under the course name.
- Use the Launch Course Builder button in the header of the block editor.
- Use the Launch Course Builder button in the course settings sidebar.
Method 1. Using the course builder link under the course name.
Step 1. Navigate to WordPress Dashboard > Courses.
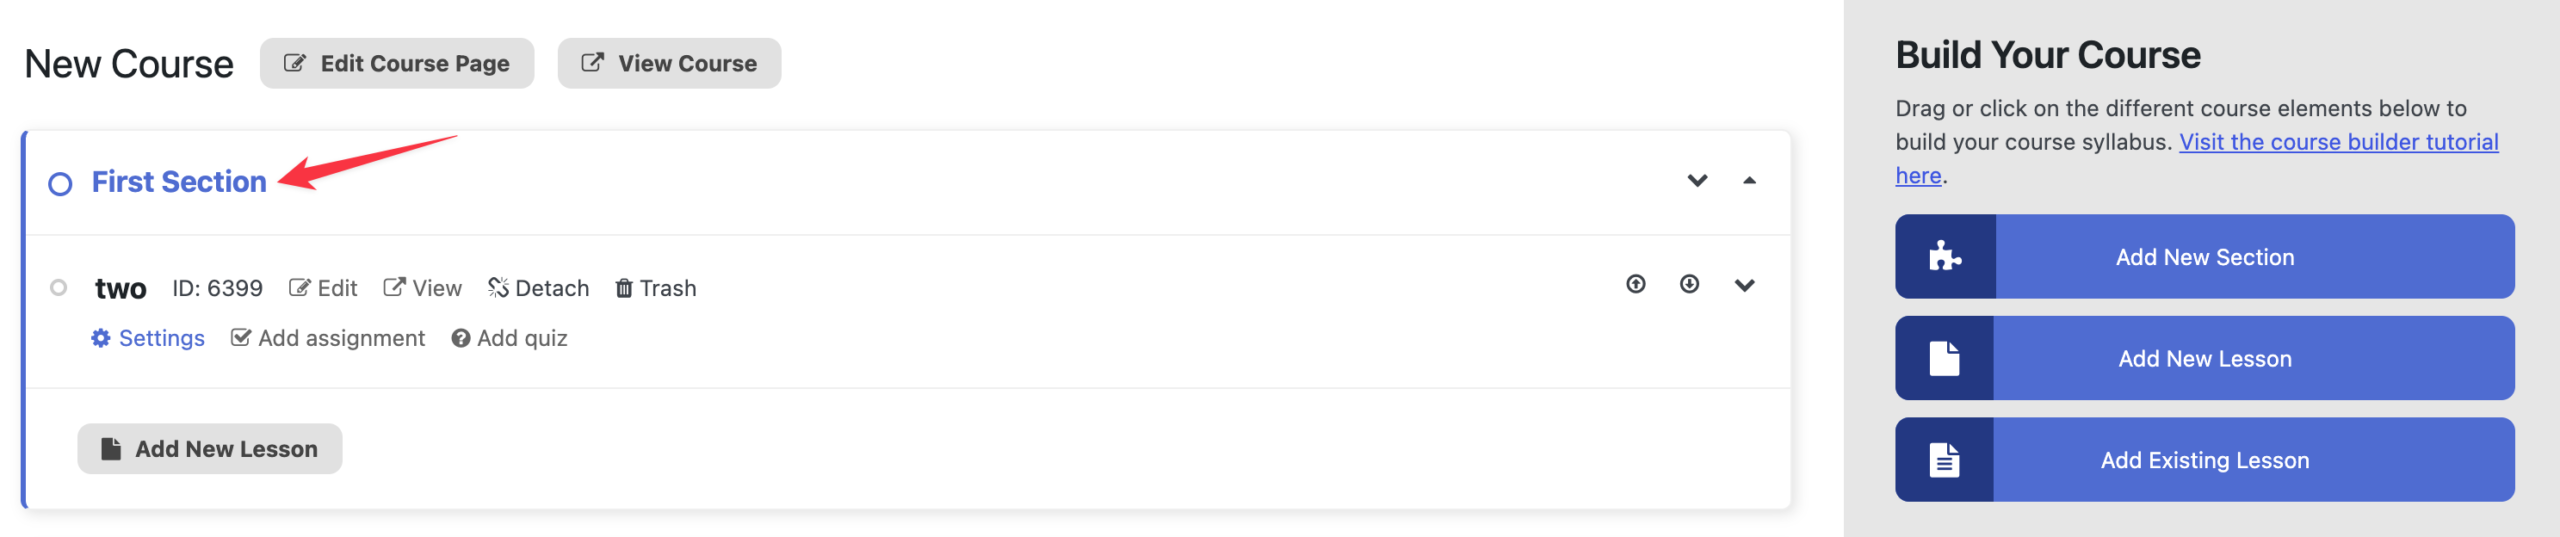
Step 2. Hover under the course name of the course you want to edit, and click on the Builder link.
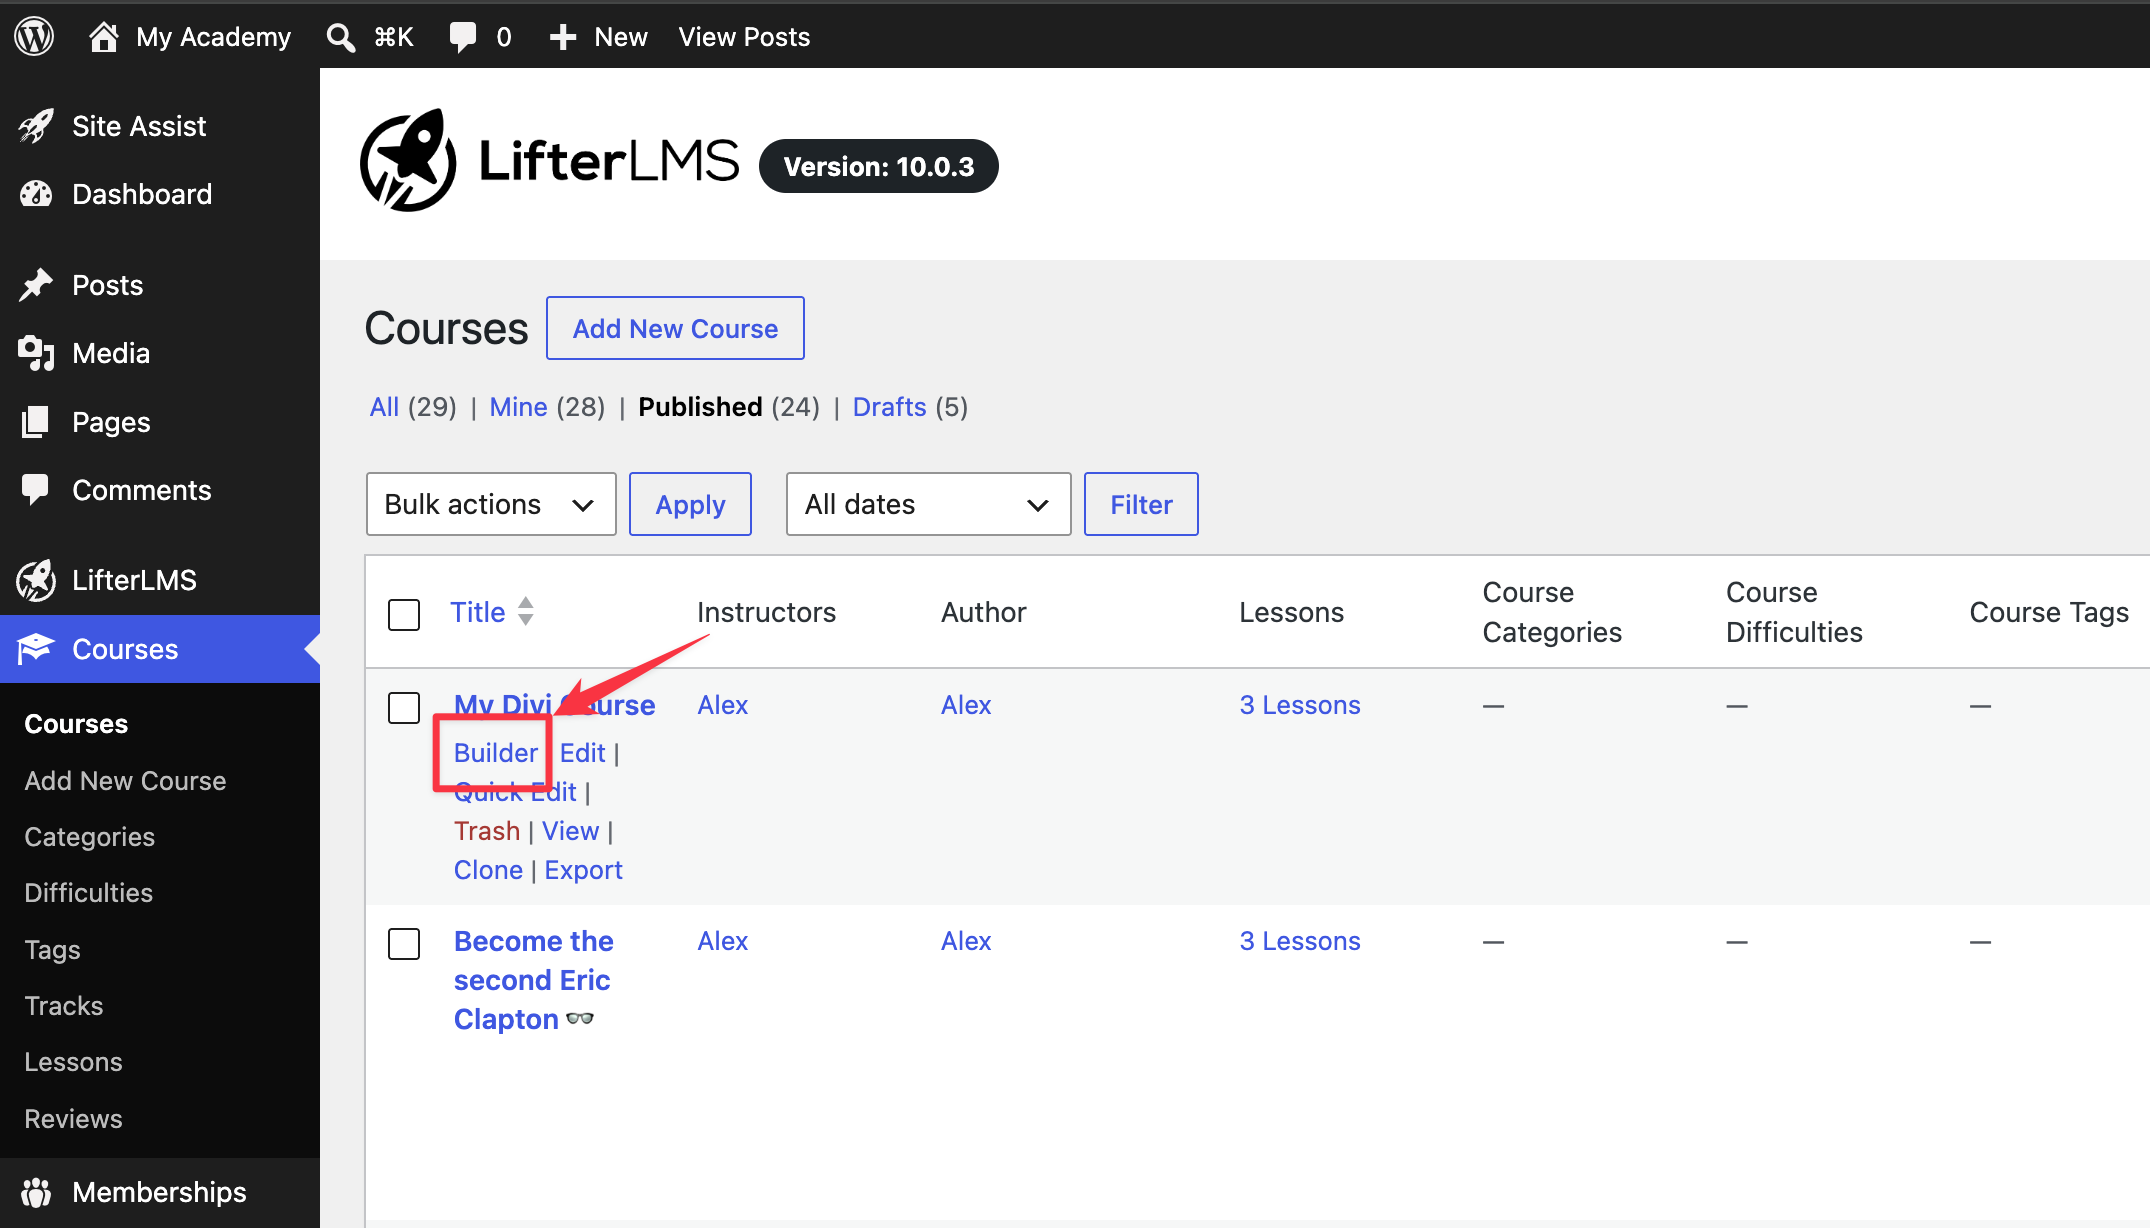
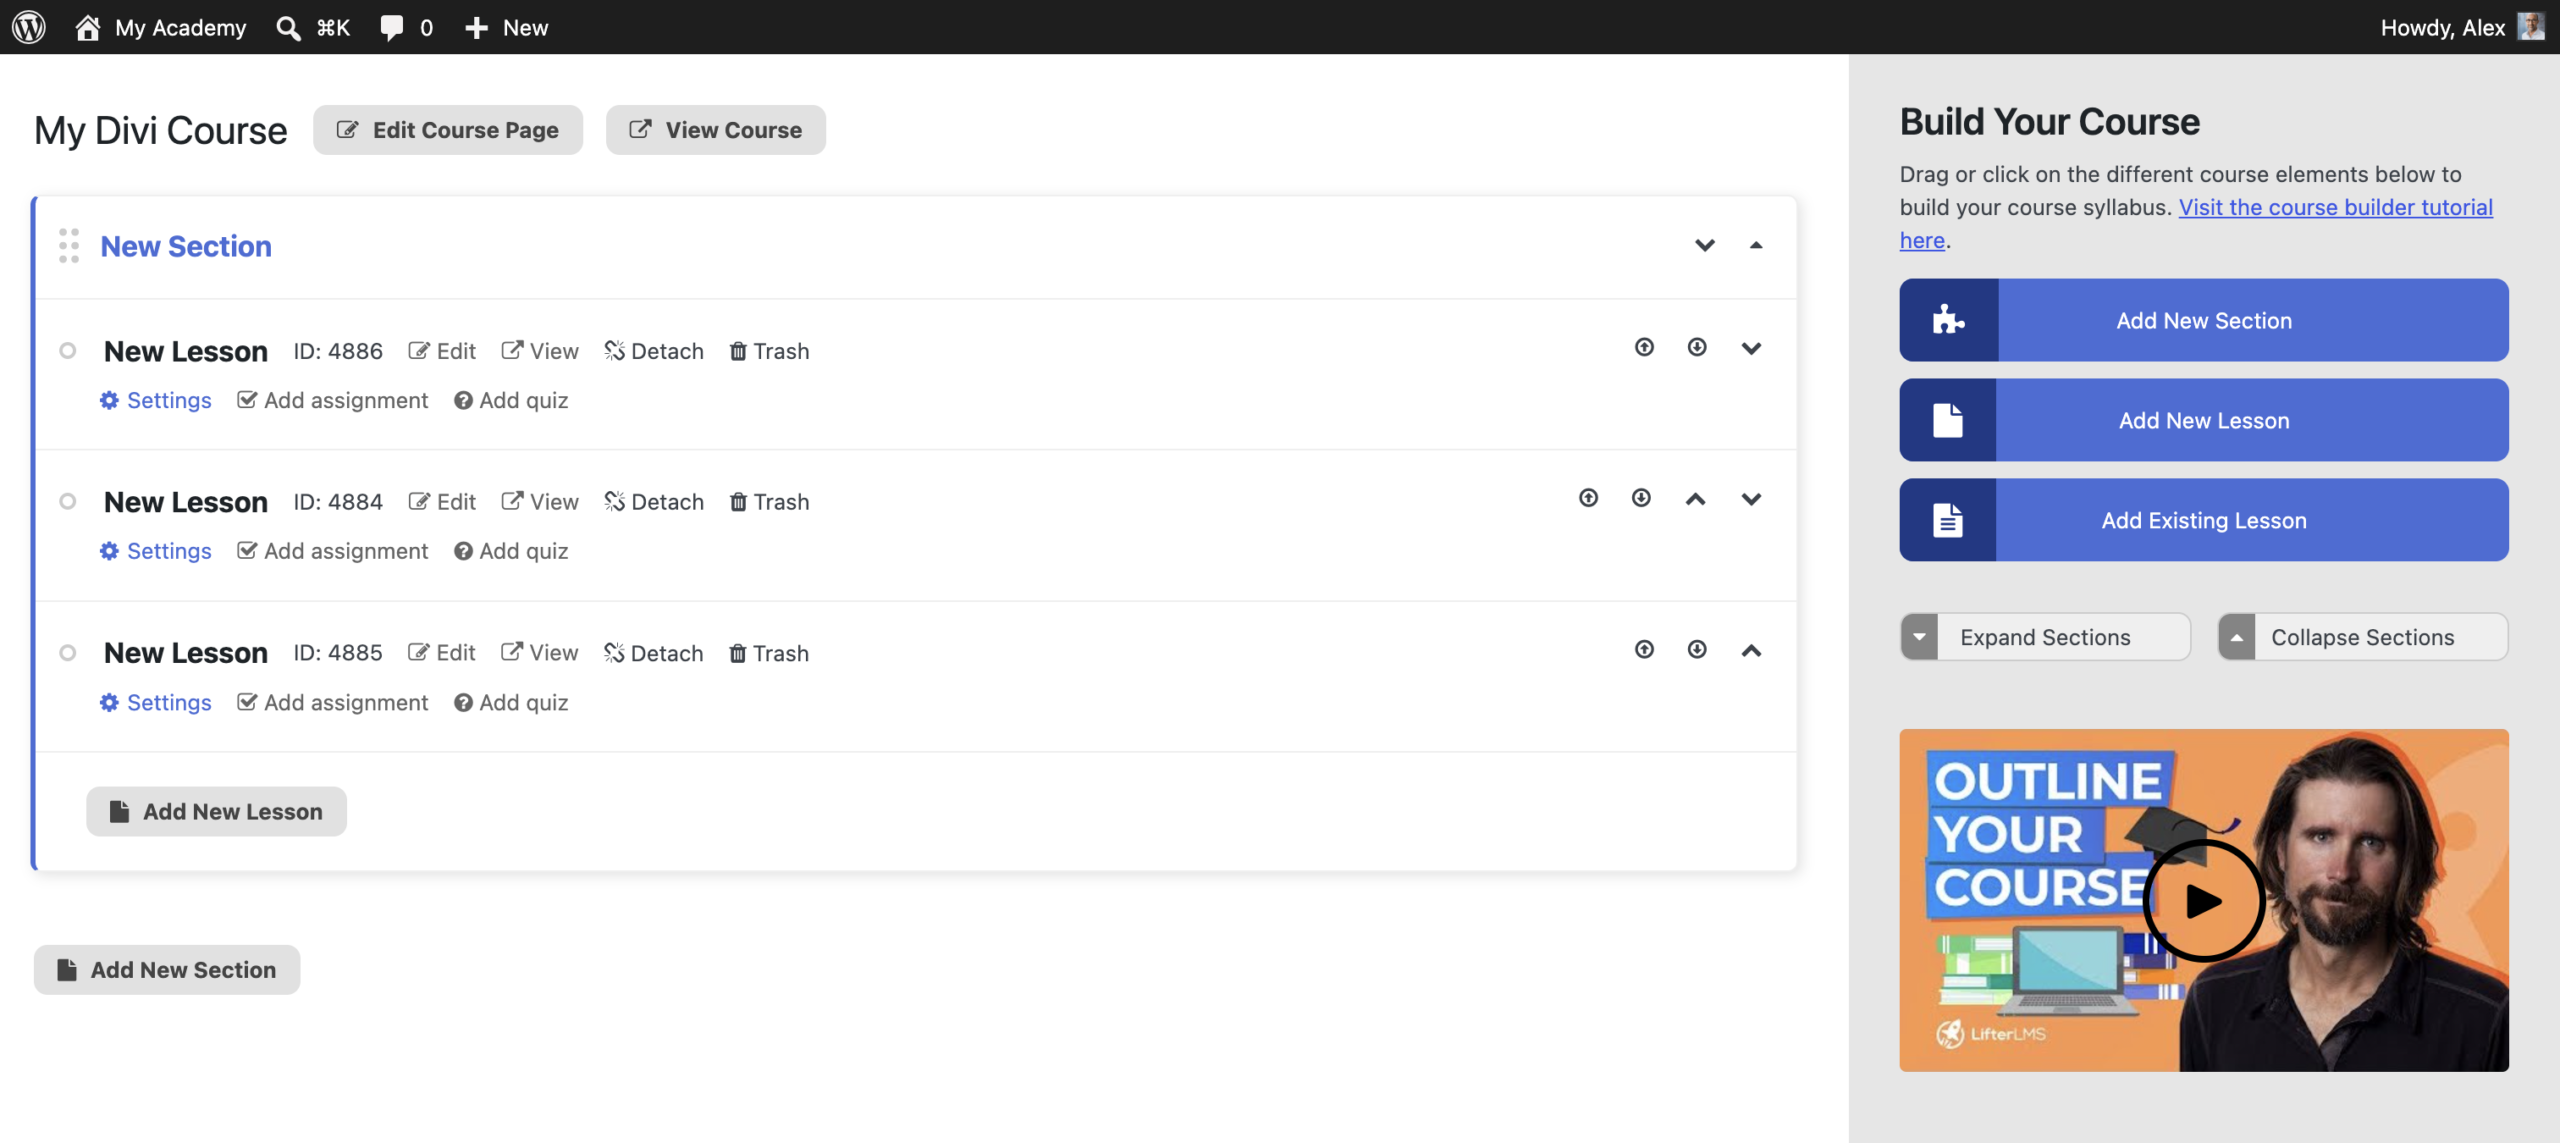
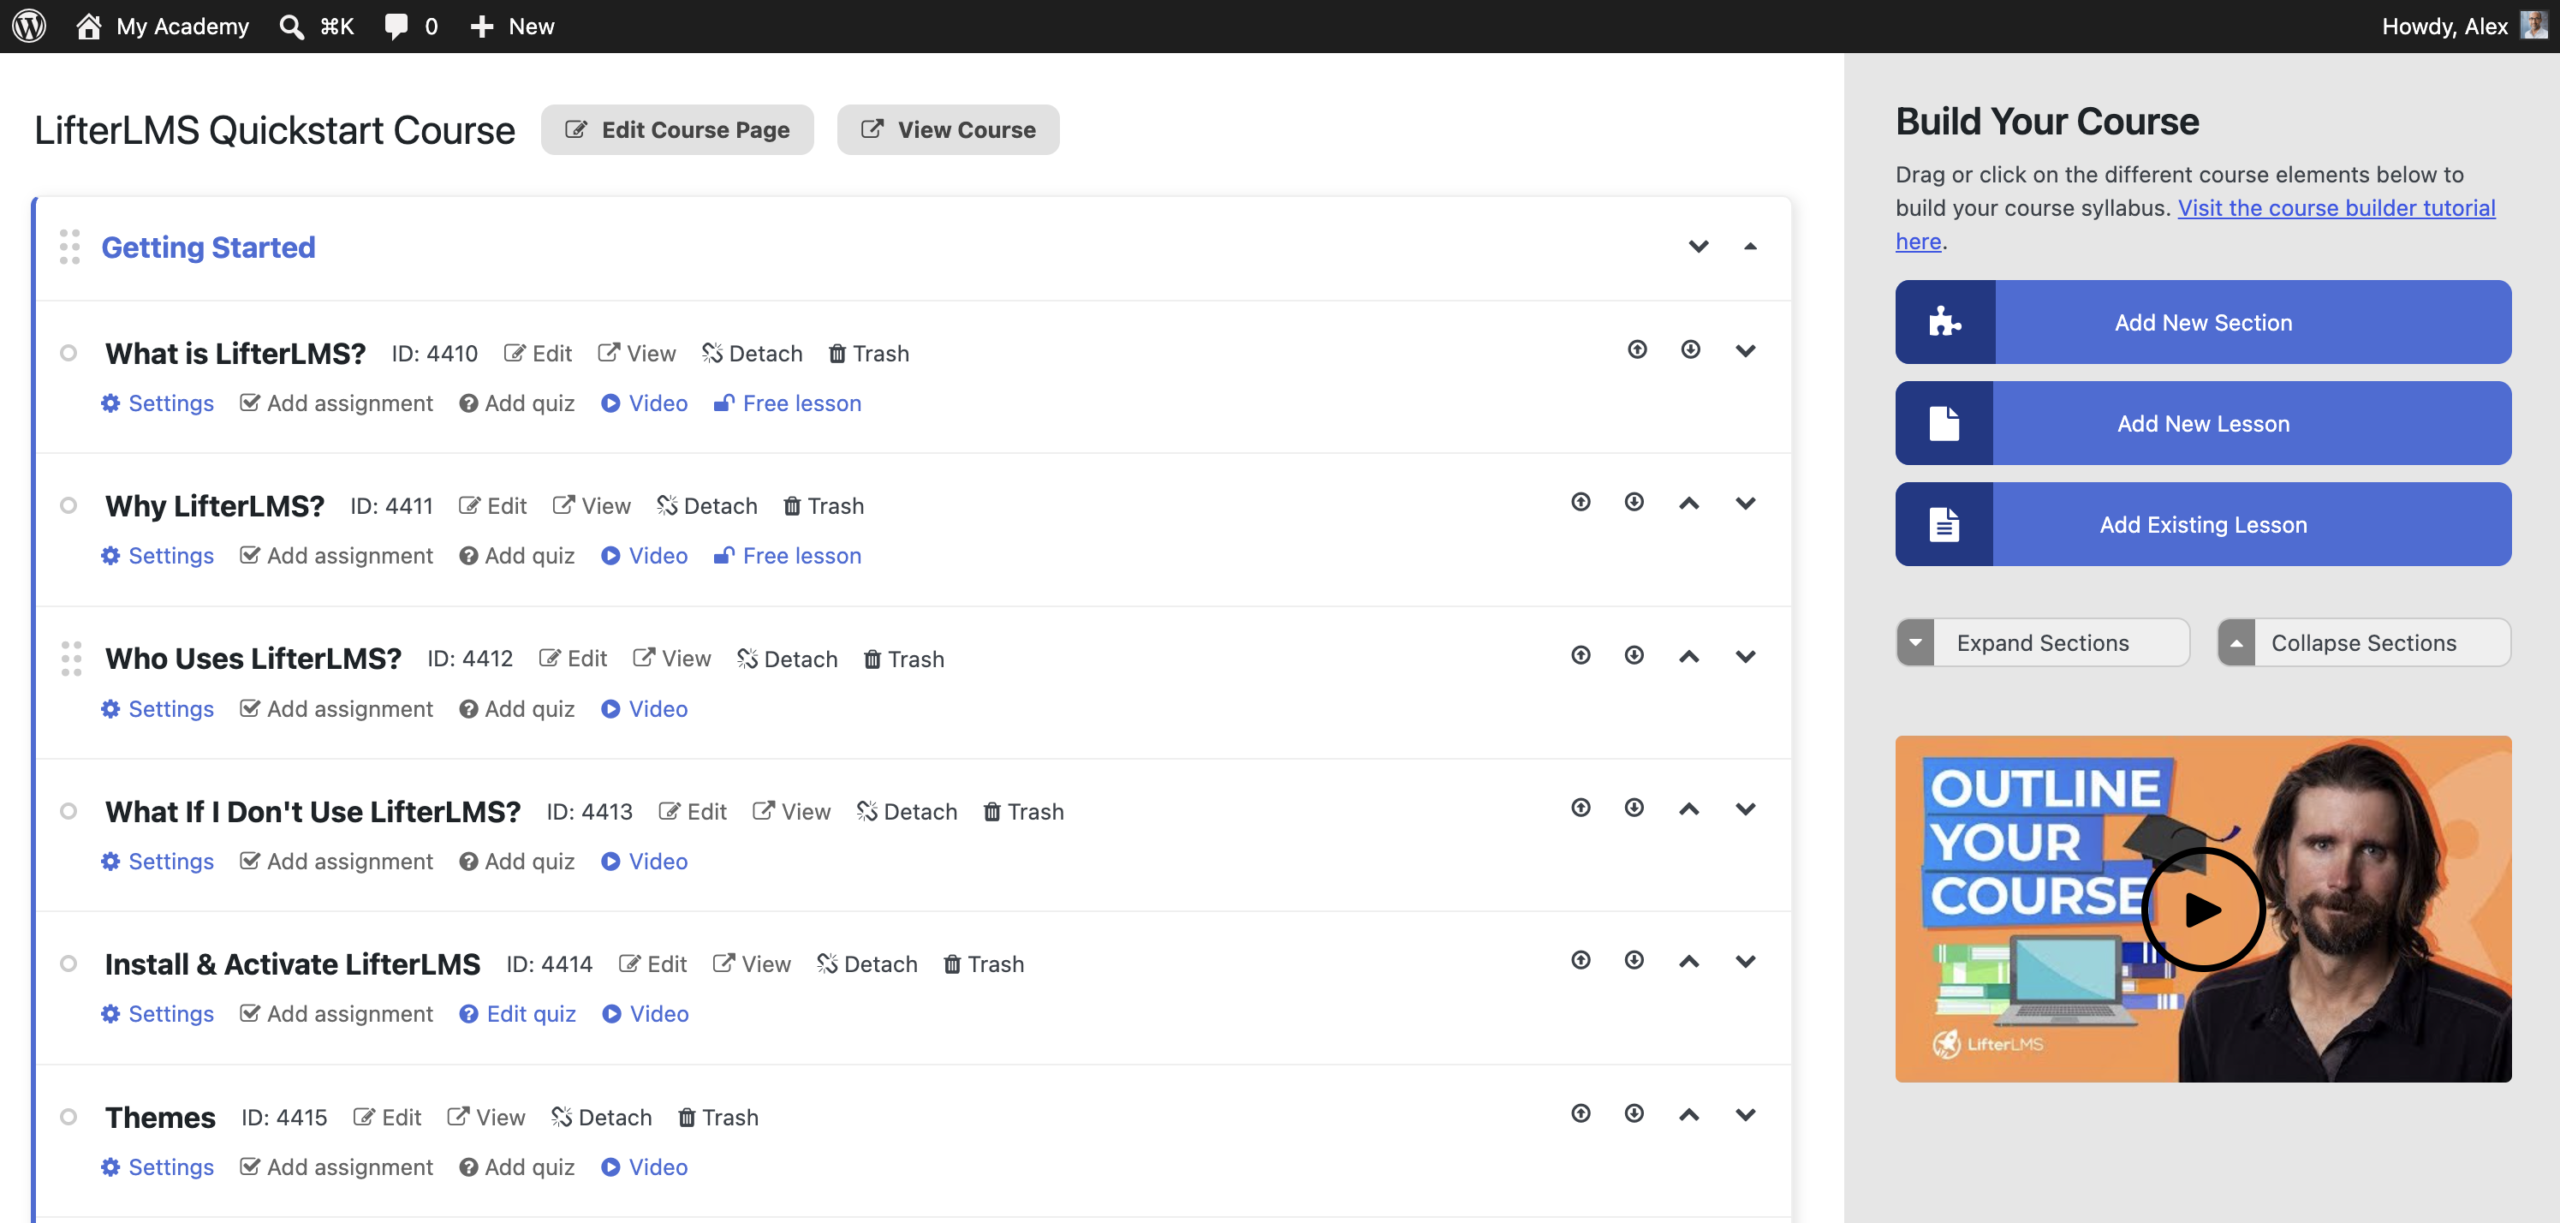
This will load the course builder in the same tab, as shown below.
Method 2. Using the Launch Course Builder button in the header of the block editor.
Step 1. Navigate to WordPress Dashboard > Courses.
Step 2. Hover under the course name of the course you want to edit, and click on the Edit link.

This will open the course in the block editor (Gutenberg).
Step 3. Click on the Launch Course Builder button in the editor’s top toolbar.
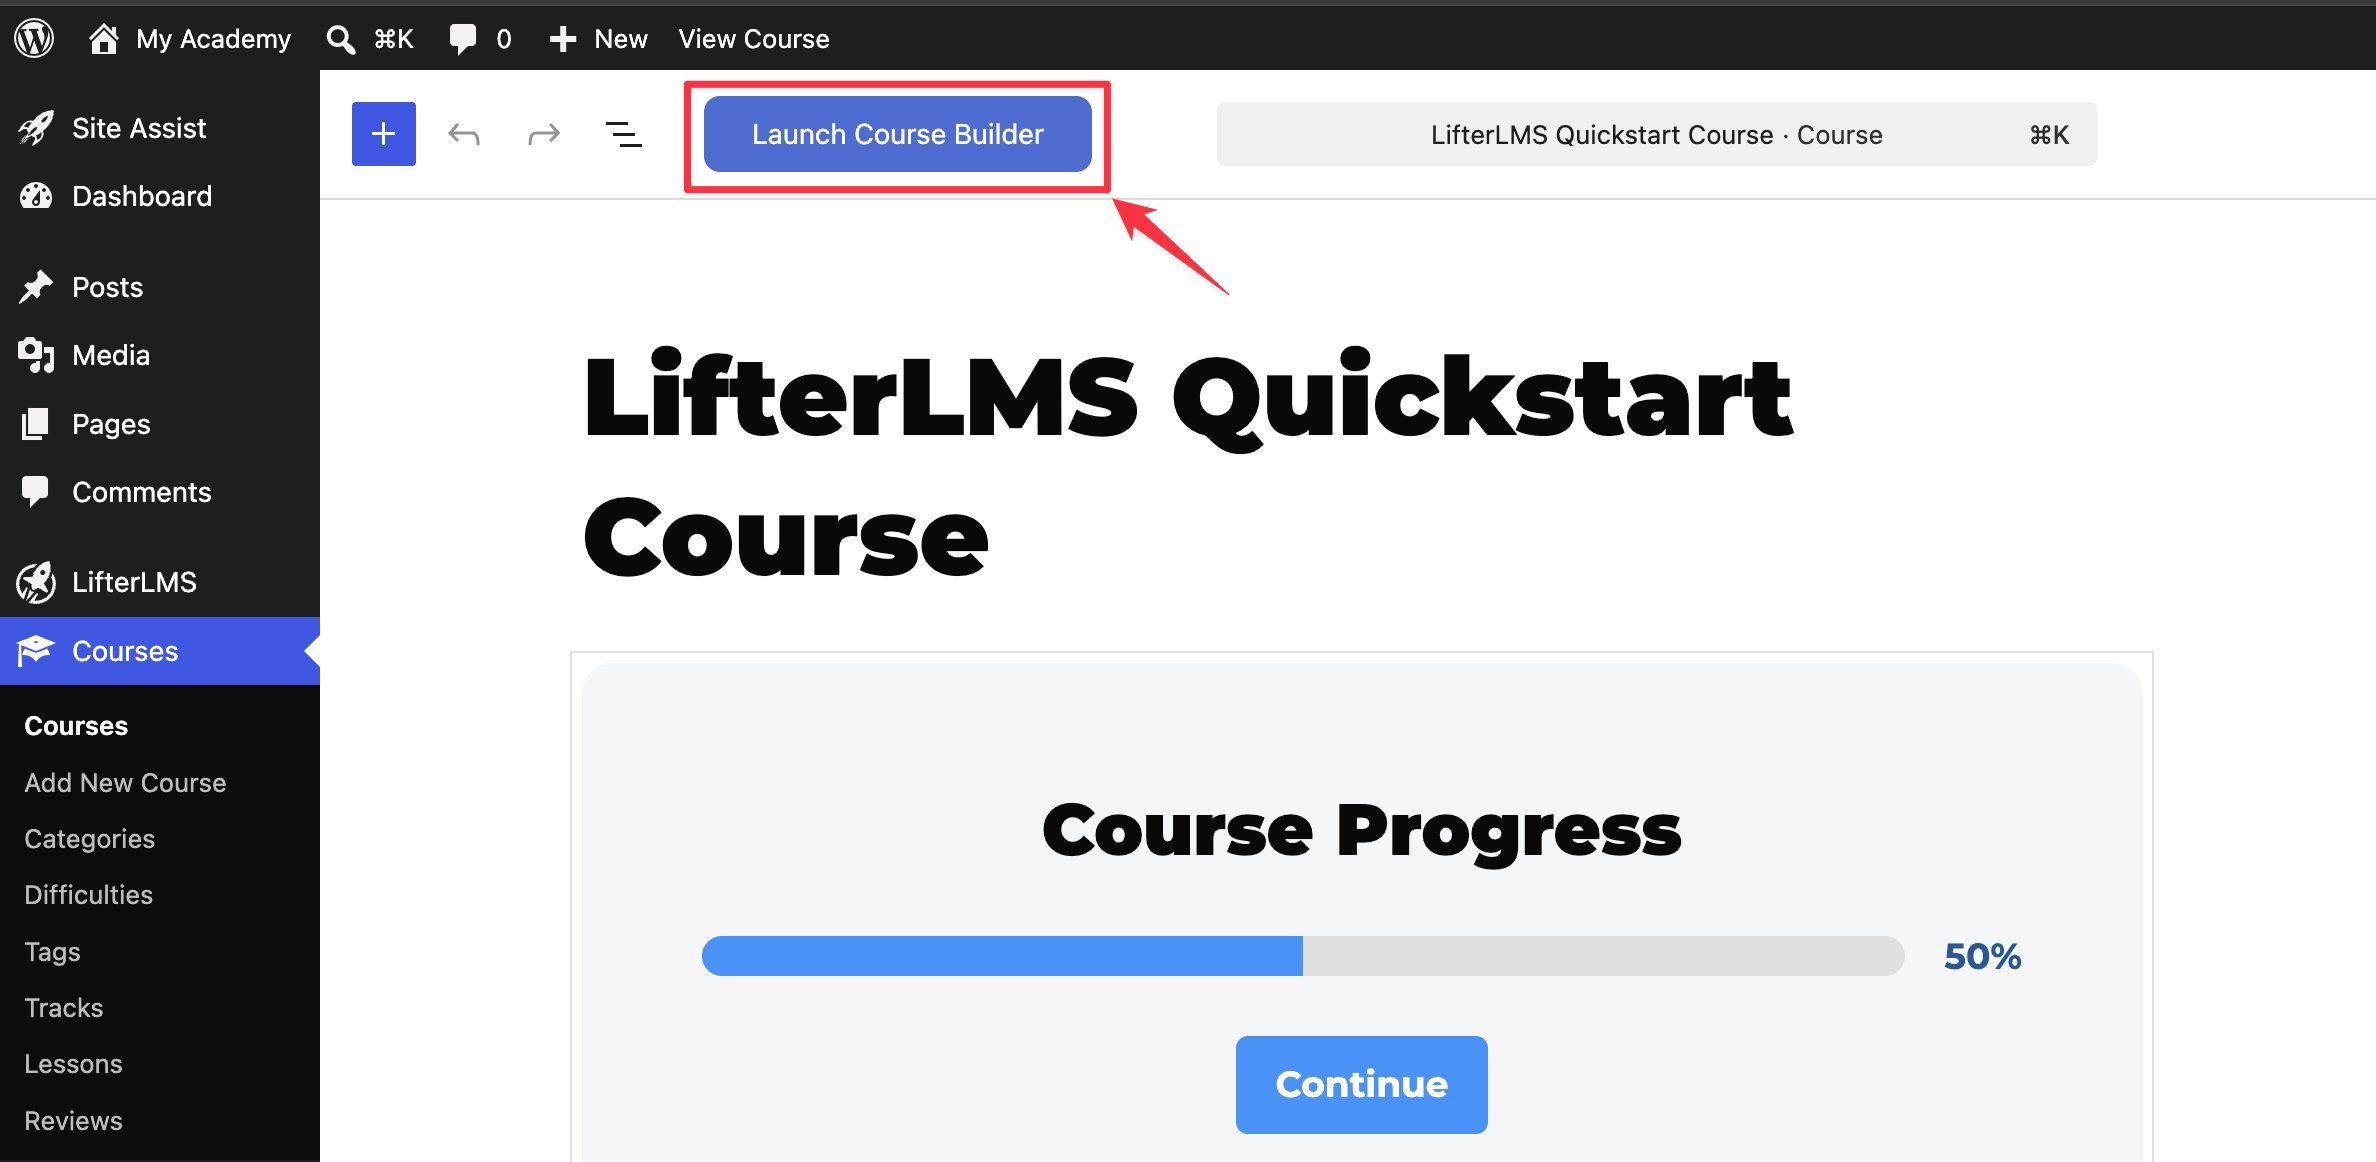
This will load the course builder in the same tab.
Method 3. Using the Launch Course Builder button in the course settings sidebar.
Step 1. Navigate to WordPress Dashboard > Courses.
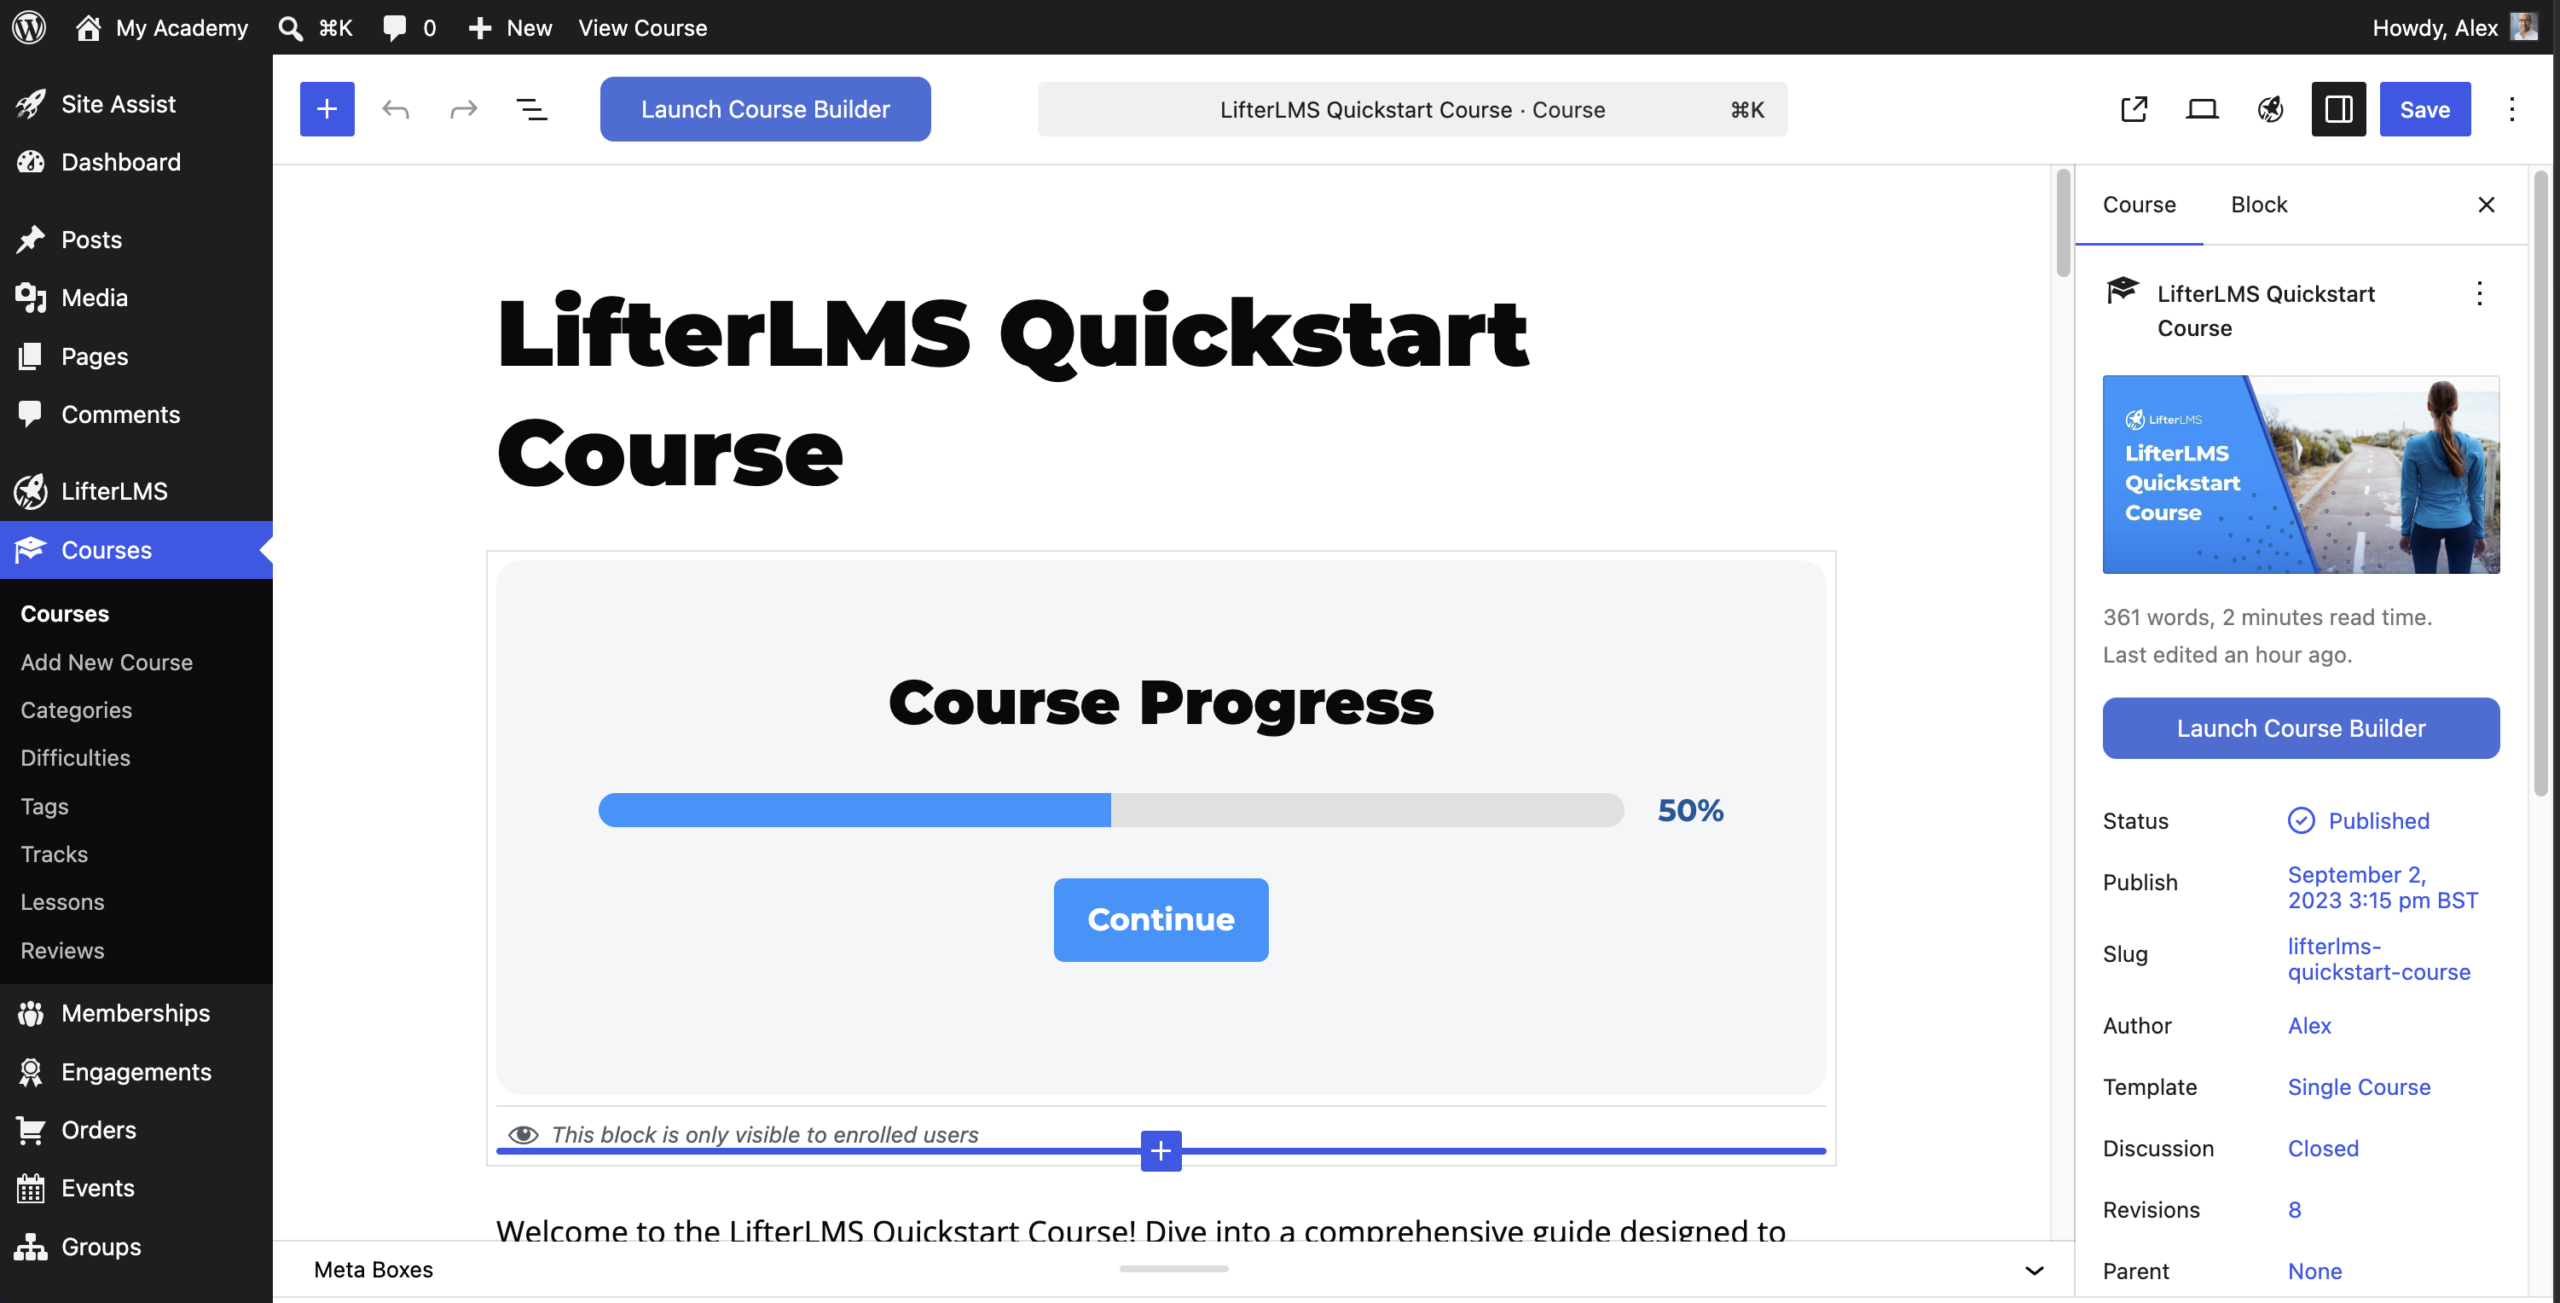
Step 2. Hover under the course name of the course you want to edit, and click on the Edit link.
This will open the course in the block editor (Gutenberg).
Step 3. Click on the Settings icon in the editor’s top toolbar.
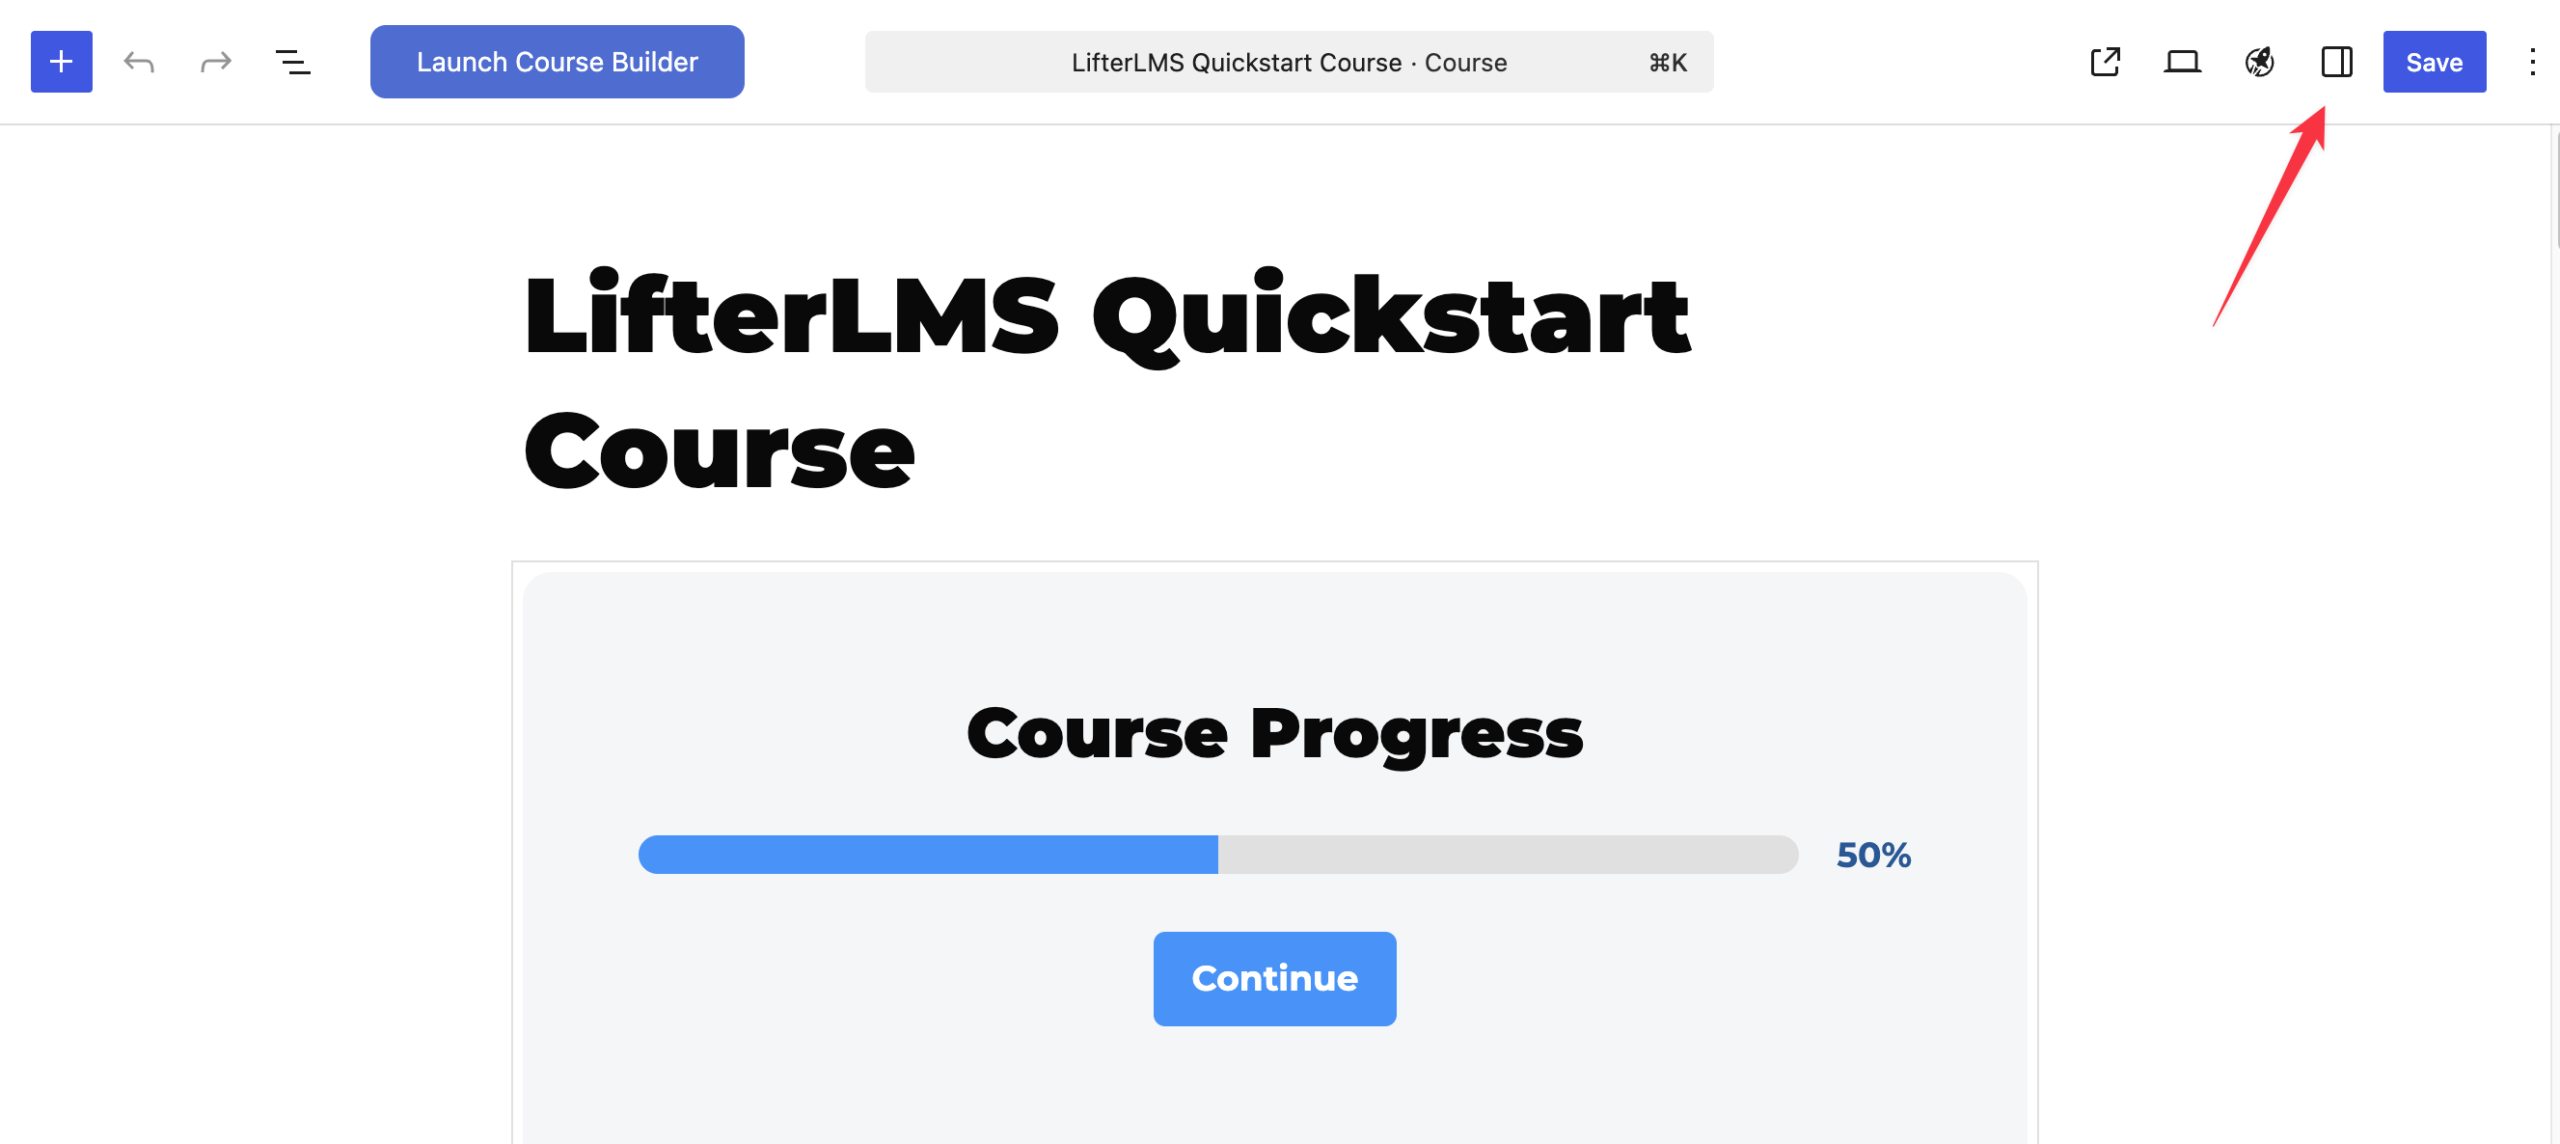
This will open the course settings panel on the side.
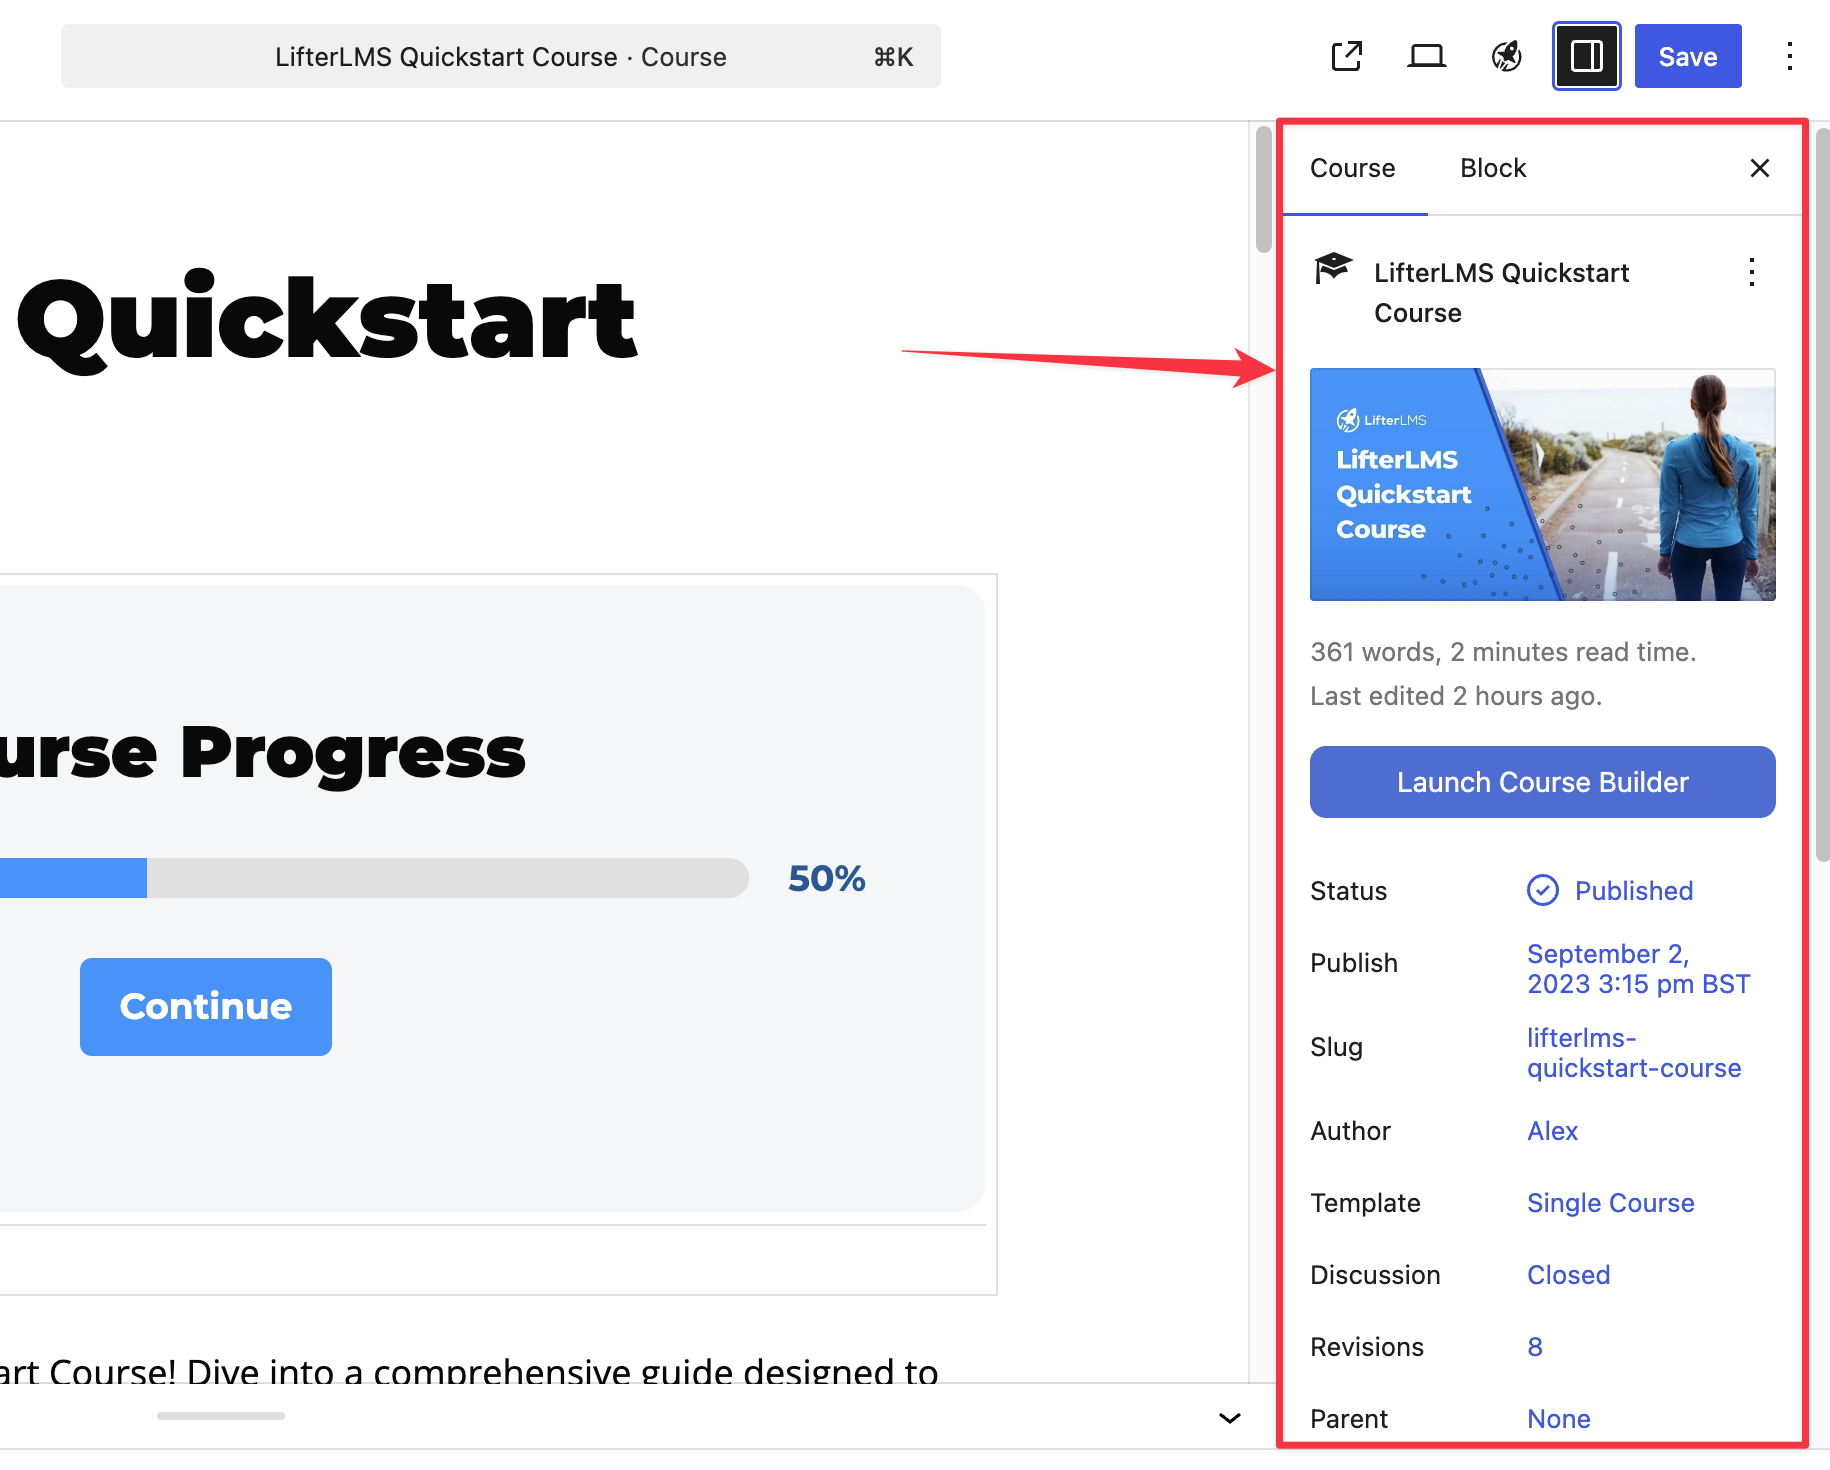
Step 4. Click on the Launch Course Builder button on the course settings panel on the side.
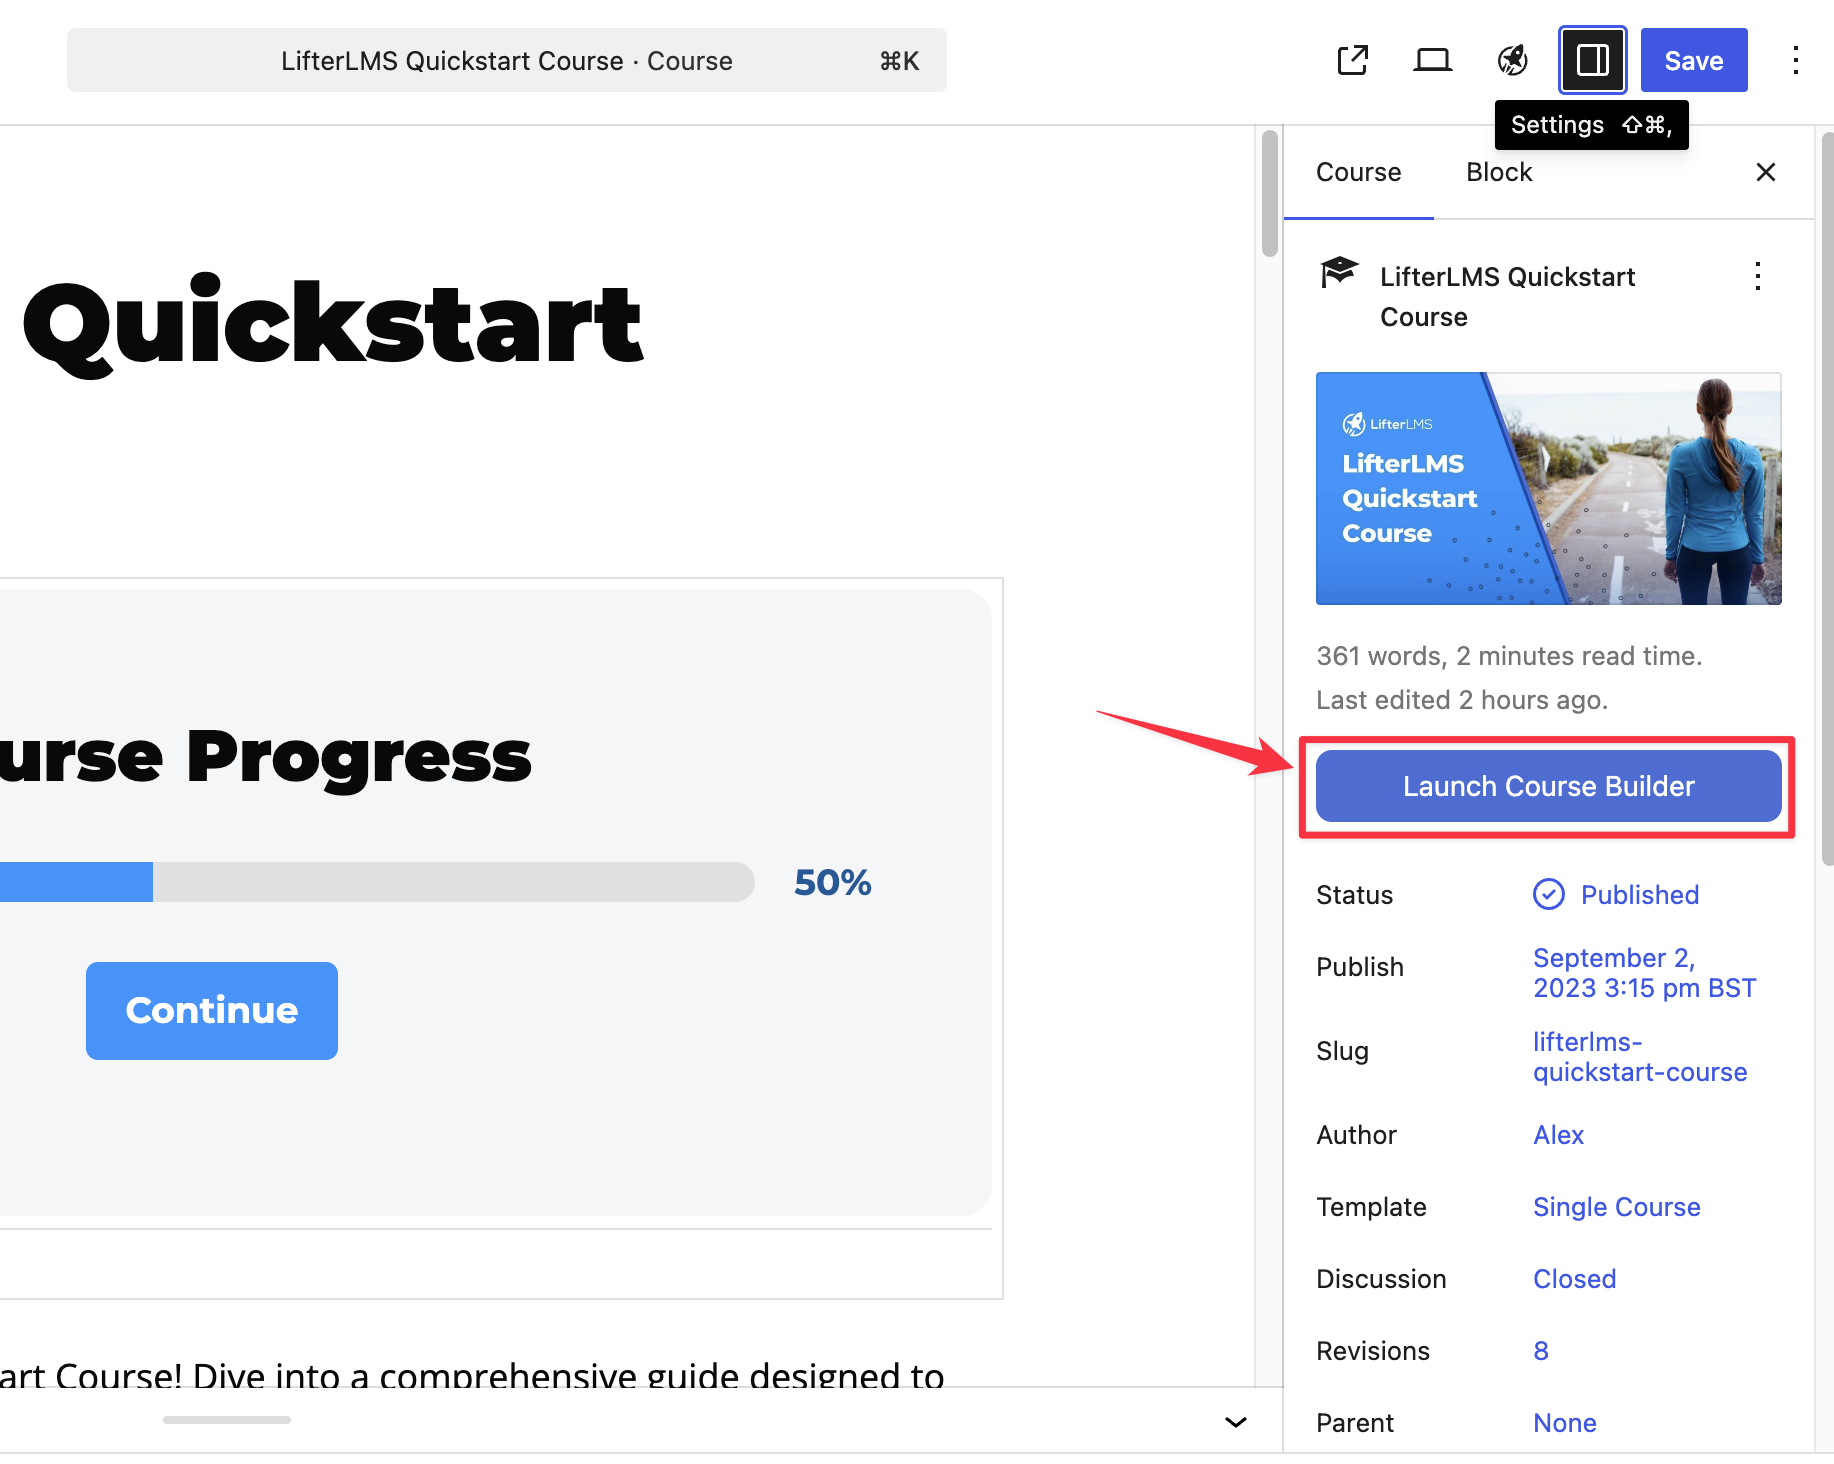
This will load the course builder in the same tab, as shown below.
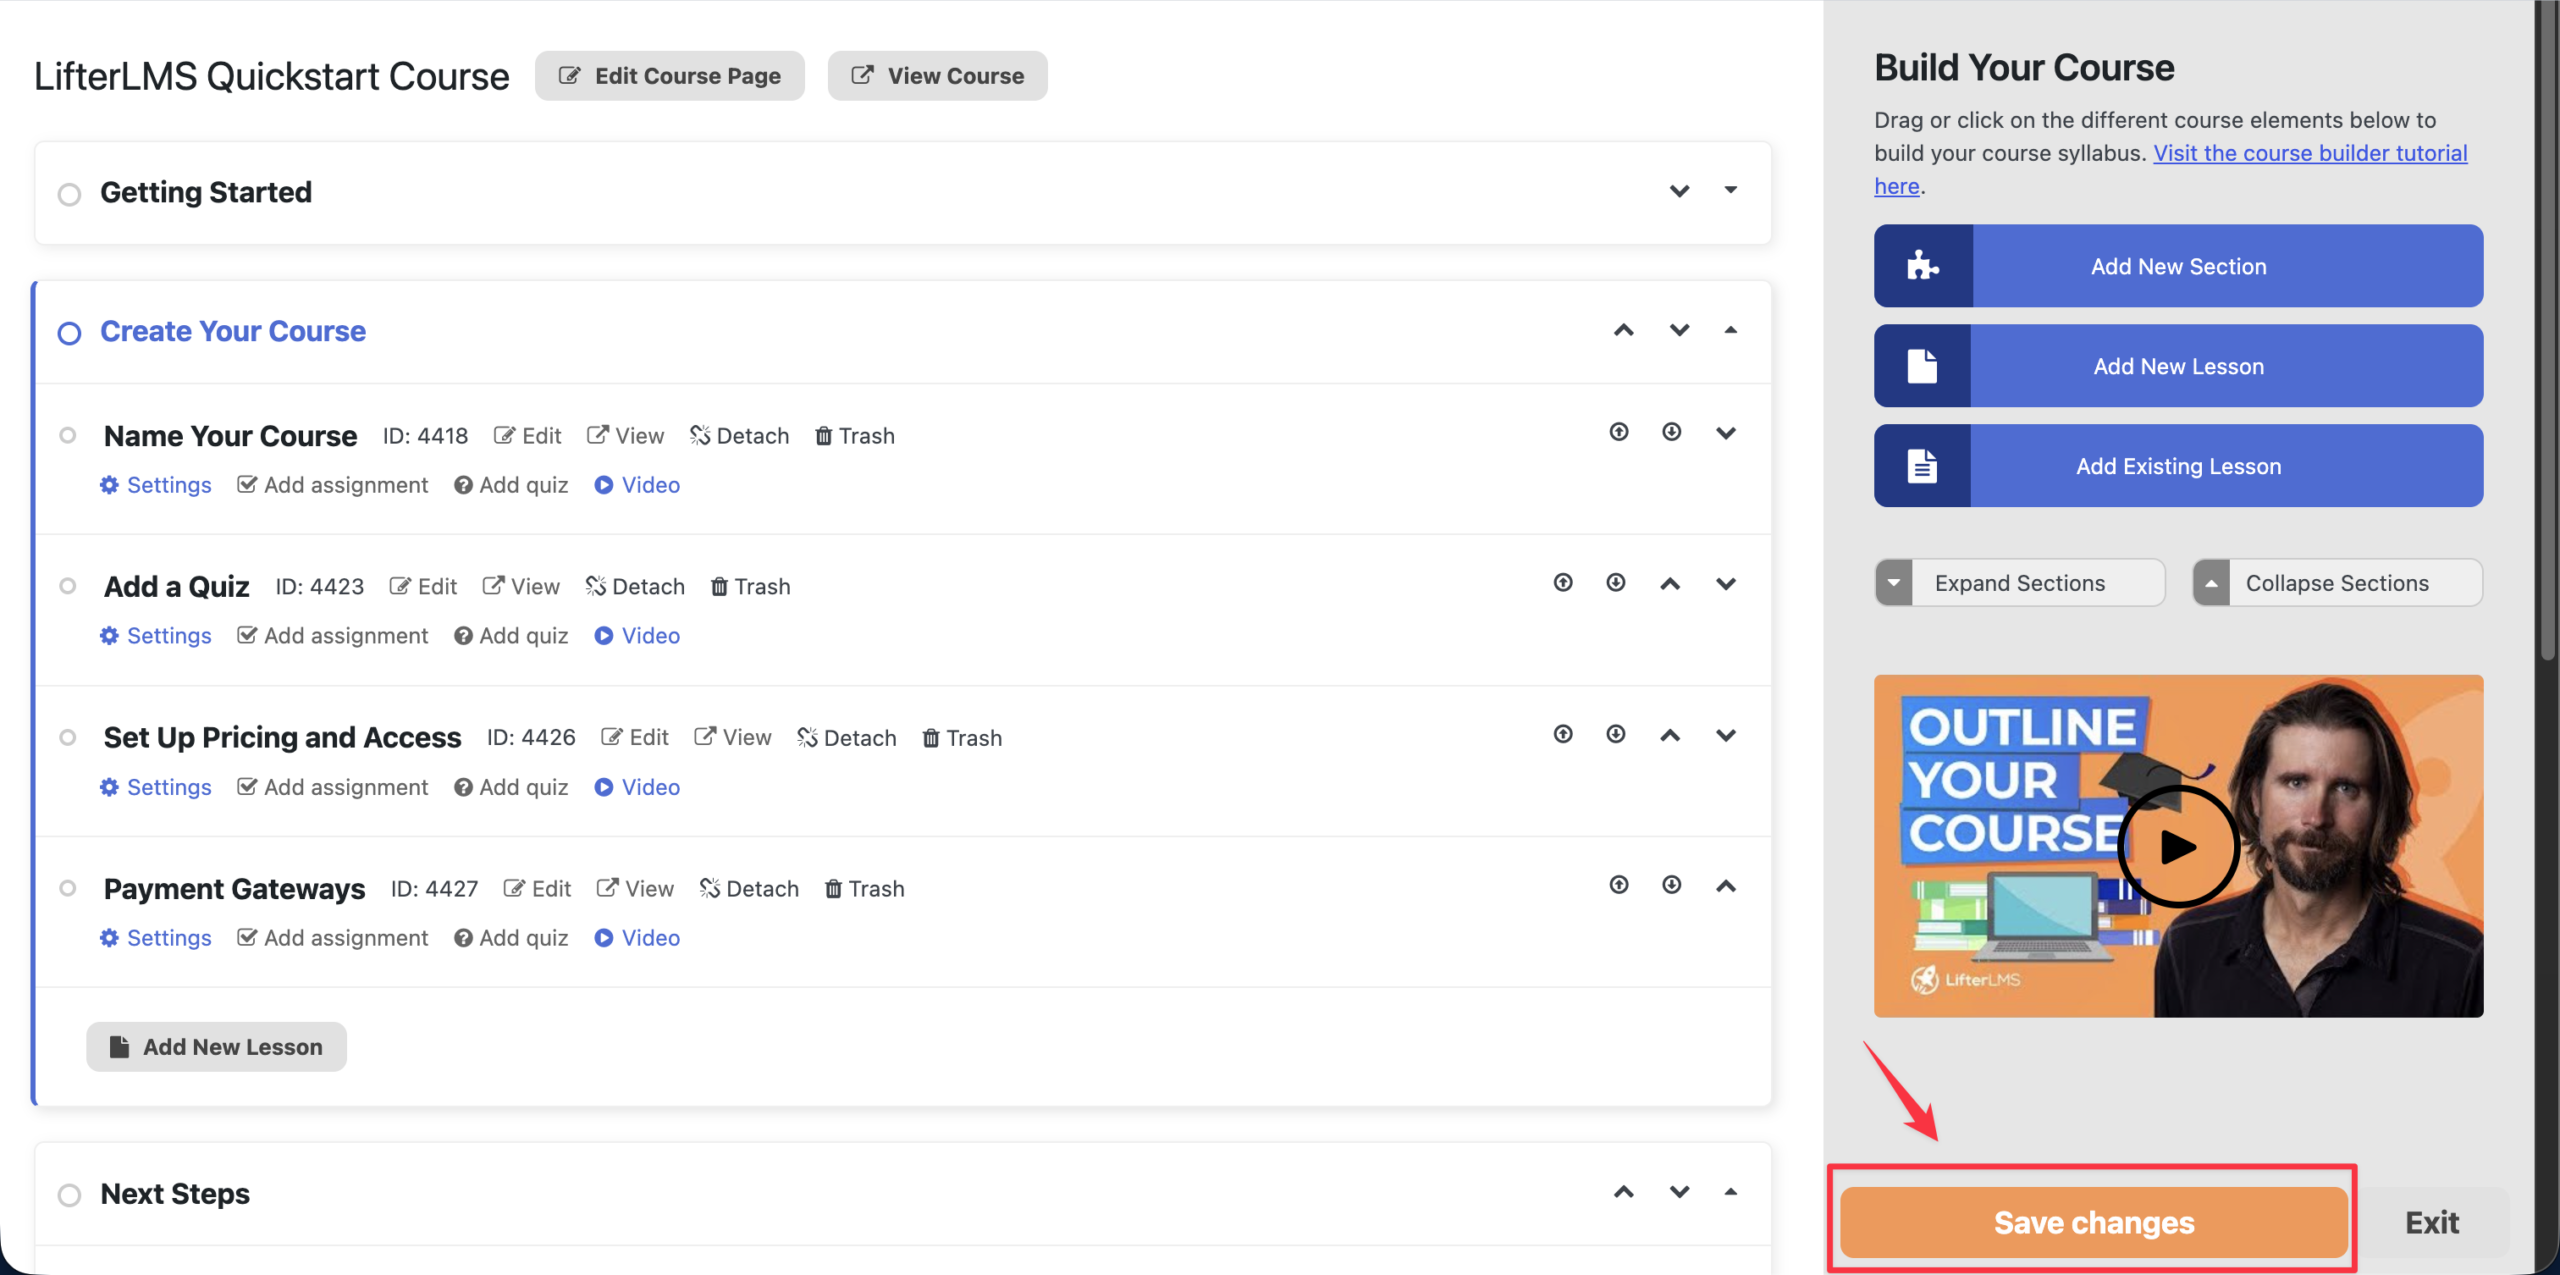
Changes in the course builder can either be saved automatically or manually. Regardless of how the save occurred, the save button in the bottom-right corner of the course builder will only display the three states below.
- “Save changes” button. When you see this orange button, it indicates that changes have not been saved. In this state, you can click the indicator button to save your changes.
- “Saving changes…” button. This pale blue disabled button indicates that data is currently being saved.
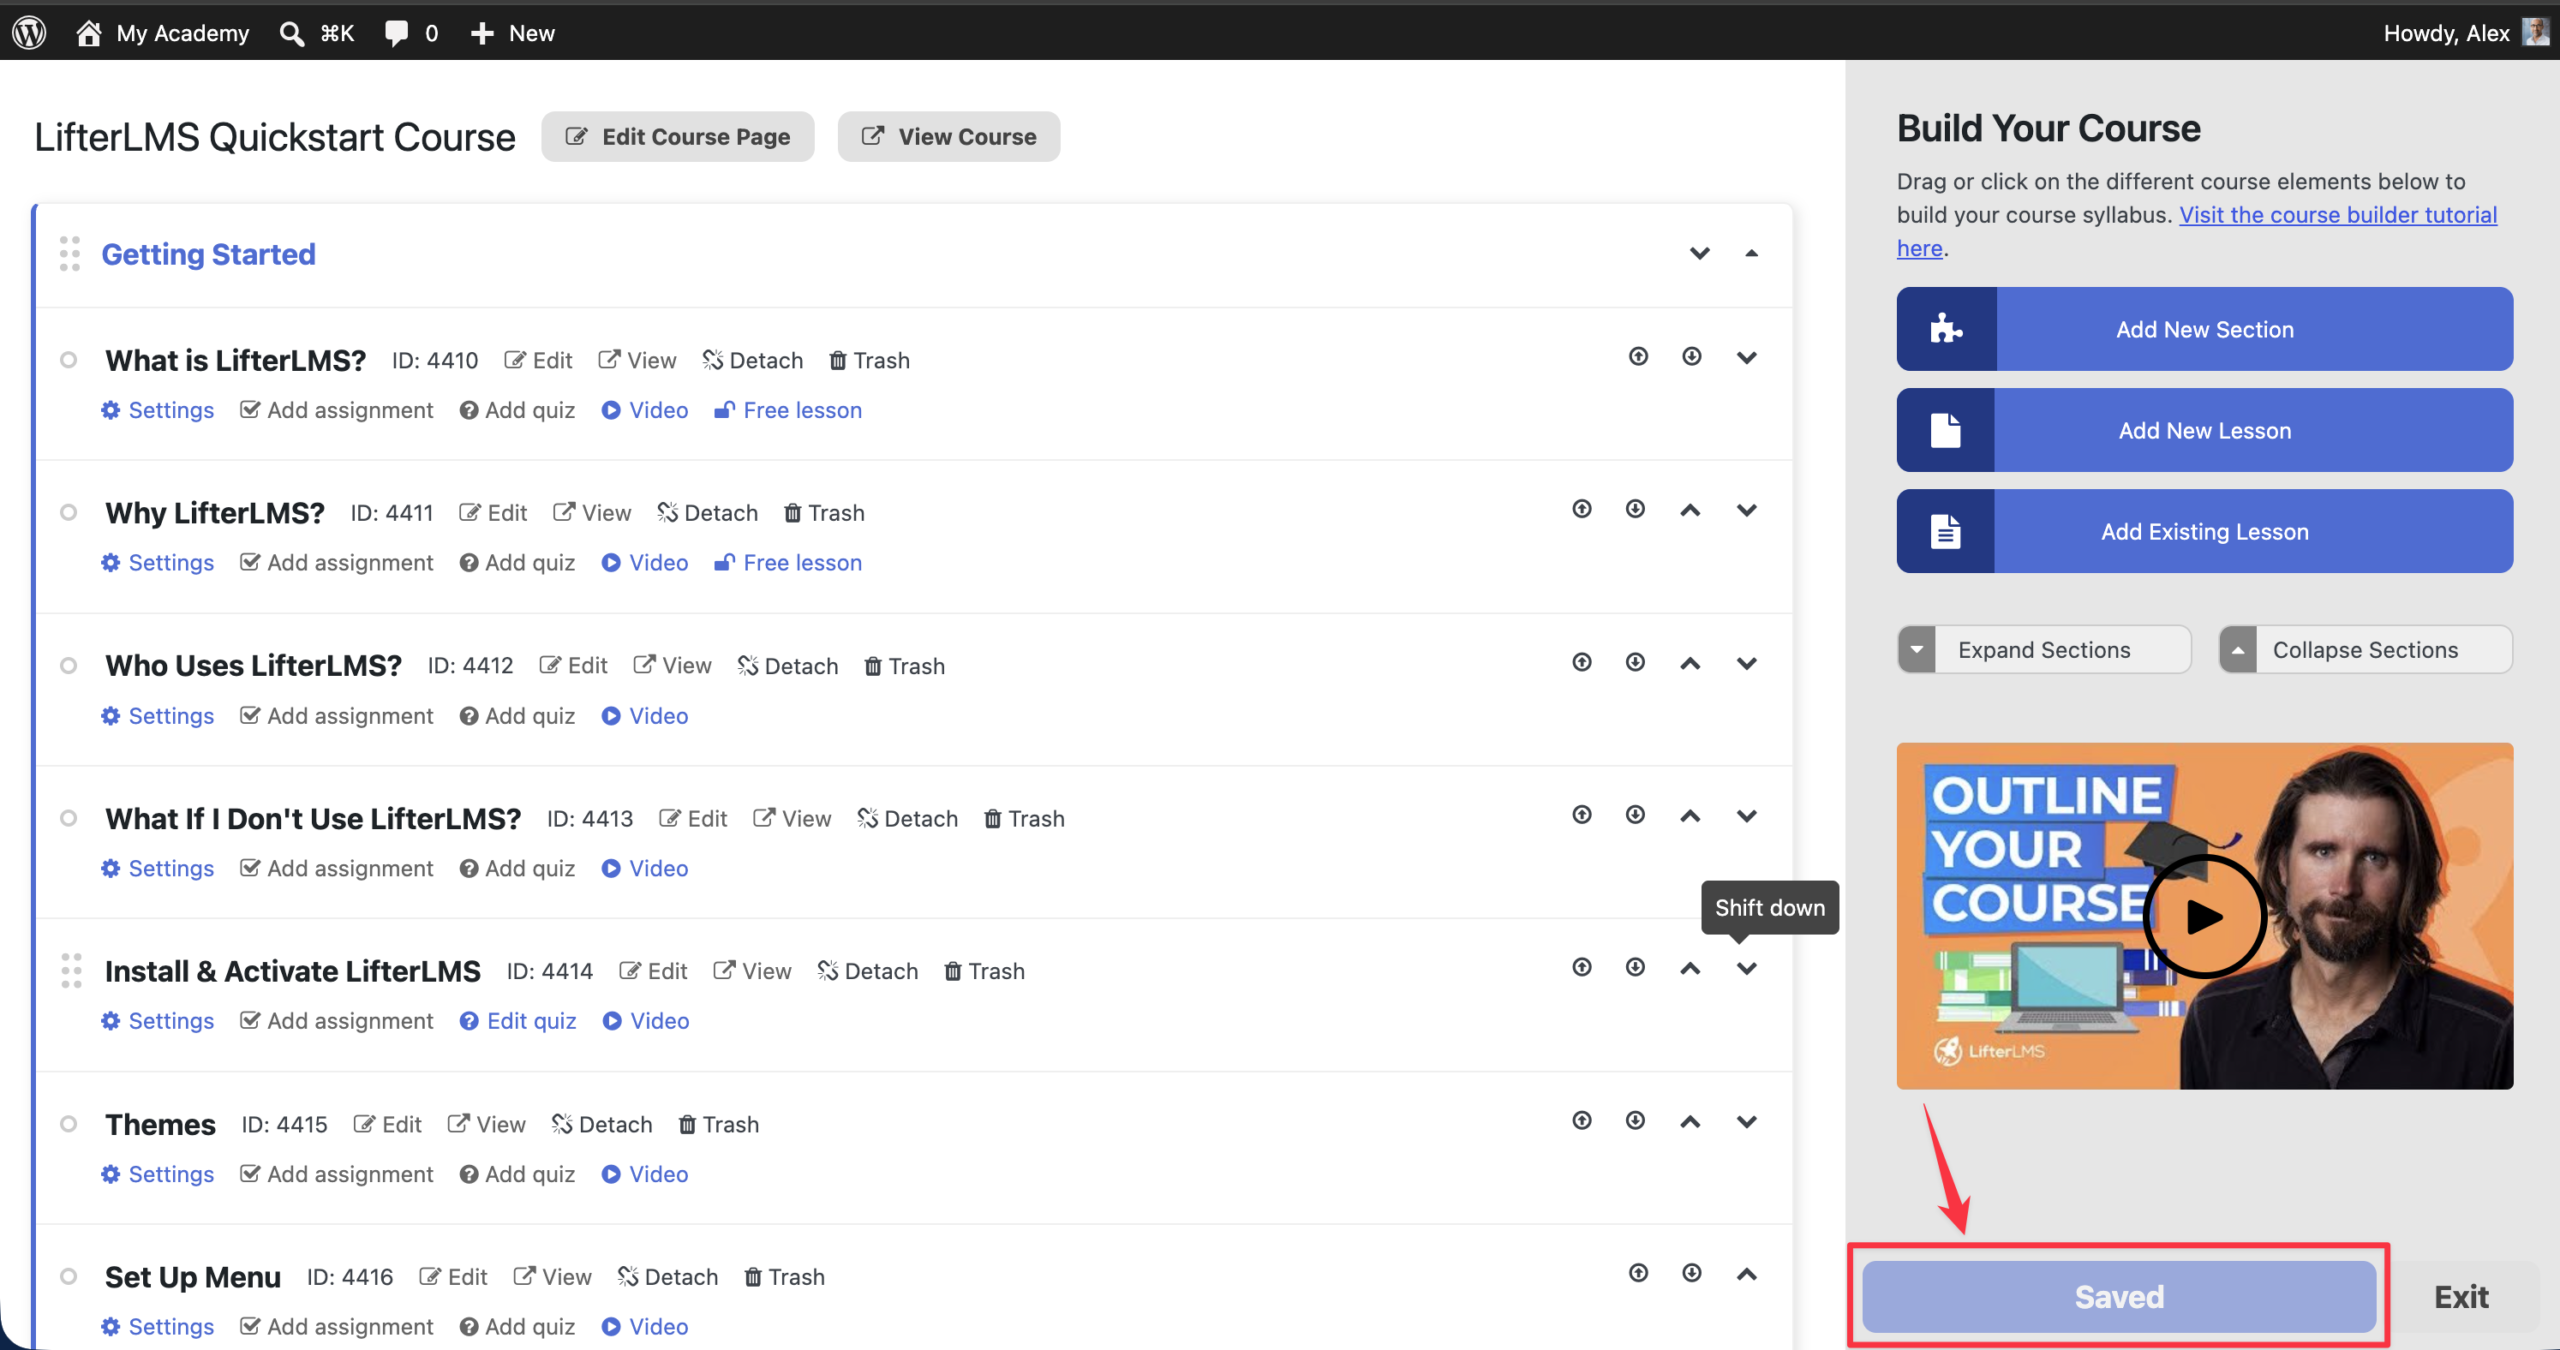
- “Saved” button. This pale blue disabled button indicates that all changes have been successfully saved.
Method 1. Manual Saving
Step 1. Make some changes inside the course builder. Once you do this, you will see the “Save changes” button in the bottom-right corner of the page. Click that button.
This will change the button to a disabled (i.e., unclickable) pale blue “Saving changes…” button. Once the saving is done, this will change to a disabled (i.e., unclickable) pale blue “Saved” button.
Method 2. Automatic Saving
By default, changes in the course builder are not automatically saved. If you want the changes to be automatically saved (about 10 seconds after your last change), follow the instructions below.
Step 1. Navigate to WordPress Dashboard > Users > Profile.
Step 2. Make sure that Course Builder Autosave is checked.

Step 3. Save the changes by clicking on the Update Profile button.
Now, once you make changes in the course builder, you will see that your changes will begin to automatically save after about 10 seconds of waiting.
Step 1. If you have unsaved changes, save the changes first.
Step 2. Click on the Exit button at the bottom right corner of the course builder.
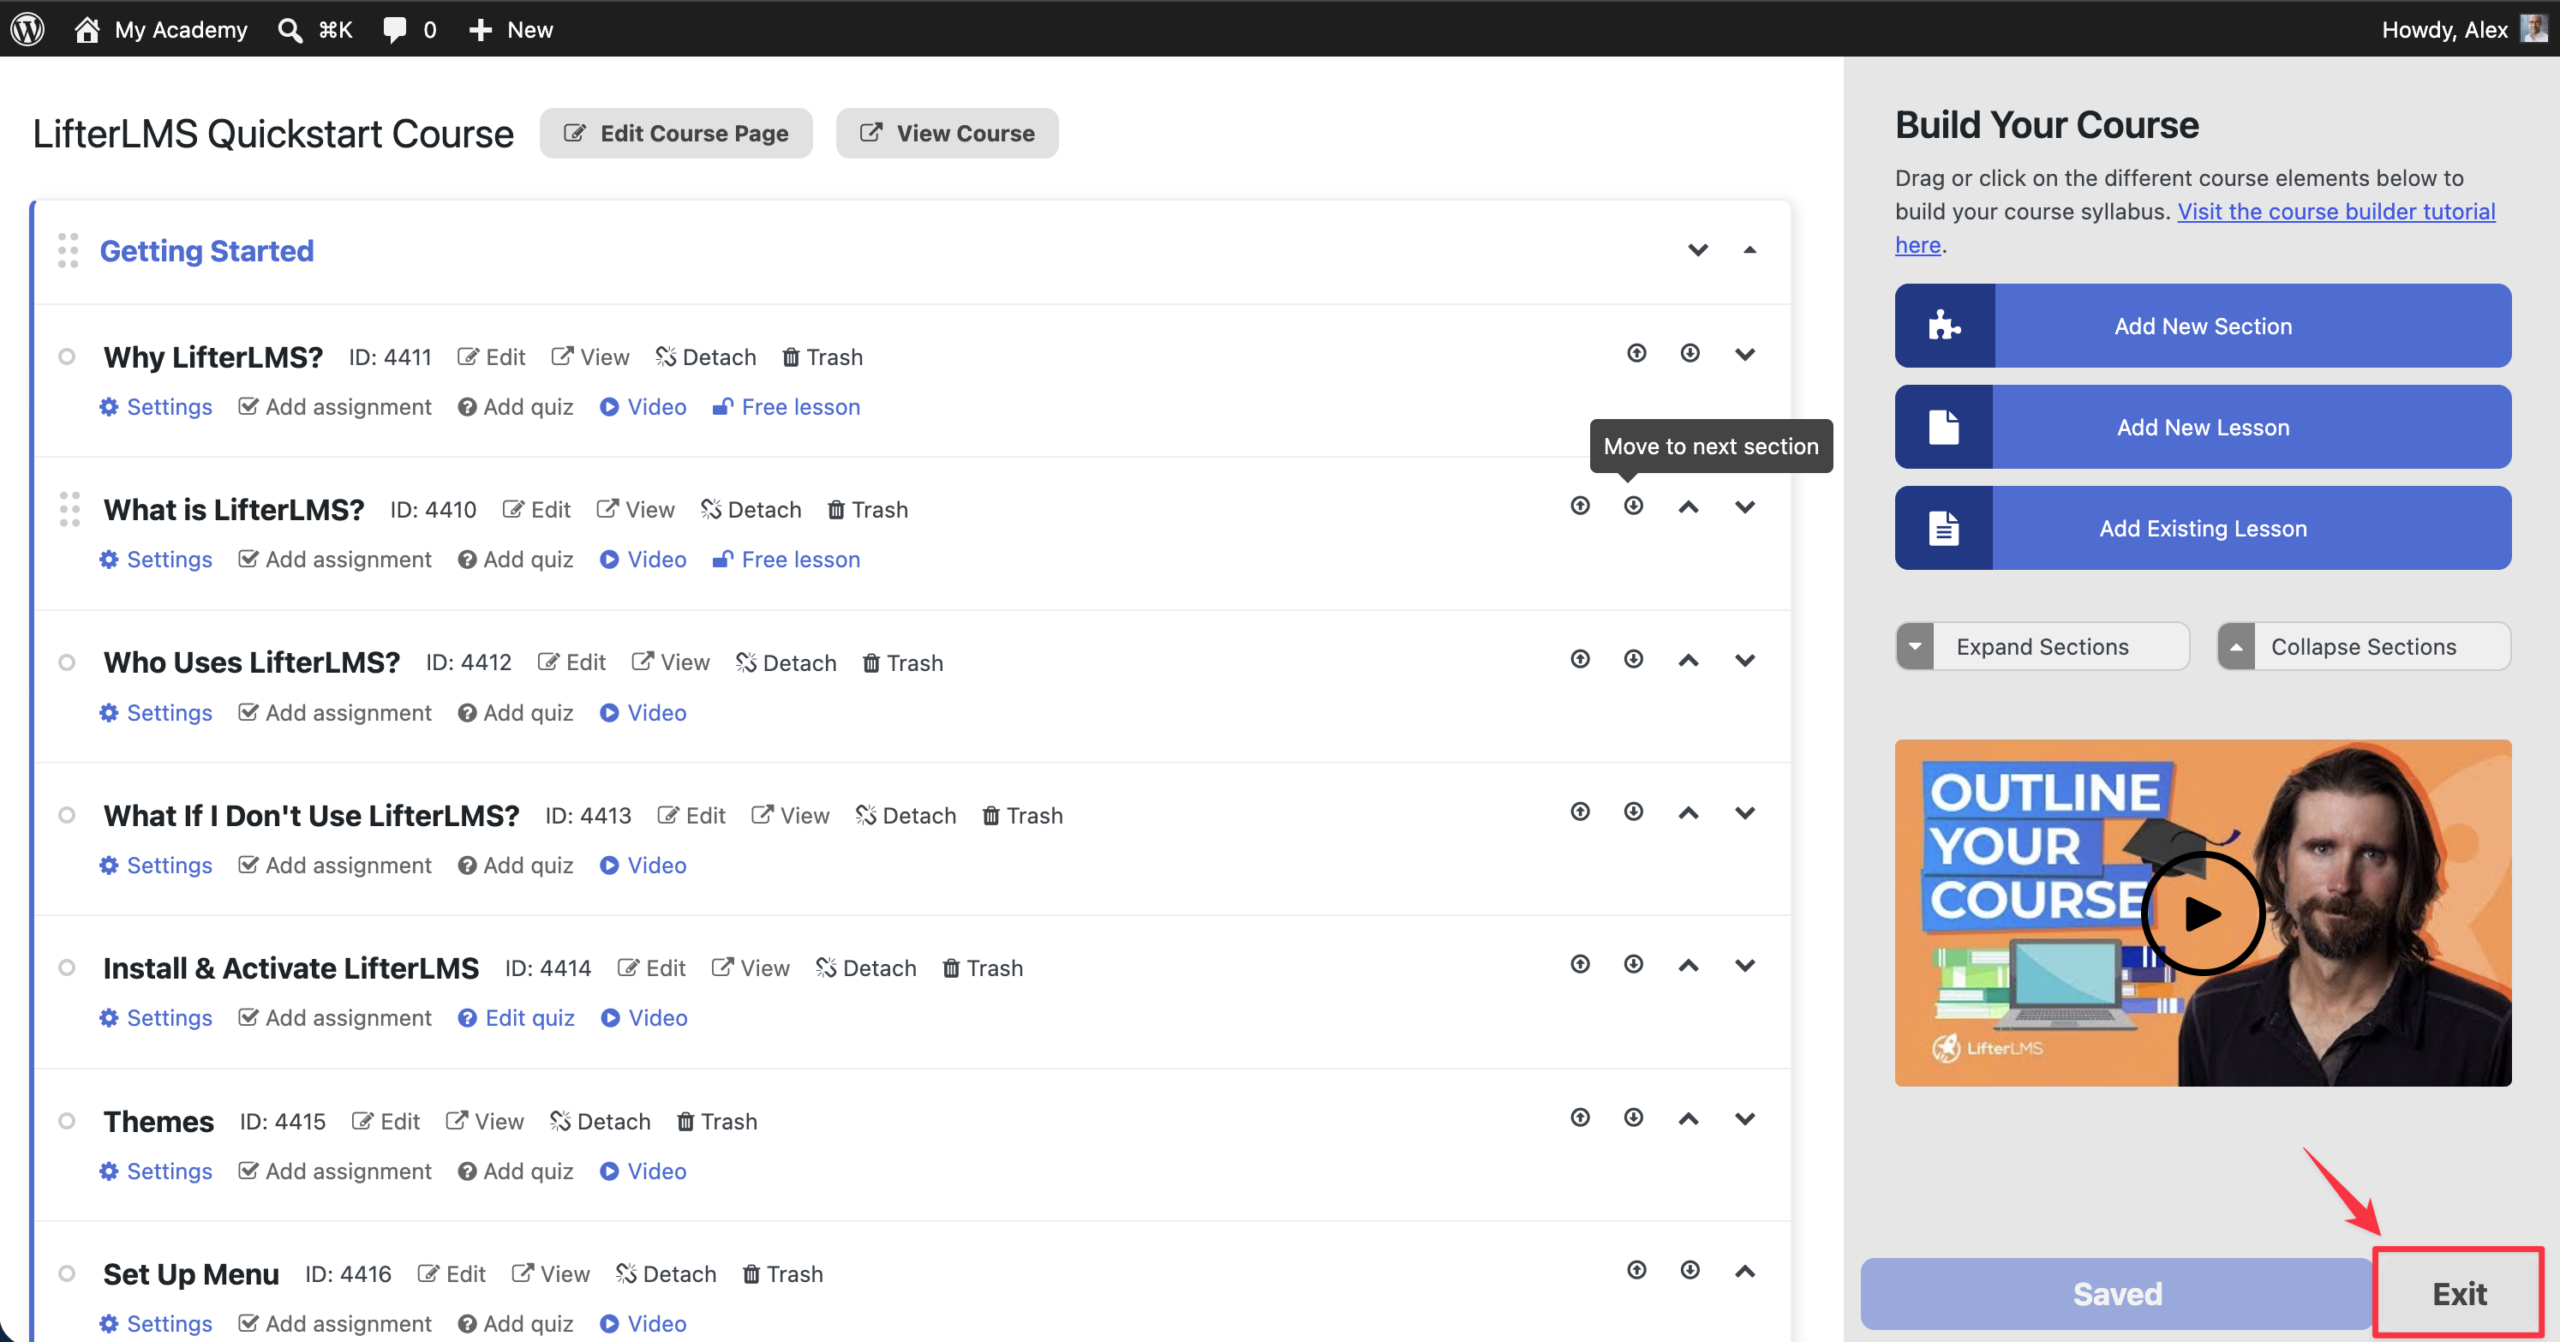
This will take you back to the backend (the block editor) of the same course you were editing previously.
A section is simply a collection of lessons bundled together. Sections can only be created from inside the course builder.
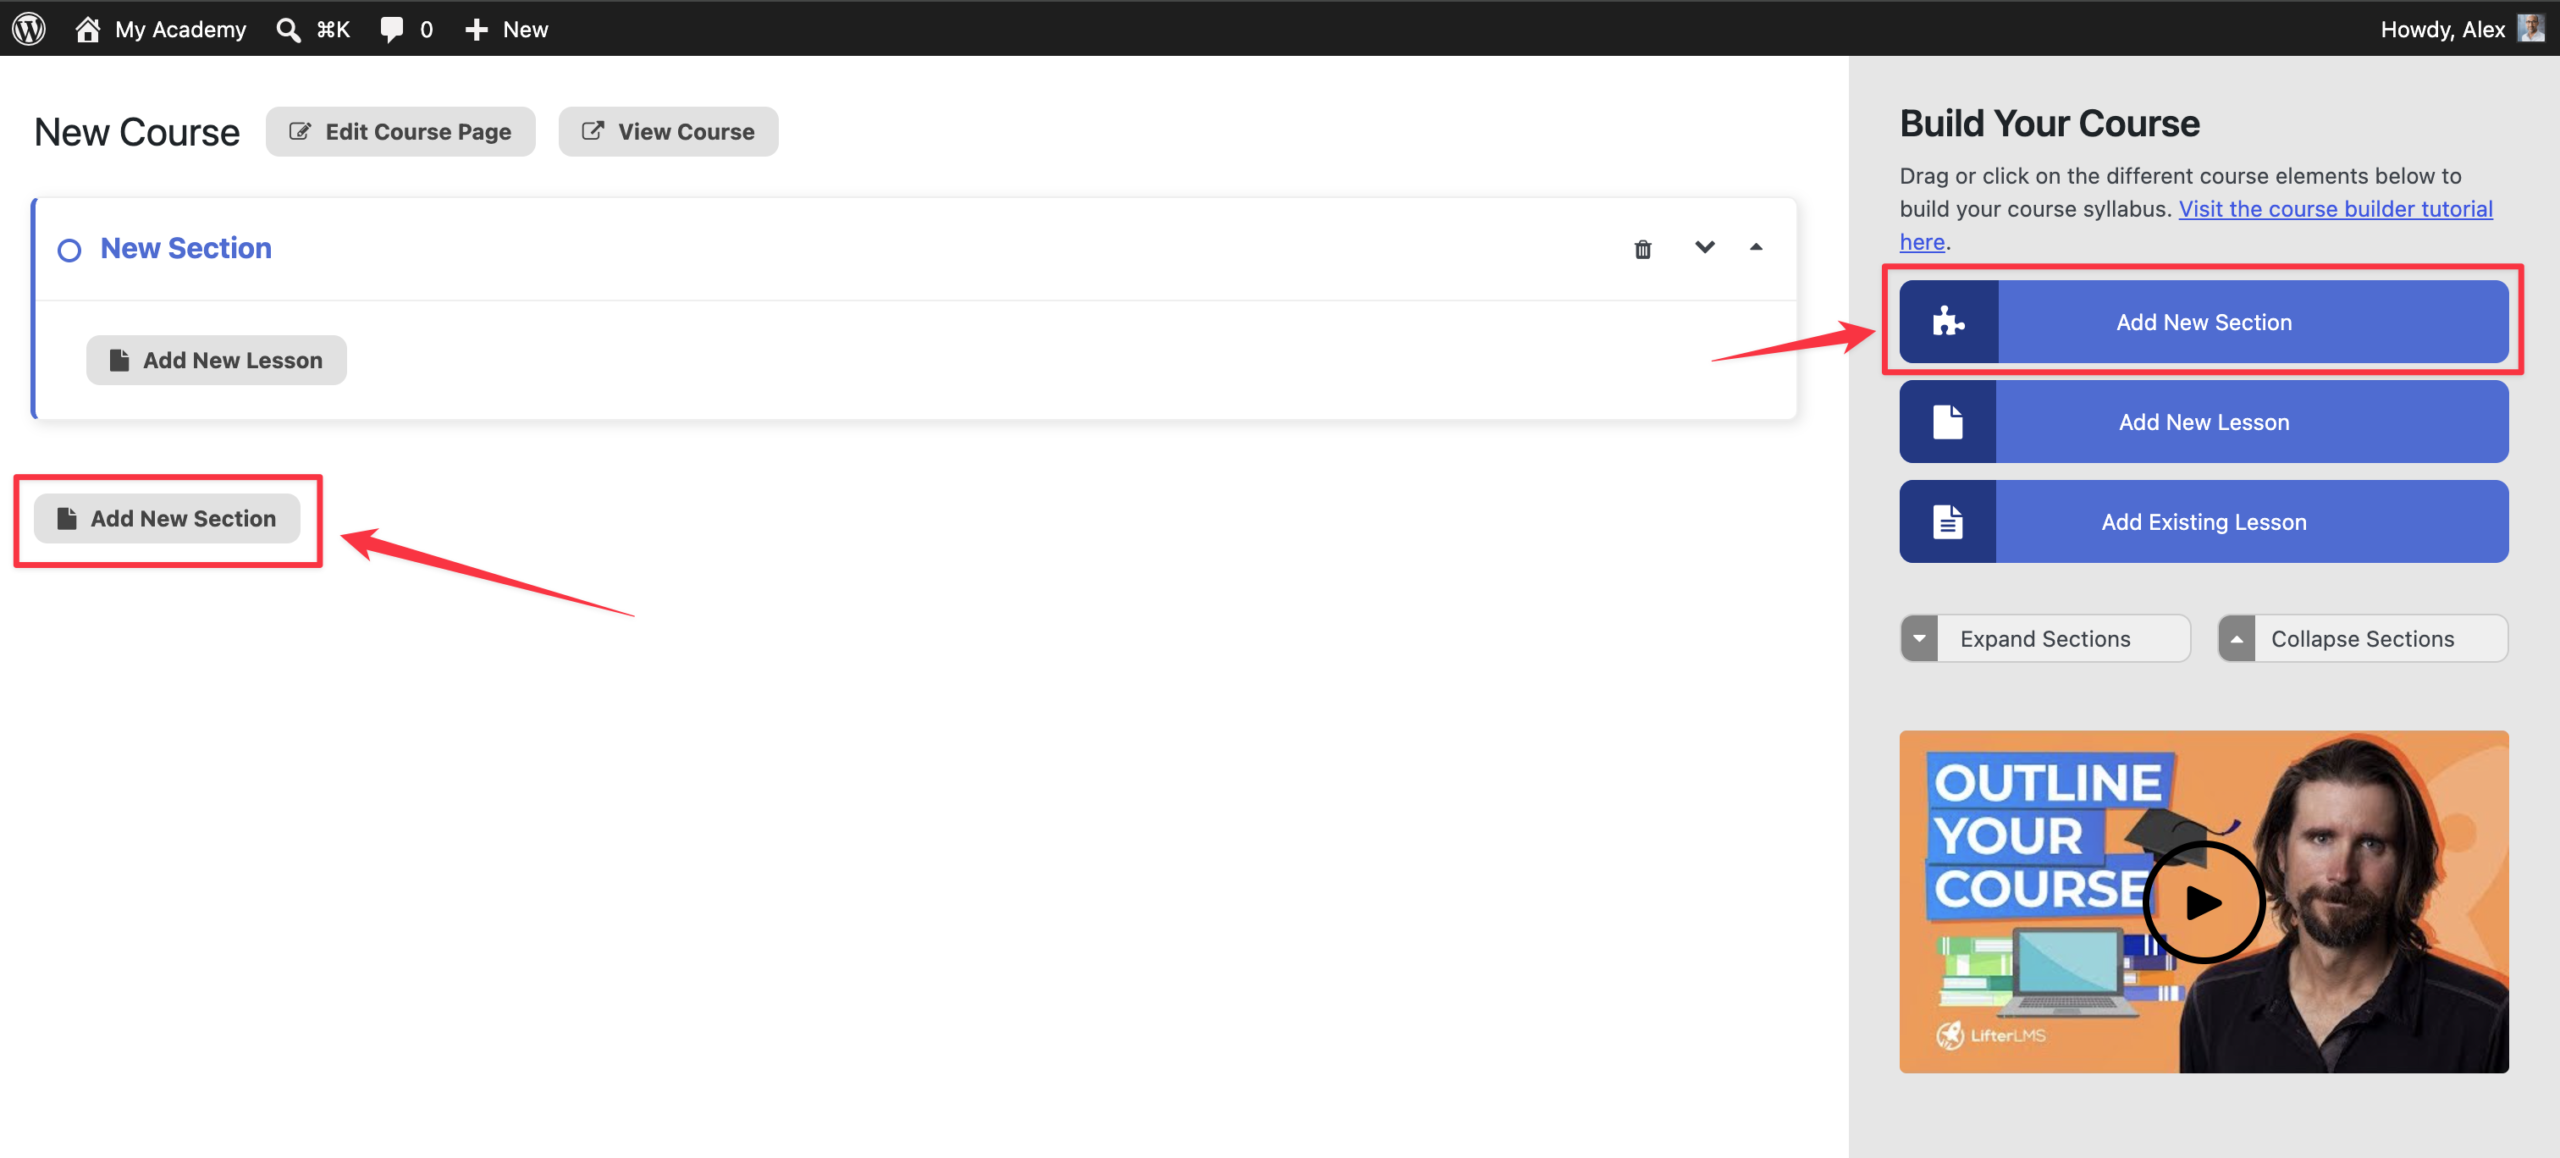
Step 1. To create a section, you need to click on one of the two Add New Section buttons shown below.
Step 2. Click on “New Section” and highlight the “New Section” text to make it editable.

Step 3. Type the new section title and make necessary edits.
Step 4 (Optional). Add another section. You’ll notice that the new section has been added at the bottom of the last section.

Step 5. Save the changes once you are done.
There are two ways in which you can rearrange the order in which your sections appear inside the course builder:
- By dragging and dropping the sections to their new location.
- By clicking on the Shift up and Shift down buttons of each section.
Method 1. By dragging and dropping the sections to their new location
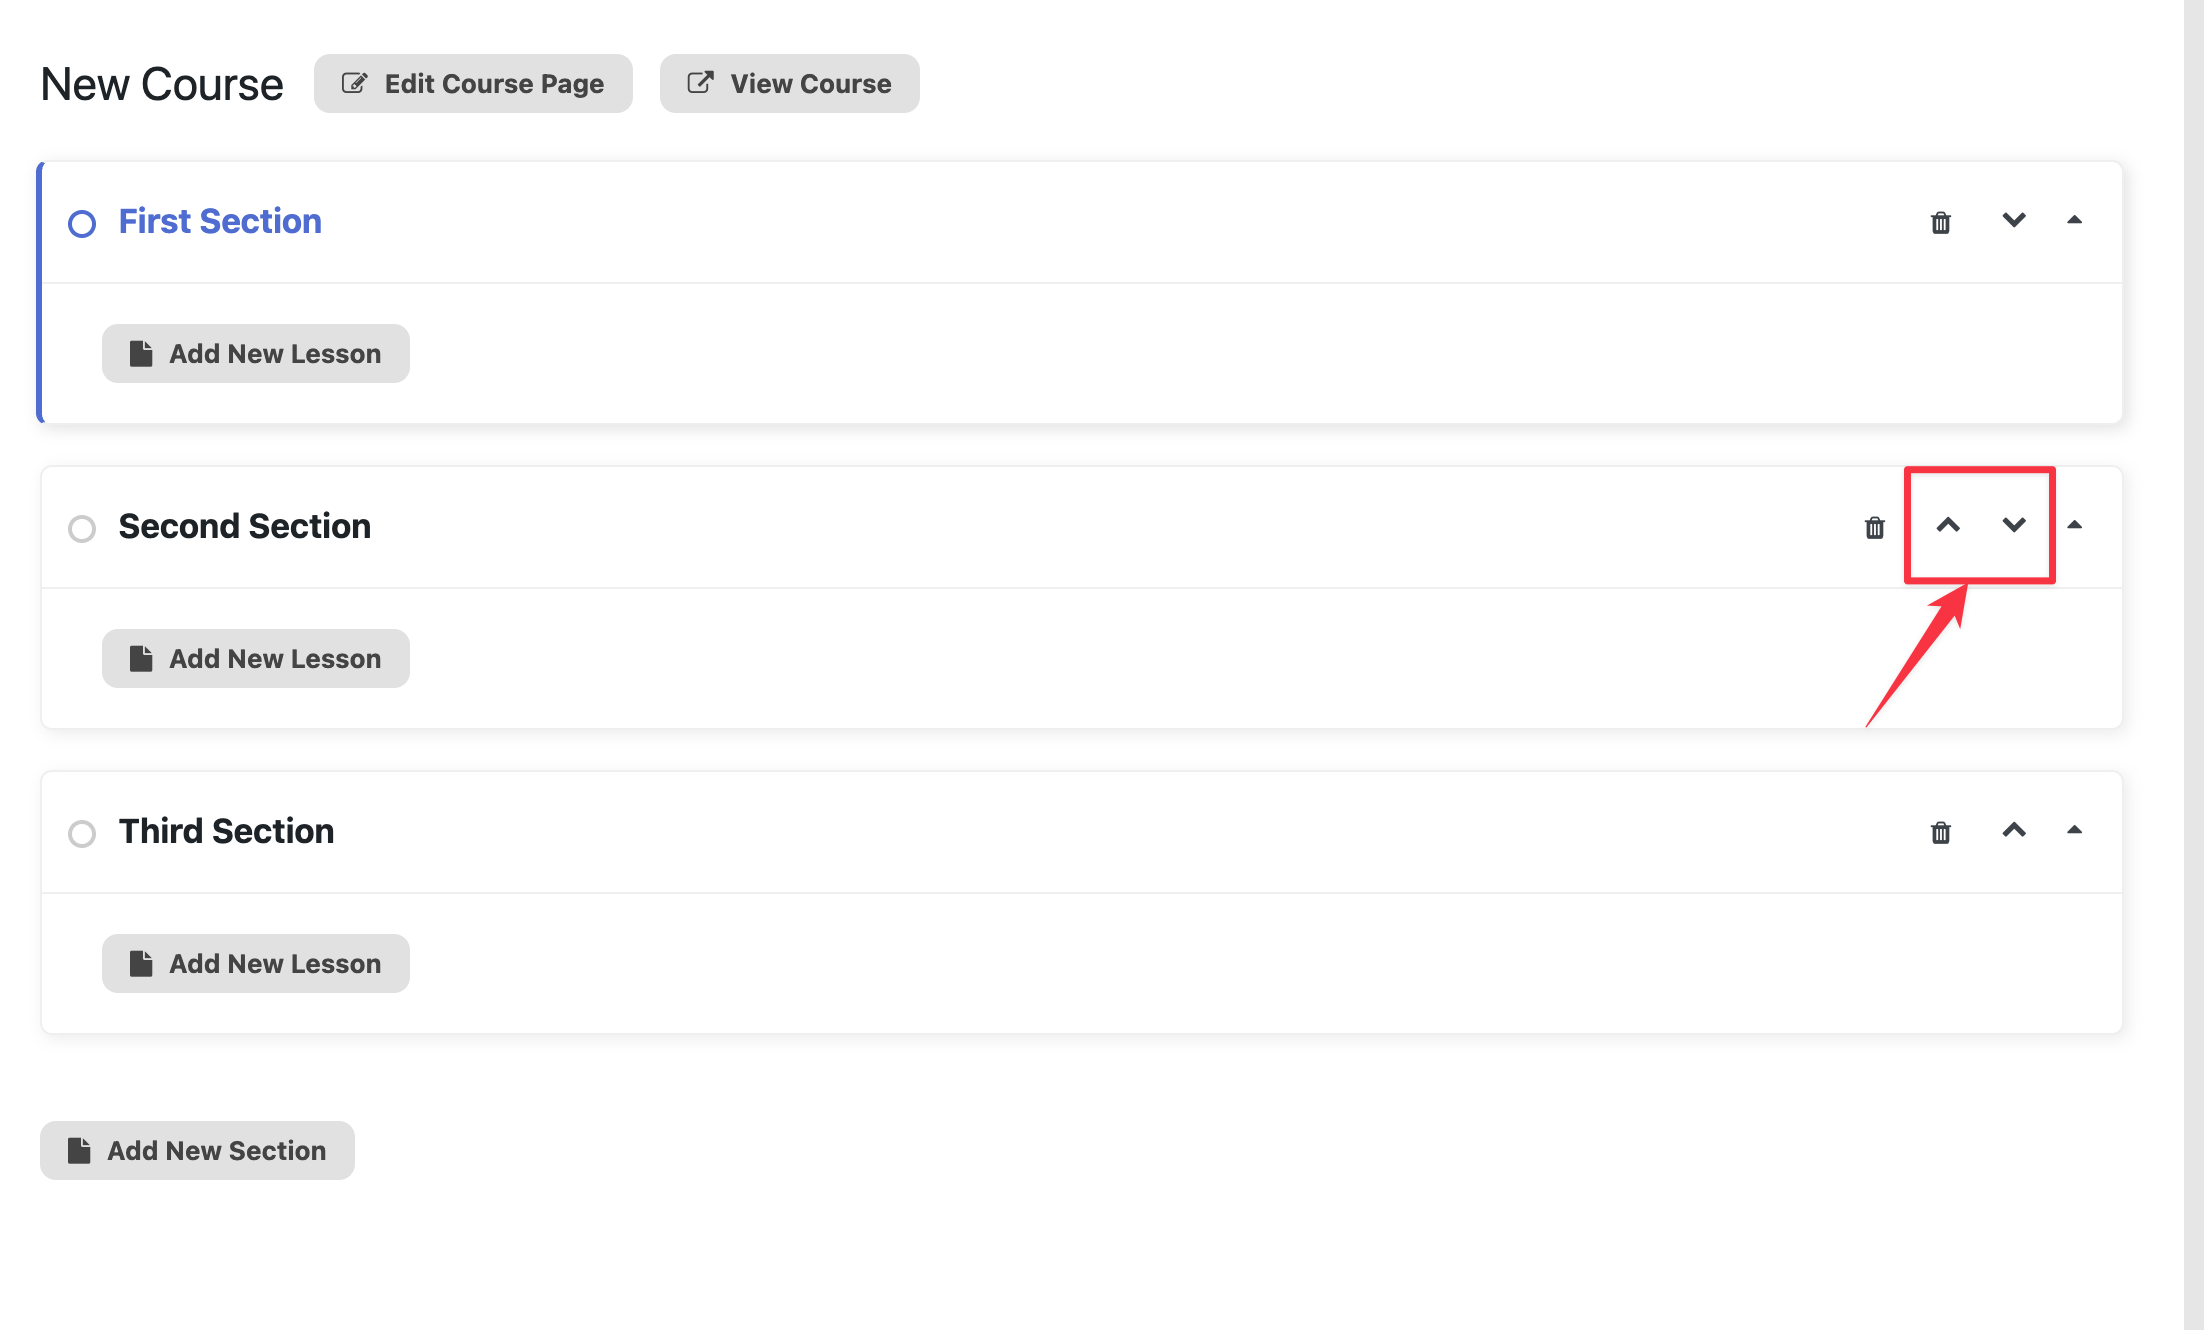
Method 2. By clicking on the Shift up and Shift down buttons of each section.
In the course builder, you can collapse or expand sections one at a time or all of them at the same time. In other words, you can:
- Collapse/expand all sections at once
- Collapse/expand each section individually
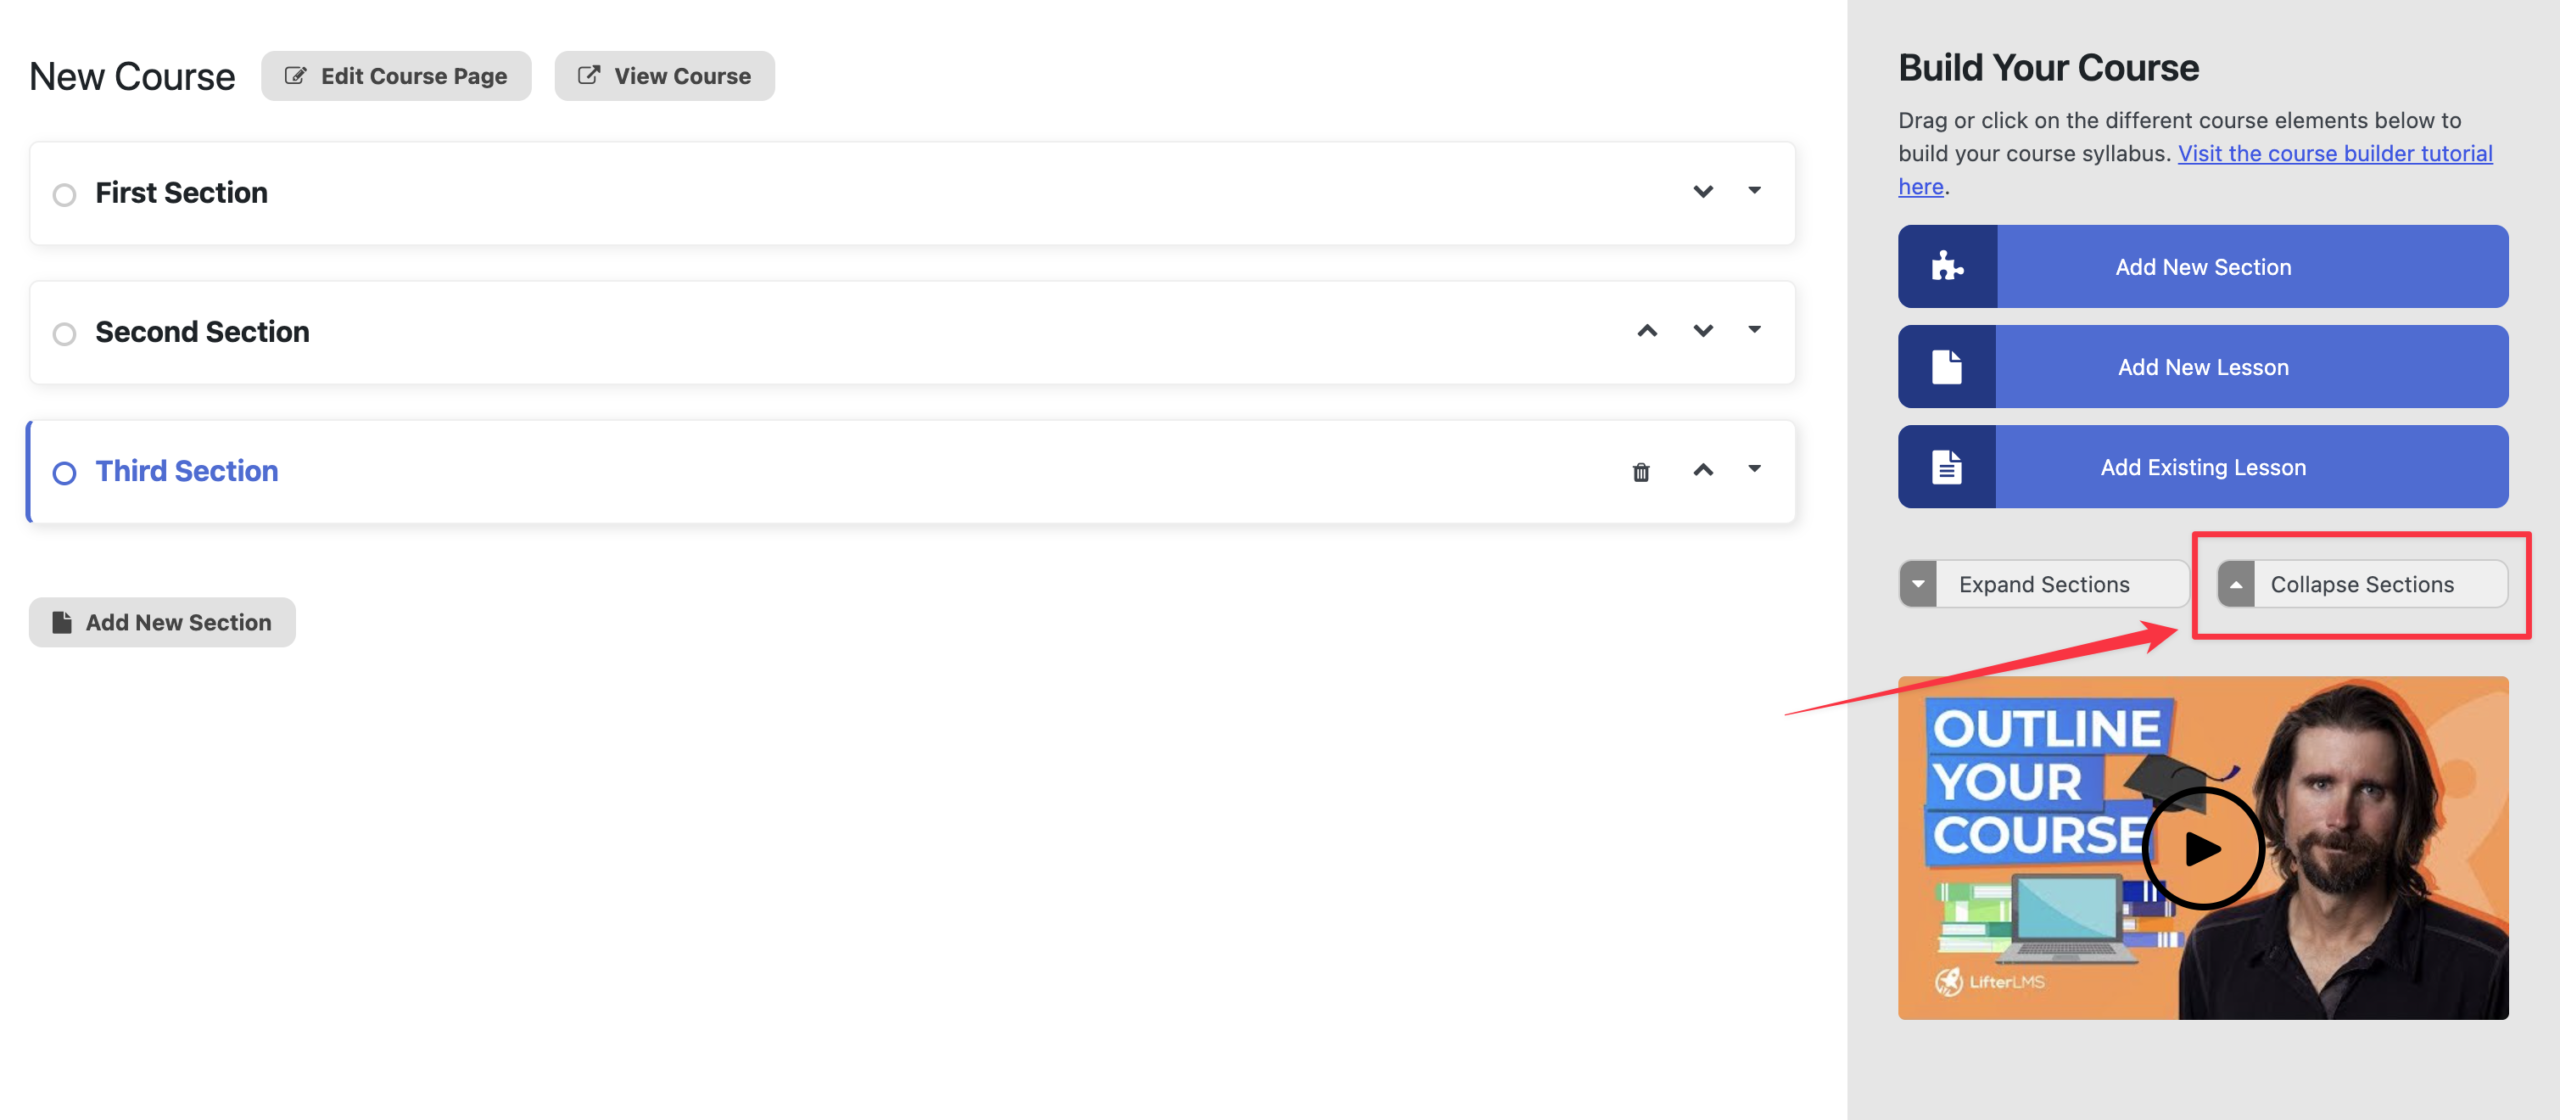
Method 1. Collapse/expand all sections at once
Step 1. To collapse all sections at once, click on the Collapse Sections button on the side.
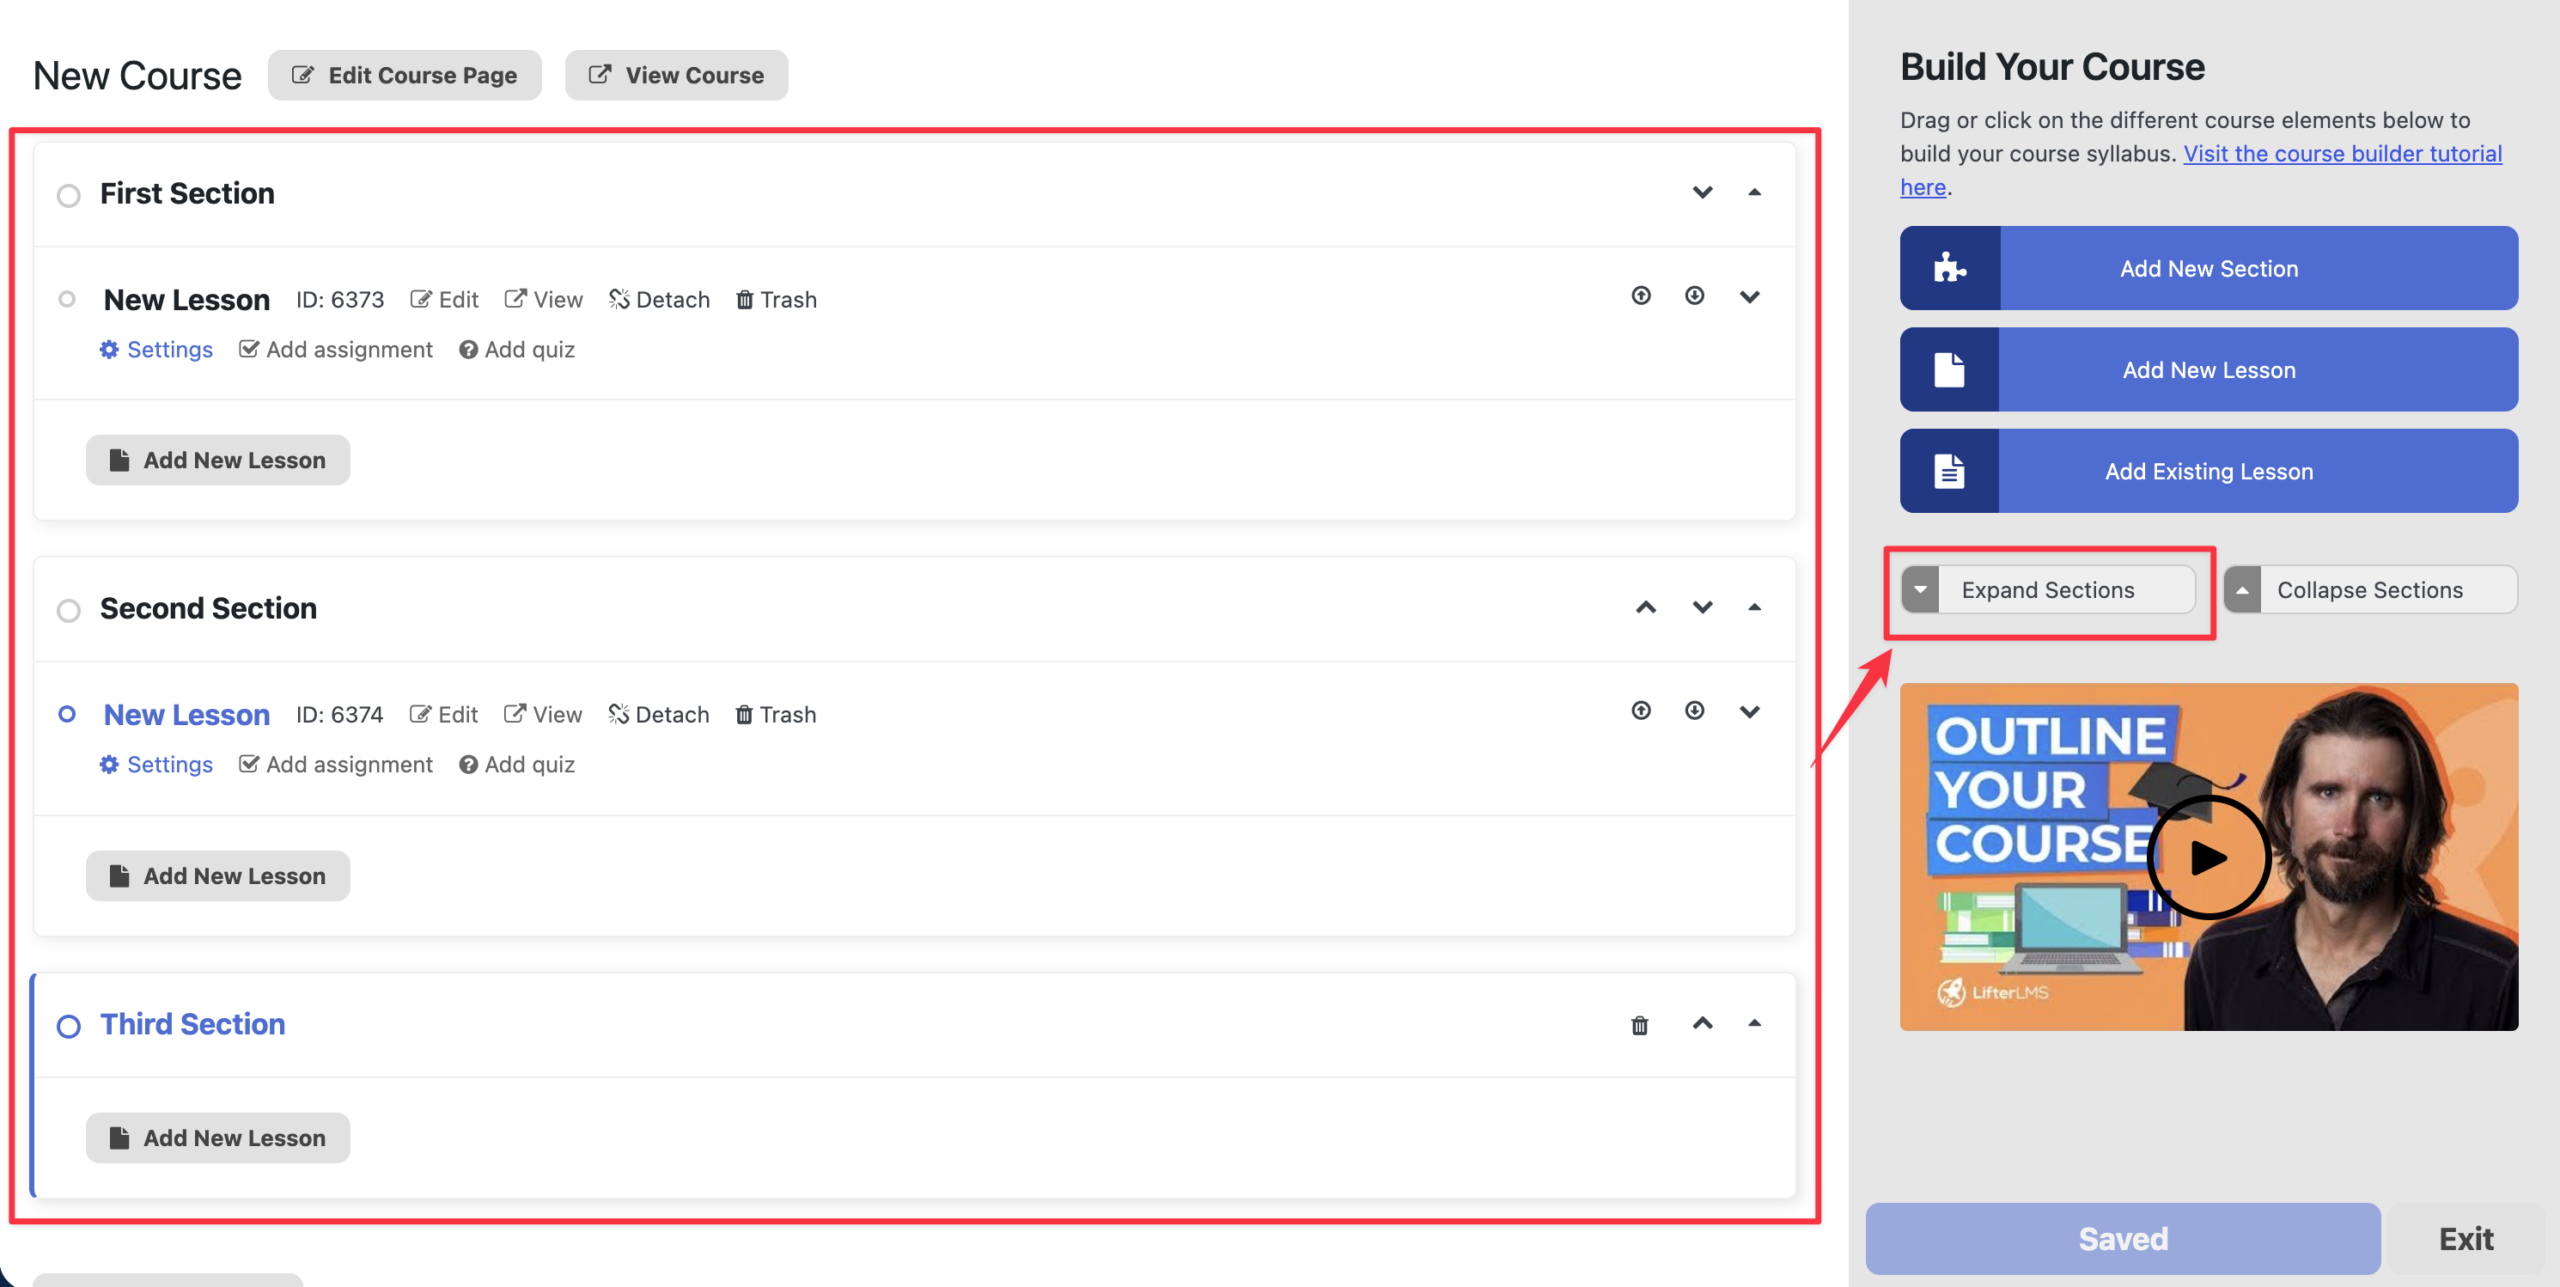
Step 2. To expand all sections at once, click on the Expand Sections button on the side.
Method 2. Collapse/expand each section individually
Step 1. To collapse an expanded section, click on the upward-pointing Collapse section icon.
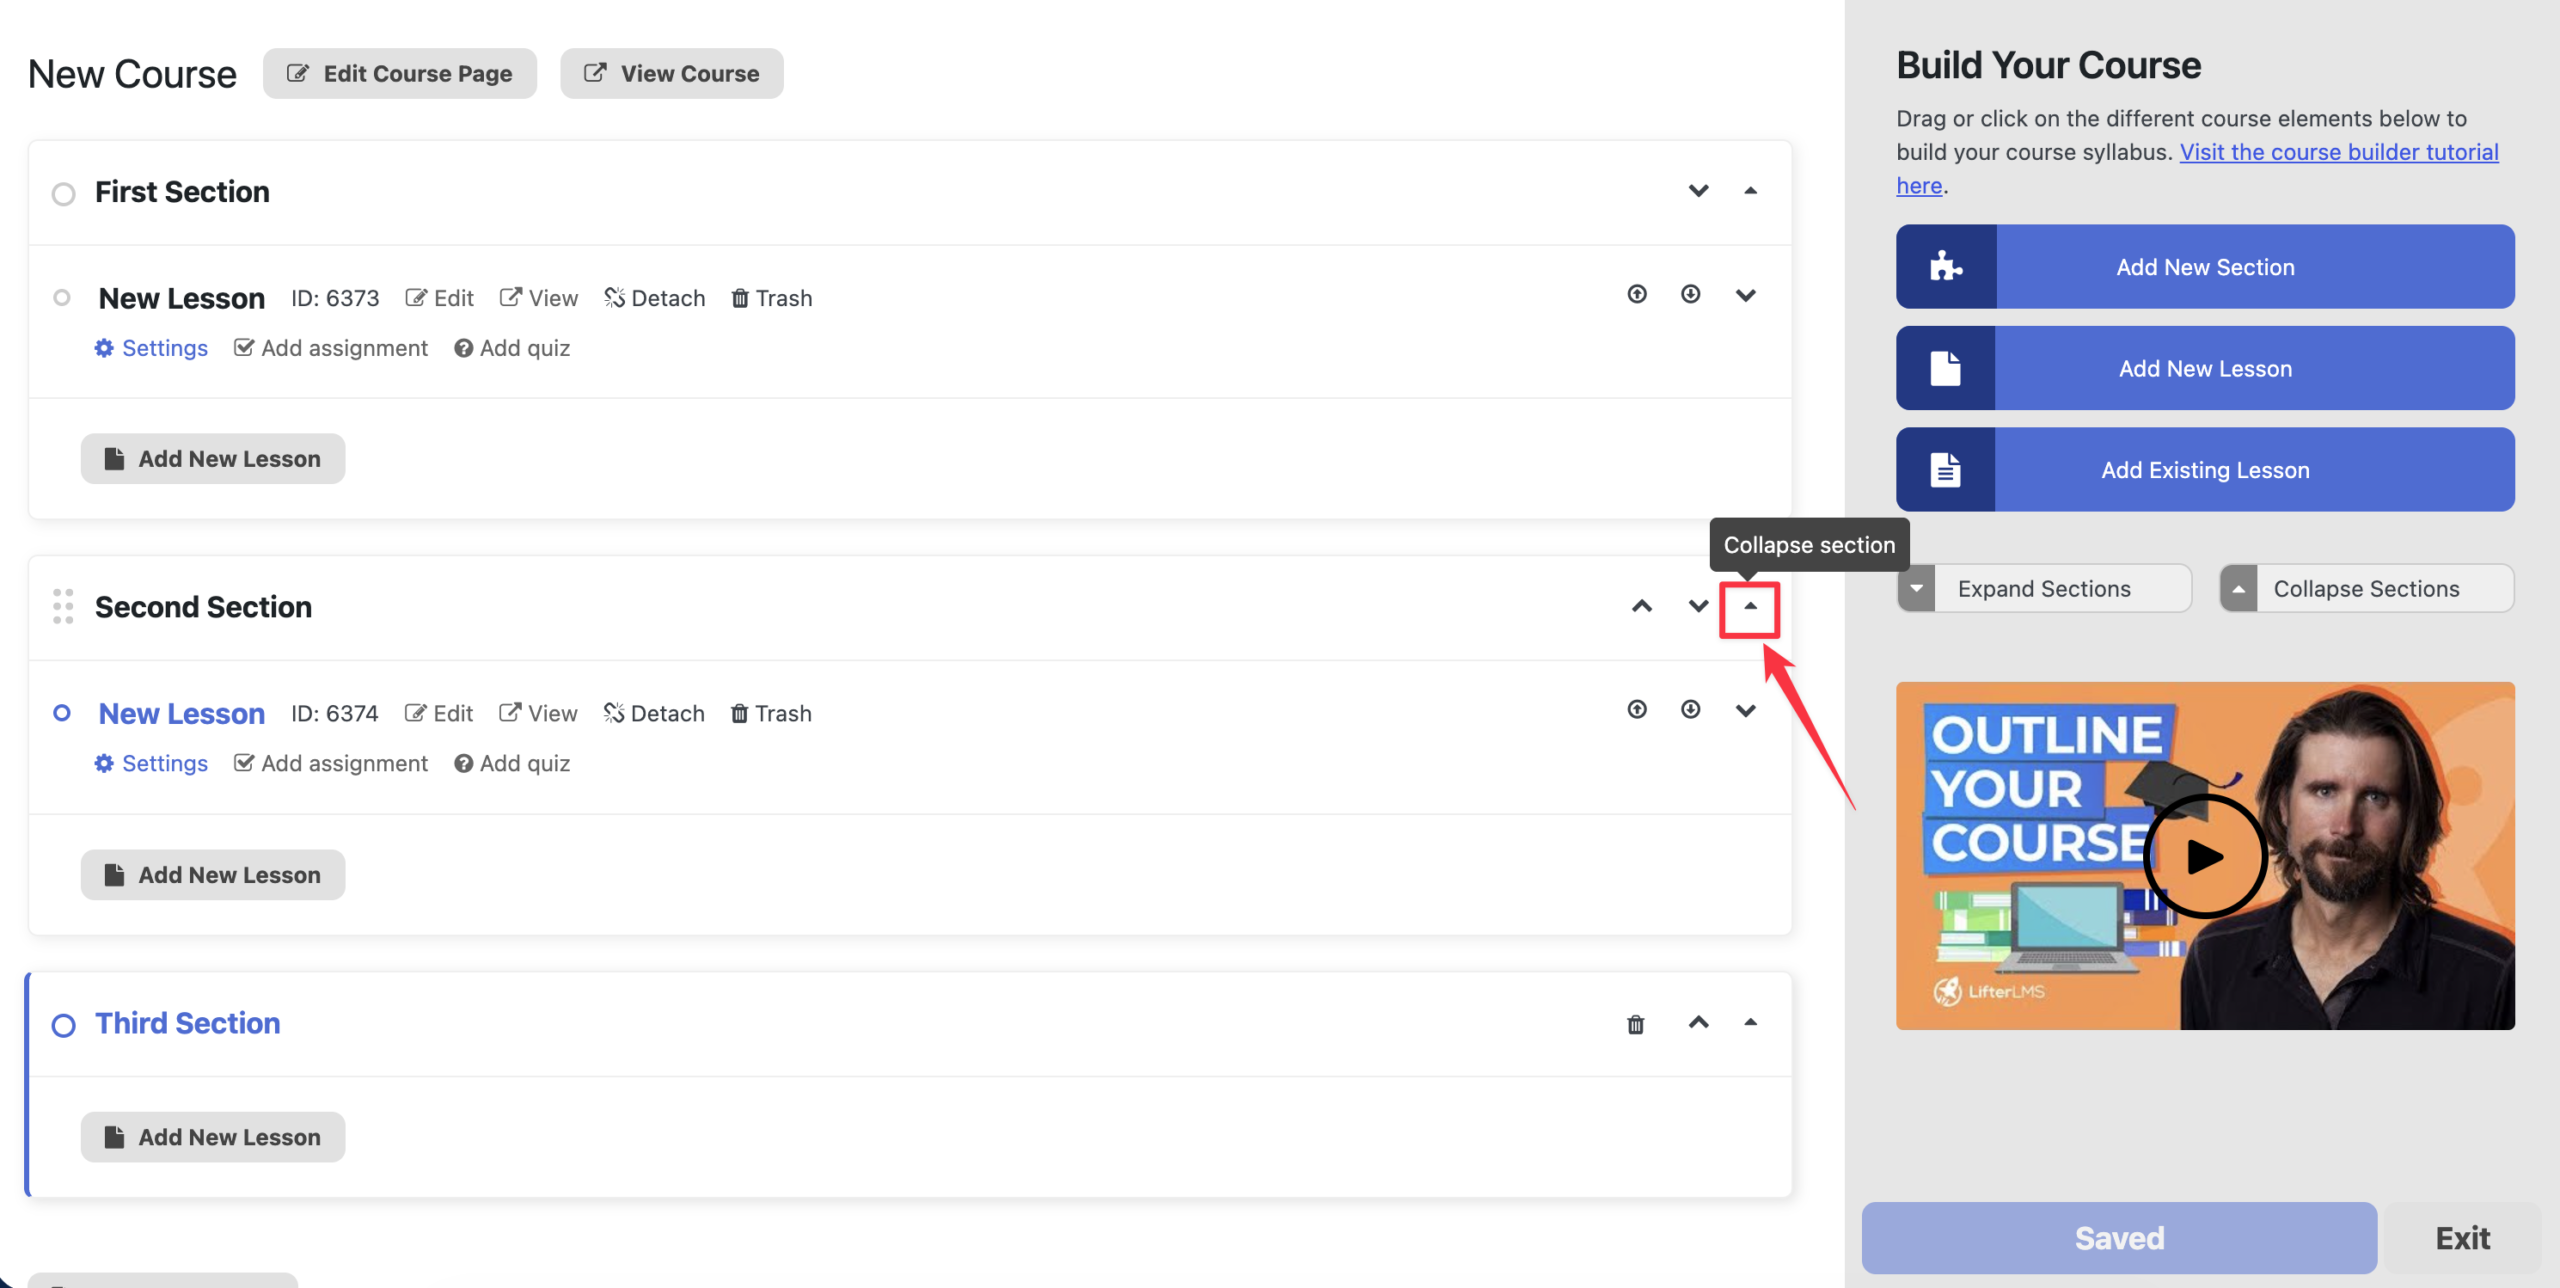
Step 2. Similarly, to expand a collapsed section, click on the downward-pointing Expand section icon.
You can only delete empty sections. An empty section is a section that does not contain a lesson. Non-empty sections (i.e., sections that contain a lesson) cannot be deleted.
Step 1. Identify the empty section that you want to delete.
Step 2. Click on the “Delete section” trash icon of that section.
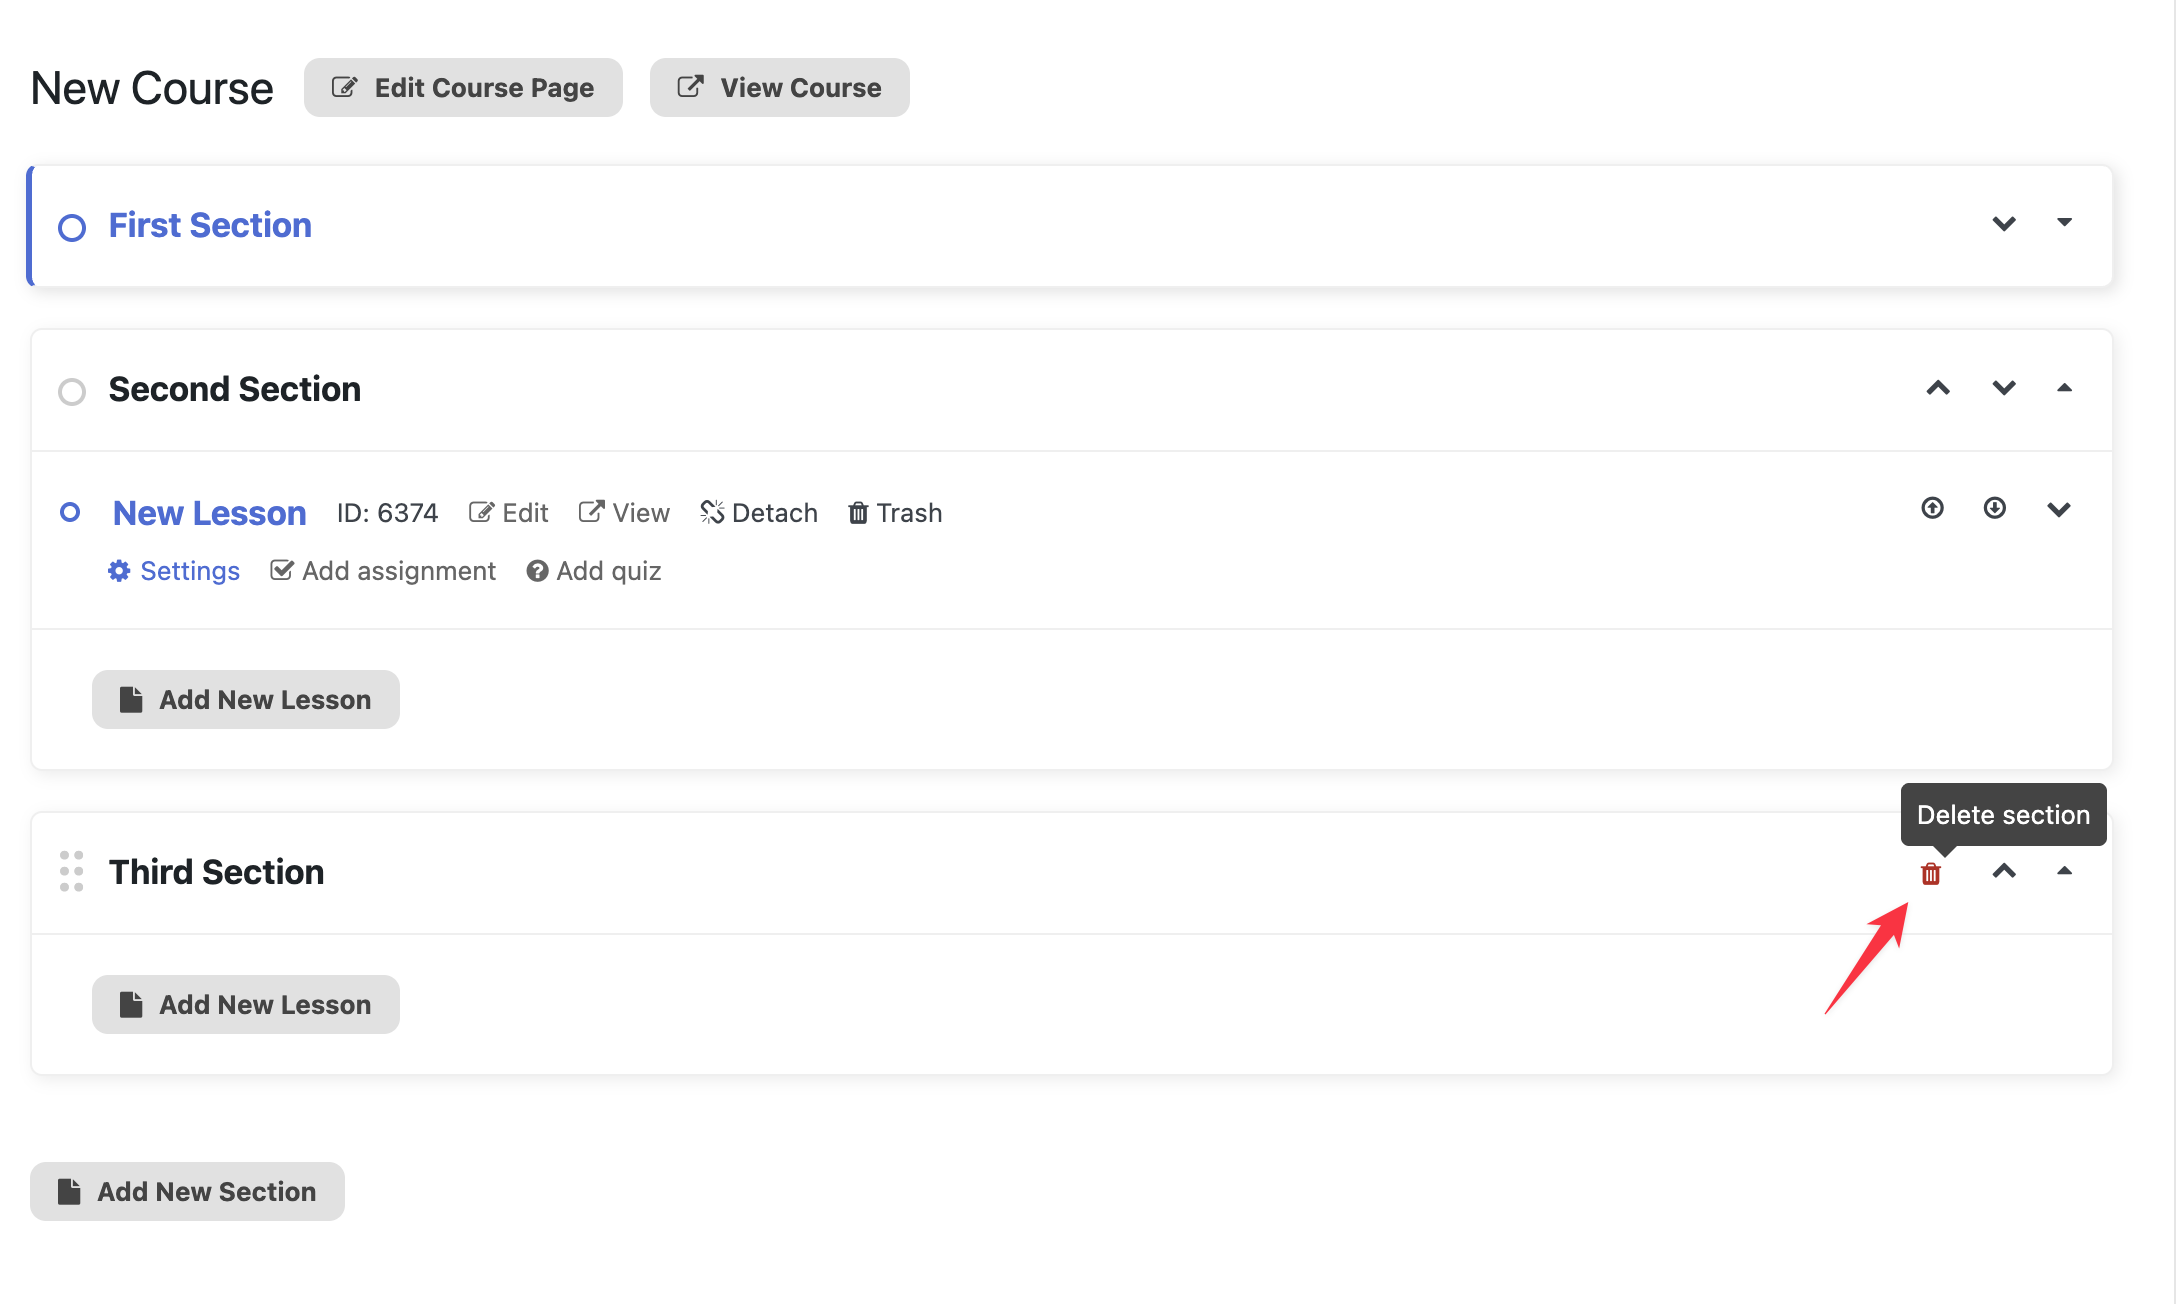
Step 3. This will open a confirmation dialog box. Click on OK to confirm the deletion. (Otherwise, click on Cancel if you do not want to continue deleting.)
Step 4. Save the changes once you are done deleting.
A lesson can only be added inside a currently selected section. By default, the currently selected section is the last section of the course, regardless of whether that last section is collapsed or expanded.
To change the currently selected section, just click the desired section until it expands. (If you click on an already expanded section, it will collapse. Since a section won’t be selected if it is collapsed, you have to click on it again to expand it.)
Now, there are two methods by which you can add lessons to the currently selected section:
- Use the Add New Lesson button under each specific section.
- Use the Add New Lesson button on the course builder sidebar.
Method 1: Using the Add New Lesson button under each specific section
In this method, the currently selected section is the section containing the Add New Lesson button that you clicked.
Step 1. Identify the section you want to add a new lesson to.
Step 2. Click on the Add New Lesson button at the bottom of that specific section.

This will immediately add the new lesson to the currently selected section.
Step 3. Make sure that you save the changes.
Method 2: Using the Add New Lesson button on the course builder sidebar
In this second method, the currently selected section will be displayed by default (unless you manually click the section you want).
Step 1. Click on the section you want to add a new lesson to until that chosen section is expanded (not collapsed). This will be the currently selected section.
Step 2. Click on the Add New Lesson button on the side.
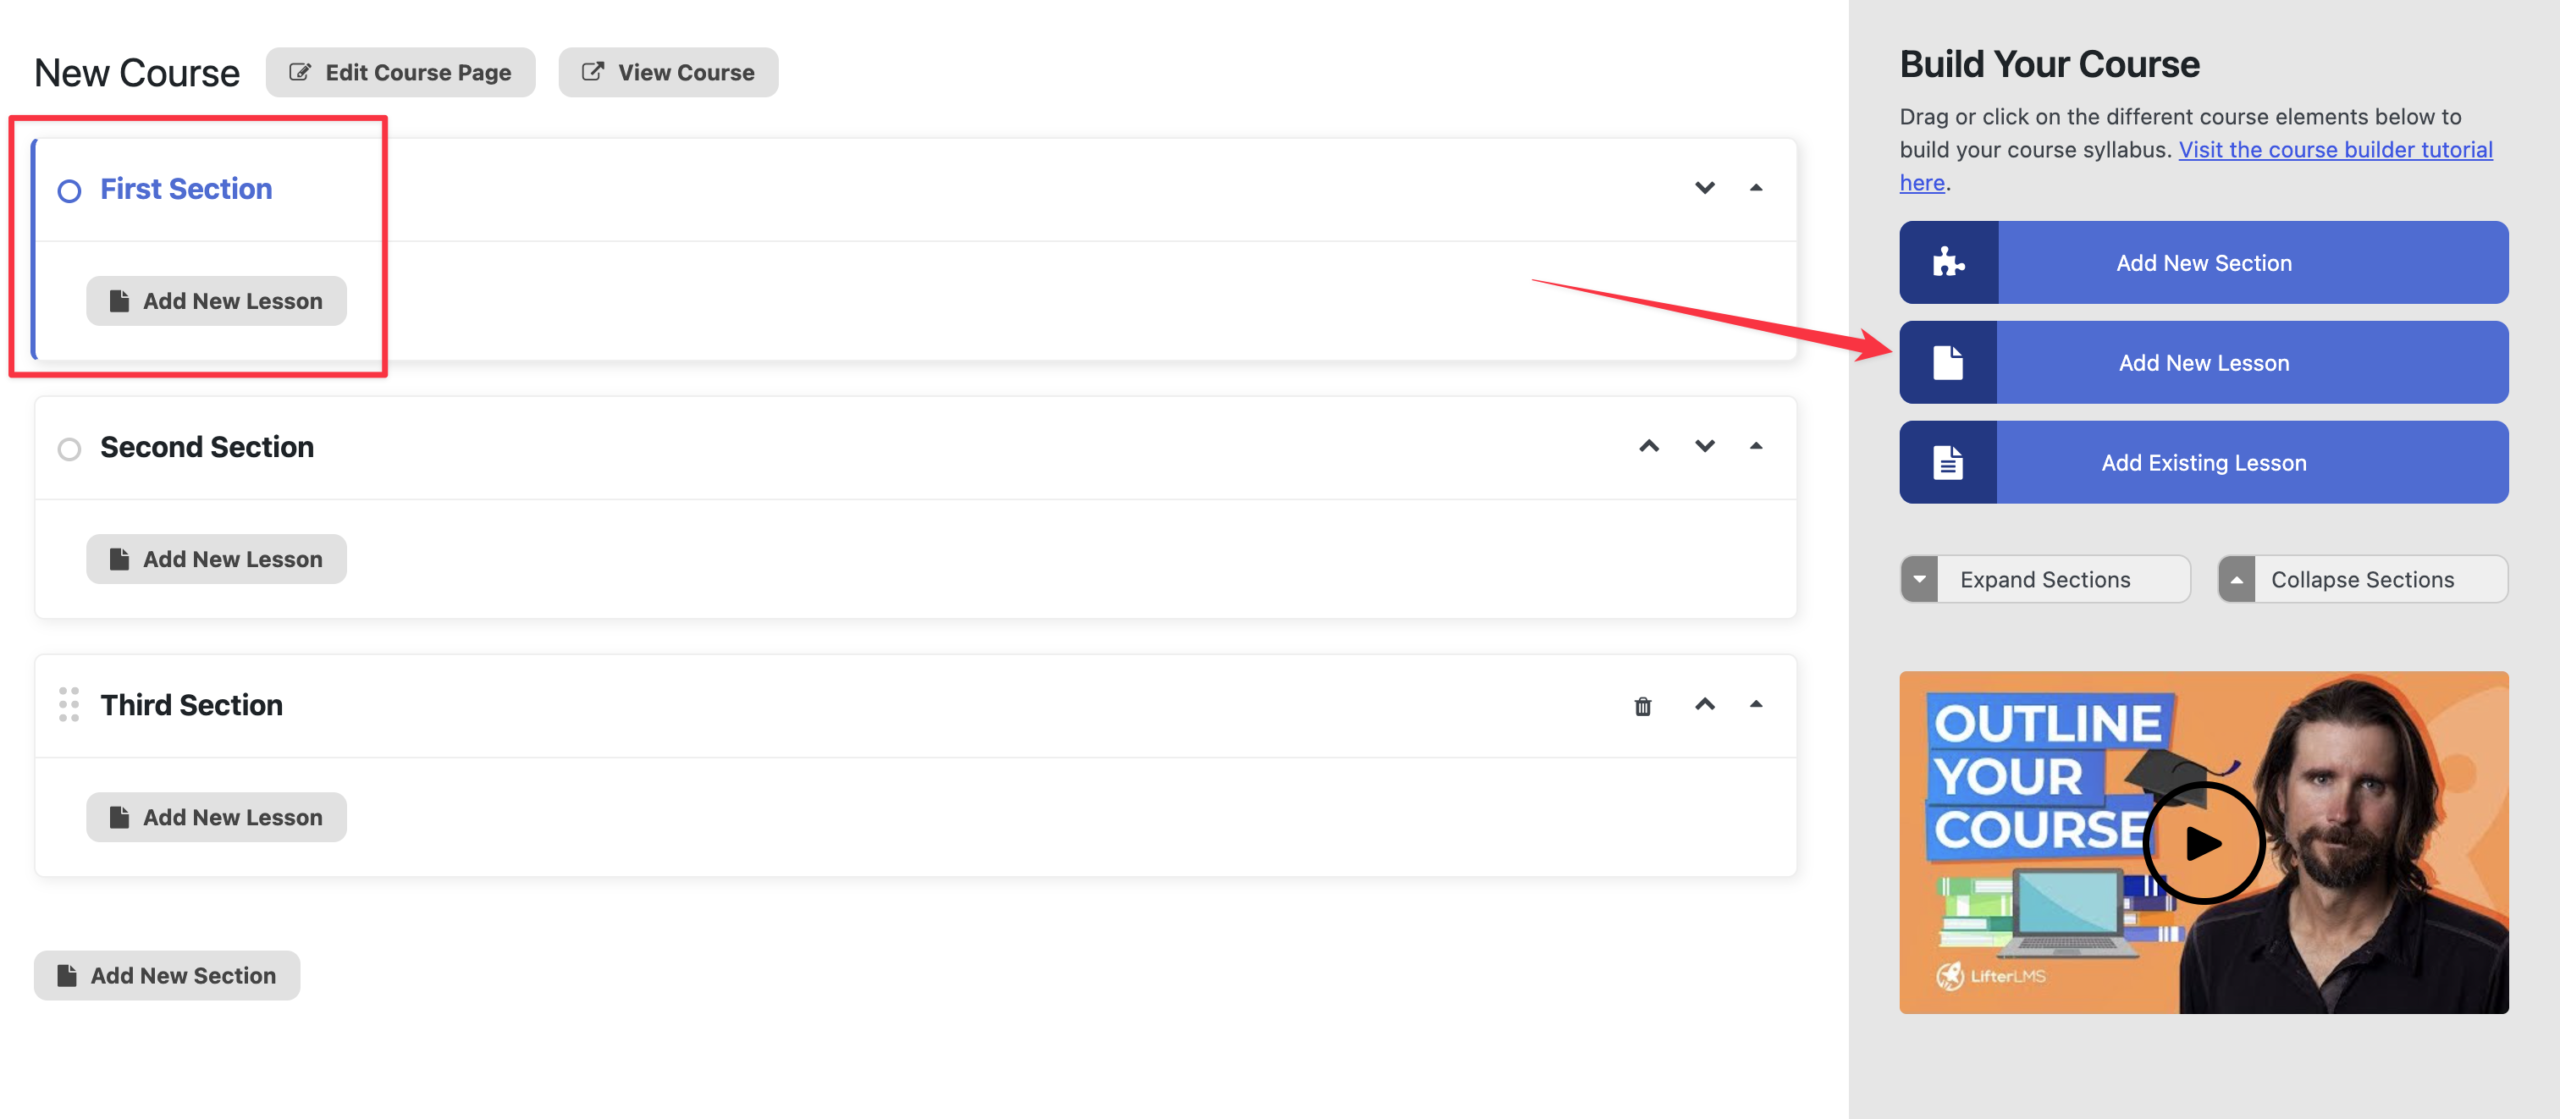
This will add a new lesson to the currently selected section (provided that section is also expanded).
Step 3. Make sure that you save the changes.
The order of these lessons within the same section can be changed, as shown below.
These lessons can also be moved between different sections, as shown below.
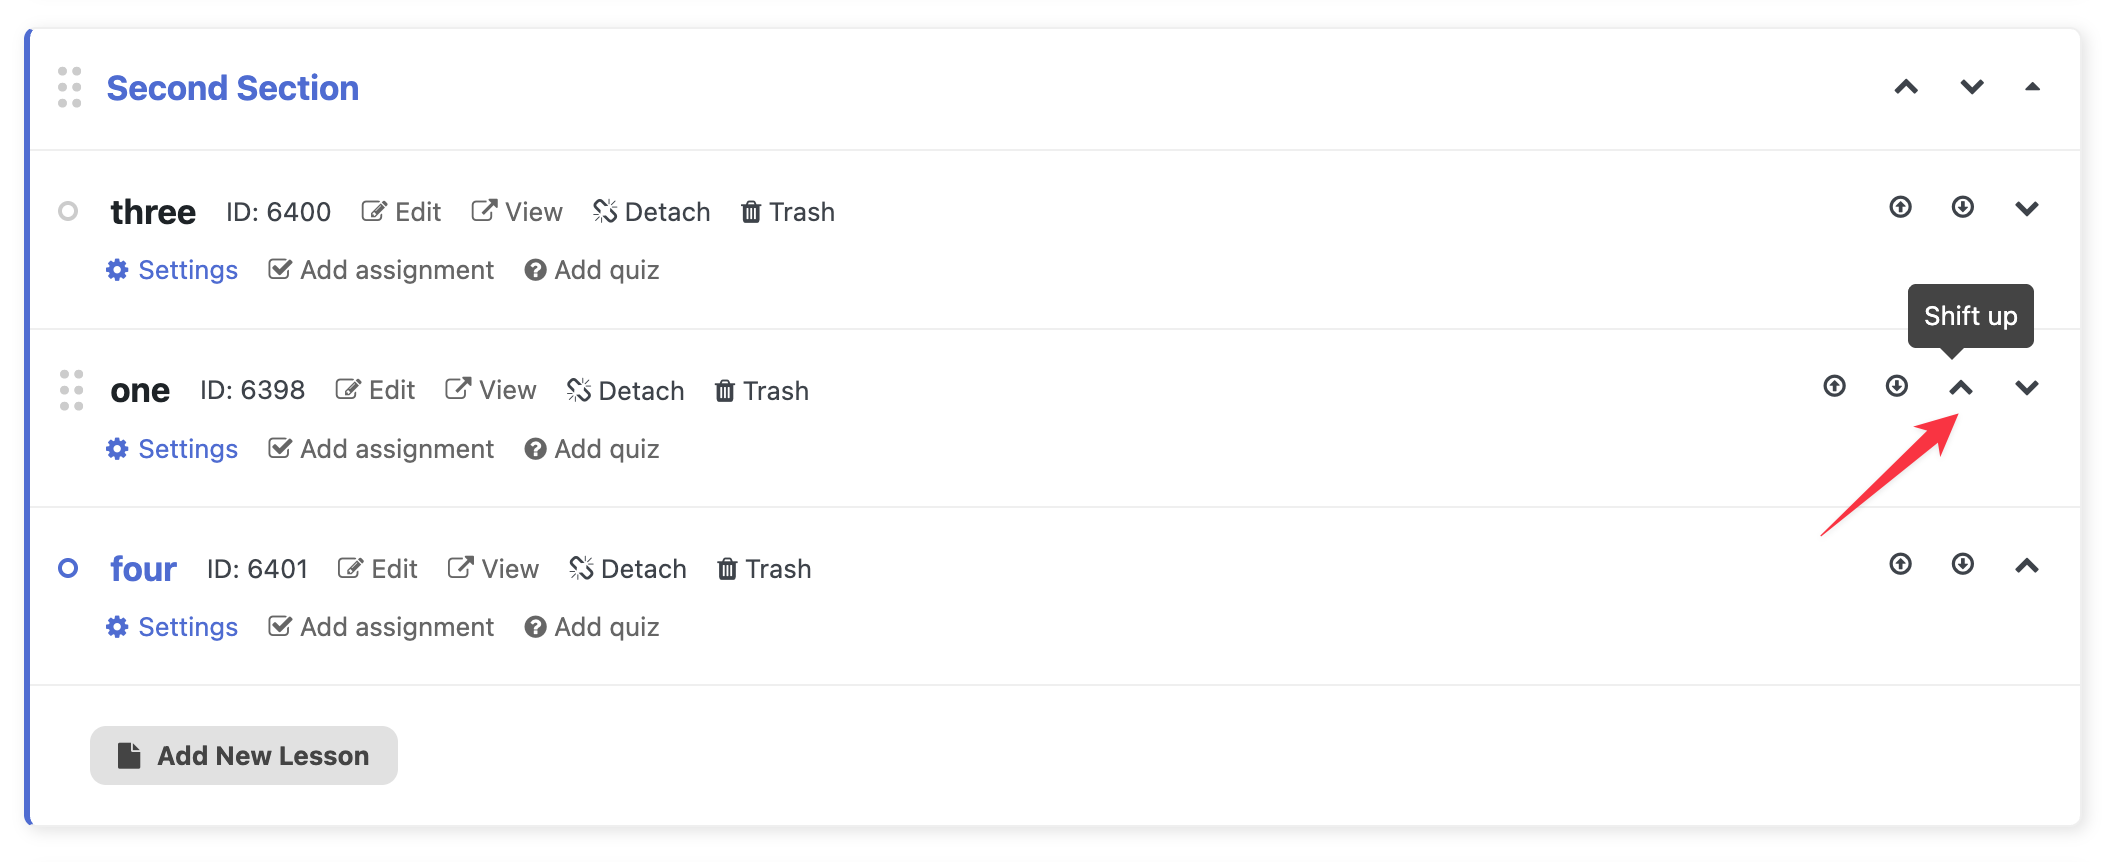
Finally, you can use the Shift up and Shift down buttons of each lesson to shift their location up and down, respectively.
Step 1. Access the course builder of the course containing the lesson you want to add content to.
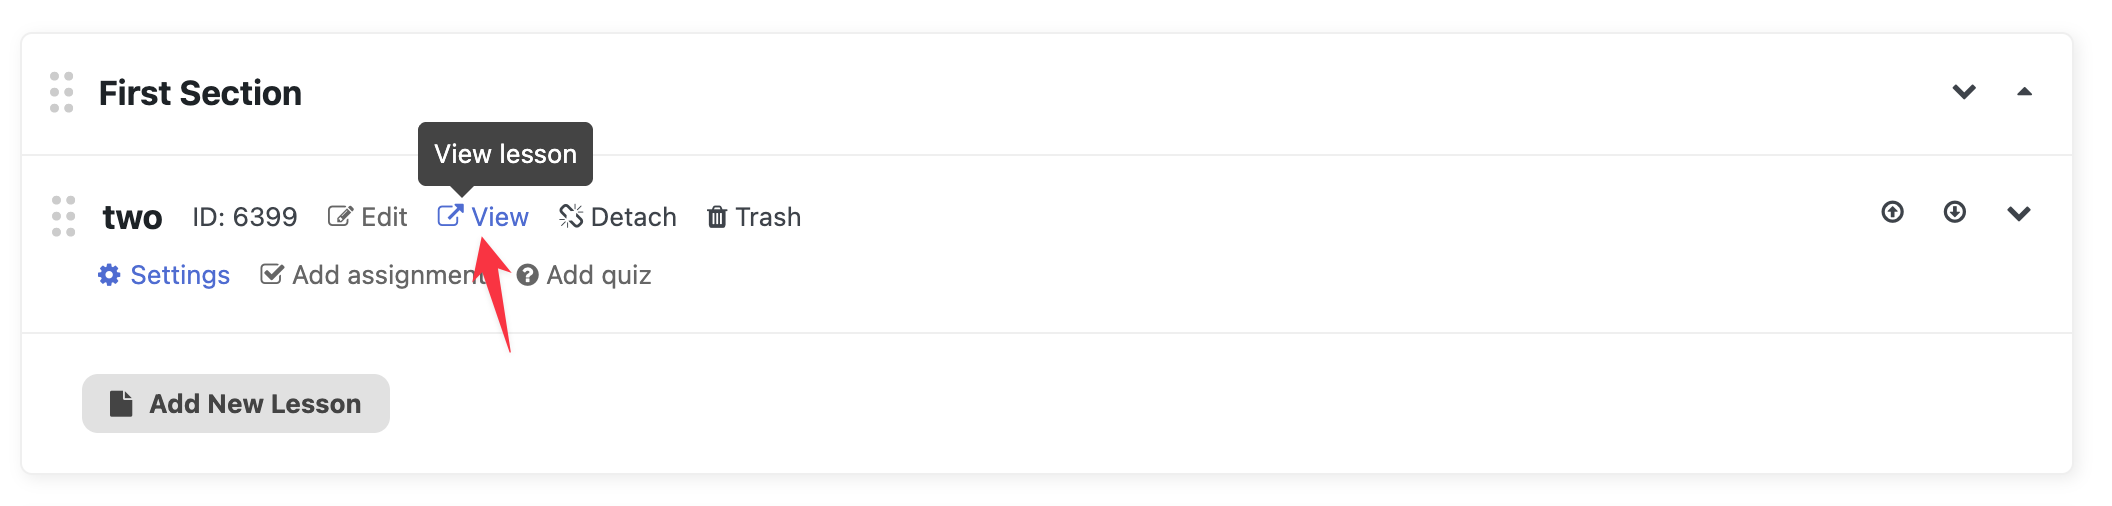
Step 2. Identify the lesson you want to view.
Step 3. Click on the View button of that lesson. This will open up the lesson in a new tab.
Step 4. Back in the course builder, click on the Edit button of that lesson. In the new tab that opens, the lesson page will load in the block editor (Gutenberg).
Step 5. For detailed, step-by-step instructions, please check out our documentation on how the LifterLMS Course Builder works or watch the YouTube tutorial below
A lesson can be cloned within the same course or copied to a different course.
For example, suppose you have two courses:
- Course A contains Lesson 1.
- Course B contains Lesson 2.
You can clone a lesson in two ways:
Clone a lesson within the same course
You can clone Lesson 2 in Course B and name the copy Lesson 3. Course B will then contain Lesson 2 and Lesson 3.
In this example:
- Source course: Course B
- Destination course: Course B
Clone a lesson from a different course
You can clone Lesson 2 from Course B into Course A. Course A will then contain Lesson 1 and a copy of Lesson 2.
In this example:
- Source course: Course B
- Destination course: Course A
In the course builder, the destination course is always the course currently open. You can change only the source course.
Step 1. Open the course you want to edit in the course builder.
Step 2. Select a section to add the existing lesson to by clicking on that section until it is expanded. This selected section will be the currently selected section. If you do not select a section, the last section will be the currently selected section.
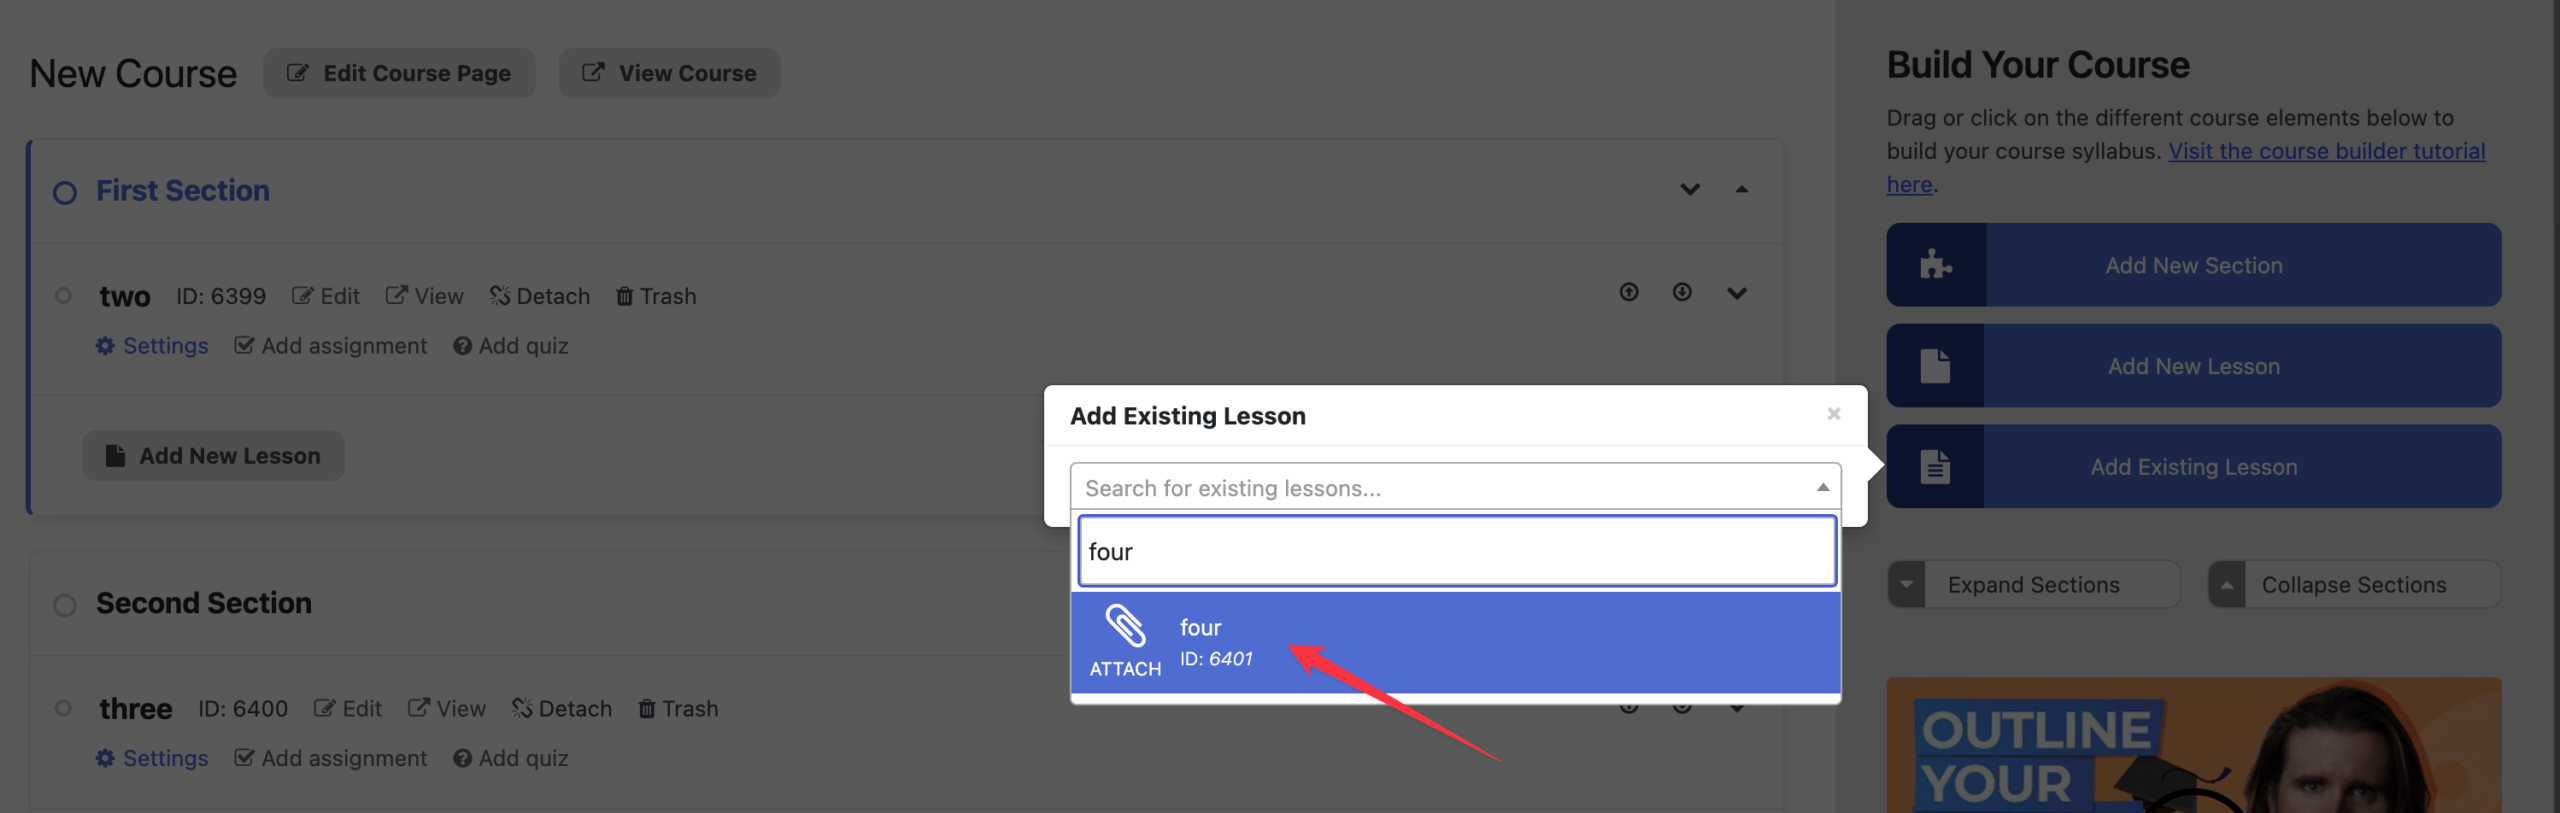
Step 3. Click on the Add Existing Lesson button on the side.
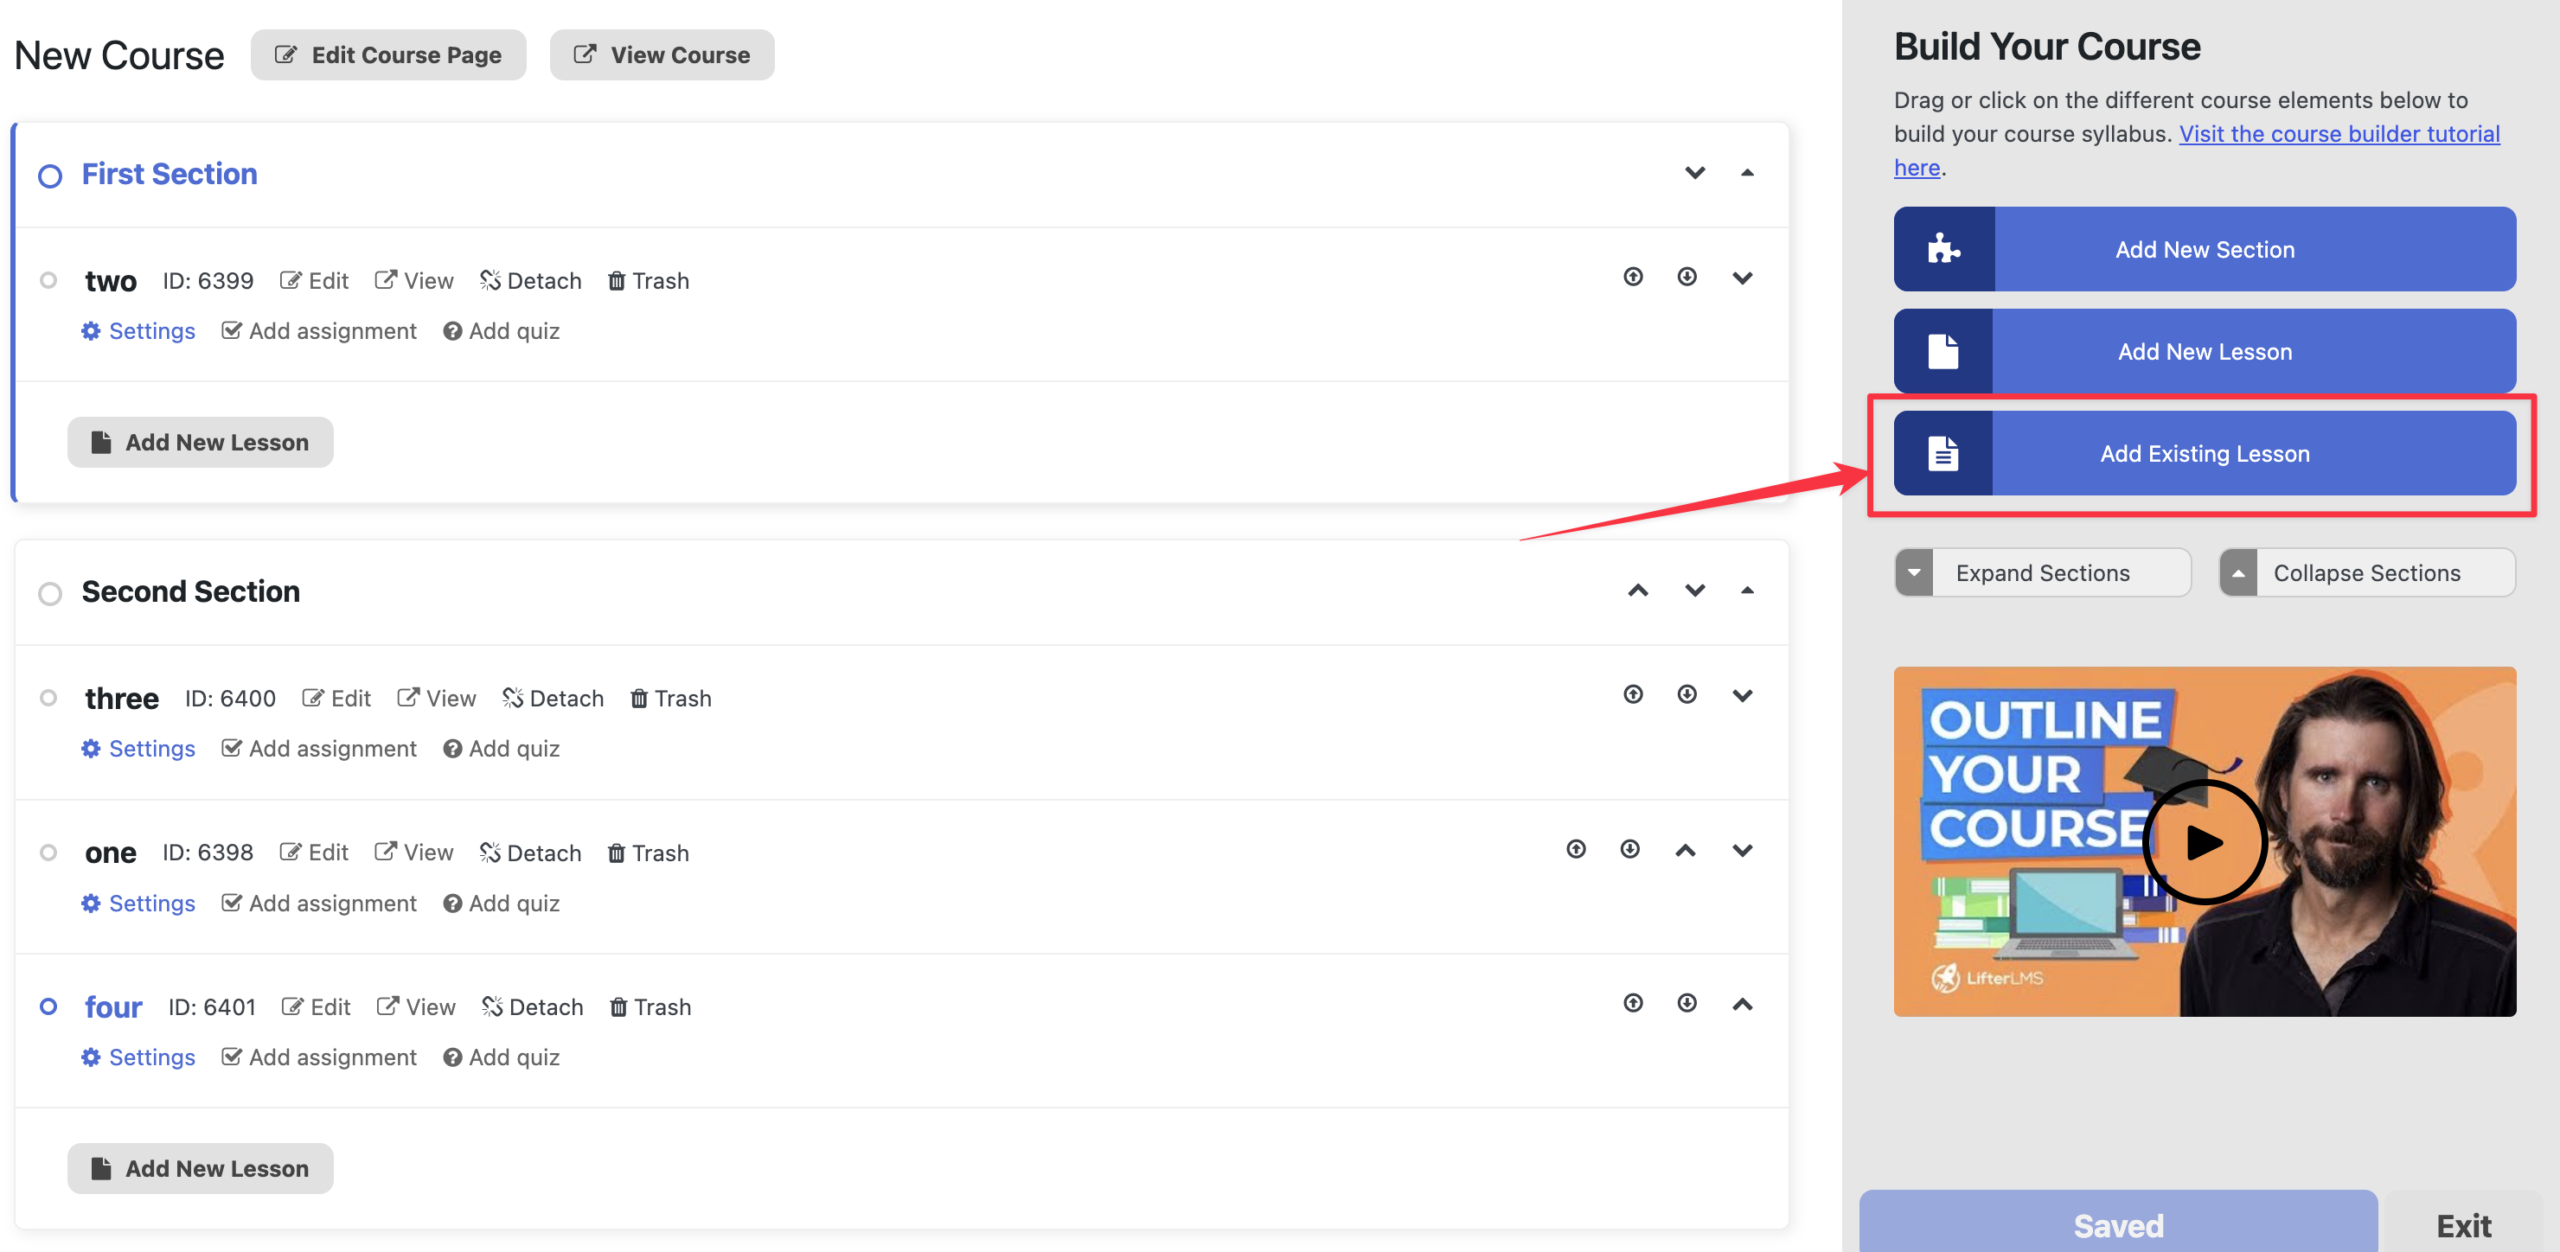
This will open up a dropdown from which you can select which existing lesson you would like to clone and add to the currently selected section.
Step 4. To clone an existing lesson from within the same course, select a lesson with the same course ID as the course you are editing in the builder.
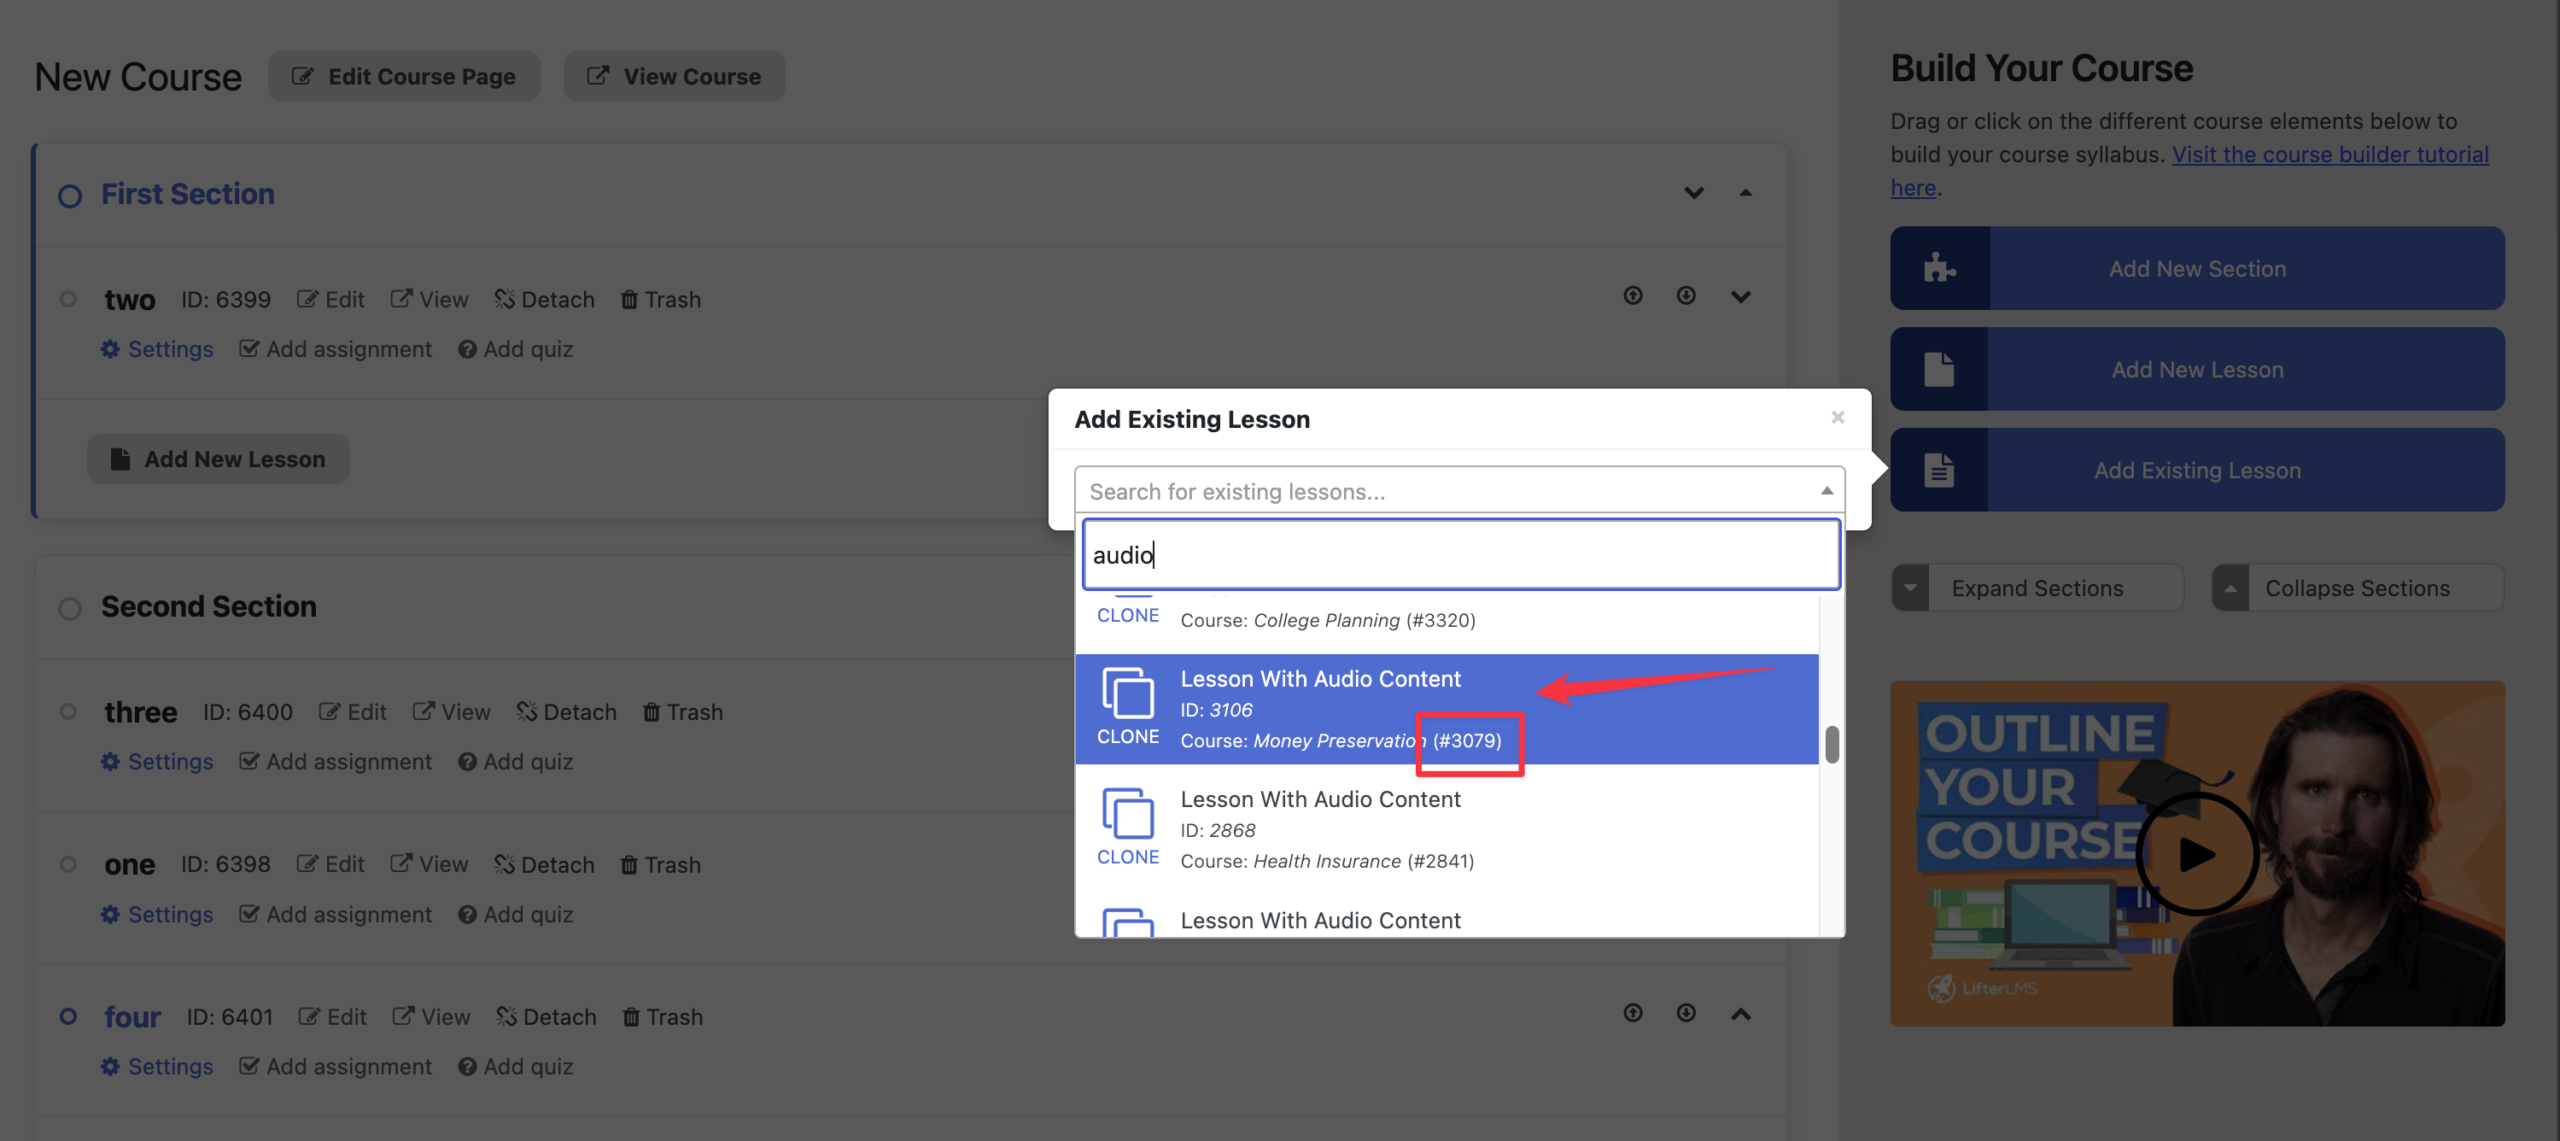
Step 5. Similarly, to clone an existing lesson from a different course, select a lesson whose course ID differs from the course you are editing in the builder.
Step 6. Make sure that you save the changes.
When a lesson gets detached from a course, it continues to exist in WordPress Dashboard > Courses > Lessons. These are called orphaned lessons. However, it is no longer associated with any course. A detached lesson will remain accessible to non-logged-in users as long as they have the lesson’s URL.
Step 1. Access the course builder for the course that contains the lesson you want to detach.
Step 2. Identify the lesson you want to detach.
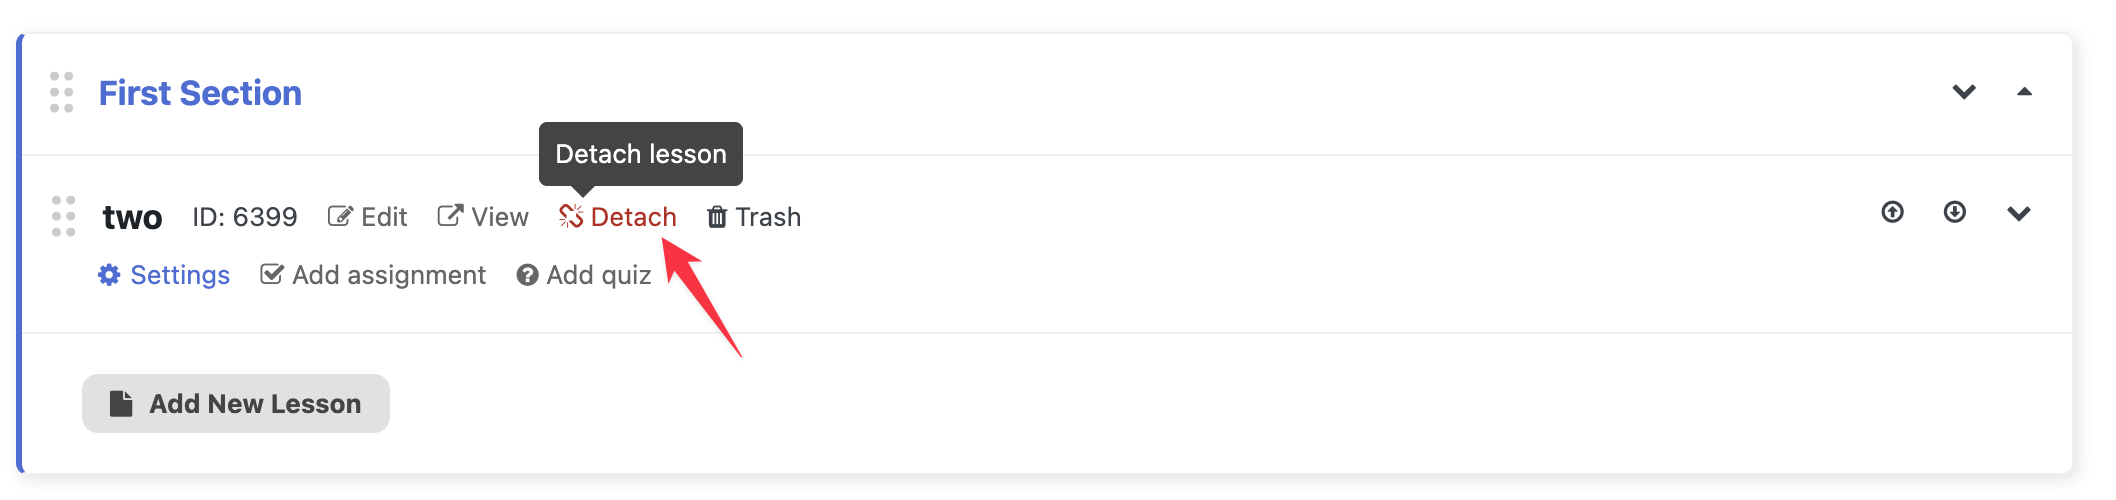
Step 3. Click on Detach. This will open a dialog box asking you to confirm whether you really want to detach the lesson.
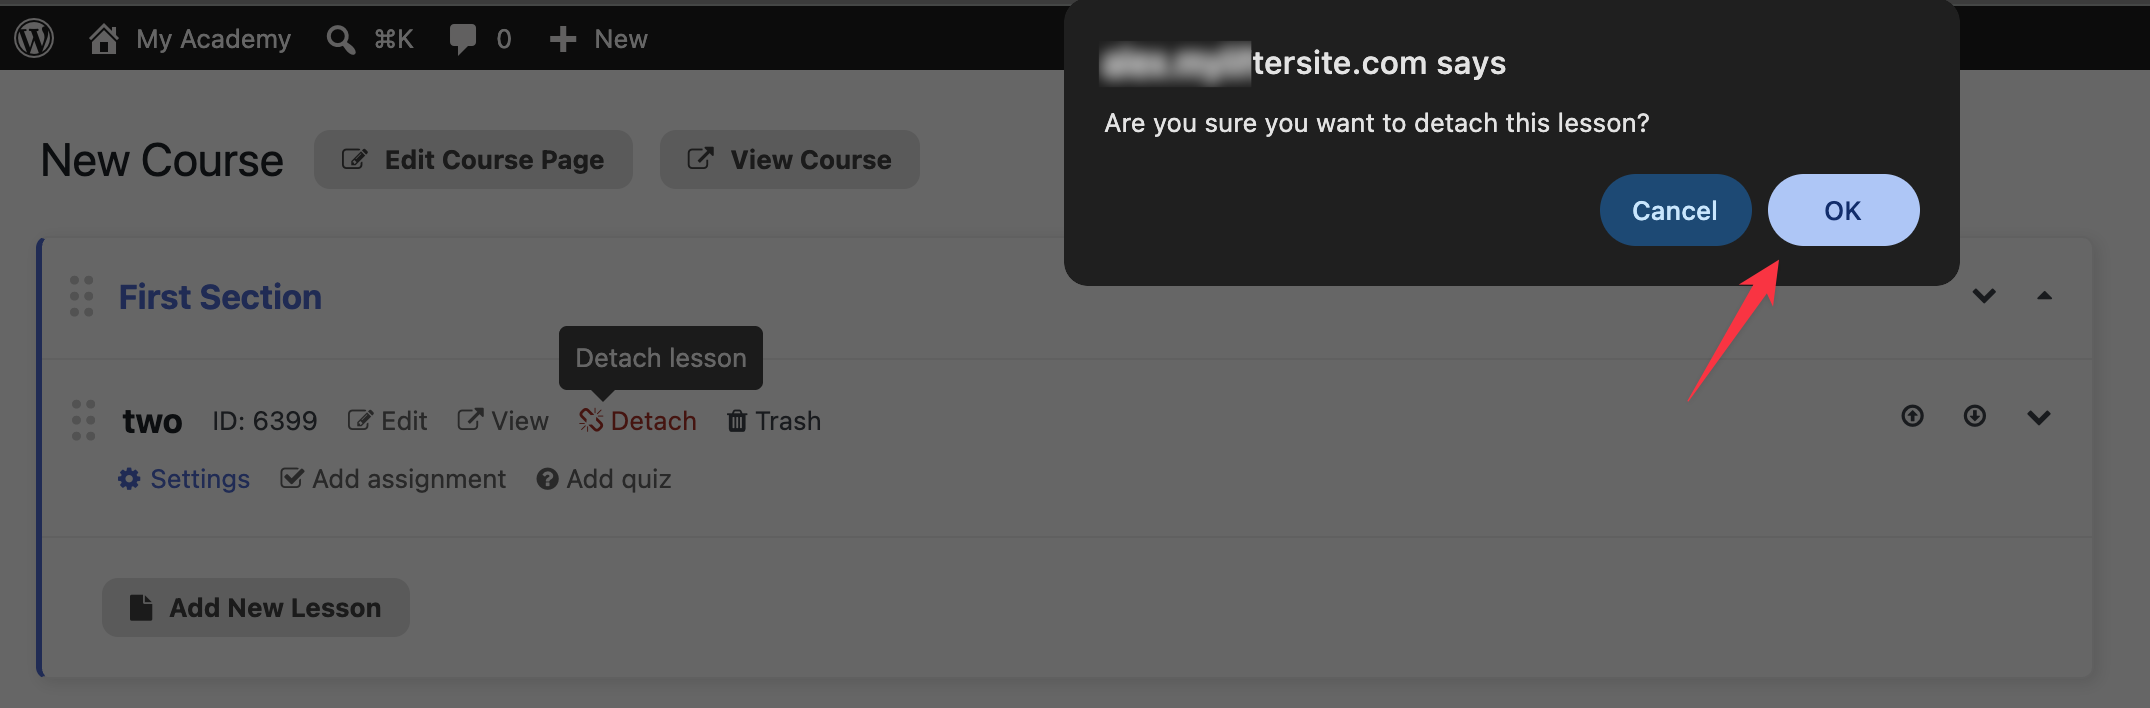
Step 4. Click on OK to confirm the detachment. This will remove the detached lesson from the course builder.
Step 5. Make sure that you save the changes.
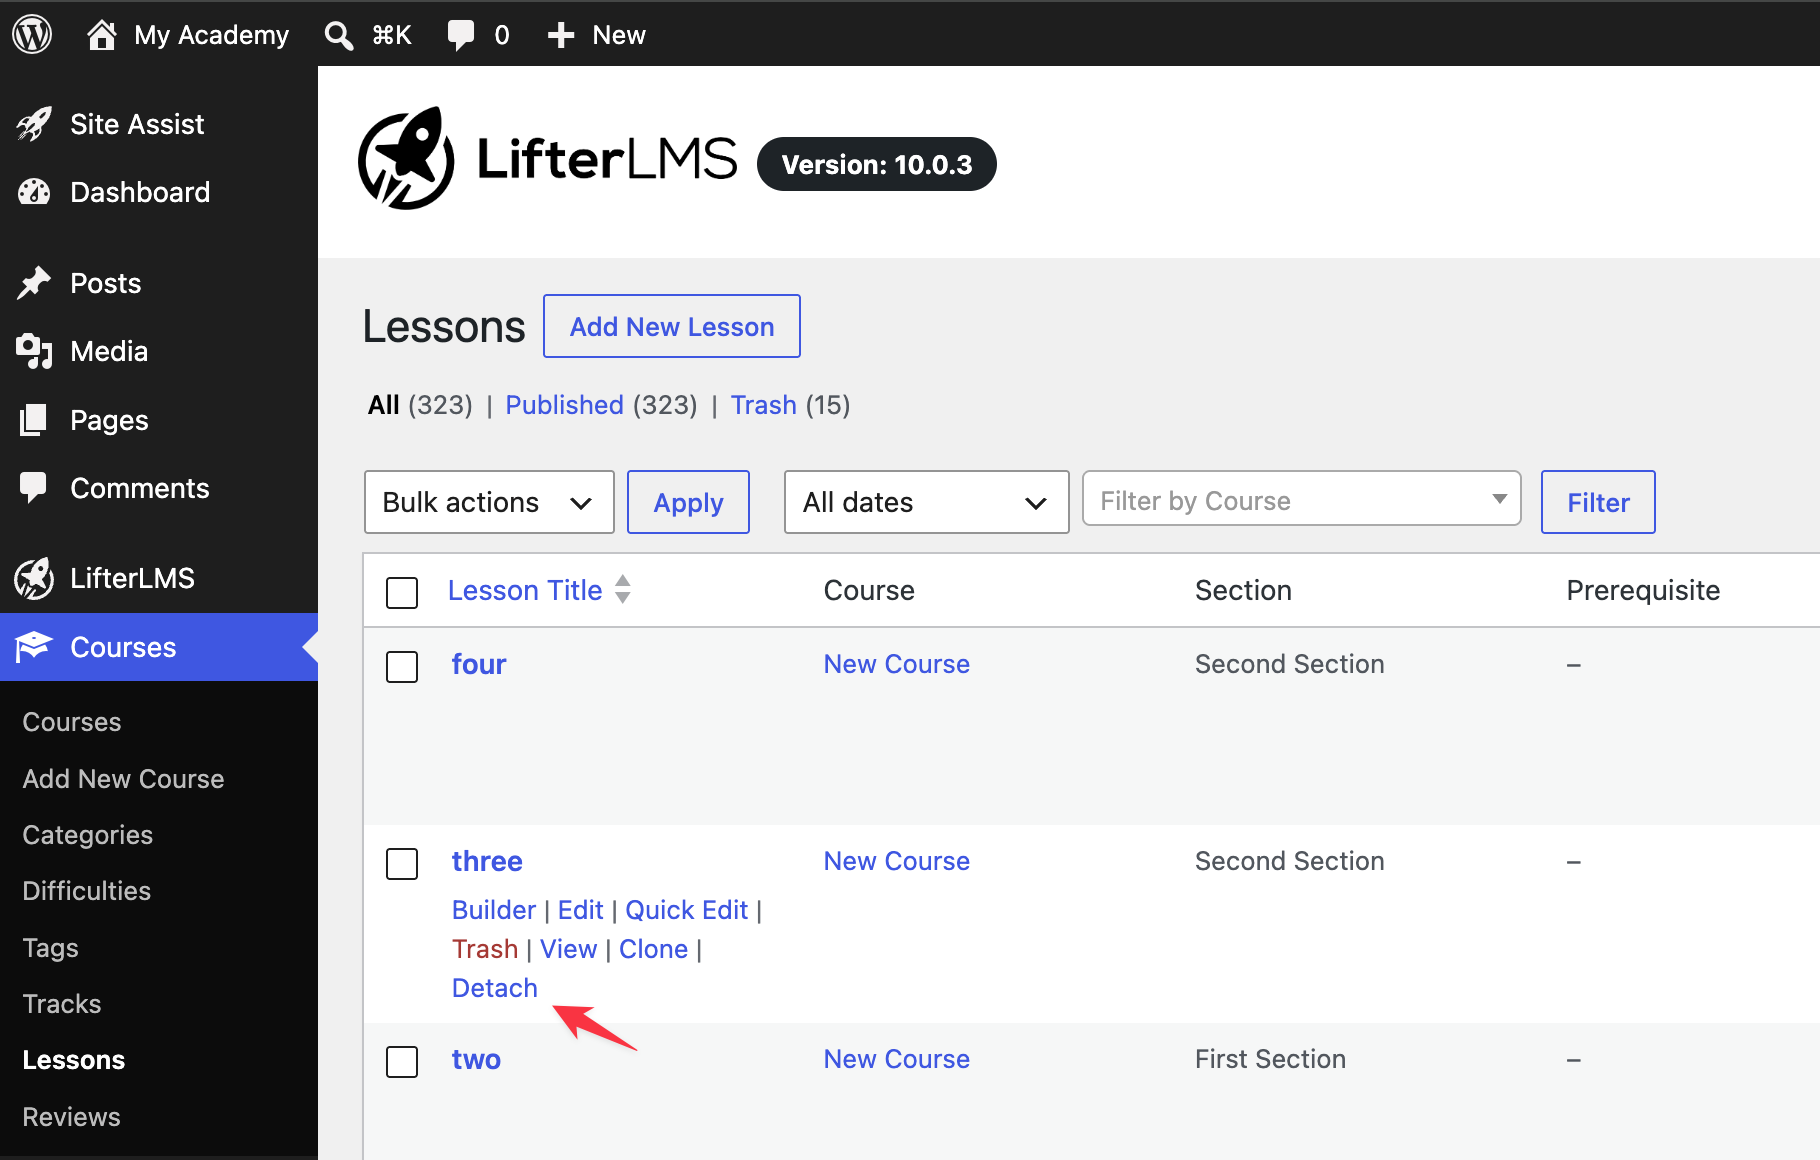
You can also detach a lesson by going to Courses > Lessons and clicking the “Detach” option. This is shown when you hover over a lesson.
When a lesson gets detached from a course, it continues to exist in WordPress Dashboard > Courses > Lessons. These are called orphaned lessons. To attach an orphaned lesson to a course, follow the steps below.
Step 1. Open the course you want to edit in the course builder.
Step 2. Select a section to add the existing lesson to by clicking on that section until it is expanded. This selected section will be the currently selected section. If you do not select a section, the last section will be the currently selected section.
Step 3. Click on the Add Existing Lesson button on the side.
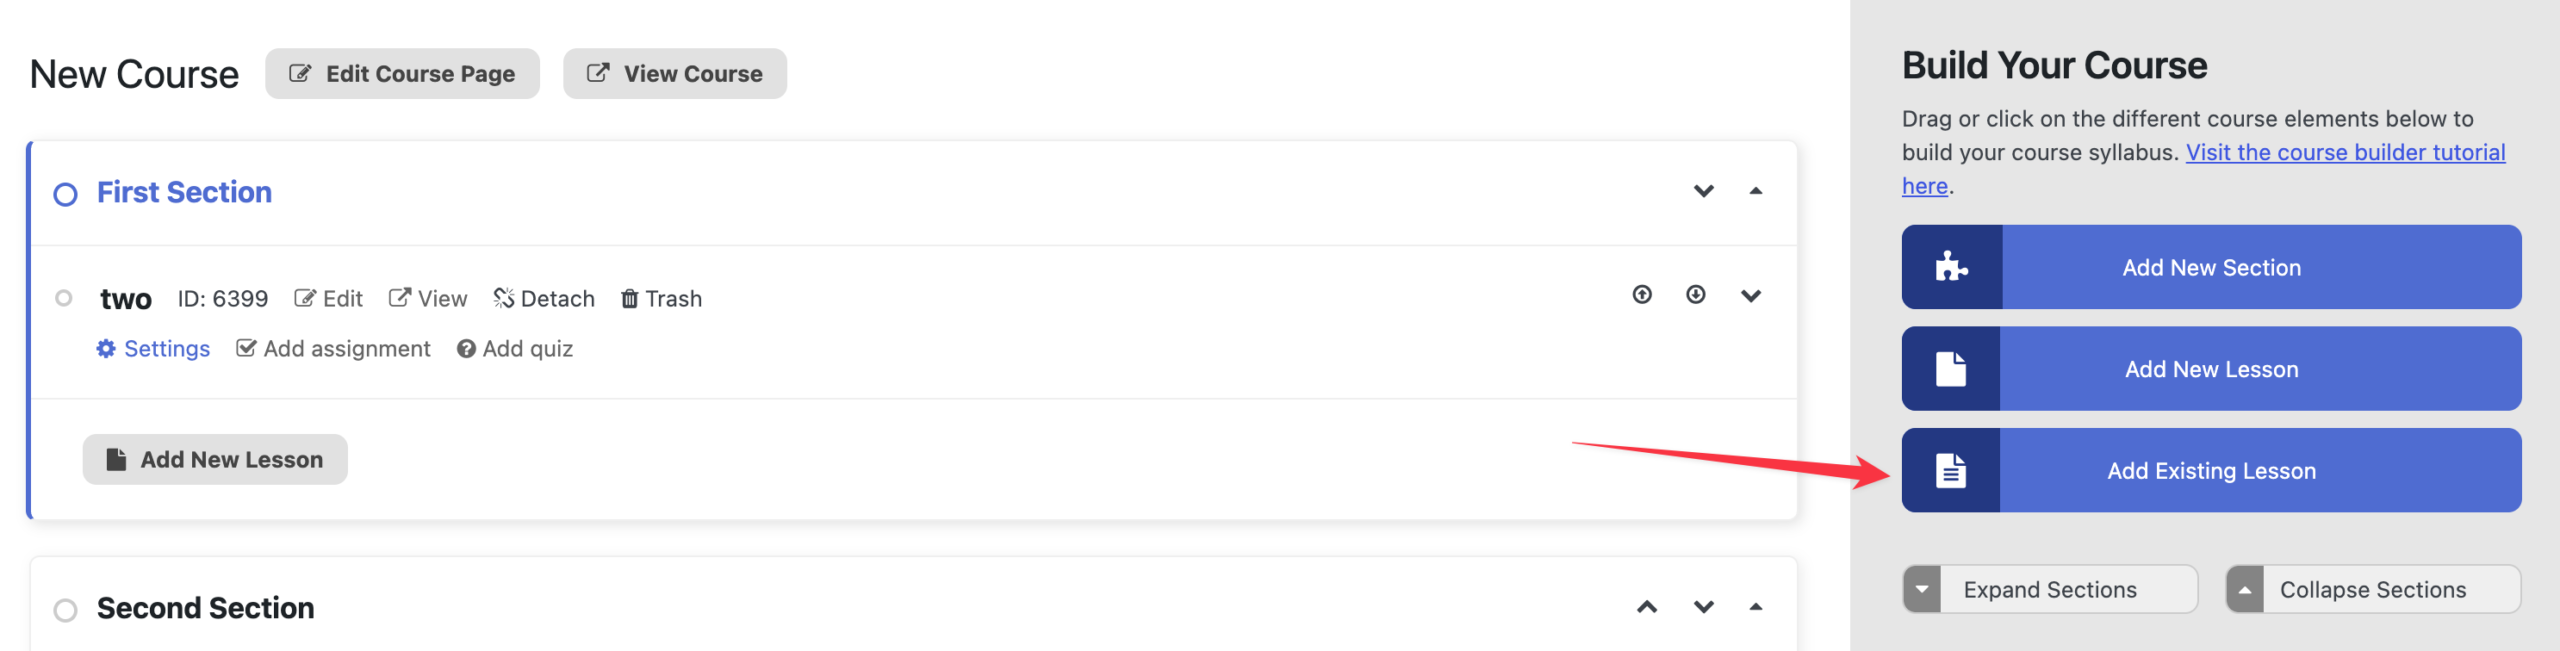
This will open up a dropdown from which you can select which existing lesson you would like to attach (not clone) into the currently selected section.
Step 4. Select the lesson you wish to attach from the dropdown. This will attach the selected lesson to the course. As shown below, only orphaned lessons can be attached without cloning. Non-orphaned lessons (i.e., lessons already attached to a course) must be cloned first before they get attached to a course.
Step 5. Make sure that you save the changes.
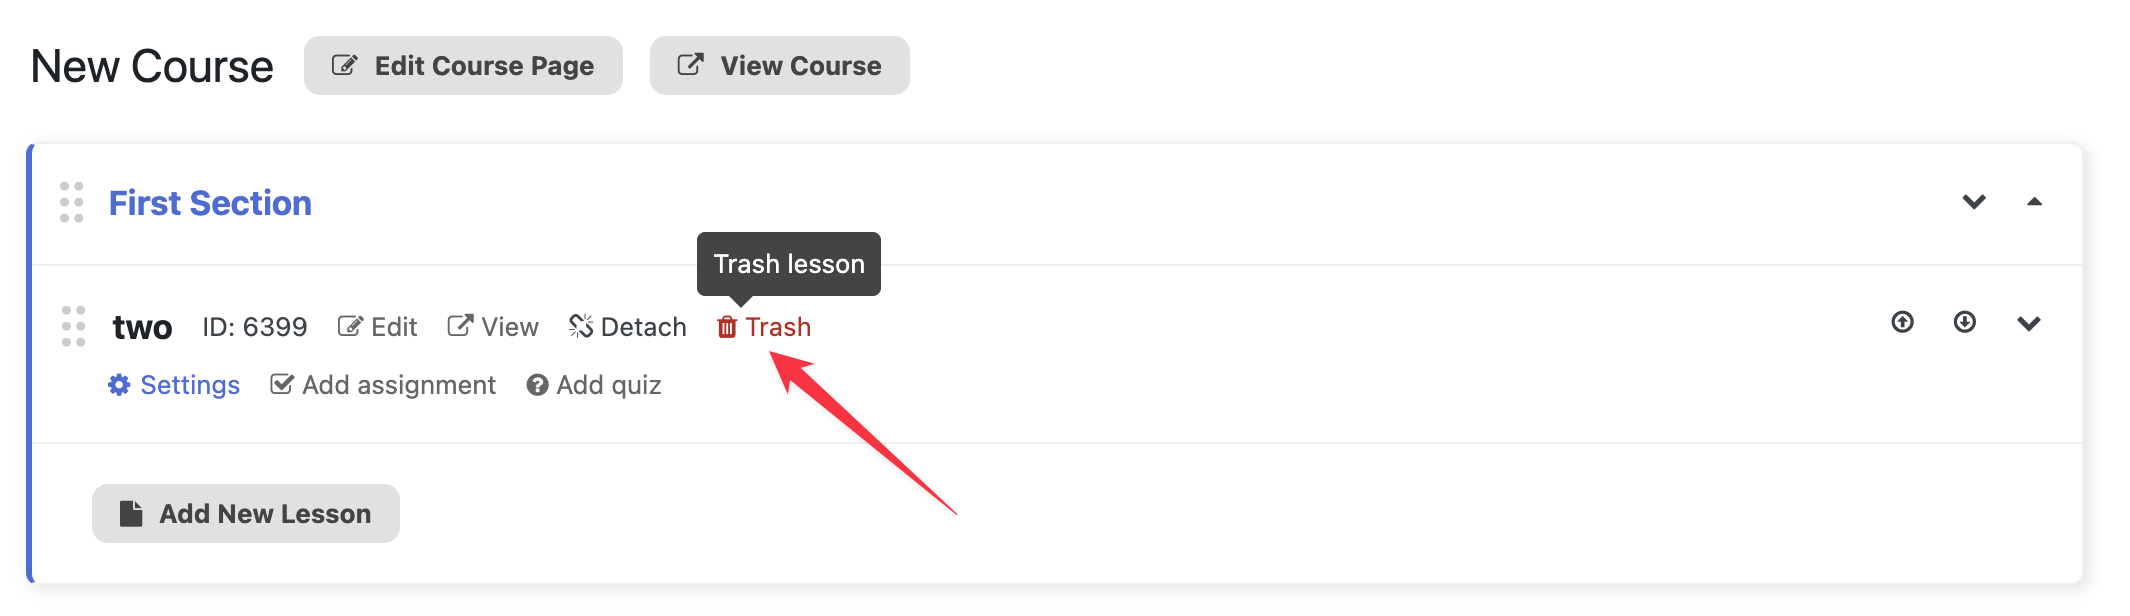
One way to delete a lesson is to click the Trash icon, as shown below.
You can also open the lesson settings and click on the trash icon there.

In both cases, a dialog box will appear asking you to confirm the deletion.
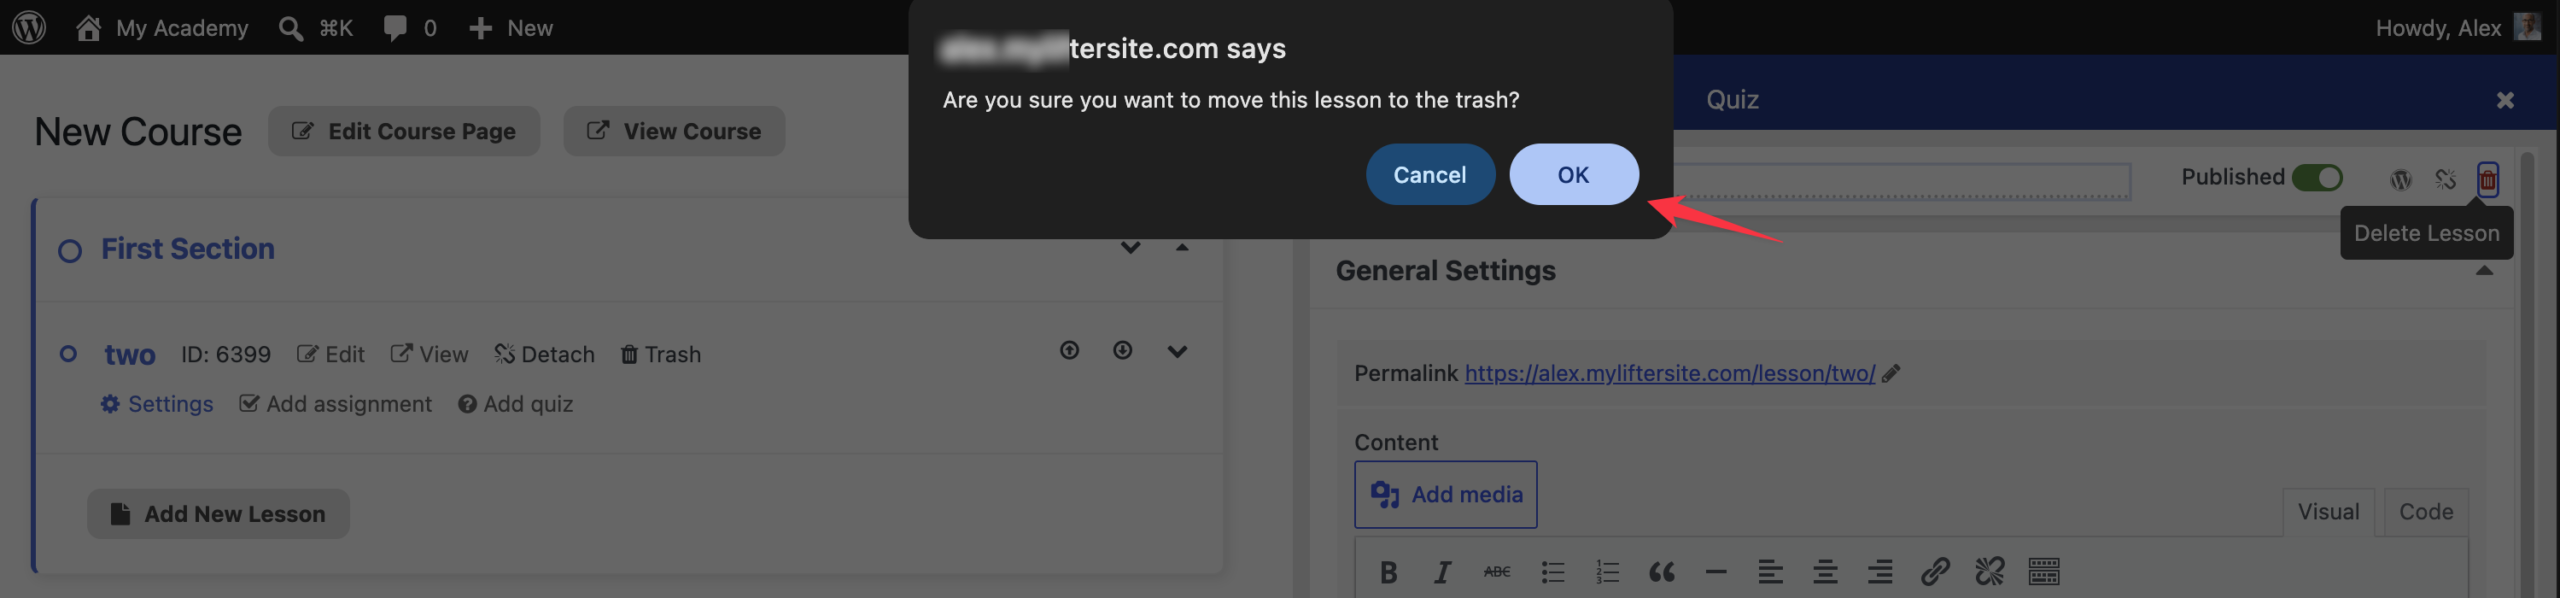
Click OK to confirm the deletion of the lesson. Otherwise, click on Cancel if you decide not to delete the lesson. Don’t forget to save the changes.
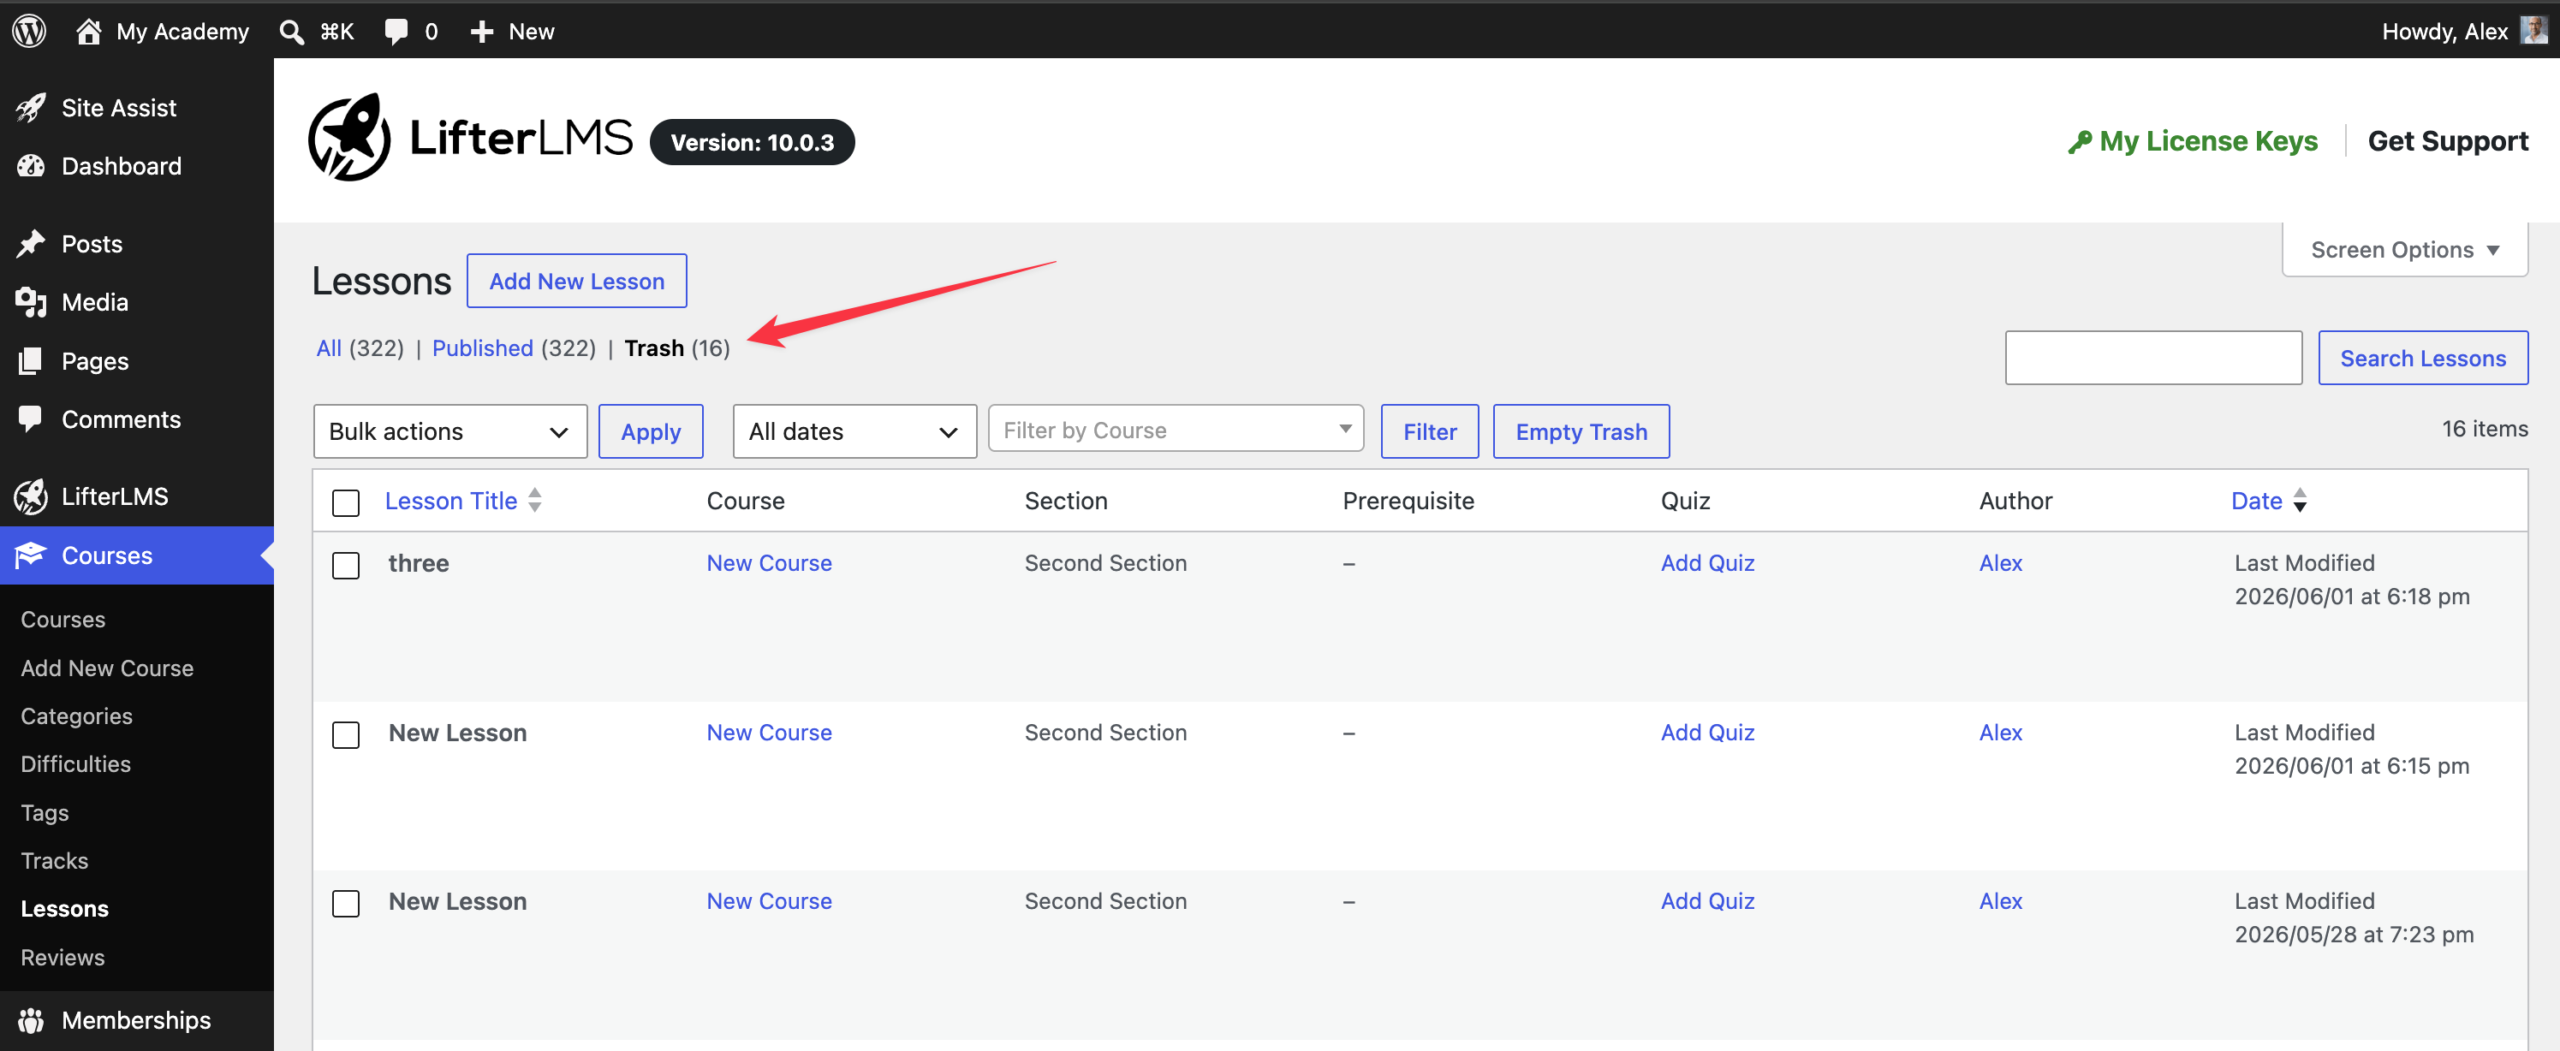
Note that your deleted lesson will still appear in WordPress Dashboard > Courses > Lessons > Trash.
The Course Builder does not include a bulk delete option for lessons. If you want to quickly delete all lessons inside a specific course, you can do this using WordPress bulk actions.
This method permanently deletes lesson posts, not just their placement in a course.
Steps
- Go to WordPress Dashboard > Courses > Lessons.
- Use the “Course” filter at the top of the lessons list to select the course you want to clean up.
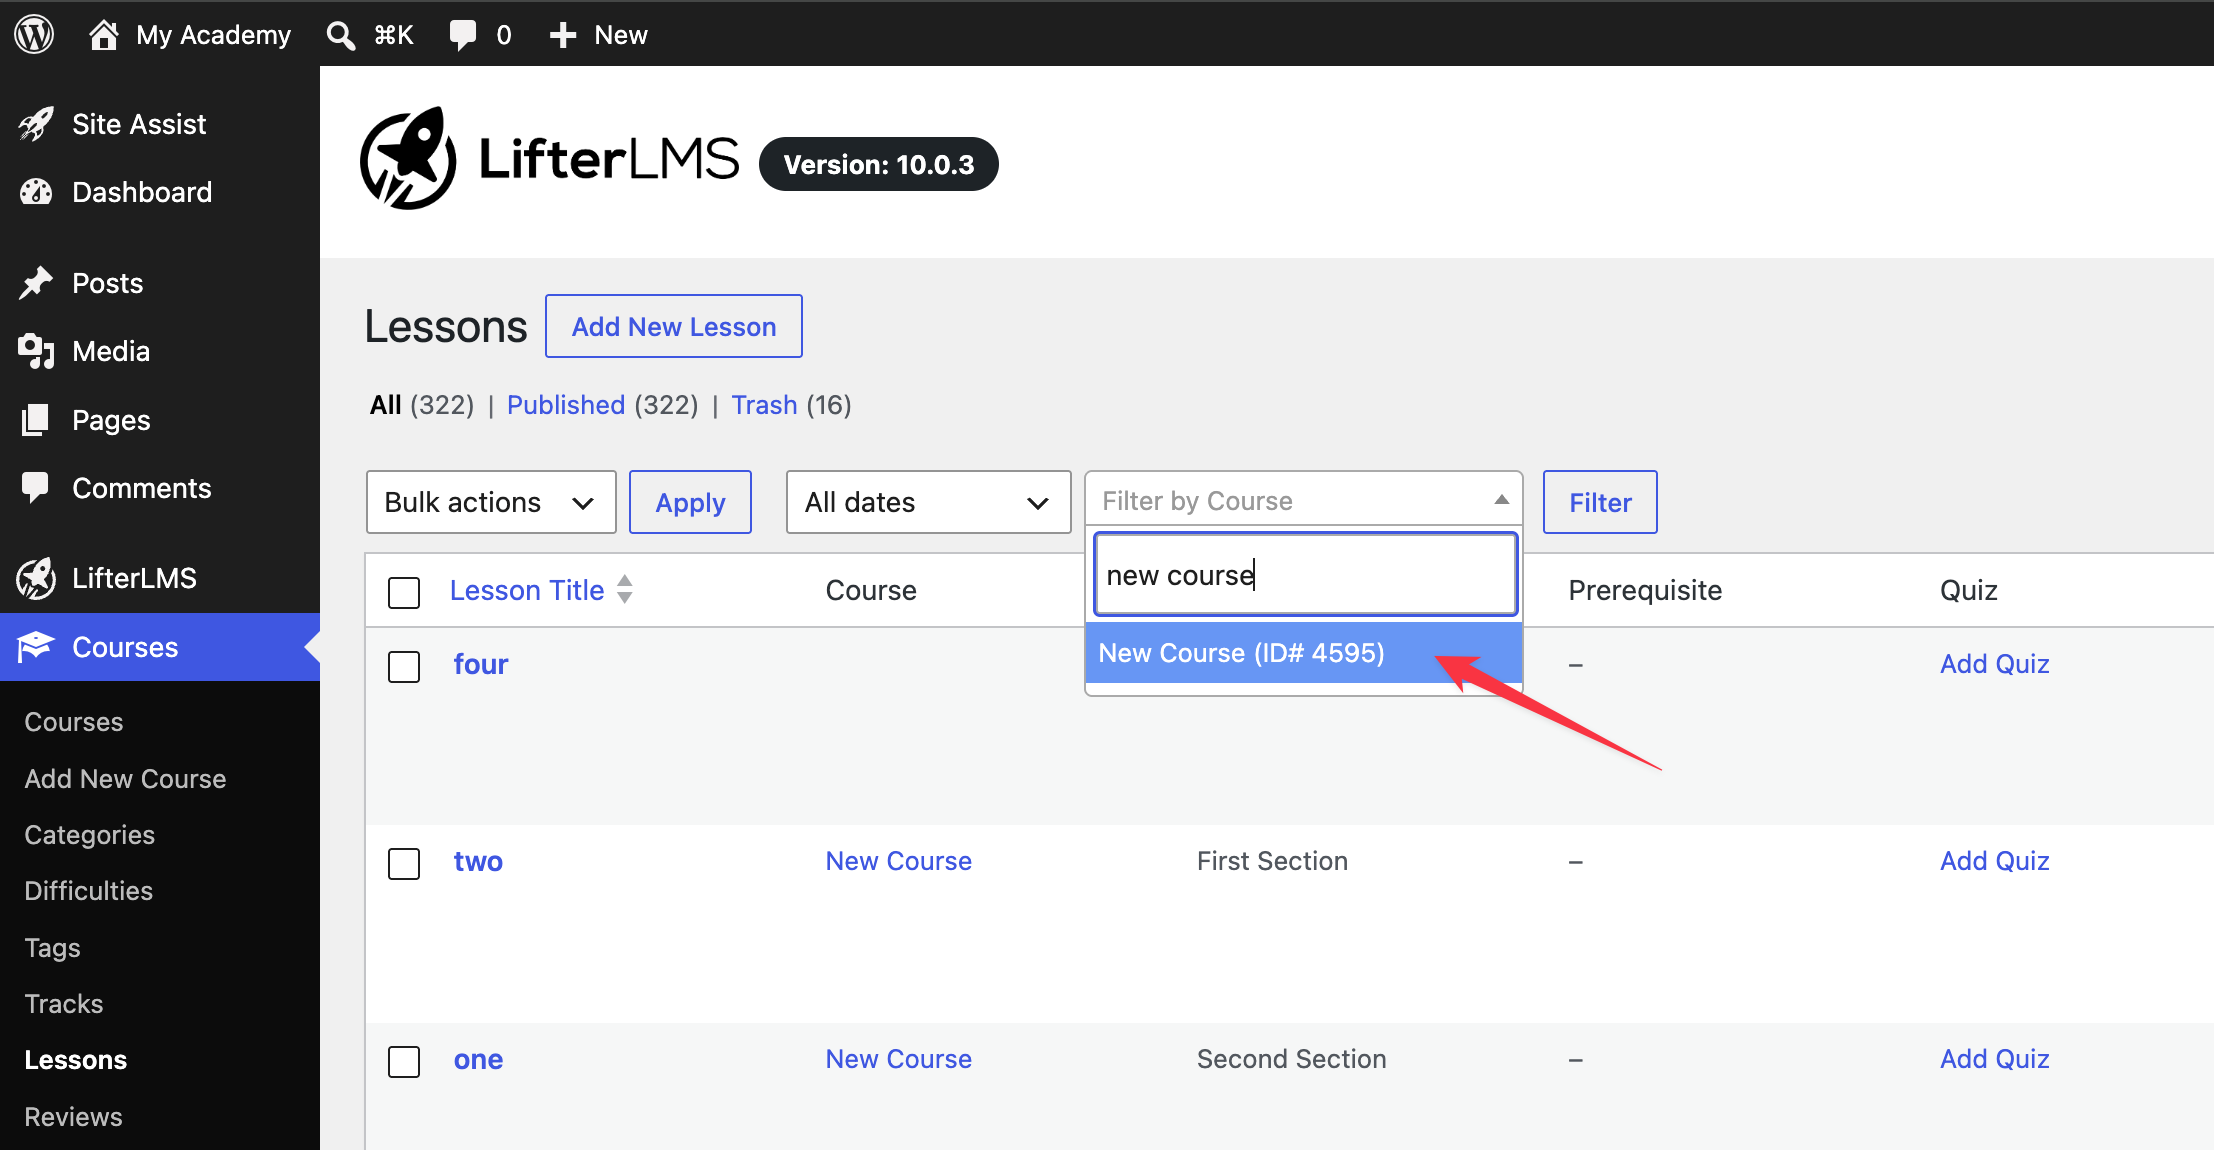
- Click Filter to show only lessons belonging to that course.
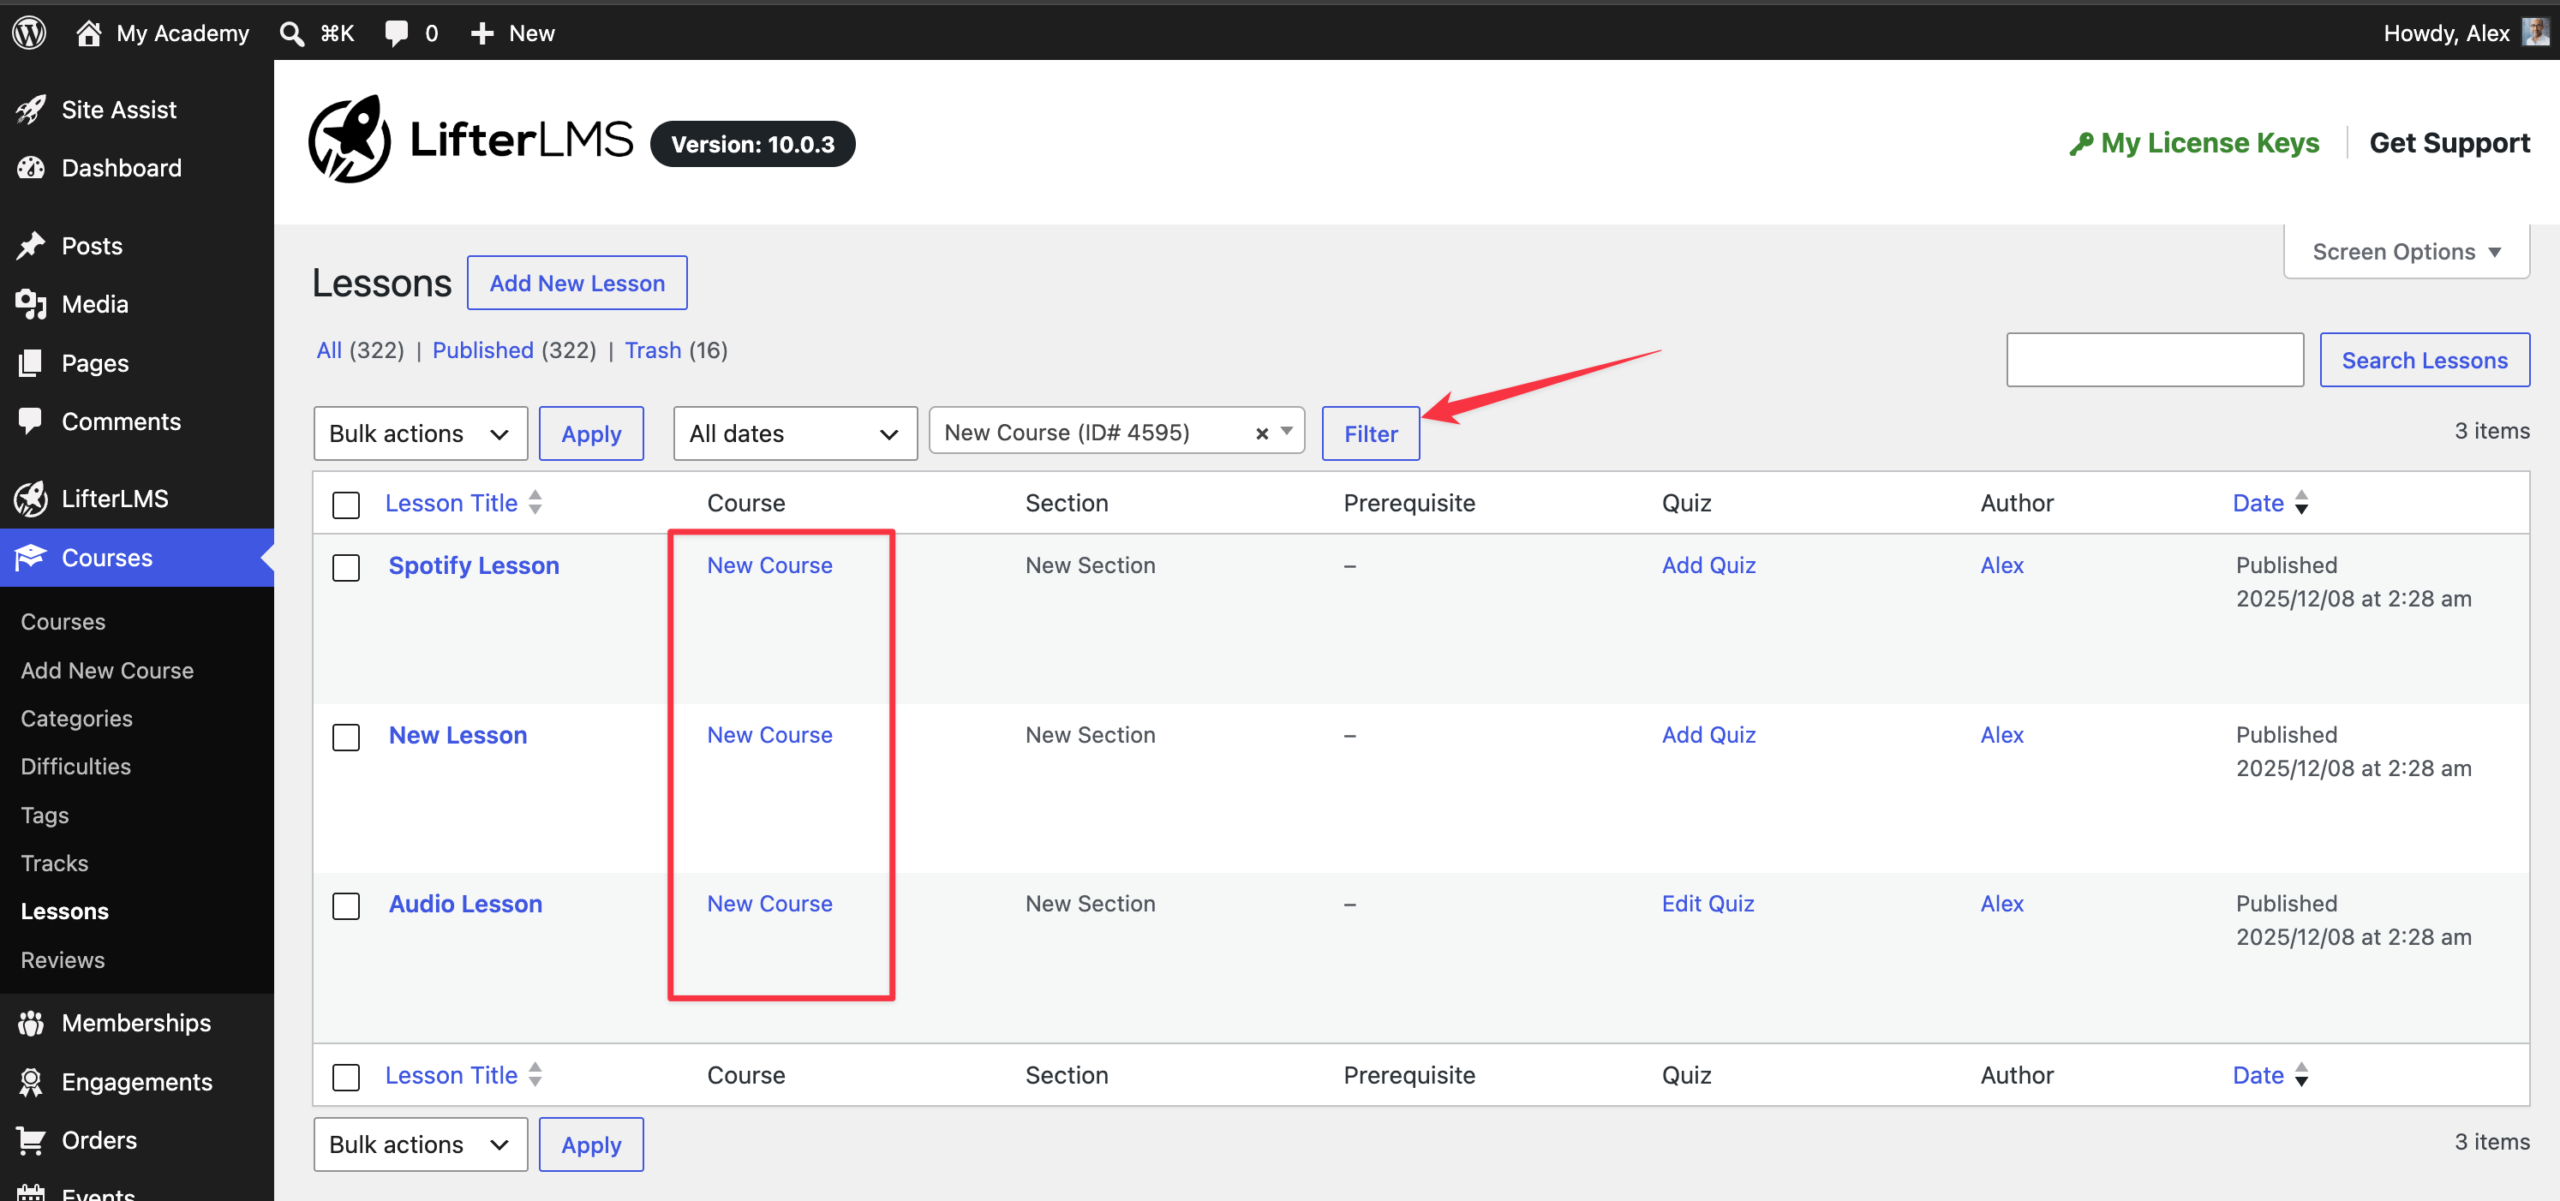
- Use the checkbox at the top of the list to select all lessons.

- From the “Bulk actions” dropdown, select Move to Trash, then click Apply.

- Refresh the course page to confirm the lessons have been removed from the course syllabus.
What happens next
- The selected lessons are moved to the WordPress Trash.
- The lessons are removed from the course syllabus immediately.
- Visiting the lesson URLs will return a “Page not found” message.
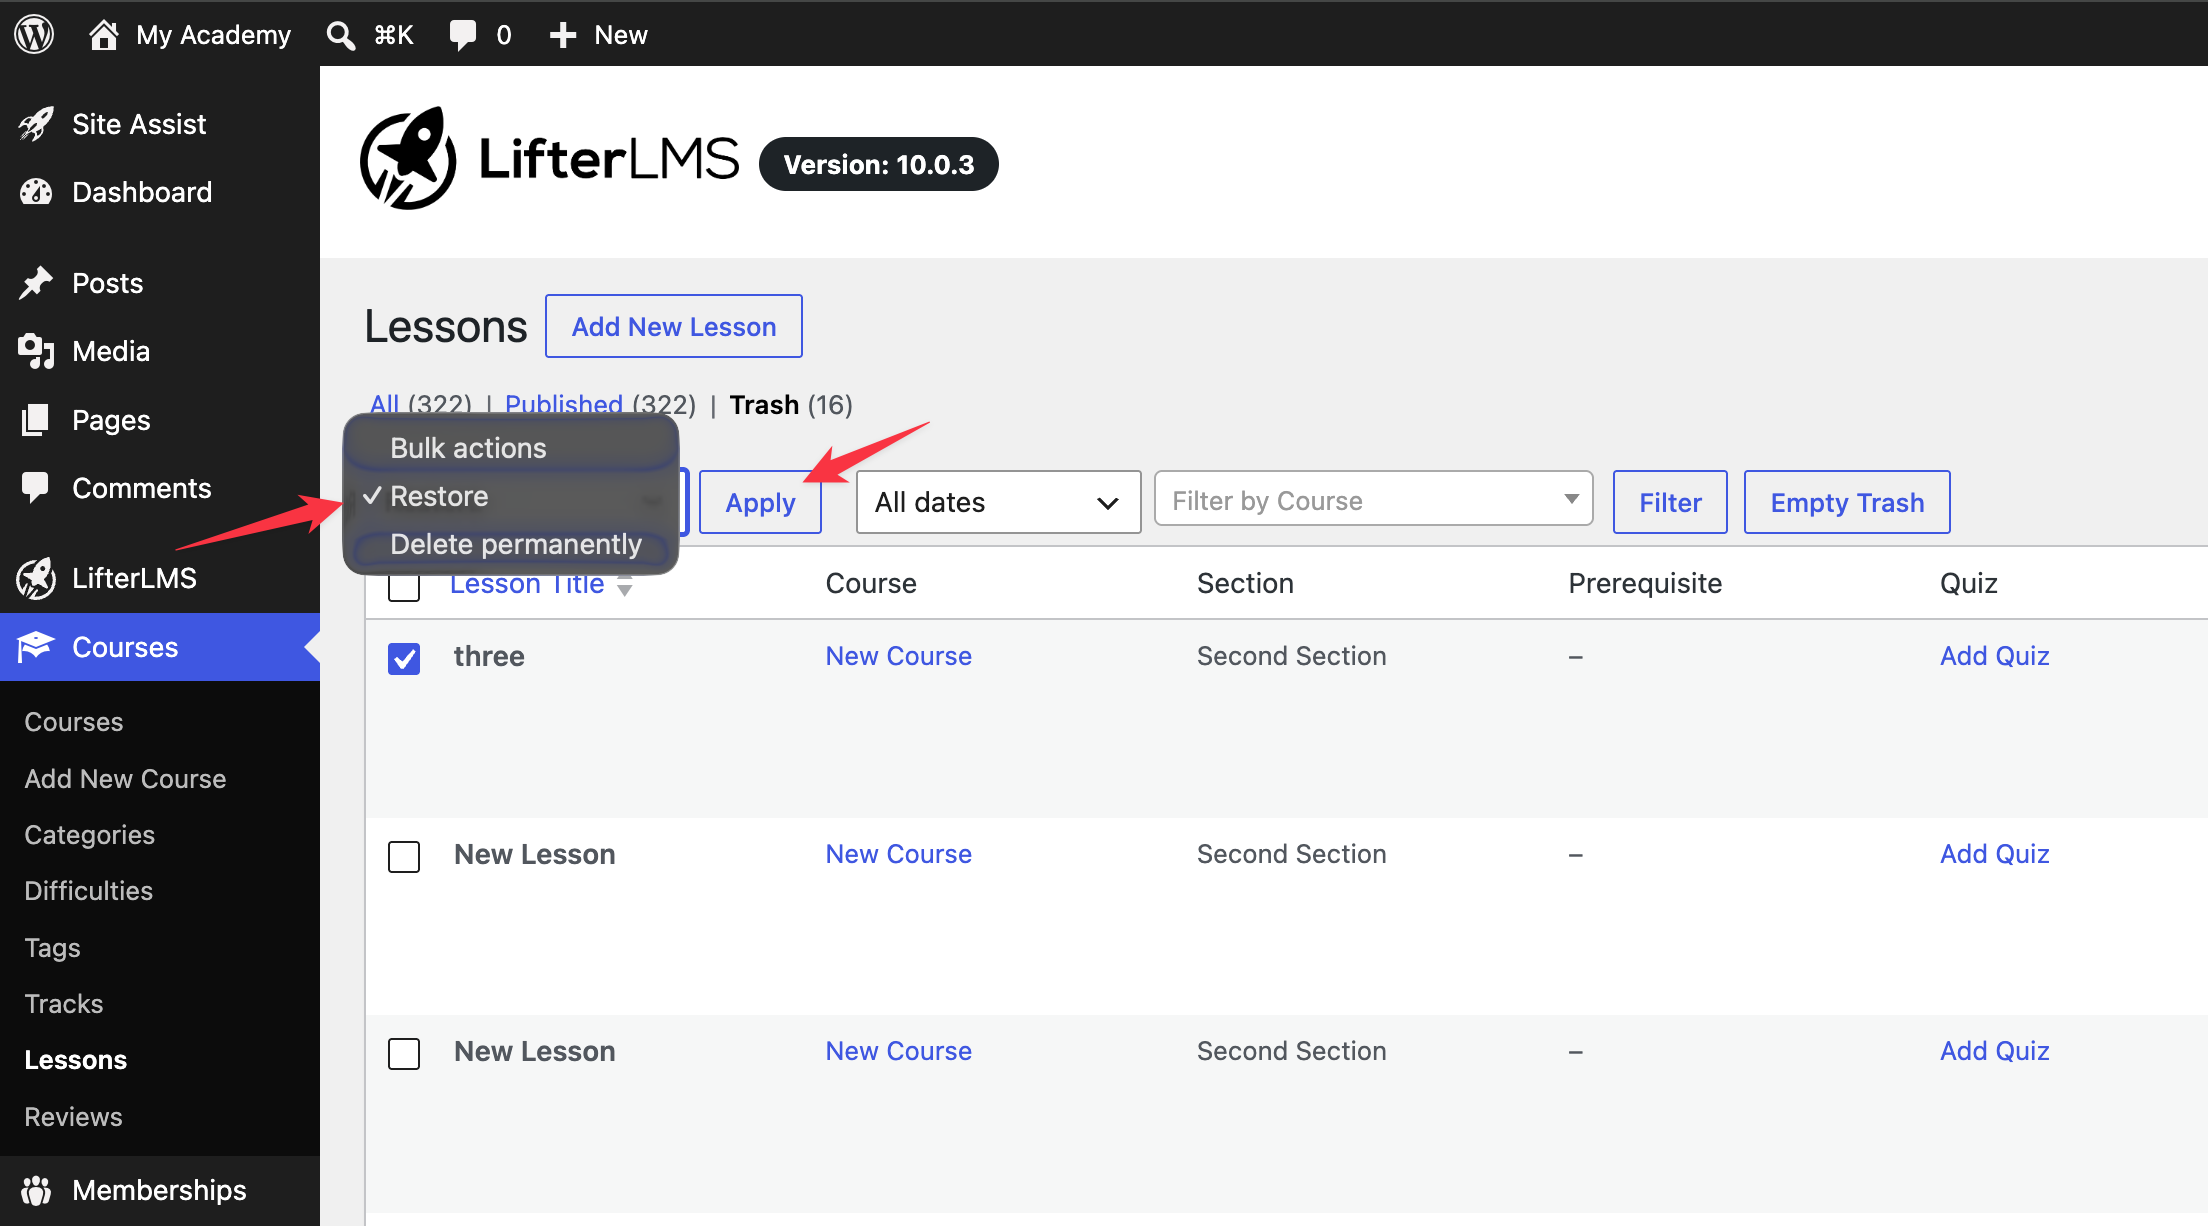
Restoring deleted lessons
- Lessons can be restored from WordPress Dashboard > Trash.
- Restored lessons return as drafts and must be republished manually.
- Once republished, lessons can be added back to a course if needed.
Important notes
- This deletes lesson posts site-wide. It does not just remove them from a course.
- Always filter by Course before bulk deleting to avoid removing the wrong lessons.
- Lessons attached to other courses are not affected when you delete lessons filtered for a specific course.
- Emptying the Trash permanently deletes the lessons and cannot be undone.
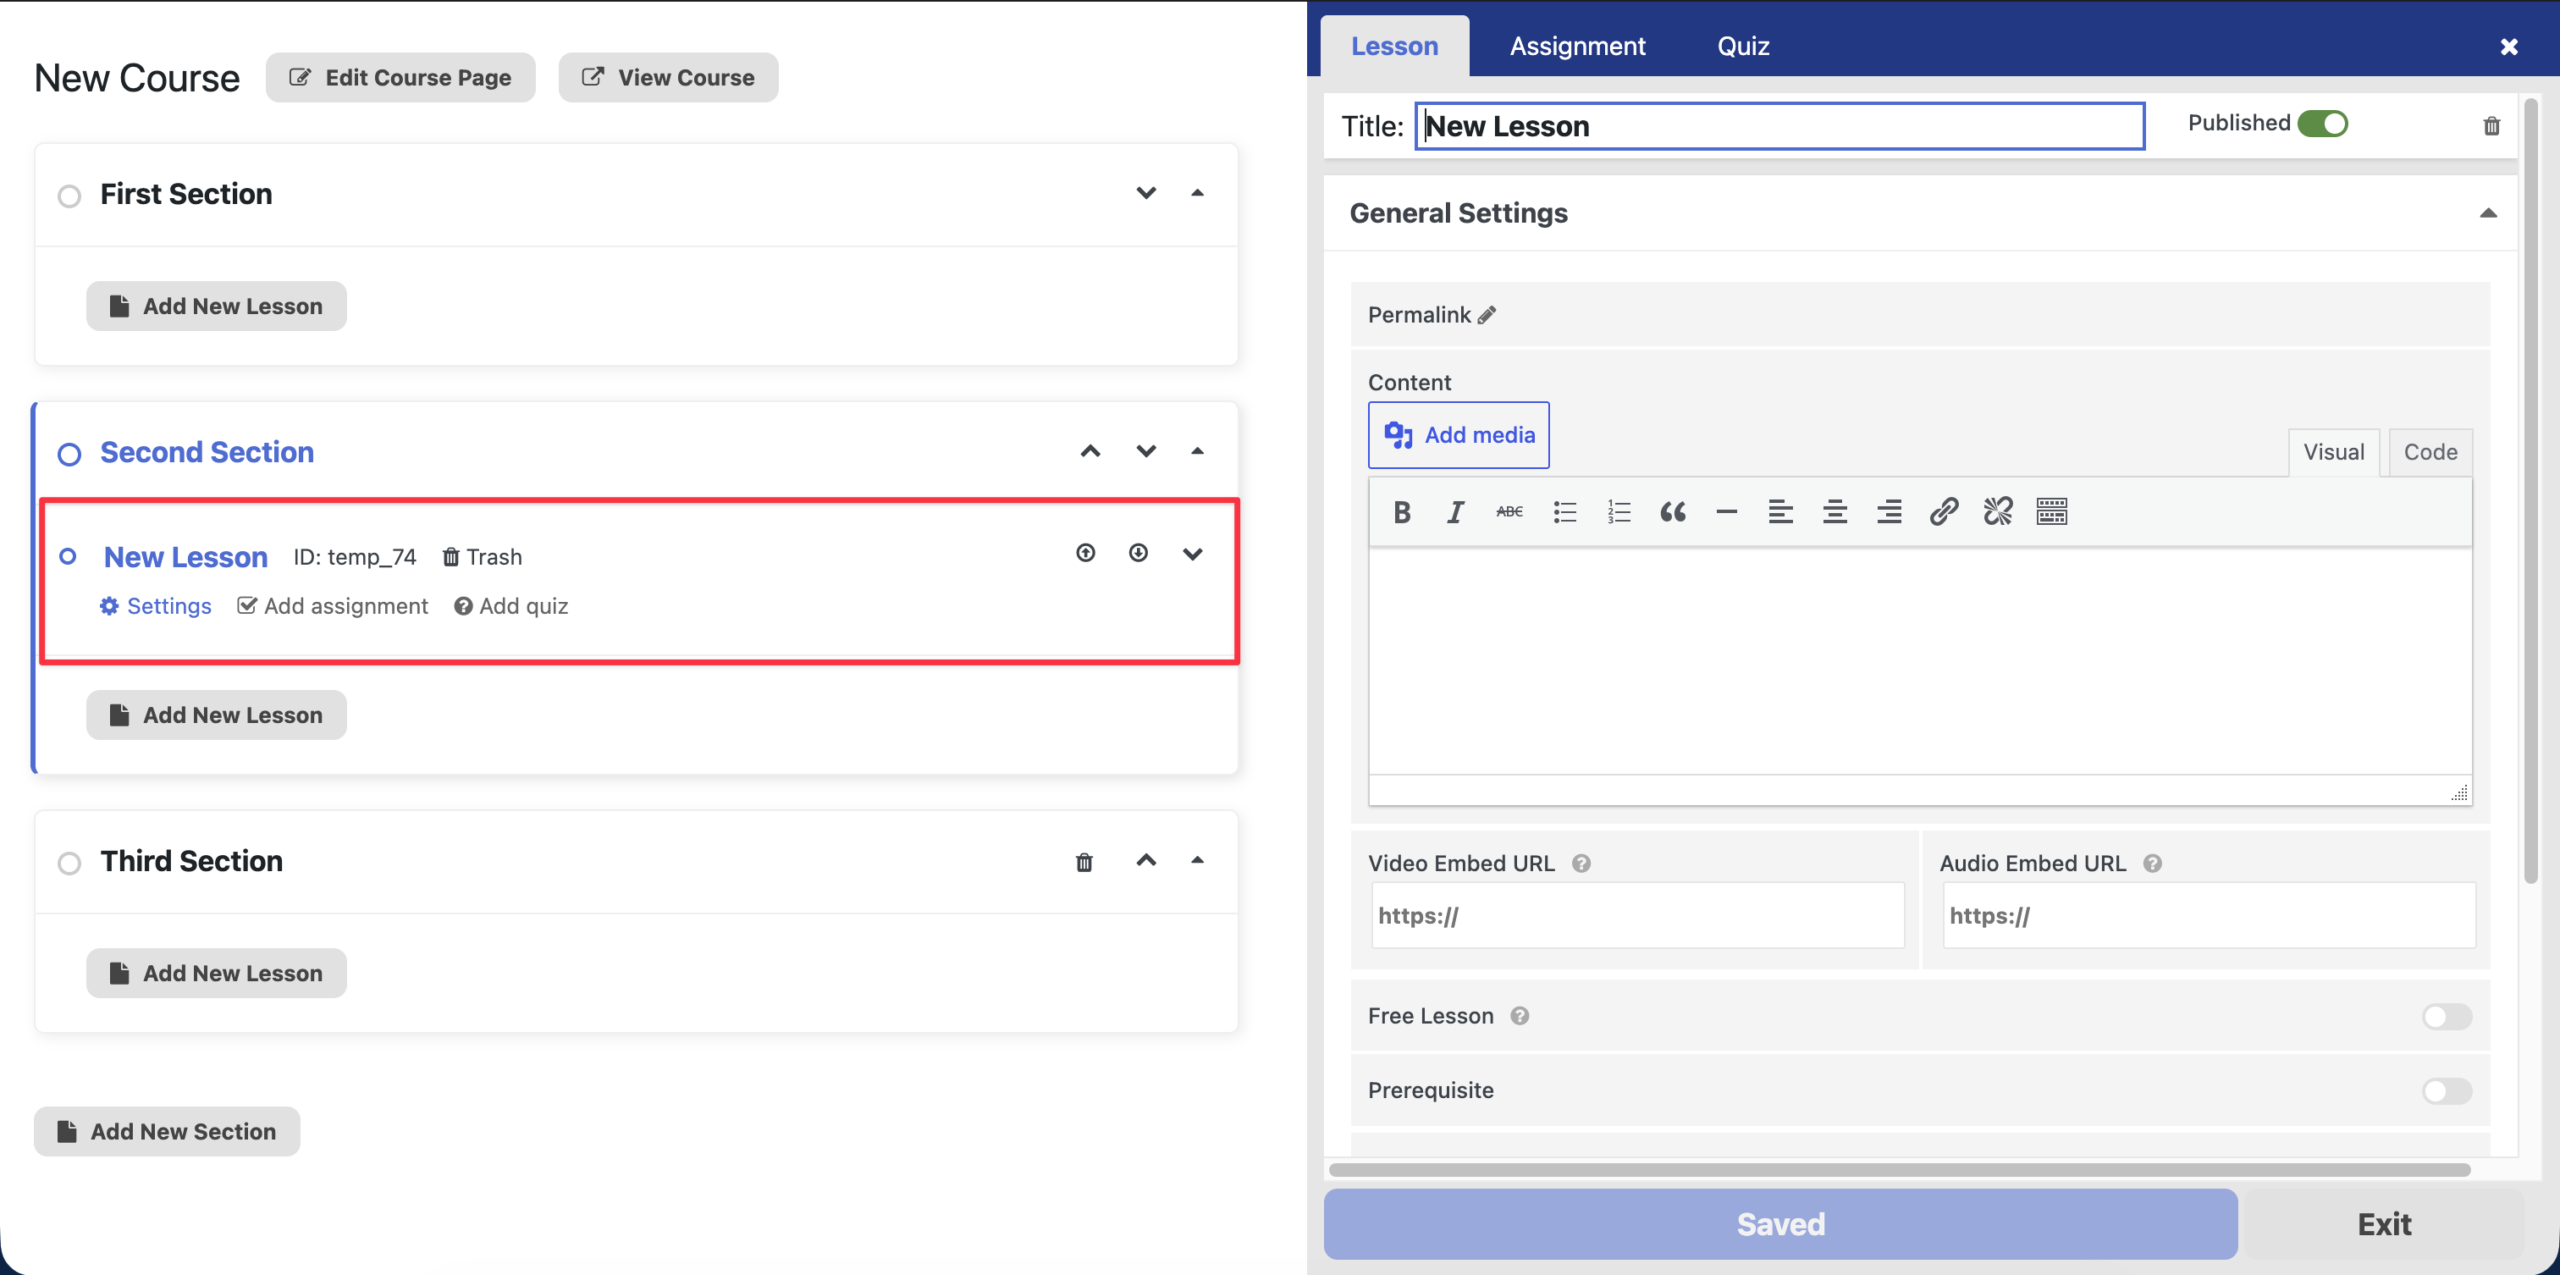
To edit the lesson settings, click on the Settings button of your chosen lesson. It will open up the lesson settings panel.
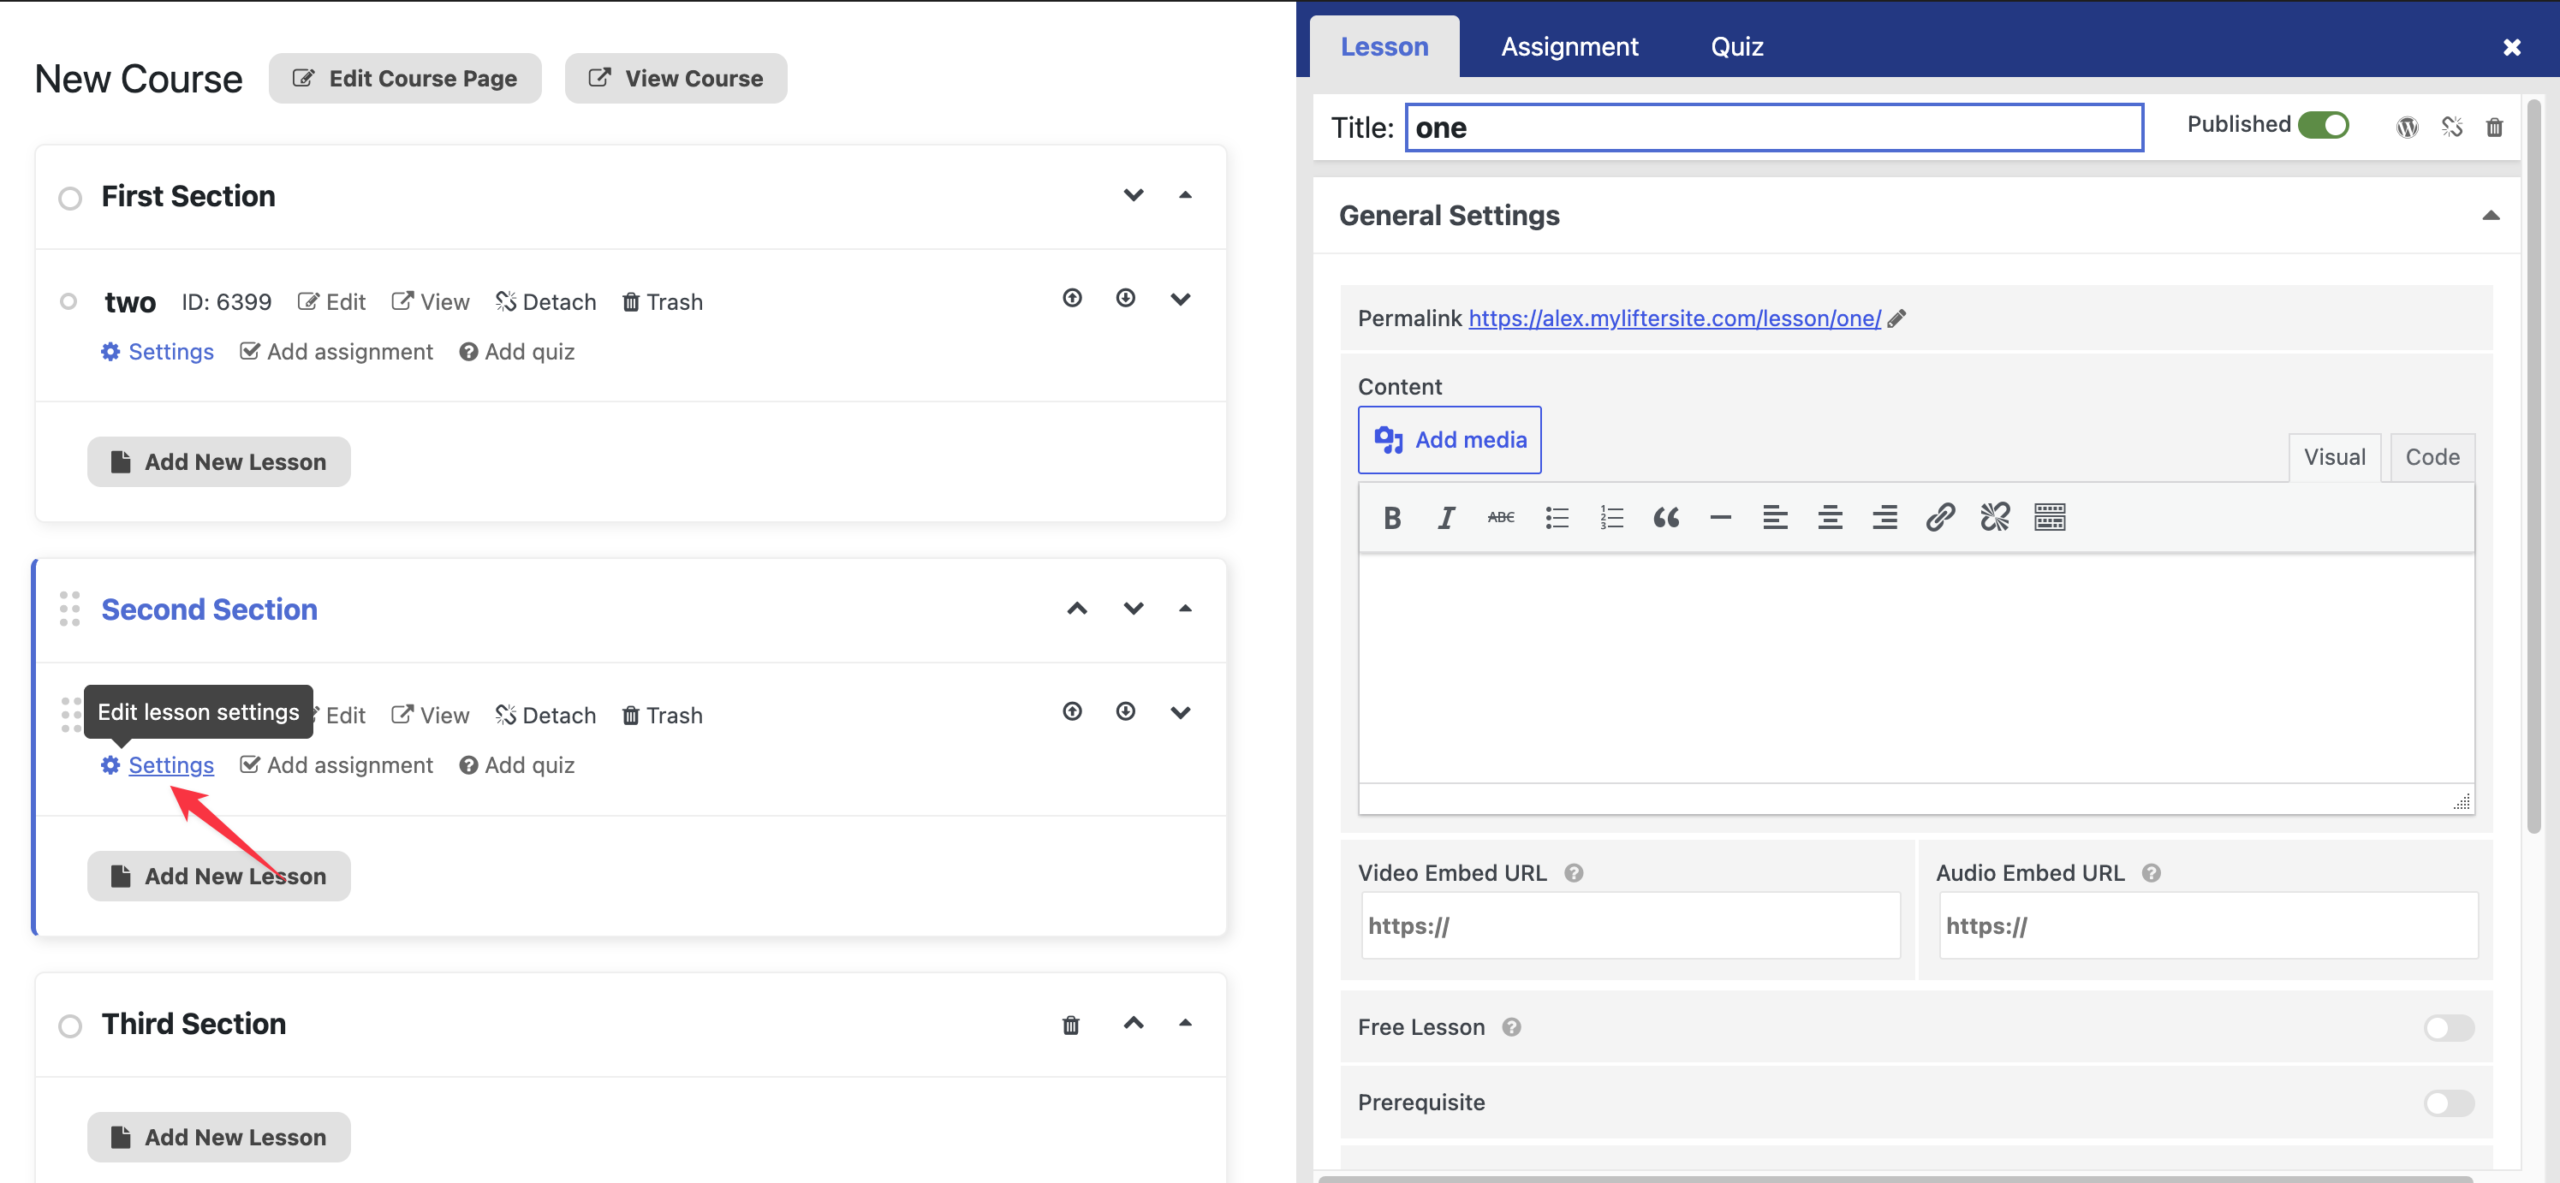
This panel has three tabs: Lesson, Assignment, and Quiz.

In this section, we’ll only focus on the Lesson tab. To learn how to use the Assignments tab, check out this tutorial on how to create assignments. Similarly, to learn how to use the Quiz tab, check out this tutorial on how to create quizzes.
The Lesson tab is divided into two sections: the Title toolbar and the General Settings panel.
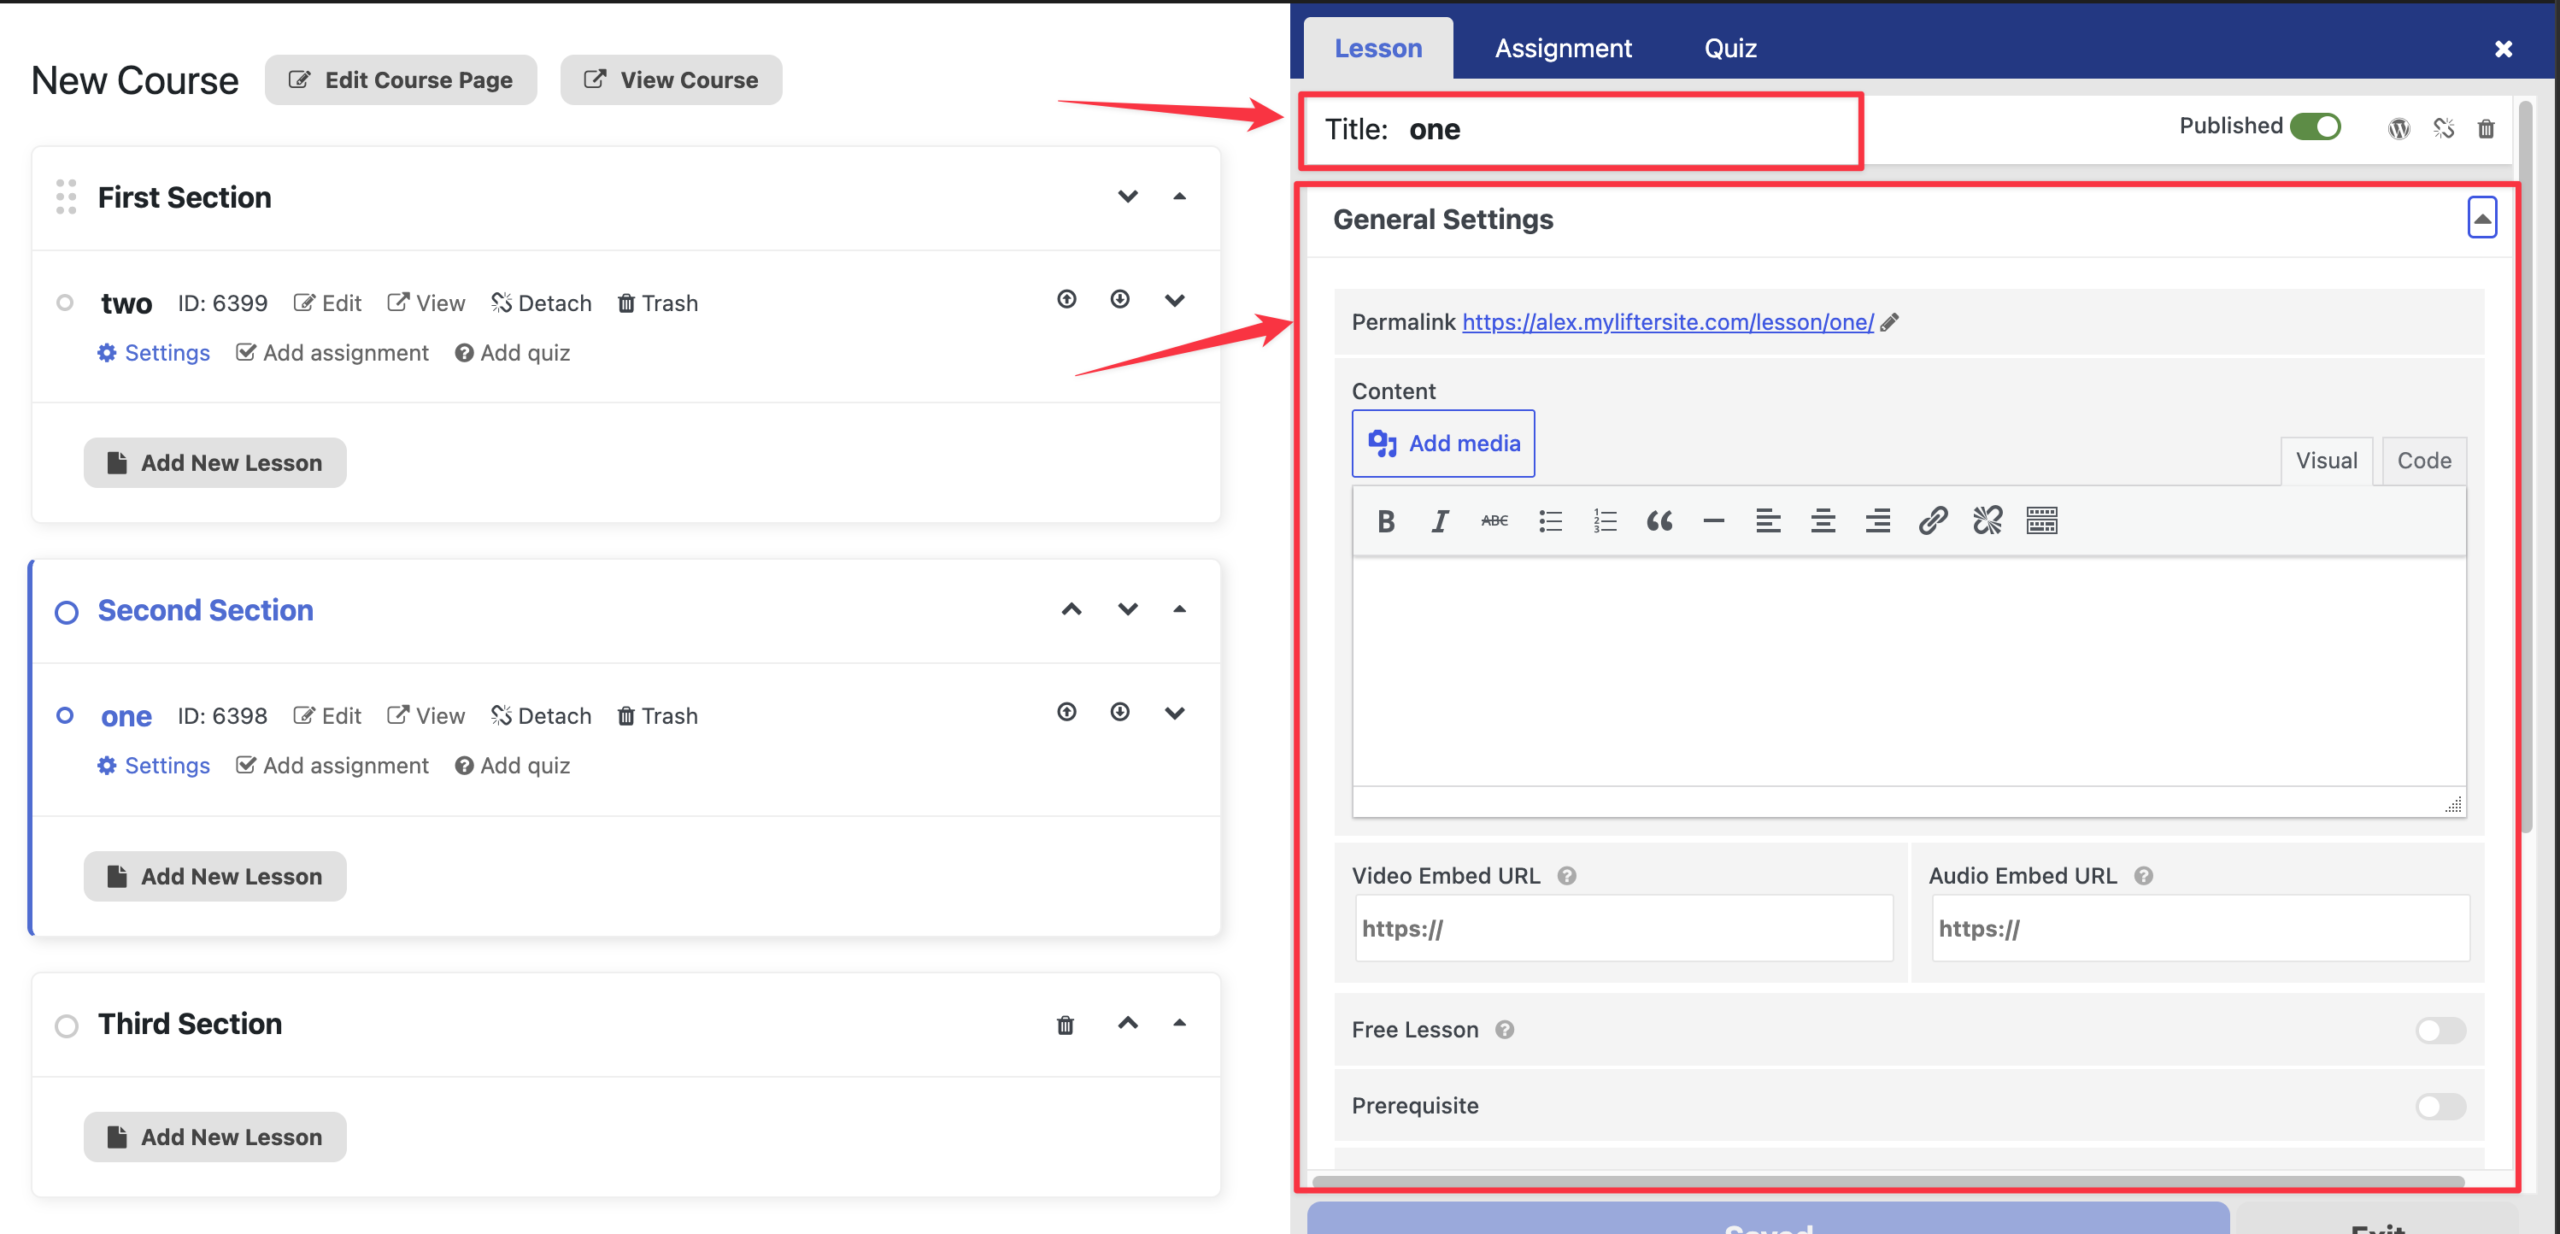
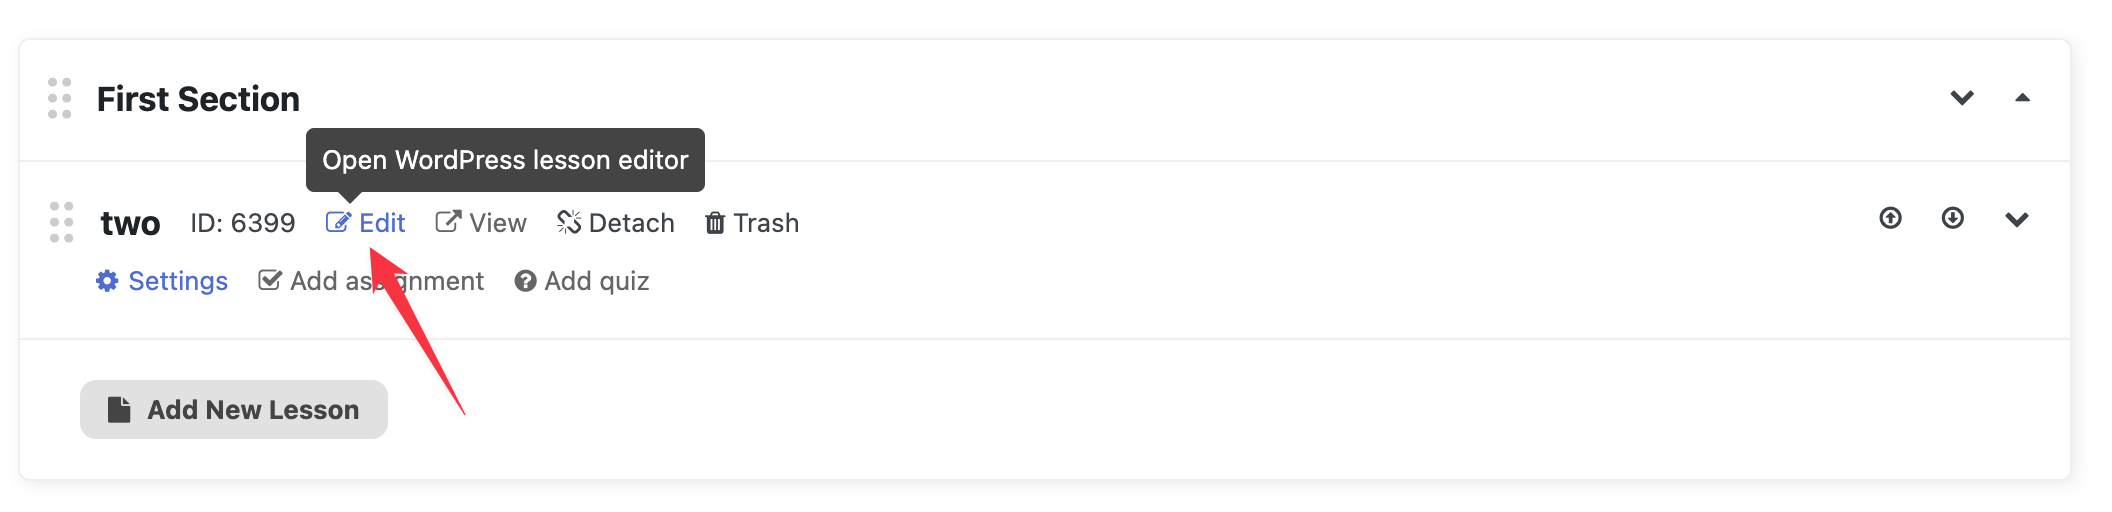
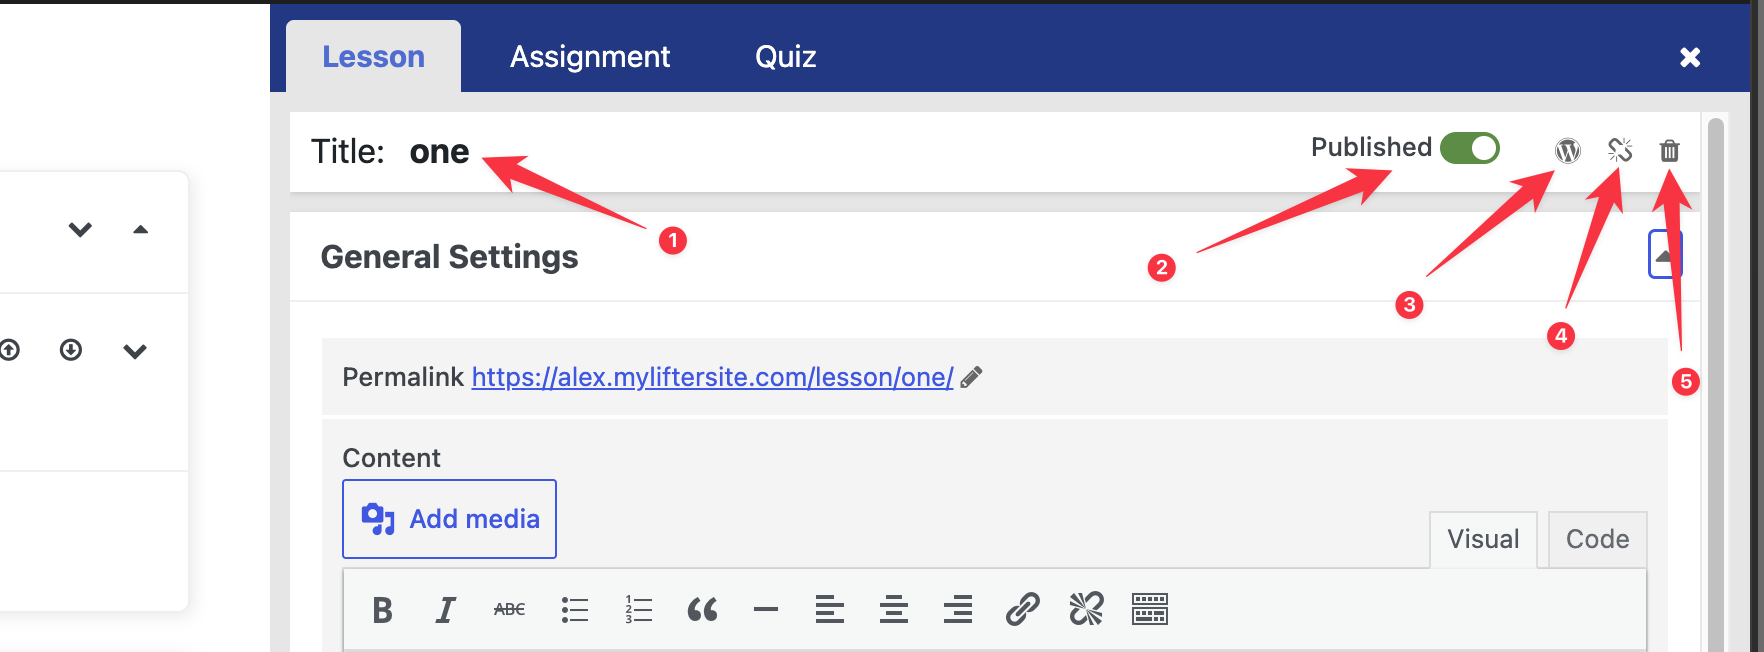
Lesson Title toolbar
This toolbar is composed of the following:
- Editable lesson Title field. Clicking on this field allows you to edit the lesson title.
- Published toggle button. This toggle lets you publish or unpublish a lesson. Only published lessons will be visible to your students.
- Open the WordPress lesson editor button. Clicking on the button opens the lesson in the block editor (Gutenberg) in a new tab.
- Detach Lesson button. Clicking this button detaches a lesson from the course. Follow this section on how to detach lessons for another way to detach lessons.
- Delete Lesson button. Clicking this lesson allows you to delete a lesson. Follow this section on how to delete lessons for another way to delete lessons.
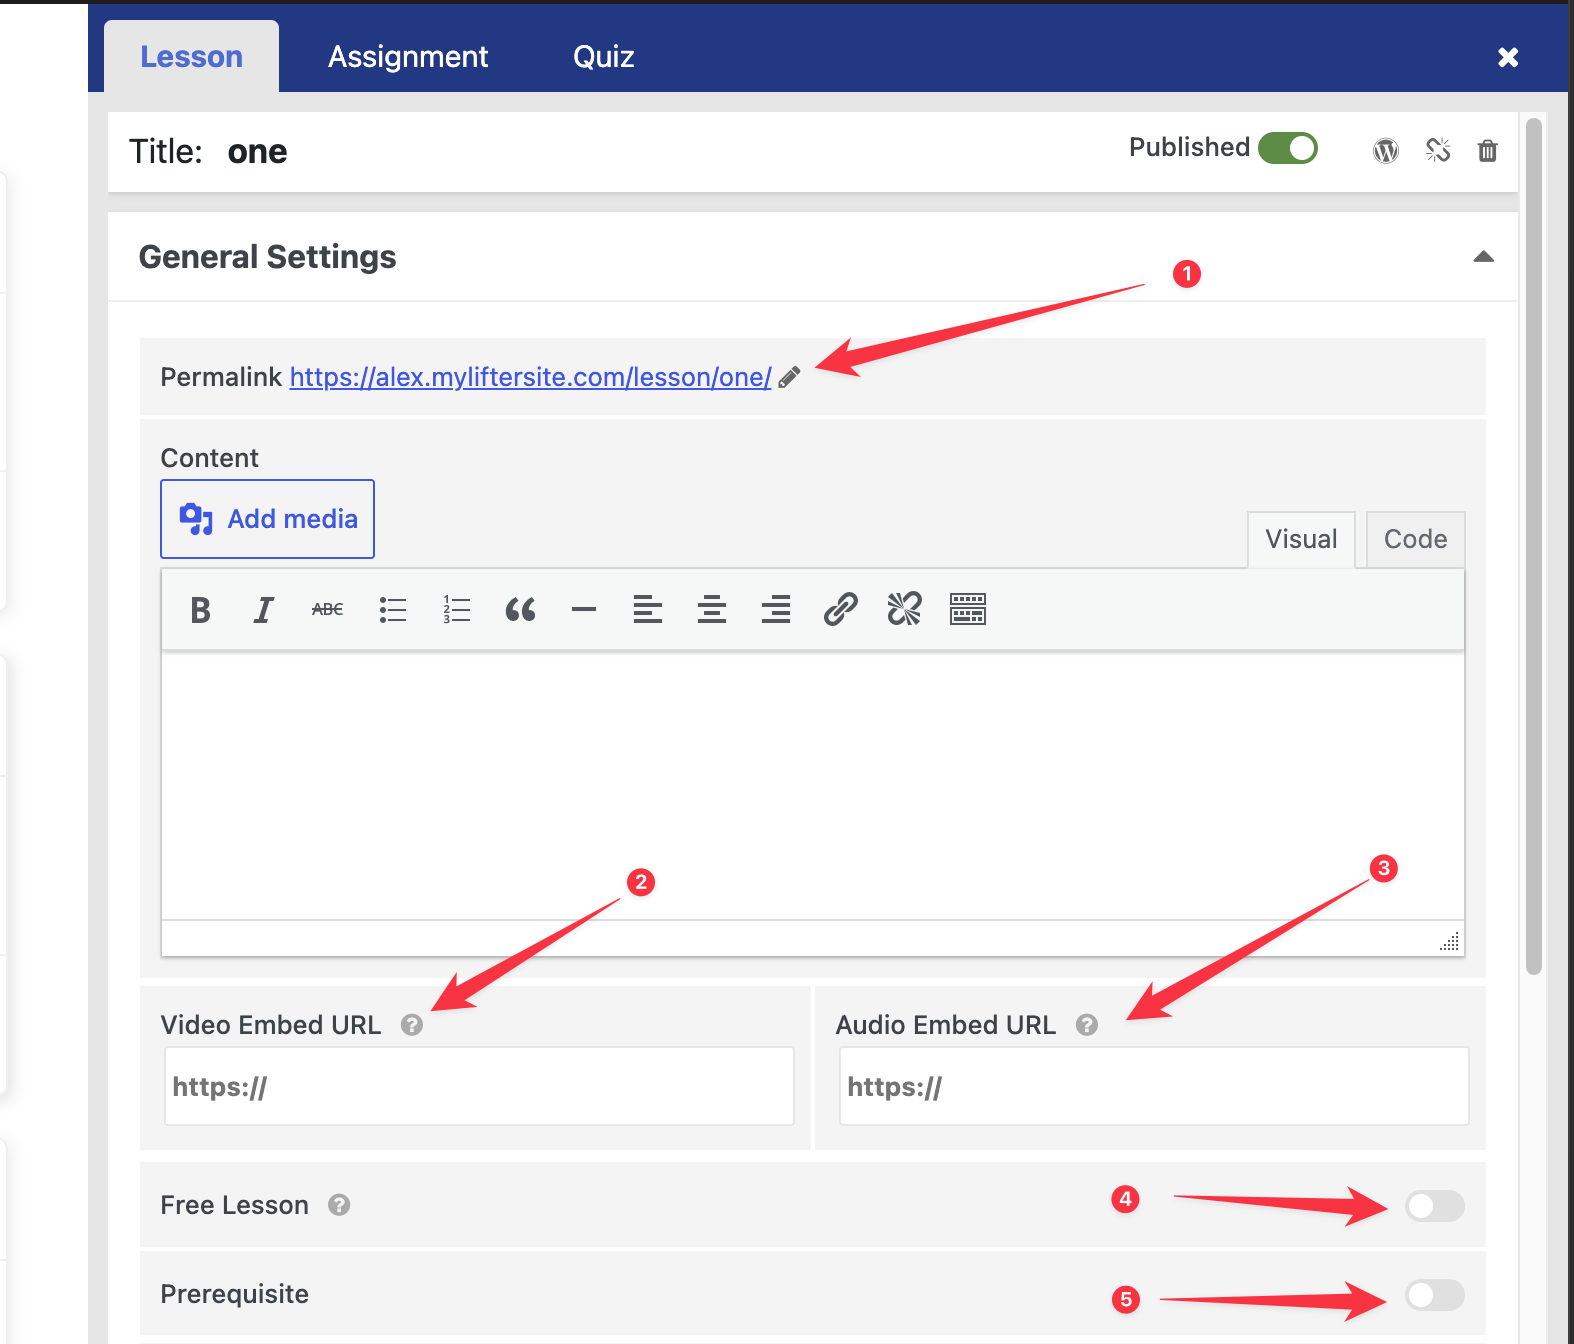
Lesson General Settings panel
- Editable Permalink field. This allows you to edit the lesson slug by clicking on the pencil icon. In the screenshot below, the editable lesson slug is
lesson-1. - Video Embed URL field. We recommend that you use Vimeo, Wistia, or YouTube URLs in this section.
- Audio Embed URL field. We recommend that you use SoundCloud or Spotify URLs in this section.
- Free Lesson toggle button. To learn how this is used, follow this tutorial on how to offer free lessons.
- Course Drip Method section. To learn how this is used, follow along with this YouTube tutorial on how to use global course drip settings.
- Drip Method dropdown. To learn how this is used, follow this tutorial on how to use drip content in LifterLMS lessons.
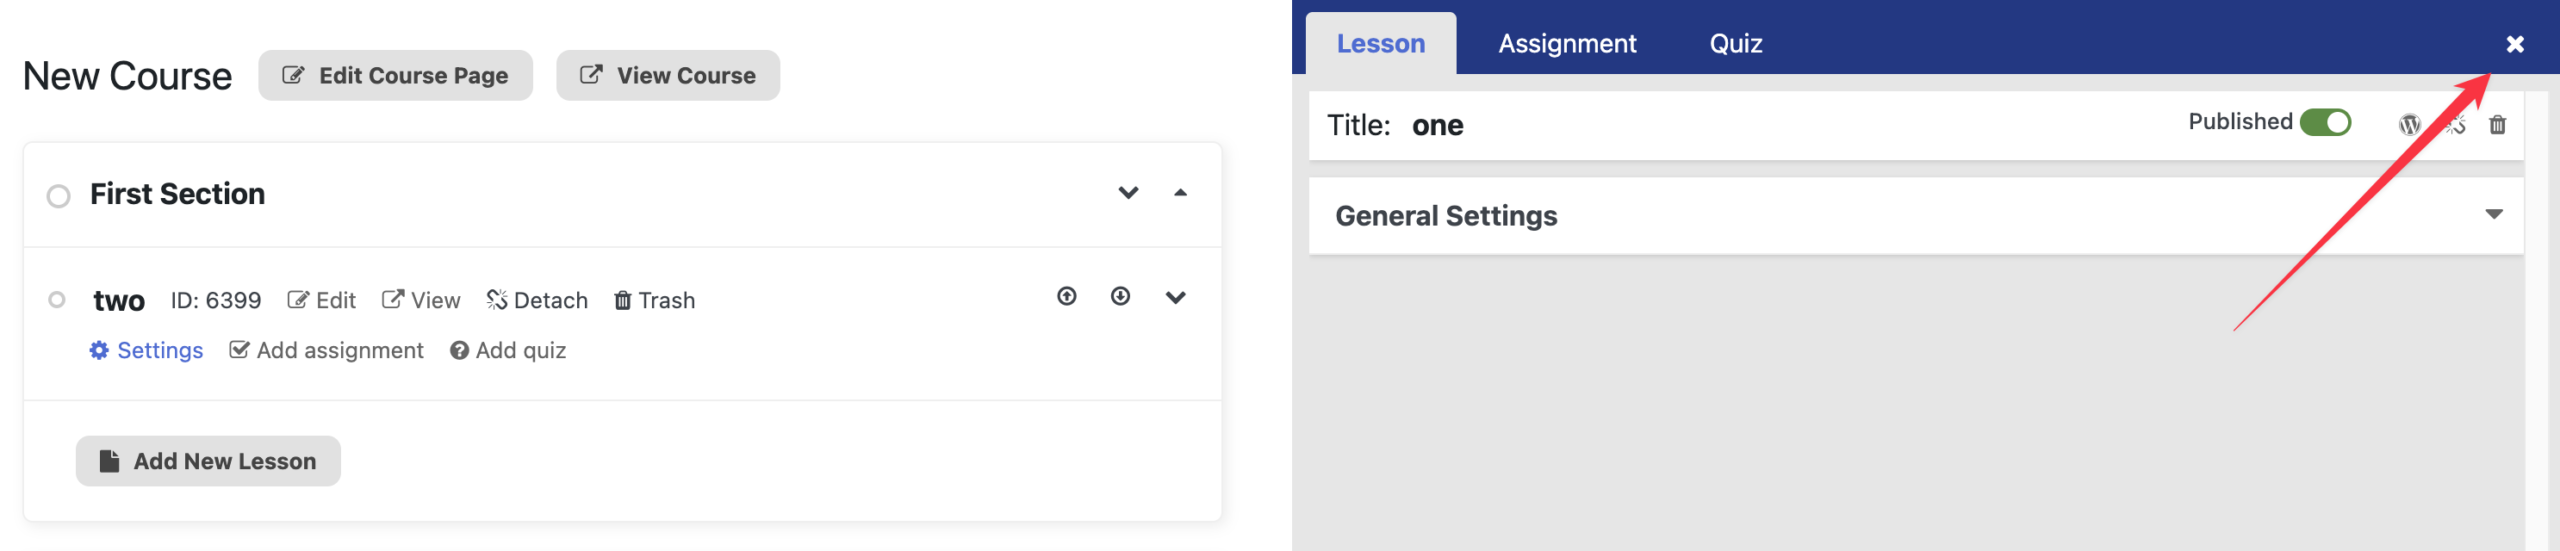
To close the lesson settings panel, click the close button in the top-right corner.
To learn how to create quizzes using the course builder, follow along this tutorial on how to create quizzes.
In order to create assignments, you first need to purchase, install, and activate the LifterLMS Assignments add-on.
Once activated, to learn how to create assignments using the course builder, follow along this tutorial on how to create assignments.


