Updating WordPress, Plugins, and Themes: Best Practices
There are three categories of software on your WordPress site that need to be updated from time to time:
- WordPress itself.
- WordPress themes installed on your site.
- WordPress plugins installed on your site.
All three categories of software above may also make updates on your WordPress database.
Updates are safe for the vast majority of time. In some cases, however, these updates can cause issues that need to be addressed. The key problem is that you can never tell ahead of time whether an update will cause problems on your site. As a user, the only way to find out is to perform the update, and then see for yourself what happens next.
But, you would not want to see issues for yourself on a live website. You want to be sure that you will only roll out software updates that do not cause any issues on your live website.
That is why it is important to perform the updates first in a staging site. This staging site is just an independent clone or replica of your live website. As a result, any change you make on your staging site will not directly affect your live website. This, in turn, is what would allow you to safely check whether an update is solid without creating any issues or challenges after the update.
If the update introduces technical issues, then you need to roll that update back to the last version that worked on your website. In other words, you need to downgrade back to the version you last upgraded from.
But the same observation for updates also applies for downgrades. Just like updates, you can never tell ahead of time whether a downgrade will cause problems on your site. As a user, the only way to find out is to perform the downgrade, and then see for yourself what happens next.
To help you perform safe updates and safe downgrades, this help document is organized into five key sections:
- How to safely update to the latest version
- How to safely downgrade/upgrade to a specific version
- How to identify a problematic theme/plugin
- How to identify a problematic version
- How to safely delete a theme/plugin that is crashing your website
The sections above should be used in combination with each other. In particular, these five sections allow you to make one of three categories of actions on your site:
- The first two sections give instructions on how to move from one software version to another software version.
- The next two sections give instructions on how to identify what software is causing the problem, and what version of it introduces the problem.
- Finally, the last section gives instructions on how to perform a safe software delete (without losing data), in case the software you need to update/downgrade is also crashing your website. Once deleted, you can then follow along the sections on safely downgrade / upgrade.
Taken together, all five sections described above will allow you to perform updates safely on your site, while simultaneously allowing you to correctly identify what update (or downgrade) is causing an issue through a guided process of elimination.
This section is broken down to three sections:
- How to safely update WordPress itself to the latest version.
- How to safely update a free theme/plugin to the latest version.
- How to safely update a paid theme/plugin to the latest version.
All three methods above share a common strategy but differ only on:
- how the update is made,
- and, where the update comes from
How to safely update WordPress itself to the latest version.
- Create a brand new staging site. Make sure that the live site and the staging site are identical, except for a few minor settings that need to be kept on/off (e.g., your LifterLMS staging site must always be in staging mode).
- Log in to your staging site as an administrator.
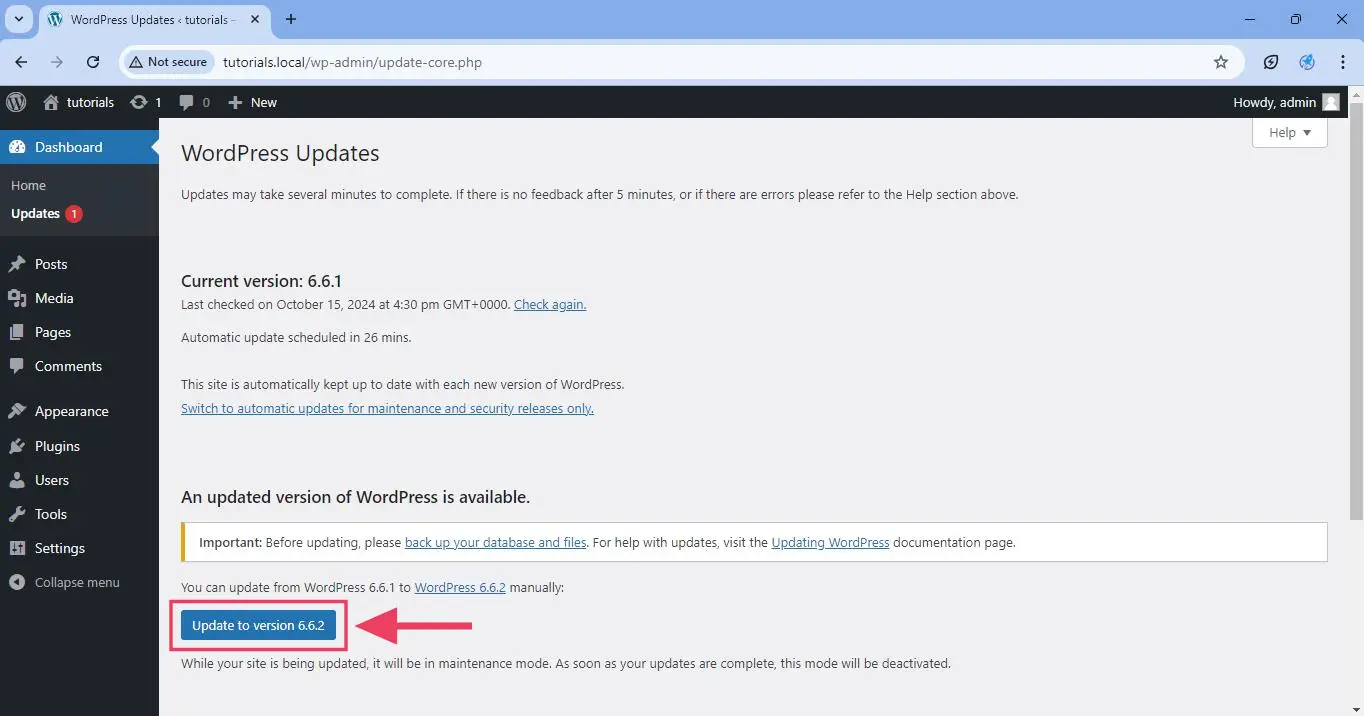
- From the WordPress admin, navigate to Dashboard > Updates.
- Update your staging site by clicking on the
Update to …button, as shown below.
- Does the update crash your staging site?
- If not, proceed to Step 6 below.
- If yes, follow the instructions on how to discover what theme / plugins are crashing your site. Then reach out to the support team of the theme / plugin that is crashing your site. Stop at this point and do not attempt to update your live site.
- Does the update introduce non-crashing issues to your staging site?
- If not, proceed to Step 7 below.
- If yes, notify the support team of the affected theme / plugin.
- Are you okay to also have these same non-crashing issues get deployed on your live site?
- If yes, proceed to Step 7 below.
- If not, then stop and do not attempt to update your live site.
- Are you okay to also have these same non-crashing issues get deployed on your live site?
- Log in to your live site as an administrator.
- Back up your live site, including the entire database.
- Follow the same steps in Step 3 to Step 4 to update your live site.
- Test your live site.
How to safely upgrade a free theme/plugin to the latest version.
- Create a brand new staging site. Make sure that the live site and the staging site are identical, except for a few minor settings that need to be kept on/off (e.g., your LifterLMS staging site must always be in staging mode).
- Log in to your staging site as an administrator.
- From the WordPress admin, navigate to Dashboard > Updates.
- To upgrade a free theme, follow these steps:
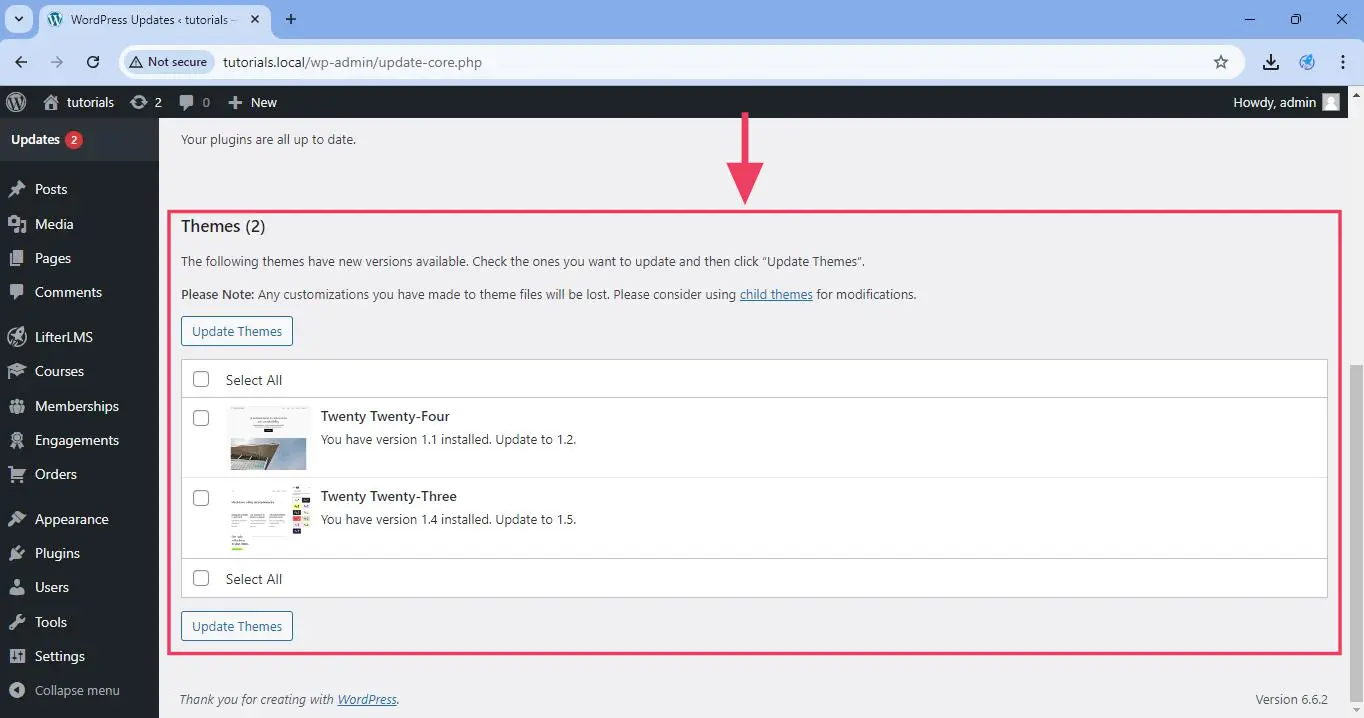
- Scroll down to Dashboard > Updates > Themes, as you can see below.
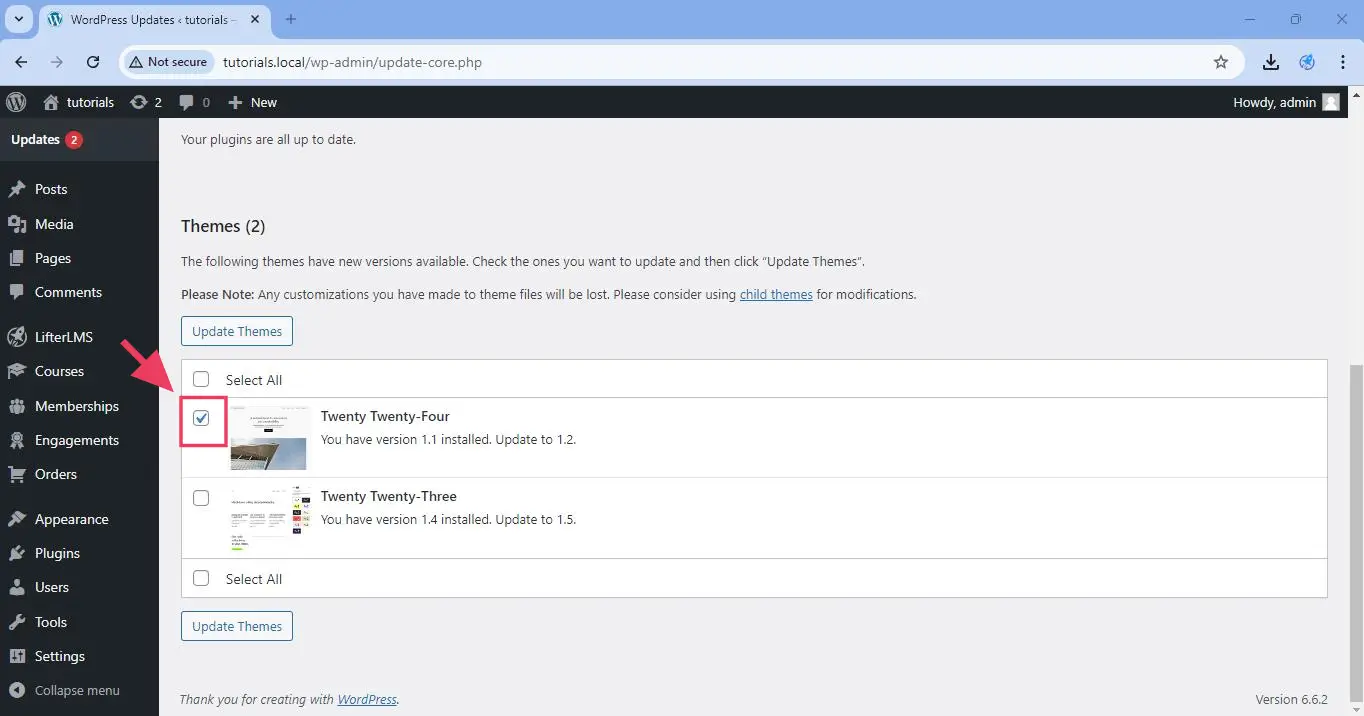
- Check the theme that you want to update, as you can see below.
- Click on the Update Themes button, as you can see below.
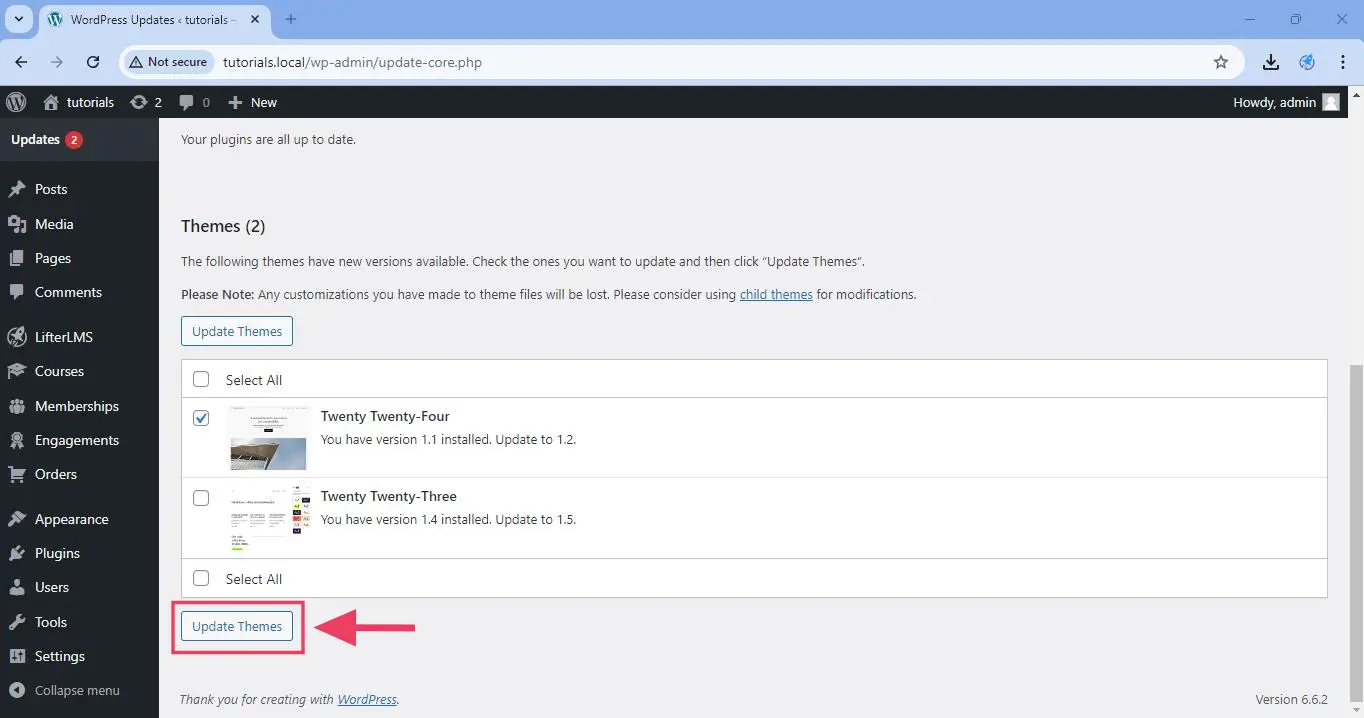
- Scroll down to Dashboard > Updates > Themes, as you can see below.
- To upgrade a free plugin, follow these steps:
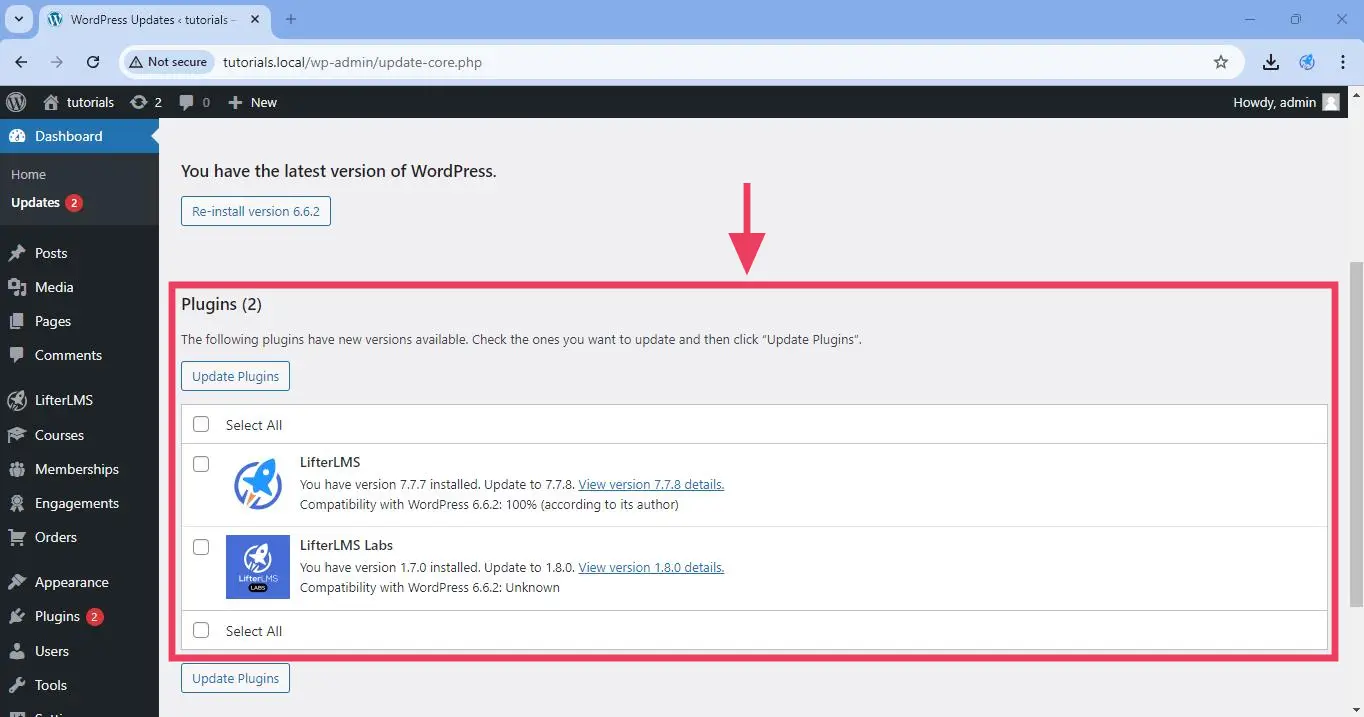
- Scroll down to Dashboard > Updates > Plugins, as you can see below.
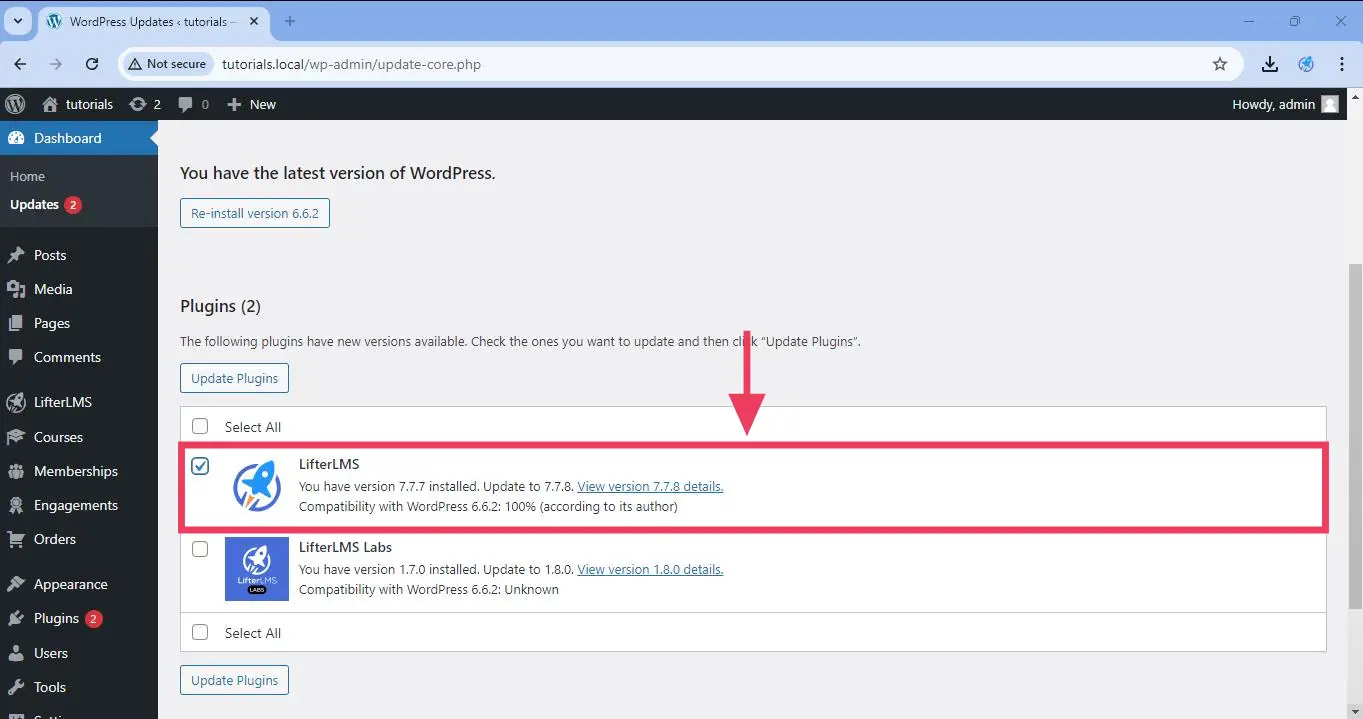
- Check the plugin that you want to update, as you can see below.
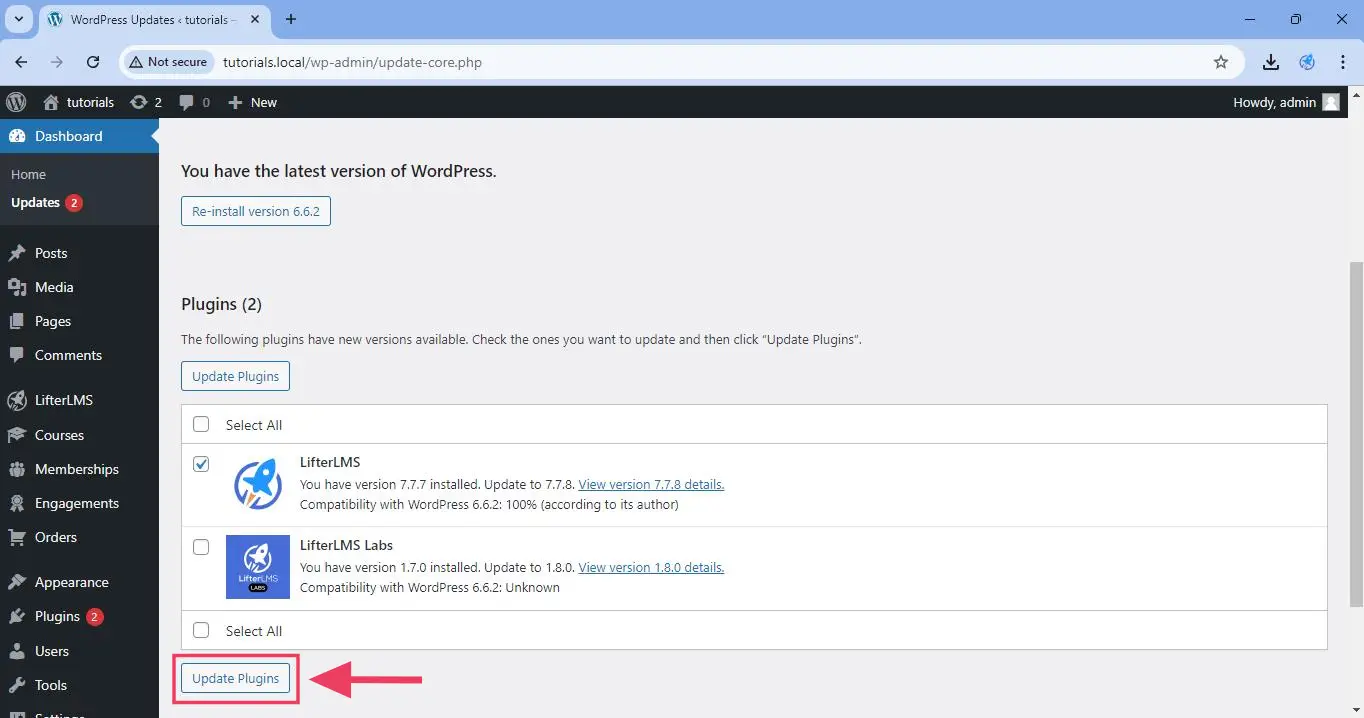
- Click on the Update Plugins button, as you can see below.
- Scroll down to Dashboard > Updates > Plugins, as you can see below.
- Does the update crash your staging site?
- If not, proceed to Step 8 below.
- If yes, reach out to the support team of the theme / plugin that is crashing your site. Stop at this point and do not attempt to update your live site.
- Does the update introduce non-crashing issues to your staging site?
- If not, proceed to Step 8 below.
- If yes, notify the support team of the affected theme / plugin.
- Are you okay to also have these same non-crashing issues get deployed on your live site?
- If yes, proceed to Step 8 below.
- If not, then stop and do not attempt to update your live site.
- Are you okay to also have these same non-crashing issues get deployed on your live site?
- Log in to your live site as an administrator.
- Back up your live site, including the entire database.
- Follow the same steps in Step 3 to Step 5 to update the corresponding free theme/plugin on your live site.
- Test your live site.
How to safely update a paid theme/plugin to the latest version.
This will depend entirely on the paid theme/plugin you are using. In the case of all the paid products of LifterLMS (e.g., the Sky Pilot theme, the LaunchPad theme, and all the plugins listed in lifterlms.com/pricing), you need to follow the steps below:
- Create a brand new staging site. Make sure that the live site and the staging site are identical, except for a few minor settings that need to be kept on/off (e.g., your LifterLMS staging site must always be in staging mode).
- Log in to your staging site as an administrator.
- From the WordPress admin, navigate to LifterLMS > Add-ons & more > My License Keys, and ensure that your LifterLMS license key is added to your WordPress website.
Once your license key is updated, follow the same steps for updating free themes / plugins.
This section is broken down into three parts:
- How to safely downgrade/update WordPress itself to a specific version.
- How to safely downgrade/update a free theme/plugin to a specific version.
- How to safely downgrade/update a paid theme/plugin to a specific version.
How to safely downgrade/update WordPress itself to a specific version
- Identify the target WordPress version you need to downgrade or update to. In this particular example we will downgrade to WordPress 6.6.1 from WordPress 6.6.2.
- Navigate to wordpress.org/download/releases, and then download the ZIP file corresponding to the target WordPress version. In this particular example, we’ll download wordpress-6.6.1.zip.
- Create a brand new staging site. Make sure that the live site and the staging site are identical, except for a few minor settings that need to be kept on/off (e.g., your LifterLMS staging site must always be in staging mode).
- Access your staging site via SFTP. You may use any popular FTP clients like FileZilla to do this.
- Using your FTP client, delete every file (including the
wp-admin/and thewp-includes/folders and all their contents). In particular, the only things that should remain on your site are the following:- the
wp-content/folder and all of its contents - the
wp-config.phpfile - the
.htaccessfile if it exists.
- the
- Unzip the ZIP file you downloaded from Step 2 above. In this particular example, unzip the wordpress-6.6.1.zip you have in your downloads folder so the unzipped folder will be
wordpress-6.6.1/. - Delete the
wordpress-6.6.1/wp-content/folder from your unzippedwordpress-6.6.1/folder in your downloads. - Upload all the contents of
wordpress-6.6.1/to your staging site’s root folder (the same folder wherewp-config.phpandwp-content/is located). - Once the upload is completed, your staging site’s root folder should now contain at least the following:
- the
wp-content/folder and all of its contents - the
wp-admin/folder and all of its contents - the
wp-includes/folder and all of its contents - the
.htaccessfile if it exists before - the
wp-config.phpfile - a lot of other PHP files from the
wordpress-6.6.1/folder
- the
- Login to your staging site as an administrator.
- Does the update crash your staging site?
- If not, proceed to Step 12 below.
- If yes, determine if a conflict with a theme or plugin is causing the crash.
- If such a fatal conflict exists, determine if downgrading / upgrading to a specific version of the theme / plugin fixes the issue.
- If a newer version of the theme / plugin fixes the issue, use that newer version and proceed to Step 12.
- If an older version of the theme / plugin fixes the issue, or if no version fixes the issue, reach out to the support team of the theme / plugin that is crashing your site and inform them that they are not compatible with the version of WordPress you just updated/downgraded to. Stop at this point and do not attempt to update your live site.
- If no such fatal conflicts exist, stop at this point and do not attempt to update your live site.
- If such a fatal conflict exists, determine if downgrading / upgrading to a specific version of the theme / plugin fixes the issue.
- Does the update introduce non-crashing issues to your staging site?
- If not, proceed to Step 13 below.
- If yes, notify the support team of the affected theme / plugin.
- Are you okay to also have these same non-crashing issues get deployed on your live site?
- If yes, proceed to Step 13 below.
- If not, then stop and do not attempt to update your live site.
- Are you okay to also have these same non-crashing issues get deployed on your live site?
- Log in to your live site as an administrator.
- Back up your live site, including the entire database.
- Follow the same steps in Step 1 to Step 9 to downgrade / update WordPress on your live site to a specific version.
- Test your live site.
How to safely downgrade/update a free theme/plugin to a specific version
- Create a brand new staging site. Make sure that the live site and the staging site are identical, except for a few minor settings that need to be kept on/off (e.g., your LifterLMS staging site must always be in staging mode).
- Log in to your staging site as an administrator.
- From the WordPress admin, navigate to Plugins > Add New Plugin, then search for, install, and activate the WP Rollback plugin.
- To downgrade / update a free theme to a specific version, follow the instructions below:
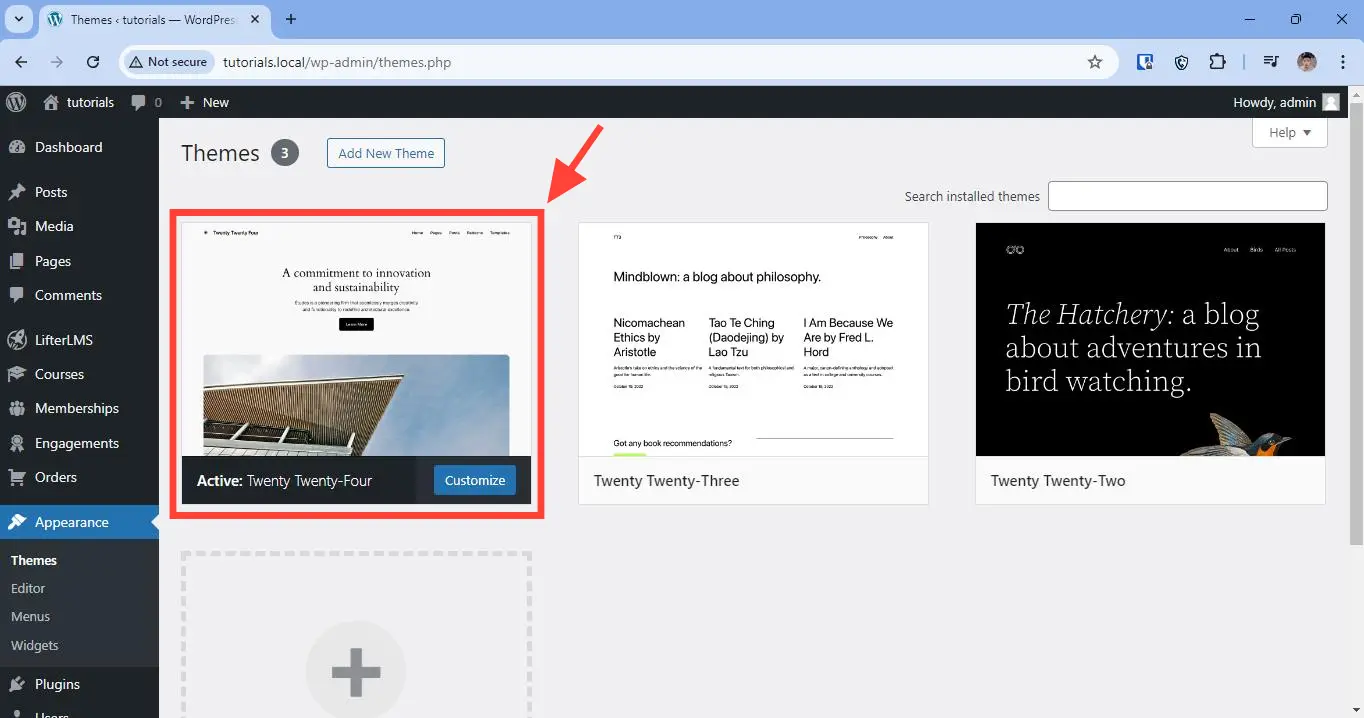
- From the WordPress admin, navigate to Appearance > Themes.
- Click on the theme thumbnail that you want to downgrade / update.
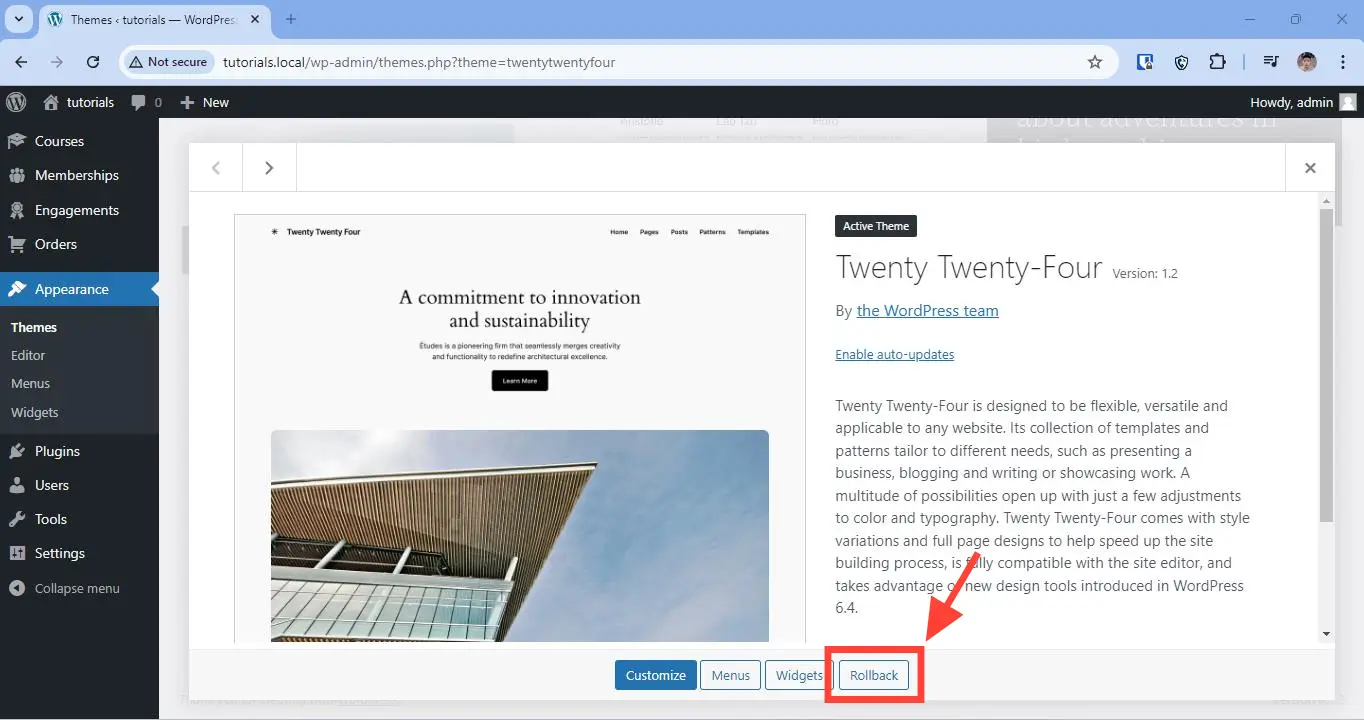
- On the screen that loads, click on Rollback, as you can see below.
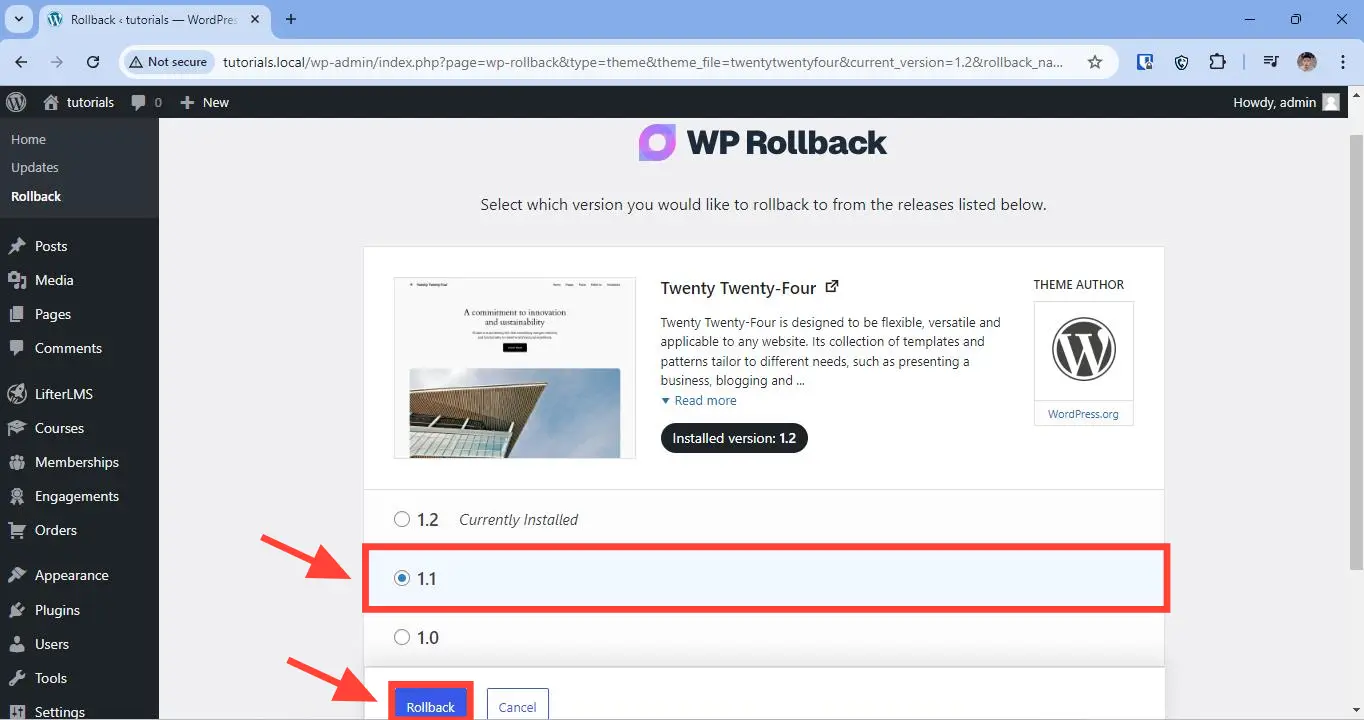
- Select the version that you want to downgrade / upgrade to, as you can see below, and then follow all the steps from there.
- Wait for the rollback to finish.
- To downgrade / update a free plugin to a specific version, follow the instructions below:
- From the WordPress admin, navigate to Plugins > Installed Plugins.
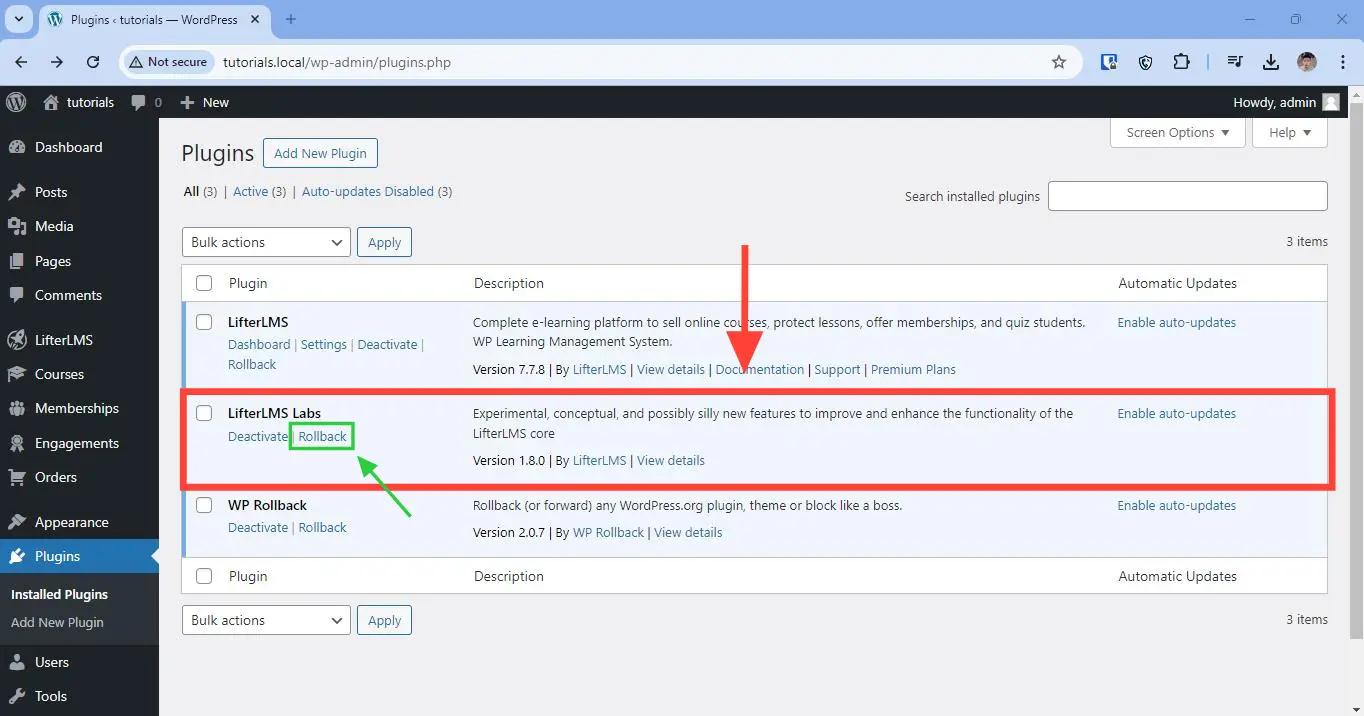
- Identify the plugin that you want to downgrade / update, and click on Rollback just below that plugin’s name, as you can see below.
- Select the version that you want to downgrade / upgrade to, as you can see below, and then follow the steps from there.
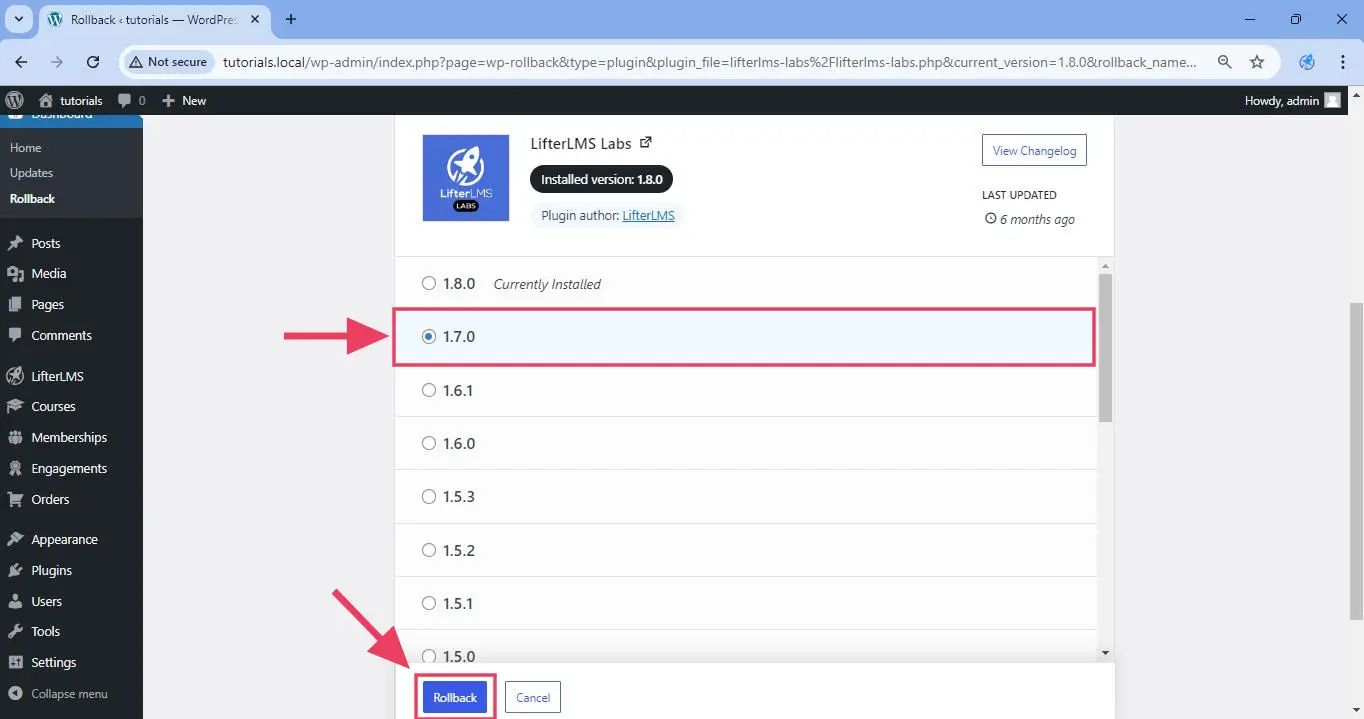
- Wait for the rollback to finish.
- Once the rollback is finished, click on Activate Plugin, as you can see below.
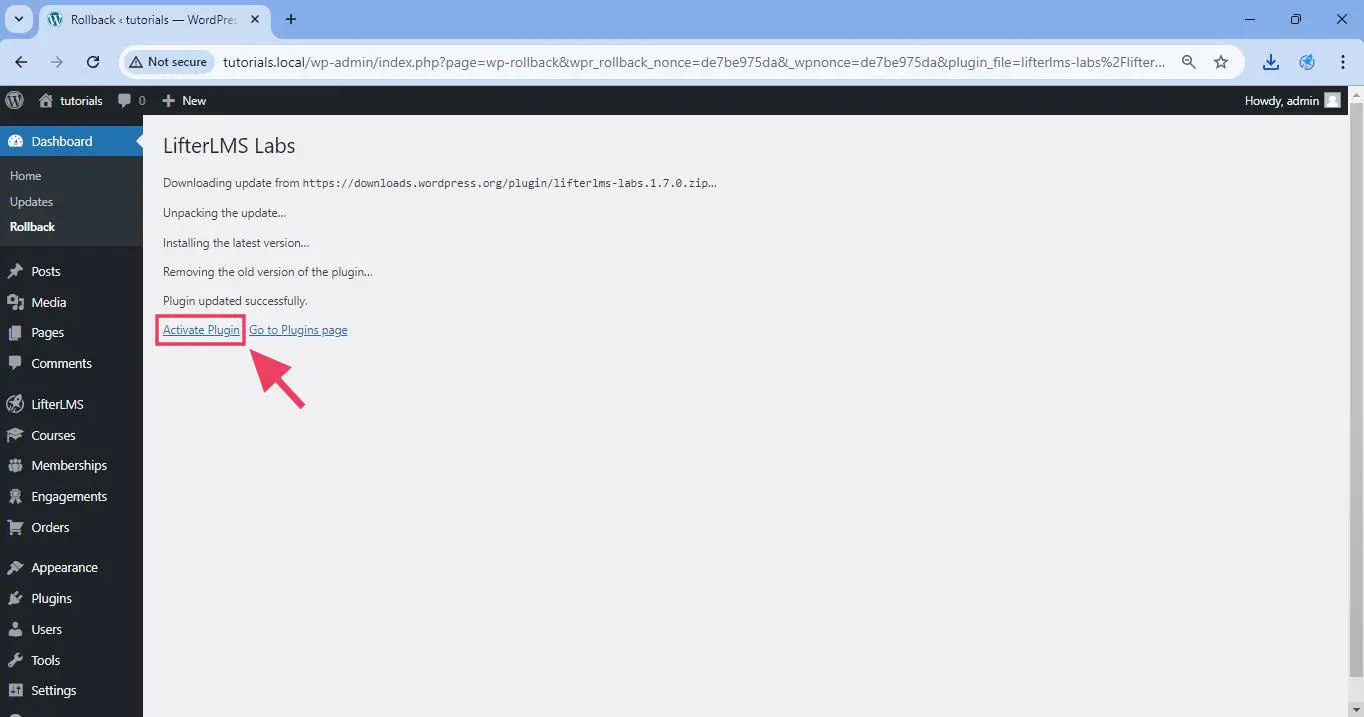
- Does the update crash your staging site?
- If not, proceed to Step 7 below.
- If yes, reach out to the support team of the theme / plugin that is crashing your site. Stop at this point and do not attempt to update your live site.
- Does the update introduce non-crashing issues to your staging site?
- If not, proceed to Step 8 below.
- If yes, notify the support team of the affected theme / plugin.
- Are you okay to also have these same non-crashing issues get deployed on your live site?
- If yes, proceed to Step 8 below.
- If not, then stop and do not attempt to update your live site.
- Are you okay to also have these same non-crashing issues get deployed on your live site?
- Log in to your live site as an administrator.
- Back up your live site, including the entire database.
- Follow the same steps in Step 3 to Step 5 to downgrade / update the corresponding free theme / plugin on your live site to a specific version.
- Test your live site.
How to safely downgrade / update a paid theme/plugin to a specific version
This will depend entirely on the paid theme or paid plugin you are using. If the paid theme or paid plugin does not provide a one-click or a few-clicks way of downgrading or upgrading to a specific version, then you need to perform the upgrade by following the steps below.
- First, reach out to the support team of the paid theme / plugin and ask them to send you the ZIP file of the specific theme / plugin version that you need from them. Once you have the needed ZIP file, proceed to Step 2 below.
- Create a brand new staging site. Make sure that the live site and the staging site are identical, except for a few minor settings that need to be kept on/off (e.g., your LifterLMS staging site must always be in staging mode). Skip this step if you are already in a brand new staging site.
- Manually delete the paid theme / plugin.
- To delete a plugin:
- Navigate to Plugins > Installed Plugins.
- Identify the plugin you want to delete, then click on Deactivate under that plugin’s name if it is not already deactivated.
- Once the plugin is deactivated, click on Delete under the plugin name.
- To delete a theme:
- Navigate to Appearance > Themes.
- If the theme you want to delete is the current theme, activate any other themes first so that the theme you want to delete is no longer the current theme.
- Click on the thumbnail of the theme you want to delete.
- On the screen that loads, click on Delete.
- Click OK to confirm the deletion.
- To delete a plugin:
- Once deleted, install and activate the version of the paid theme / paid plugin using that ZIP file. You can follow these steps on how to manually install a plugin from a ZIP file. If its a theme you need to install, follow these steps on how to manually install a theme from a ZIP file.
- Does the update crash your staging site?
- If not, proceed to Step 6 below.
- If yes, reach out to the support team of the theme / plugin that is crashing your site. Stop at this point and do not attempt to update your live site.
- Does the update introduce non-crashing issues to your staging site?
- If not, proceed to Step 7 below.
- If yes, notify the support team of the affected theme / plugin.
- Are you okay to also have these same non-crashing issues get deployed on your live site?
- If yes, proceed to Step 7 below.
- If not, then stop and do not attempt to update your live site.
- Are you okay to also have these same non-crashing issues get deployed on your live site?
- Log in to your live site as an administrator.
- Back up your live site, including the entire database.
- Follow the same steps in Step 3 to Step 4 to downgrade / update the corresponding paid theme / plugin on your live site to a specific version.
- Test your live site.
Some themes / plugins have an uninstallation script that runs a clean up operation on the database. If you want to avoid running that uninstalling script, you will need to delete your paid theme / plugin using SFTP. In this case, jump to this section on how to delete problematic themes / plugins via SFTP.
This section is divided into two sections:
- How to discover what theme/plugins are causing non-crashing issues on you site
- How to discover what theme/plugins are crashing your site
How to discover what theme/plugins are causing non-crashing issues on you site
The instructions below are designed for systematic blind troubleshooting: they are designed to systematically reduce the set of all possible causes of the problem by rejecting all wrong hypothesized causes, without requiring you, the troubleshooter, to be familiar with the underlying settings, details, complexities, of the theme/plugin you are having issues with.
But blind systematic approaches can be expensive to carry out, especially on large and complex WordPress websites. Moreover, while it’s guaranteed to reduce the set of all possible causes to a smaller set, it is not guaranteed to reduce that set to a set of just 1 hypothesized cause. For example, if the blind troubleshooting steps given below fail to identify an offending theme / plugin, it will not be able to tell you if the cause of the issue is a server setting, a database setting, a web host-controlled MU plugins, DNS issues affecting your web host or your web host’s data centers, etc.
As a result, this should be a last resort. Before attempting this, attempt to familiarize yourself with the relevant documentation of the theme / plugin you are having problems with. Educating yourself by taking free courses can help you a lot when it comes to reducing troubleshooting time. Oftentimes, you really just need to turn on/off a switch somewhere in the settings page of your theme or plugin to fix a seemingly intractable problem.
- Create a brand new staging site. Make sure that the live site and the staging site are identical, except for a few minor settings that need to be kept on/off (e.g., your LifterLMS staging site must always be in staging mode). Skip this step if you are already in a brand new staging site.
- Log in to your staging site as an administrator.
- Ensure that your staging site is not using any form of caching (e.g., server-side caching, CDN caching, etc.). Reach out to your webshot to confirm this.
- If the issue disappears as soon as you disable caching, then you simply have a caching issue. In this case, stop and do not proceed any further.
- If you suspect that a plugin is affected by a theme:
- Activate a default WordPress theme (e.g., Twenty Twenty-Four).
- Check to see if the issue disappears.
- If the problem disappears, then there is a theme conflict with the current theme.
- If there is a theme update available, try to update the theme. If this solves the problem, stop now. Otherwise, report the issue to the authors/developers of the theme.
- If there is no theme update available, follow these instructions to find out the last previous version of the theme the problem will disappear. Report the issue to the authors/developers of the theme regardless of whether you find a previous working version or not.
- If the problem does not disappear, then there is either no theme conflict. Proceed to Step 6.
- If the problem disappears, then there is a theme conflict with the current theme.
- If you suspect that your theme is affected by at least one other plugin:
- Deactivate all plugins on your staging site.
- Check to see if the issue disappears.
- If the issue disappears, there is a plugin conflict. Reactivate each plugin one at a time until the problem re-appears. The last plugin you reactivated when that causes the problem to reappear is the offending plugin.
- If there is a plugin update available for the offending plugin, try to update the plugin. If this solves the problem, stop now. Otherwise, report the issue to the authors/developers of the offending plugin..
- If there is no plugin update available for the offending plugin, follow these instructions to find out the last previous version of the plugin the problem will disappear. Report the issue to the authors/developers of the plugin regardless of whether you find a previous working version or not.
- If the issue does not disappear, then there is no plugin conflict.
- Proceed to Step 4.2.
- If the issue disappears, there is a plugin conflict. Reactivate each plugin one at a time until the problem re-appears. The last plugin you reactivated when that causes the problem to reappear is the offending plugin.
- If you suspect that a single plugin
Pis affected by at least one other plugin:- Deactivate all plugins on your staging site except for plugin
P. - Proceed to Step 5.2.
- Deactivate all plugins on your staging site except for plugin
- If a set of plugins
P1,P2,P3, …,Pnare all needed to be active to produce a feature, and that feature is having issues:- Deactivate all plugins on your staging site except for plugins
P1,P2,P3, …,Pn. - Proceed to Step 5.2.
- Deactivate all plugins on your staging site except for plugins
- If a feature requires theme
T1and pluginsP1,P2,P3, …,Pn, and that feature is having issues:- Is there another theme,
T2, that works with pluginsP1,P2,P3, …,Pnto produce the exact same feature?- If yes, then do the following below.
- Install and activate that other theme
T2. - Check to see if the issue disappears.
- If the problem disappears, then there is a theme conflict with theme
T1. Proceed to Step 4.2.1. - If the problem does not disappear, then there is a plugin conflict. Proceed to Step 7.
- If the problem disappears, then there is a theme conflict with theme
- Install and activate that other theme
- If not, then proceed to Step 7.
- If yes, then do the following below.
- Is there another theme,
- If all the steps above fail to identify the offending theme/plugin, reach out to the authors/developers of the affected theme/plugin to report all your findings.
How to discover what theme/plugins are crashing your site
If a fatal error is displayed on your site during a crash, sometimes you can see the error message right in front of your site if debug mode and debug display is enabled, as you can see in below.
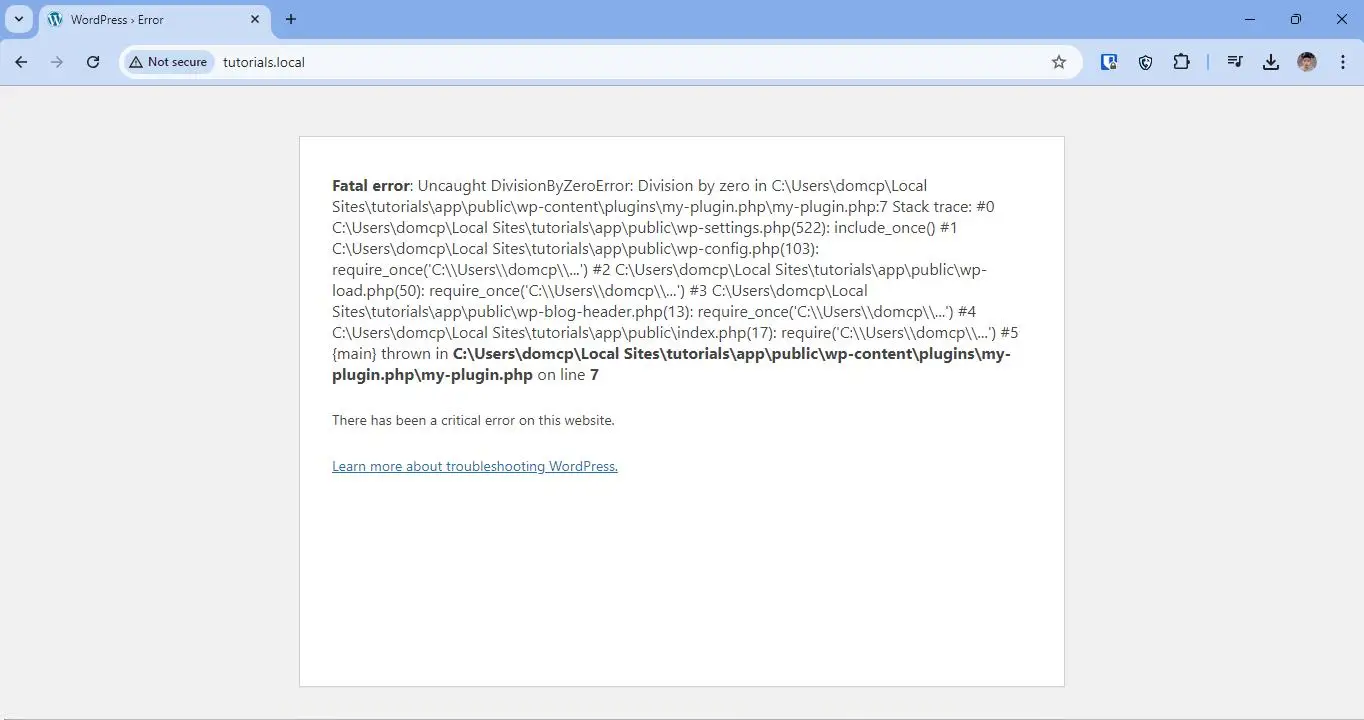
If a plugin is crashing your site, look for an error message that has a pattern similar the following:
Fatal error: … /wp-content/plugins/…phporParse error: … /wp-content/plugins/…php.
For example, as you can see in the example below, the plugin named My Plugin is the plugin that is crashing a website.
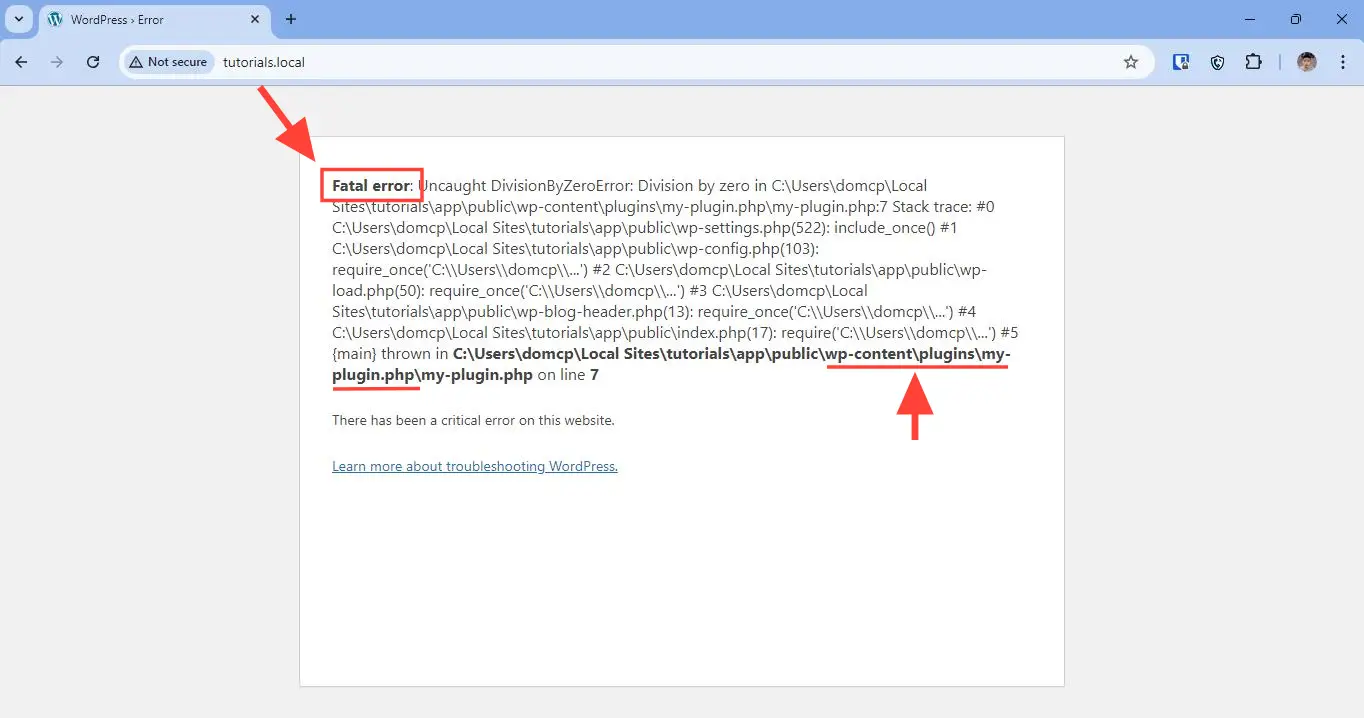
If a theme is crashing your site, look for an error message that has a pattern similar to the following:
Fatal error: … /wp-content/themes/…phporParse error: … /wp-content/themes/…php.
For example, as you can see in the example below, the current theme called My Theme is the theme that is crashing a website.
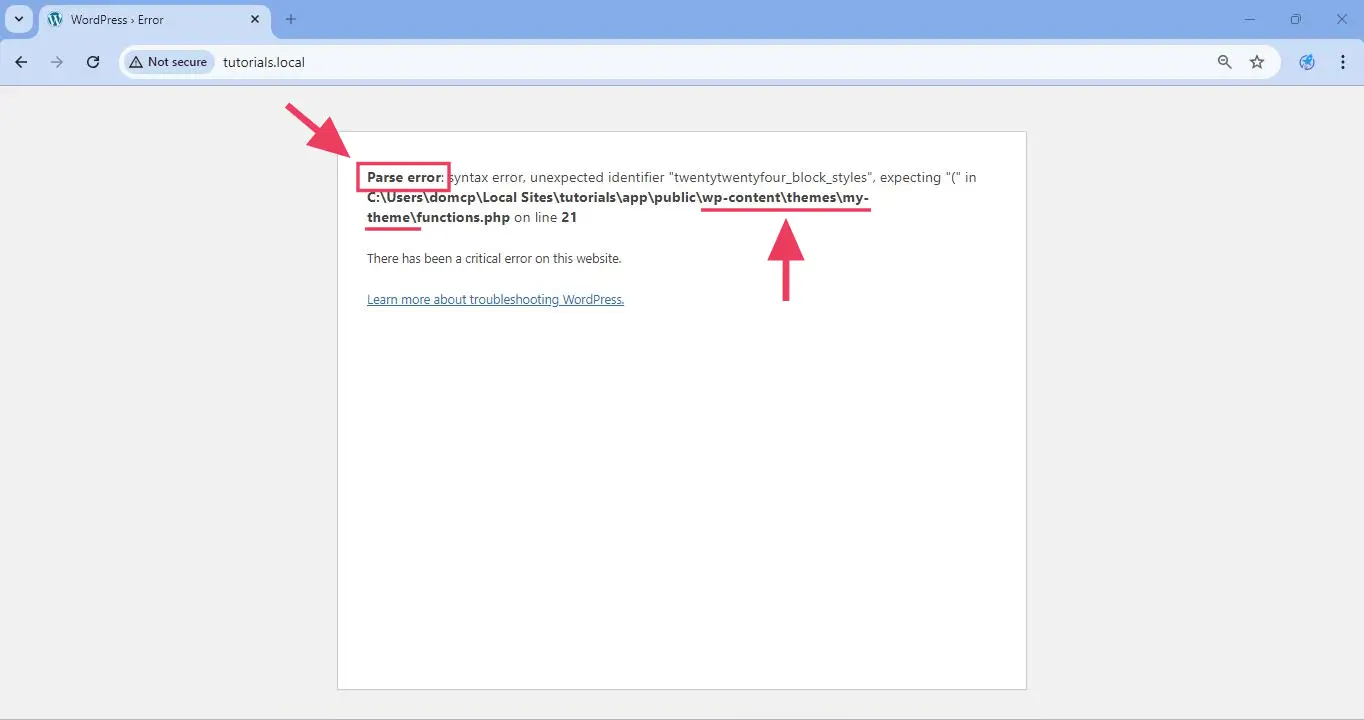
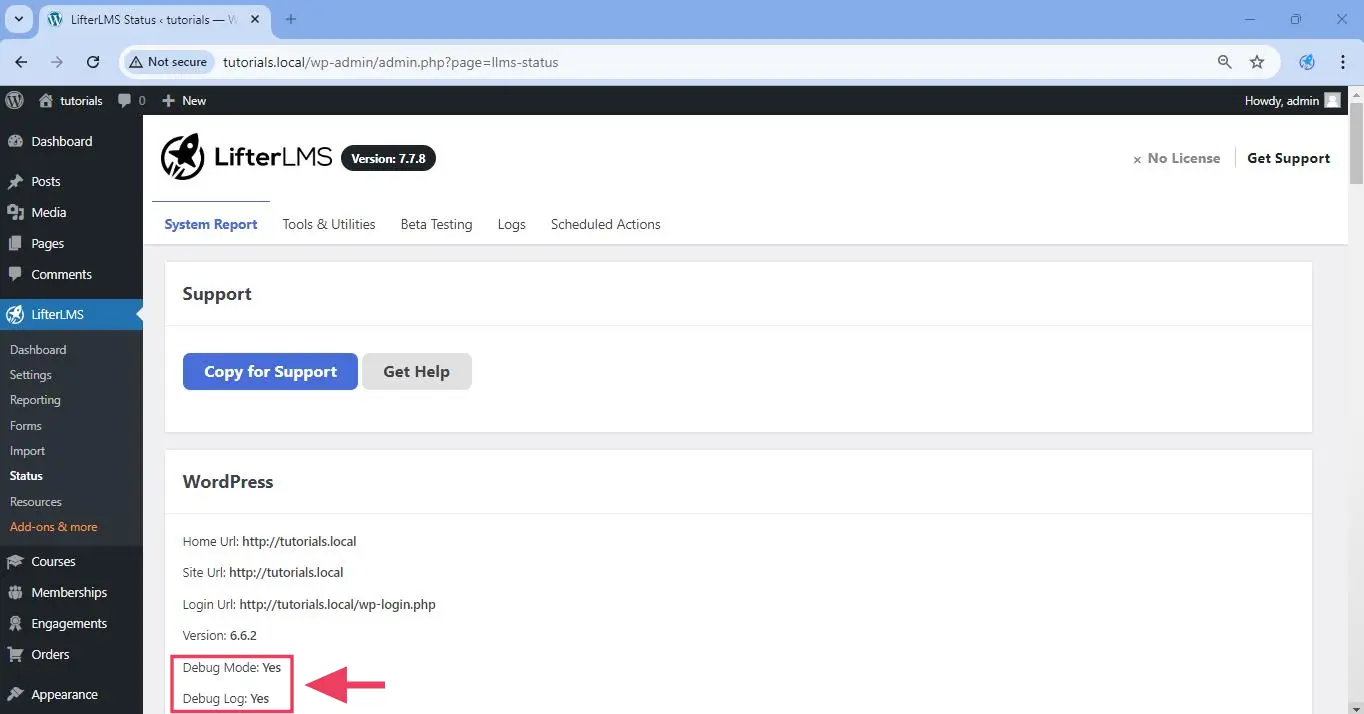
If the error display is disabled on your site, you will not see these errors. One way to still see the error is by forcing WordPress to write those errors on a log file. In this case, you need to enable debug mode and also enable debug logging.
If you have LifterLMS active on your site, you will know that you have successfully enabled debug mode and debug logging when you see Debug Mode: Yes and Debug Log: Yes in LifterLMS > Status > System Report, as you can see below.
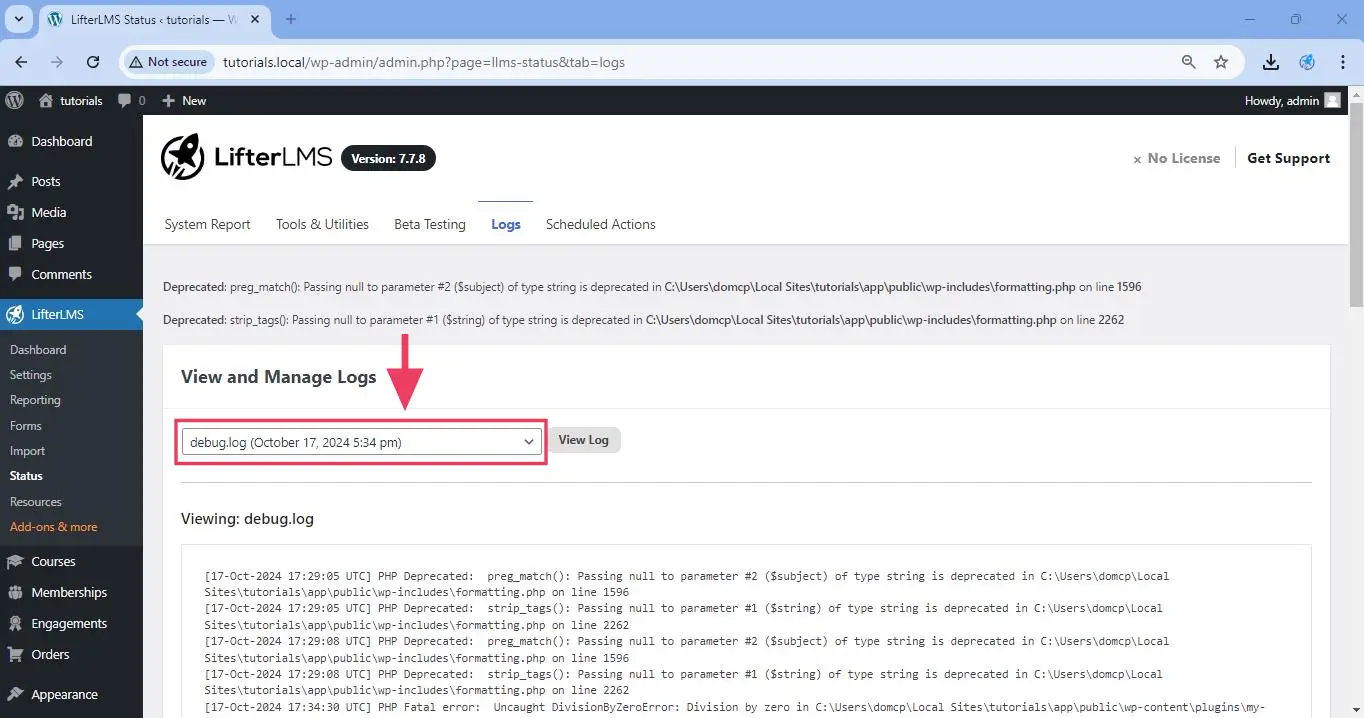
Once both debug mode and debug logging are enabled, navigate to LifterLMS > Status > Logs > View and Manage Logs and look for any debu.log or error.log or other similarly named log files in the dropdown, as you can see below.
Once selected, click on the View Log button to load the log file, as shown below.
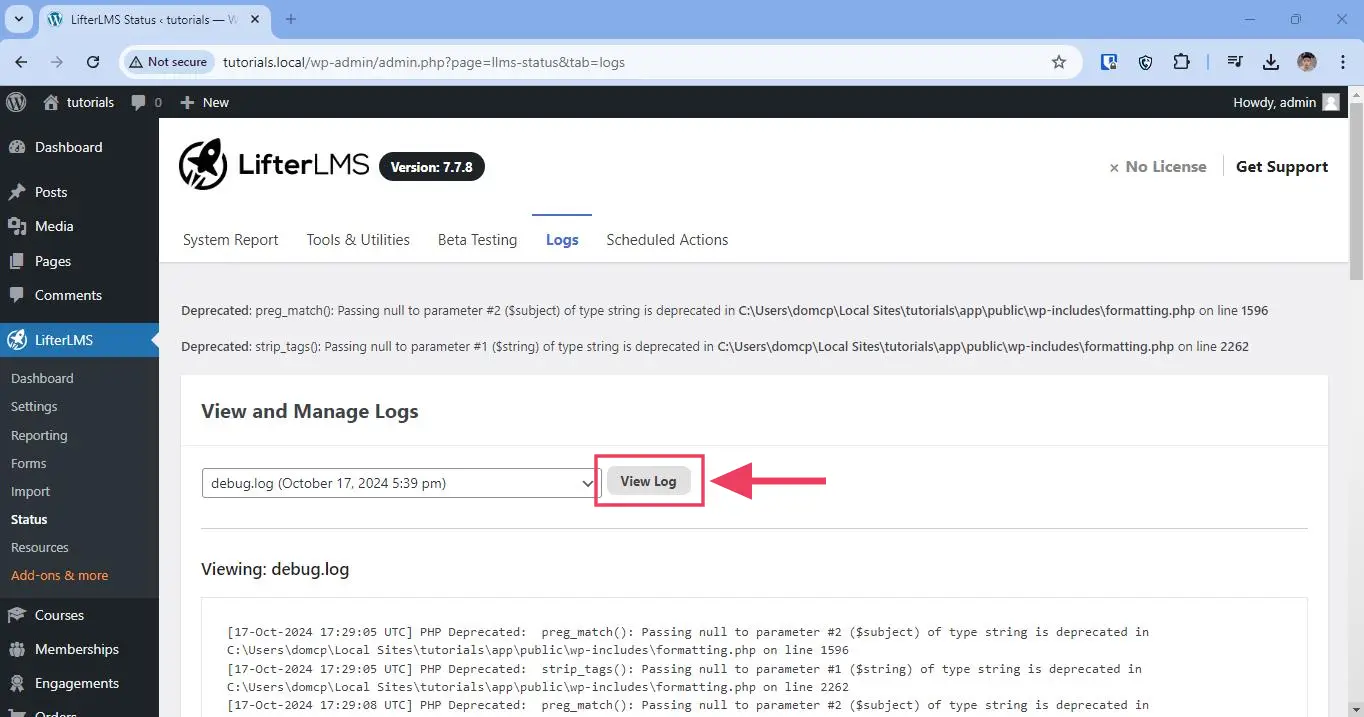
Once the log file is loaded, search for any Fatal error: or Parse error: in the log file using the Ctrl + F command in Windows or Command + F in macOS, as you can see below.
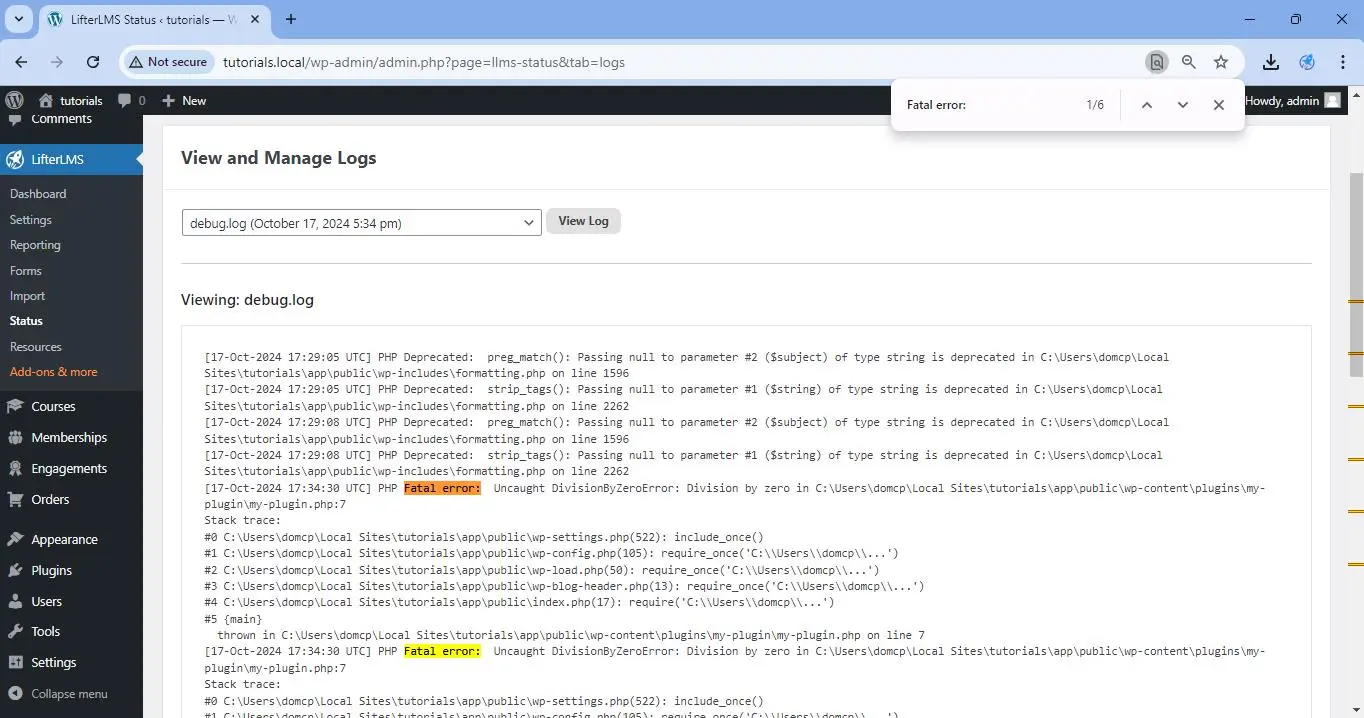
This quickly highlights where the fatal errors are, and allows you to quickly find what theme or plugin is causing the error. In the example below, you can see that it is the My Plugin plugin that is causing the fatal error.
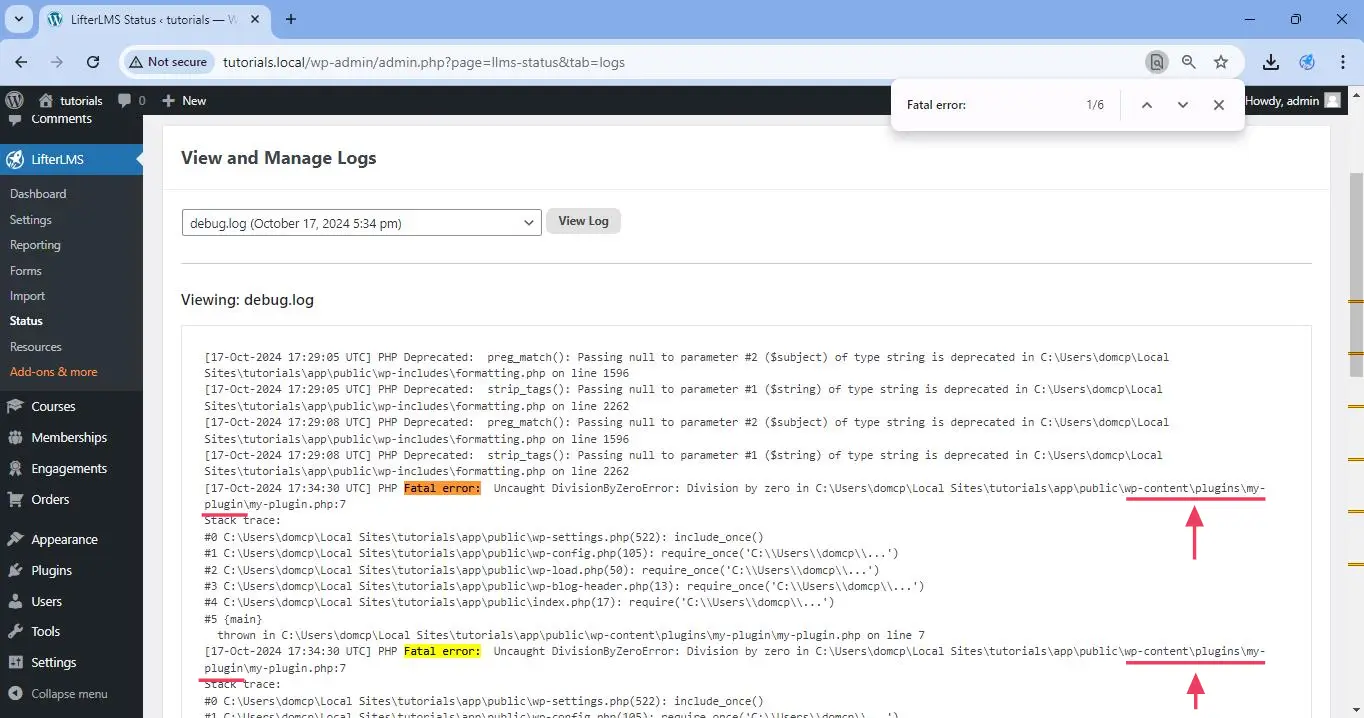
Now that you have identified the offending plugin, you just need to deactivate that plugin so that it no longer crashes your website. After that, the final step is to report this to the authors / developers of the offending plugin.
In some cases, the site crash would also prevent you from accessing the wp-admin/. In this case, access your site via SFTP, and then enable both debug mode and debug display. Once both are enabled, you will see the fatal error or parse error that is crashing your site when you try to access wp-admin/ , as you can see below.
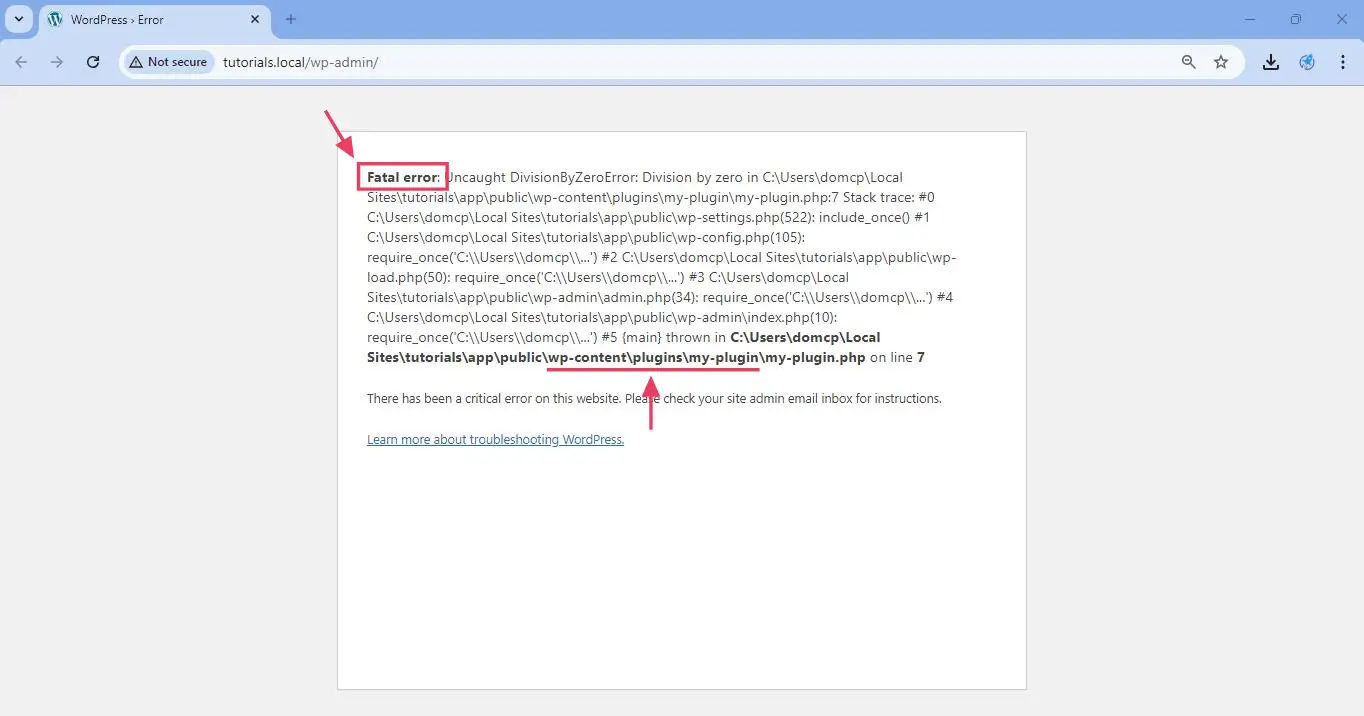
Once you identify the source of the problem, follow these steps on how to deactivate that offending plugin using SFTP.
This section is further divided into two parts:
- How to identify a problematic WordPress version.
- How to identify a problematic theme / plugin version.
How to identify a problematic WordPress version
- Find out what your current WordPress version is. Call this version X .
- Create a brand new staging site. Make sure that the live site and the staging site are identical, except for a few minor settings that need to be kept on/off (e.g., your LifterLMS staging site must always be in staging mode).
- Check if a WordPress update is available. You can find a list of all available WordPress versions at wordpress.org/download/releases.
- If there is a WordPress update available, try to update WordPress to the latest version. If this solves the problem, stop now. Otherwise, report the issue to the authors / developers of the theme / plugin affected by this problematic WordPress version.
- If there is no theme update available, downgrade WordPress to the version immediately preceding version X .
- Keep on downgrading one previous version at a time until you find a version where the issue gets fixed. Take note of that working WordPress version and report that to the authors / developers of the theme / plugin affected by this problematic WordPress version.
How to identify a problematic theme / plugin version
- Find out what your current theme / plugin version is. Call this version X .
- Create a brand new staging site. Make sure that the live site and the staging site are identical, except for a few minor settings that need to be kept on/off (e.g., your LifterLMS staging site must always be in staging mode).
- Check if a theme / plugin update is available.
- If there is a theme / plugin update available, try to update that theme / plugin to the latest version. If this solves the problem, stop now. Otherwise, report the issue to the authors / developers of the theme / plugin.
- If there is no theme update available, downgrade that theme / plugin to the version immediately preceding version X .
- Keep on downgrading one previous version at a time until you find a version where the issue gets fixed. Take note of that working WordPress version and report the issue to the authors / developers of the theme / plugin.
Sometimes a theme/plugin downgrade/upgrade can potentially crash your website in such a way that you can no longer access the WordPress dashboard (i.e., wp-admin/ ).
When this happens, you’ll need to deactivate and then delete the theme/plugin that is causing the crash. To do that, follow the steps below:
- Follow the steps in identifying what theme / plugin is crashing your site.
- Connect to your website via FTP or SFTP.
- To deactivate the theme/plugin that is causing the crash, you need to rename its folder.
- If what you are going to deactivate is a theme, navigate to wp-content/themes/ and then rename the theme’s folder.
For example, if the theme folder is wp-content/themes/my-awesome-theme/ you can just rename it to wp-content/themes/my-awesome-theme-delete-this/ . This action will automatically deactivate the theme. - If what you are going to deactivate is a plugin, navigate to wp-content/plugins/ and then rename the plugin’s folder.
For example, if the plugin folder is wp-content/plugins/my-awesome-plugin/ you can just rename it to wp-content/plugins/my-awesome-plugin-delete-this/ . This action will automatically deactivate the plugin.
- If what you are going to deactivate is a theme, navigate to wp-content/themes/ and then rename the theme’s folder.
- Once the theme/plugin has been deactivated, you can now delete it from your WordPress dashboard.
Some themes/plugins have uninstall scripts that also delete data associated with the theme/plugin. If you do not want any data to be deleted, you have to delete the theme/plugin by deleting the theme/plugin folder via FTP or SFTP. Just note that this deletion process can take a while.
- Testing an update first on a staging site reduces the risk of introducing problematic updates on a live and busy production website.
- It’s possible for any website owner to get good at updating software in this risk-free, diligent way. It just takes practice.
- Some web hosts test updates for you and can help when challenges arise.
- You don’t have to do these updates and testing yourself. There are LifterLMS experts you can hire to perform updates, testing, troubleshooting, and problem-solving for you.


