All About Staging Sites
A staging site is a copy of your live production site, which can be used to safely test updates to plugins, themes, and custom code.
The staging site has a separate file system and set of database tables, so while it is a clone of your production site, changes made to your staging site will never affect your live site. In this way, the staging site lets you ensure updates and changes have no negative impact on your site before applying them to your production site.
In WordPress, the most common scenario is having a handful of plugins installed and working together. However, each new plugin update comes with a chance of new plugin conflicts with other plugins and your theme.
When using a staging site, you can safely and calmly test new plugin updates to ensure they have no negative impact on other plugins, your theme, or your site as a whole.
The primary reason for using a staging site is to ensure your students’ experience of visiting and interacting with your website is not disturbed when you make changes and upgrades to your site.
However, there are many other reasons why using a staging site is beneficial:
- You can thoroughly test updates and changes and prevent downtime by ensuring there are no new conflicts or issues
- You can get to know new features before deploying those features to your students and visitors
- When problems and issues arise, and you require the assistance of third-party support (Like our LifterLMS Support team), the support team can troubleshoot more rapidly in a staging site
- Prevent loss of income and user confidence in your site and platform from downtime, bugs, and issues
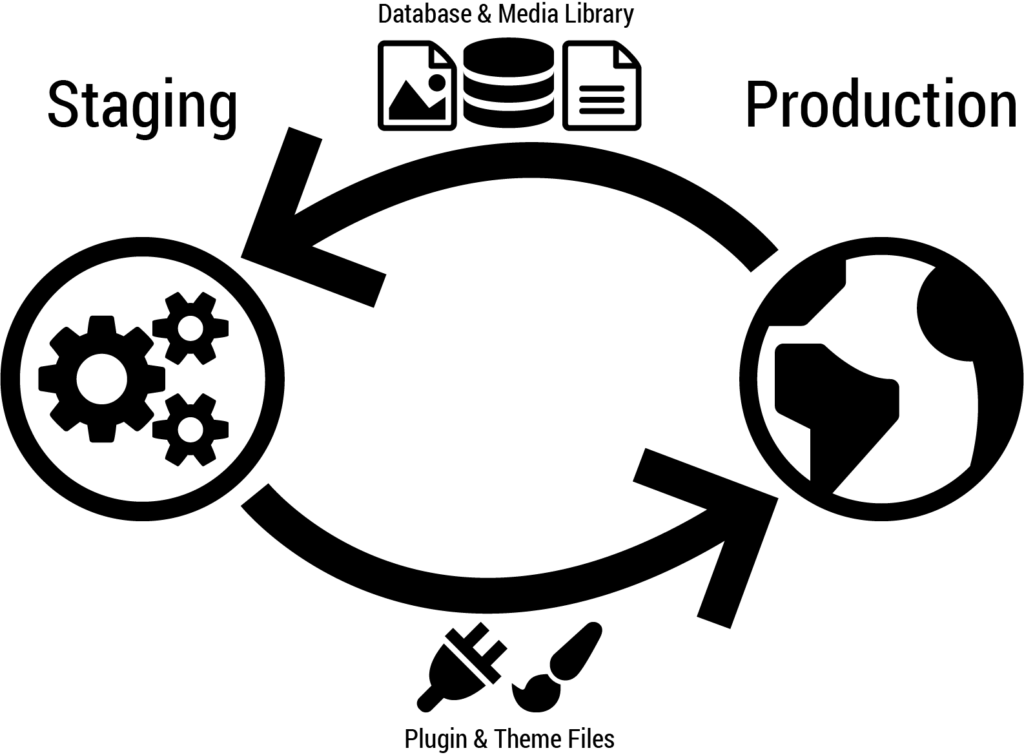
To use a staging site, you’ll want to understand the core concepts and adapt this general workflow to your website’s functionality.
In general, you’ll want to follow these rules:
- Before testing new changes, copy data and files (your media library and your WordPress database) from Production to Staging (not the other way around!).
- In staging, update your plugins and themes and make any custom code changes.
- In staging, run your functional tests and perform a visual inspection of both the frontend (what your students and visitors see) and backend (admin panel) of your site.
- When deploying, move your plugin and theme files from staging to production. In most cases, you should not move your media library and database files from staging to production, as doing so could result in data loss on your production site.
Setting up a staging site does not have to be complicated but you will have to do some work. The work you’ll need to do depends on the method you choose:
- Use the staging service offered by your web host (The fastest and best method available)
- Use an application service from a third party (A great alternative if your host doesn’t offer staging)
- Manually Configure (A good solution after some initial DIY effort)
Look below for details on each of these methods.
On nearly any web host, you can create a staging site on a subdomain or in a subdirectory of your main site.
Setting up a subdomain (for example, staging.mywebsite.com) is slightly more complicated, as it requires configuring DNS settings for the new subdomain.
A subdirectory (for example, mywebsite.com/staging) does not require you to configure any additional DNS settings.
Once you’ve chosen method (subdomain or subdirectory) you can move on to installation. Manually configuring a staging site is essentially the same as setting up your production WordPress site. Many hosts provide you with 1-click WordPress installations, but you can, of course, install WordPress manually via FTP.
This guide assumes that you can install WordPress and will not cover the actual installation. If you need help installing WordPress, you should refer to the WordPress documentation: Installing WordPress.
Once you’ve installed WordPress in your subdirectory or subdomain, you can move on to the section below: How to Clone Your Production Site to Your Staging Site.
Many WordPress hosting companies provide you with simple 1-click staging setups and workflows. When using a 1-click staging workflow, you very likely do not have to do anything manually. You can simply click a button and create and clone to your staging site without any further effort.
We have been using WP Engine for all of our LifterLMS sites, and we use the WP Engine staging to test changes before deploying them to our live sites.
Learn more about how to create and use WP Engine’s Staging Environment.
If your host already offers staging sites, check their documentation on how to use the staging site feature.
When cloning your production site to your staging site, you must do the following:
- Copy your database and rewrite URLs
- Copy your themes and plugins
- Copy your media library
If you’re using an application or service offered by your host, you can likely skip this step, as the service will handle all of this for you. If you’re managing your staging site manually, you can do all of this manually, or use helpful plugins to speed up the process.
There are a number of tools and plugins you can use to clone your site, but for this guide, we’re going to use the free plugin All-in-One WP Migration. This plugin lets you clone your live site to production in 2 easy steps: export, then import.
- Install All-in-One WP Migration on your staging and production sites
- Generate an Export of your Production Site
- On your production site’s admin panel, navigate to All-in-One WP Migration > Export
- Set up a find-and-replace to match your sites. This will ensure that when you import it to your production site, all your images display properly and all links work.
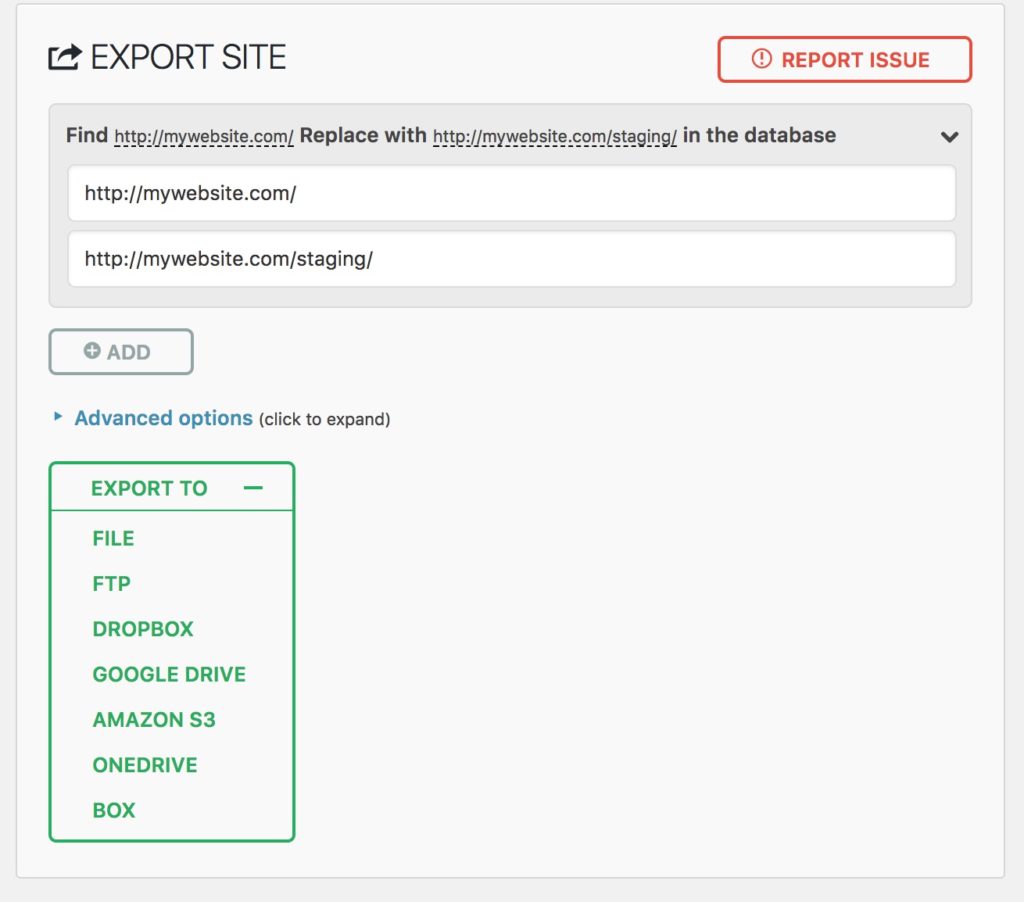
- The find should be the full URL to your production site. For example, enter http://mywebsite.com/
- Replace should be the full URL to your staging site. For example, enter http://mywebsite.com/staging/
- Set up a find-and-replace to match your sites. This will ensure that when you import it to your production site, all your images display properly and all links work.
- Expand the “Export To” menu and click “File.”
- The export may take a few minutes to process (especially on large and mature sites).
- Once ready, you will be prompted to download the file to your computer. Download that file!
- On your production site’s admin panel, navigate to All-in-One WP Migration > Export
- Import your production export to your staging site
- On your staging site’s admin panel, navigate to All-in-One WP Migration > Export
- Choose “Upload from File” and select the export file you downloaded in the previous step
- This will take a while since we’re uploading your entire site and database! Be patient.
- At the conclusion of the upload, the plugin will warn you that you are overwriting your entire website. Everything is fine! We’re doing this on purpose, but it is important to note that if you’ve made changes in your staging site, you will lose them. Click Proceed to finish the import.
- Once finished, you’ll need to log back in to your staging site. Your username and password from the production site will now work here.
- After logging back in, make sure to flush your permalinks if you see any 404 errors on the frontend of your staging site.
- Celebrate for a bit, then get to testing your plugin and theme updates safely!
Making changes directly on a live LMS site is risky.
- A plugin update can break the checkout.
- A theme change can block access to lessons.
- A small configuration tweak can reset progress or interrupt active enrollments.
Unlike a standard website, your LifterLMS site is handling real users, real payments, and ongoing course activity. Any mistake affects your students immediately.
A staging site removes that risk.
It gives you a private copy of your site where you can safely test updates, try new add-ons, and make structural changes without touching your live environment. You can break things, fix them, and refine your setup before anything reaches your learners.
InstaWP makes this process fast.
Instead of setting up staging manually, you can clone your entire WordPress site in minutes using the InstaWP Connect plugin. This gives you a working duplicate of your LMS, ready for testing, without complex setup or hosting changes.
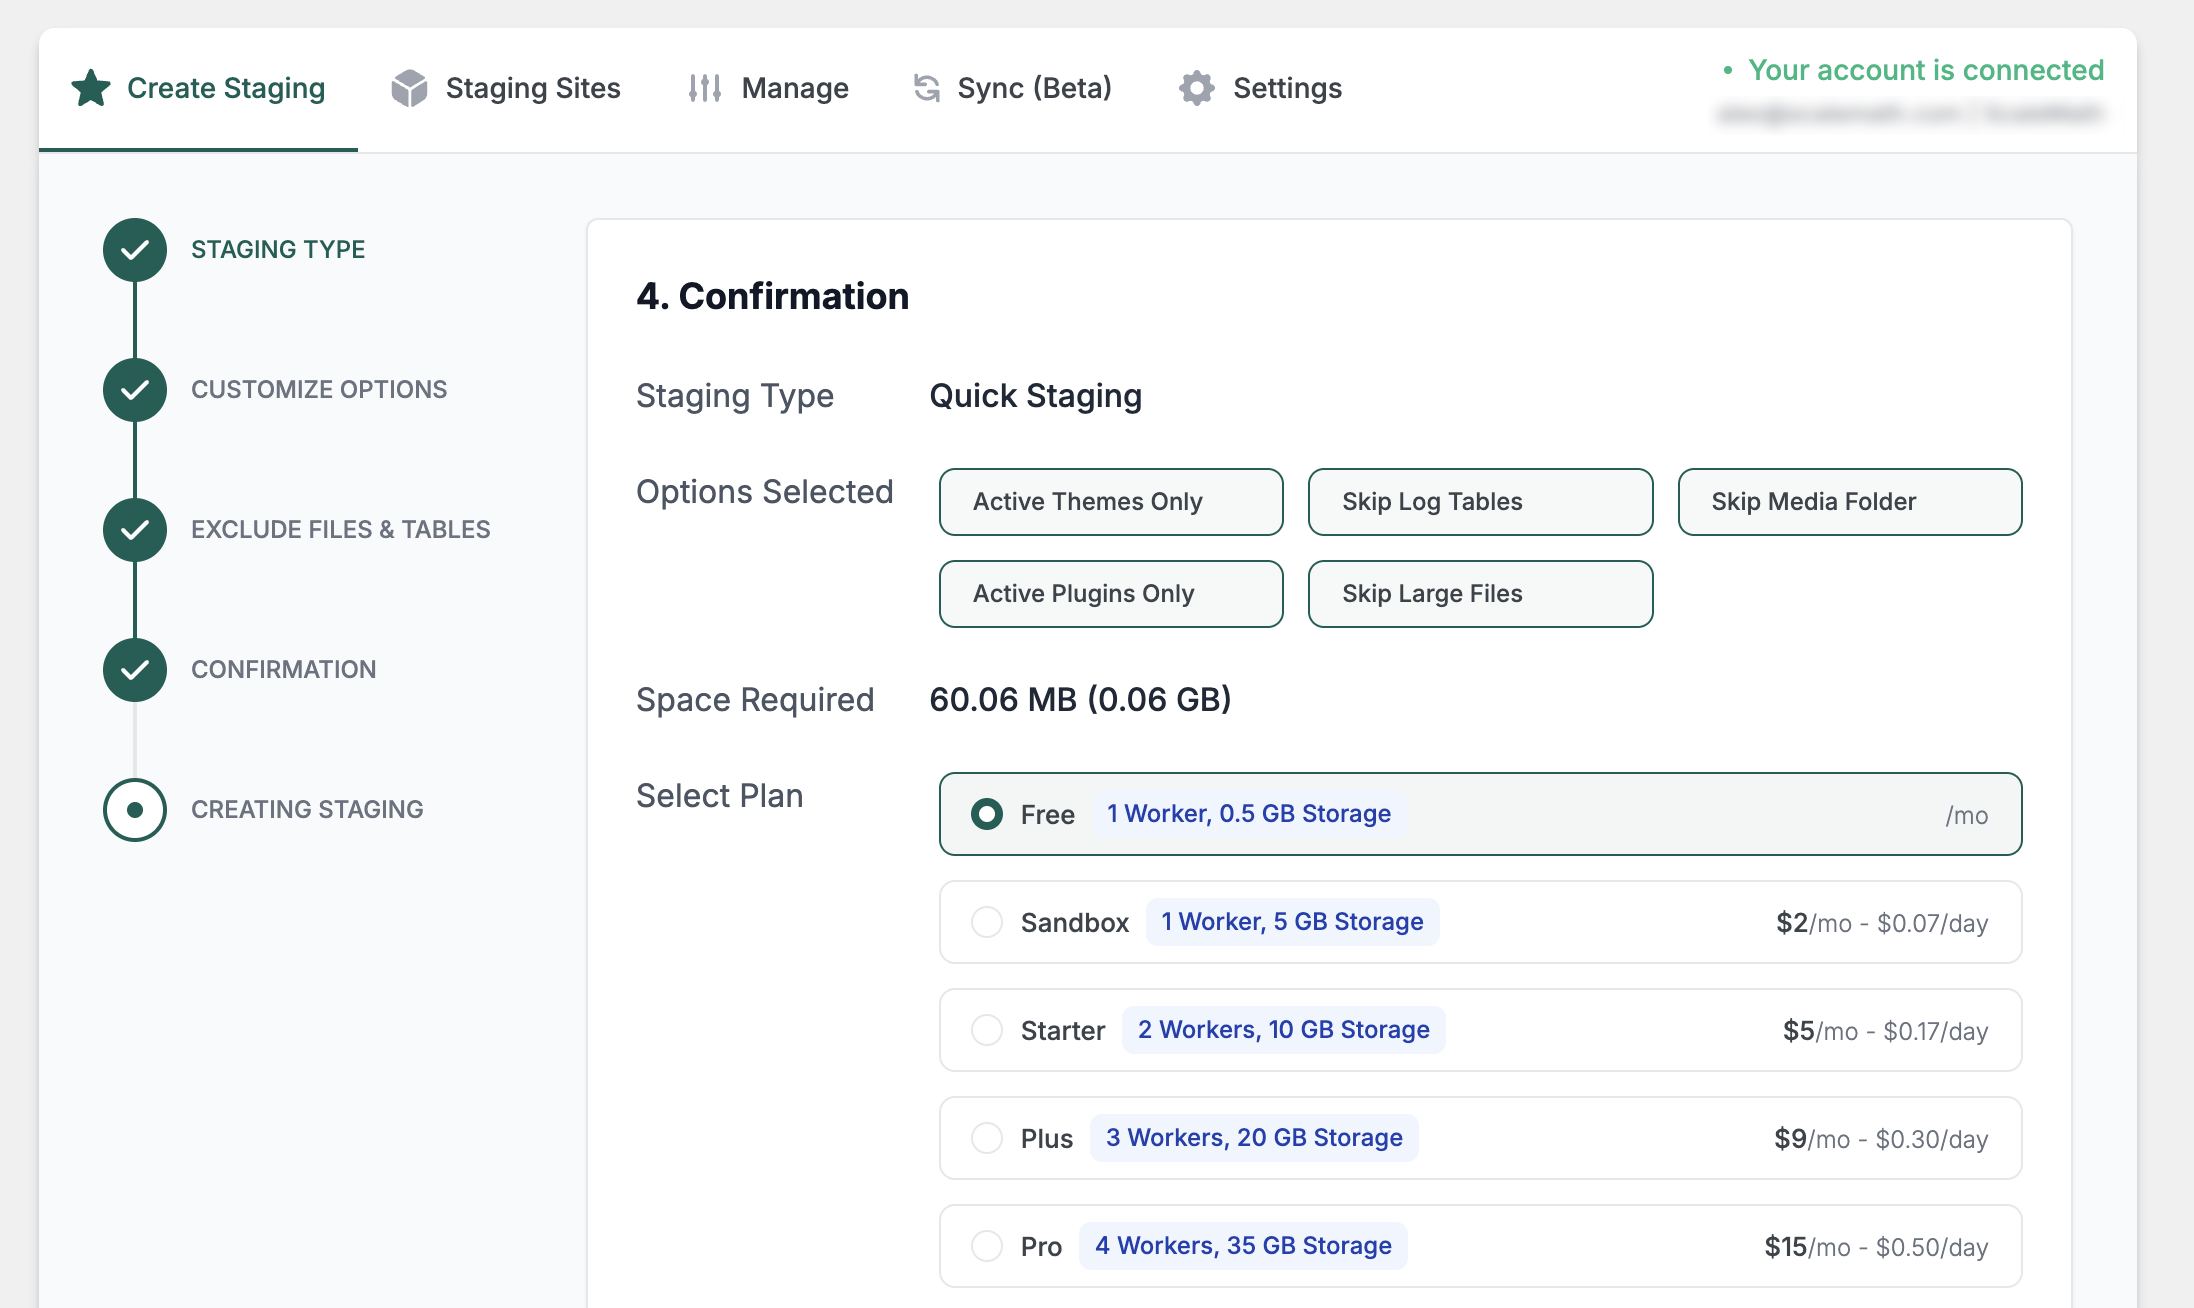
Follow these steps to spin up a staging site using InstaWP:
- Log in to your WordPress dashboard.
- Navigate to Plugins > Add New Plugin.
- Type “InstaWP Connect” into the search bar and click Install Now next to the InstaWP Connect plugin.
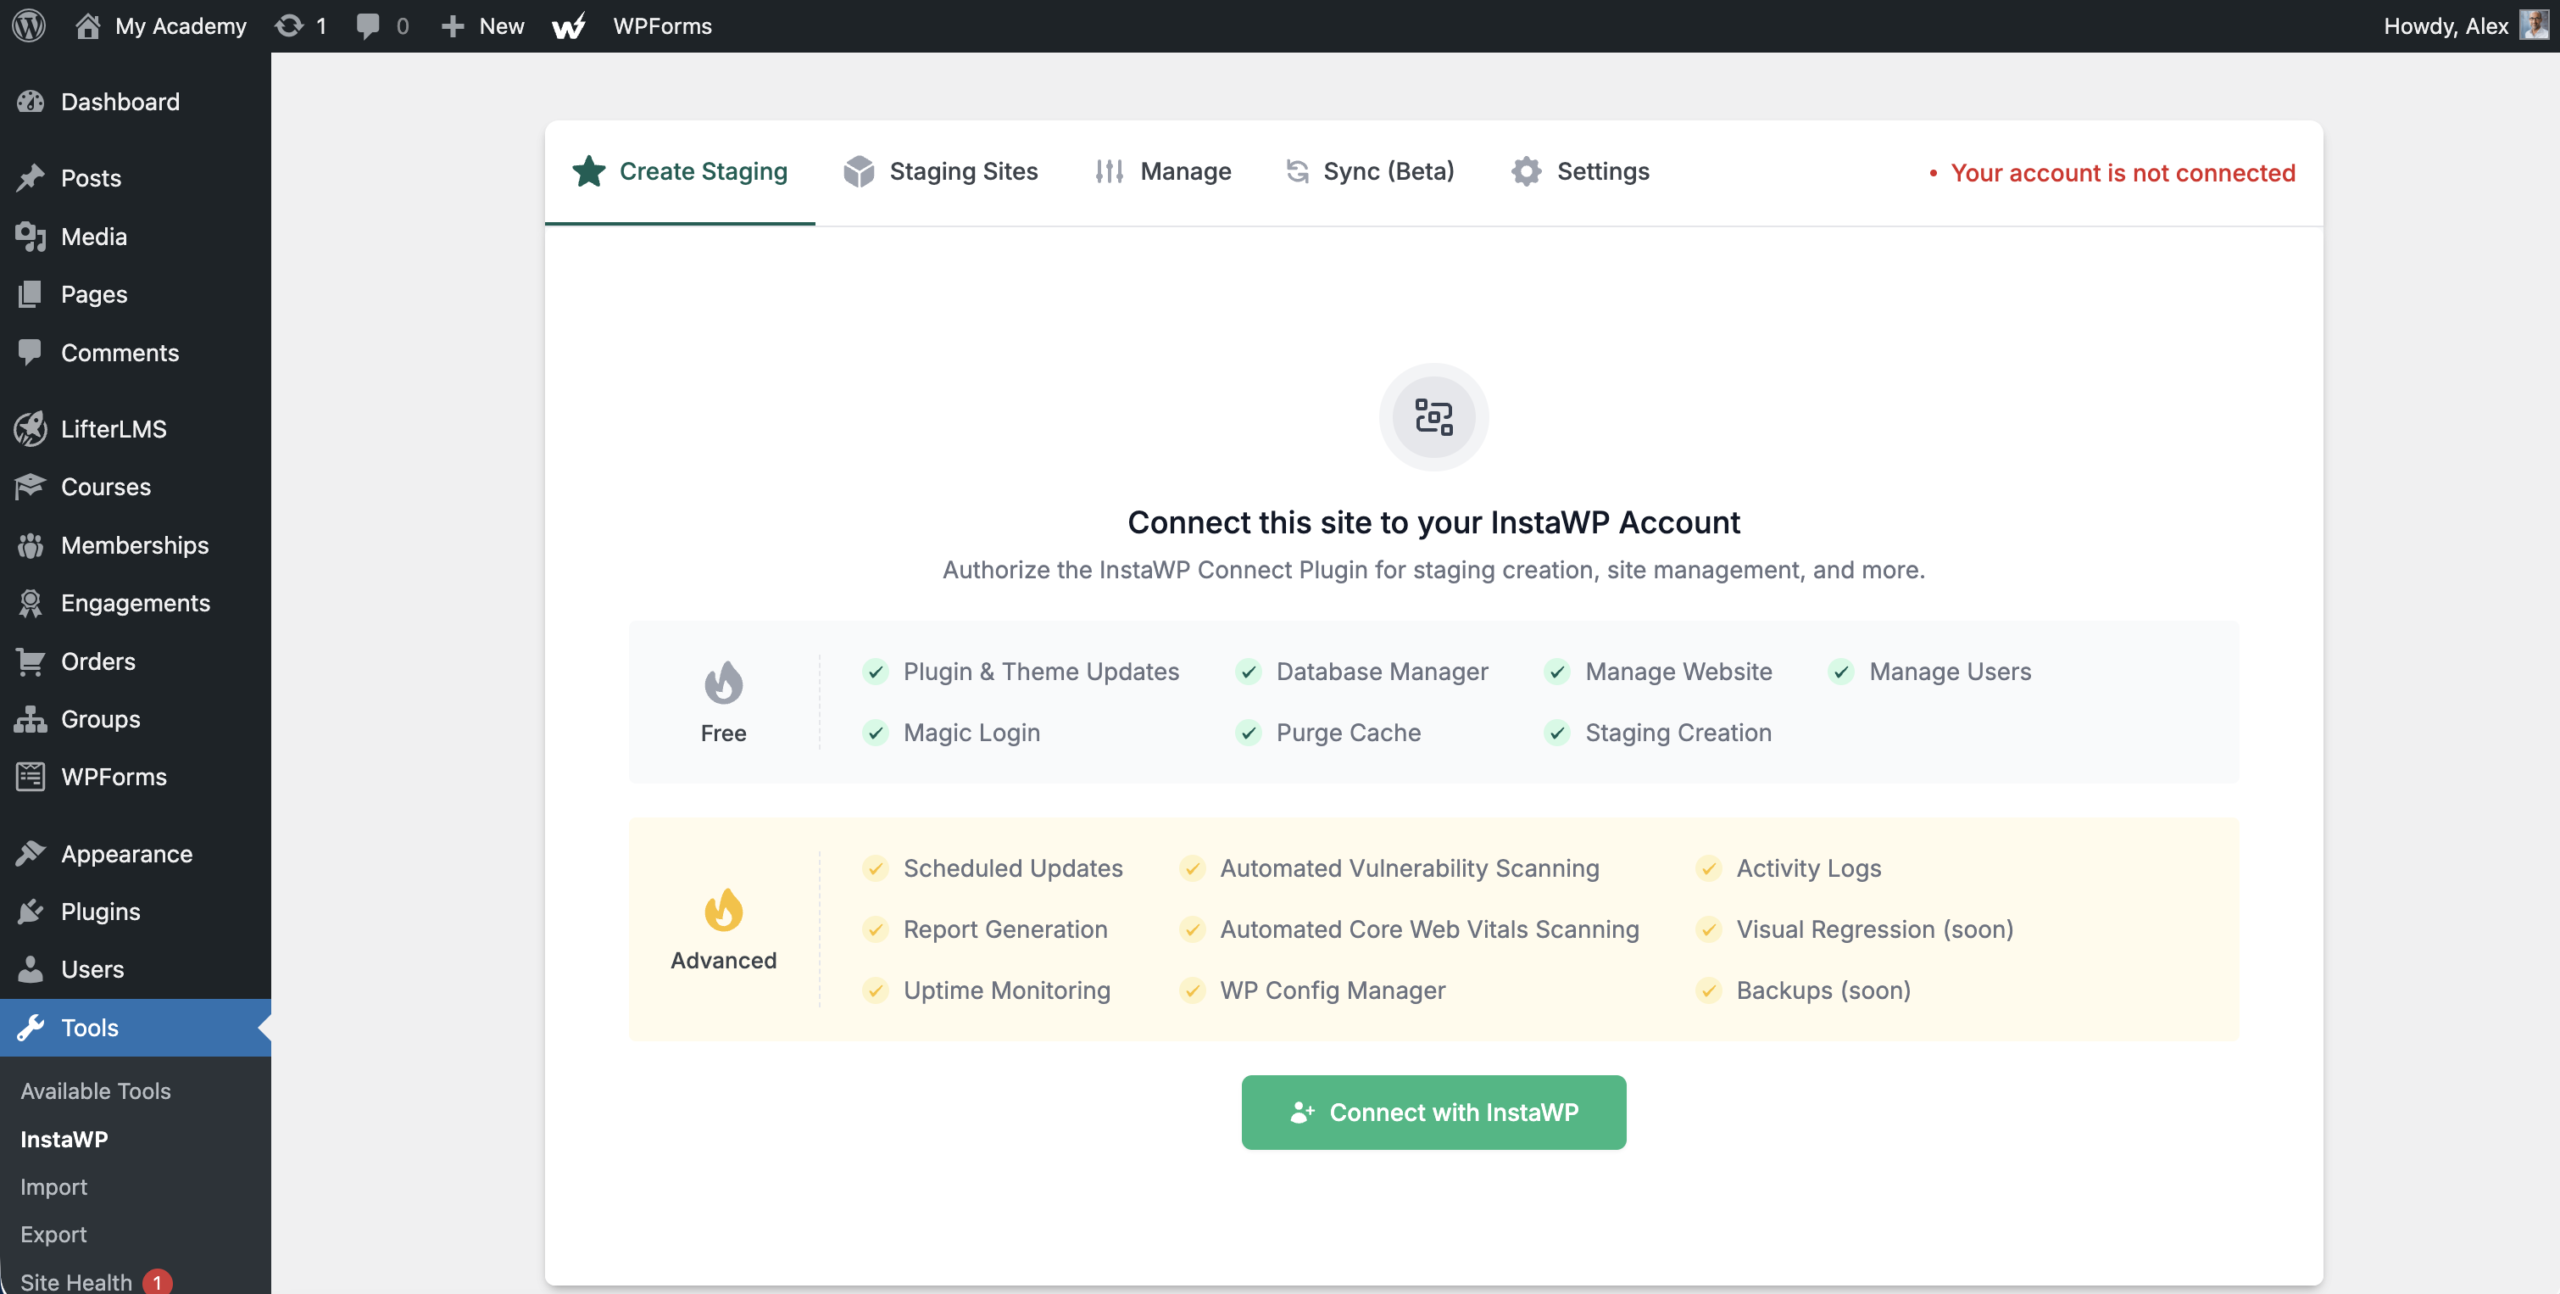
- After activating the plugin, navigate to Tools > InstaWP to open the plugin settings.
- Click Connect to link your website to your InstaWP account. If you don’t have an account, you’ll be prompted to create one.
- Click Create Staging to start building your test site.
- Choose the settings for your staging site. The default settings will copy your entire site, which is the best choice to ensure your testing environment fully matches your live LMS.
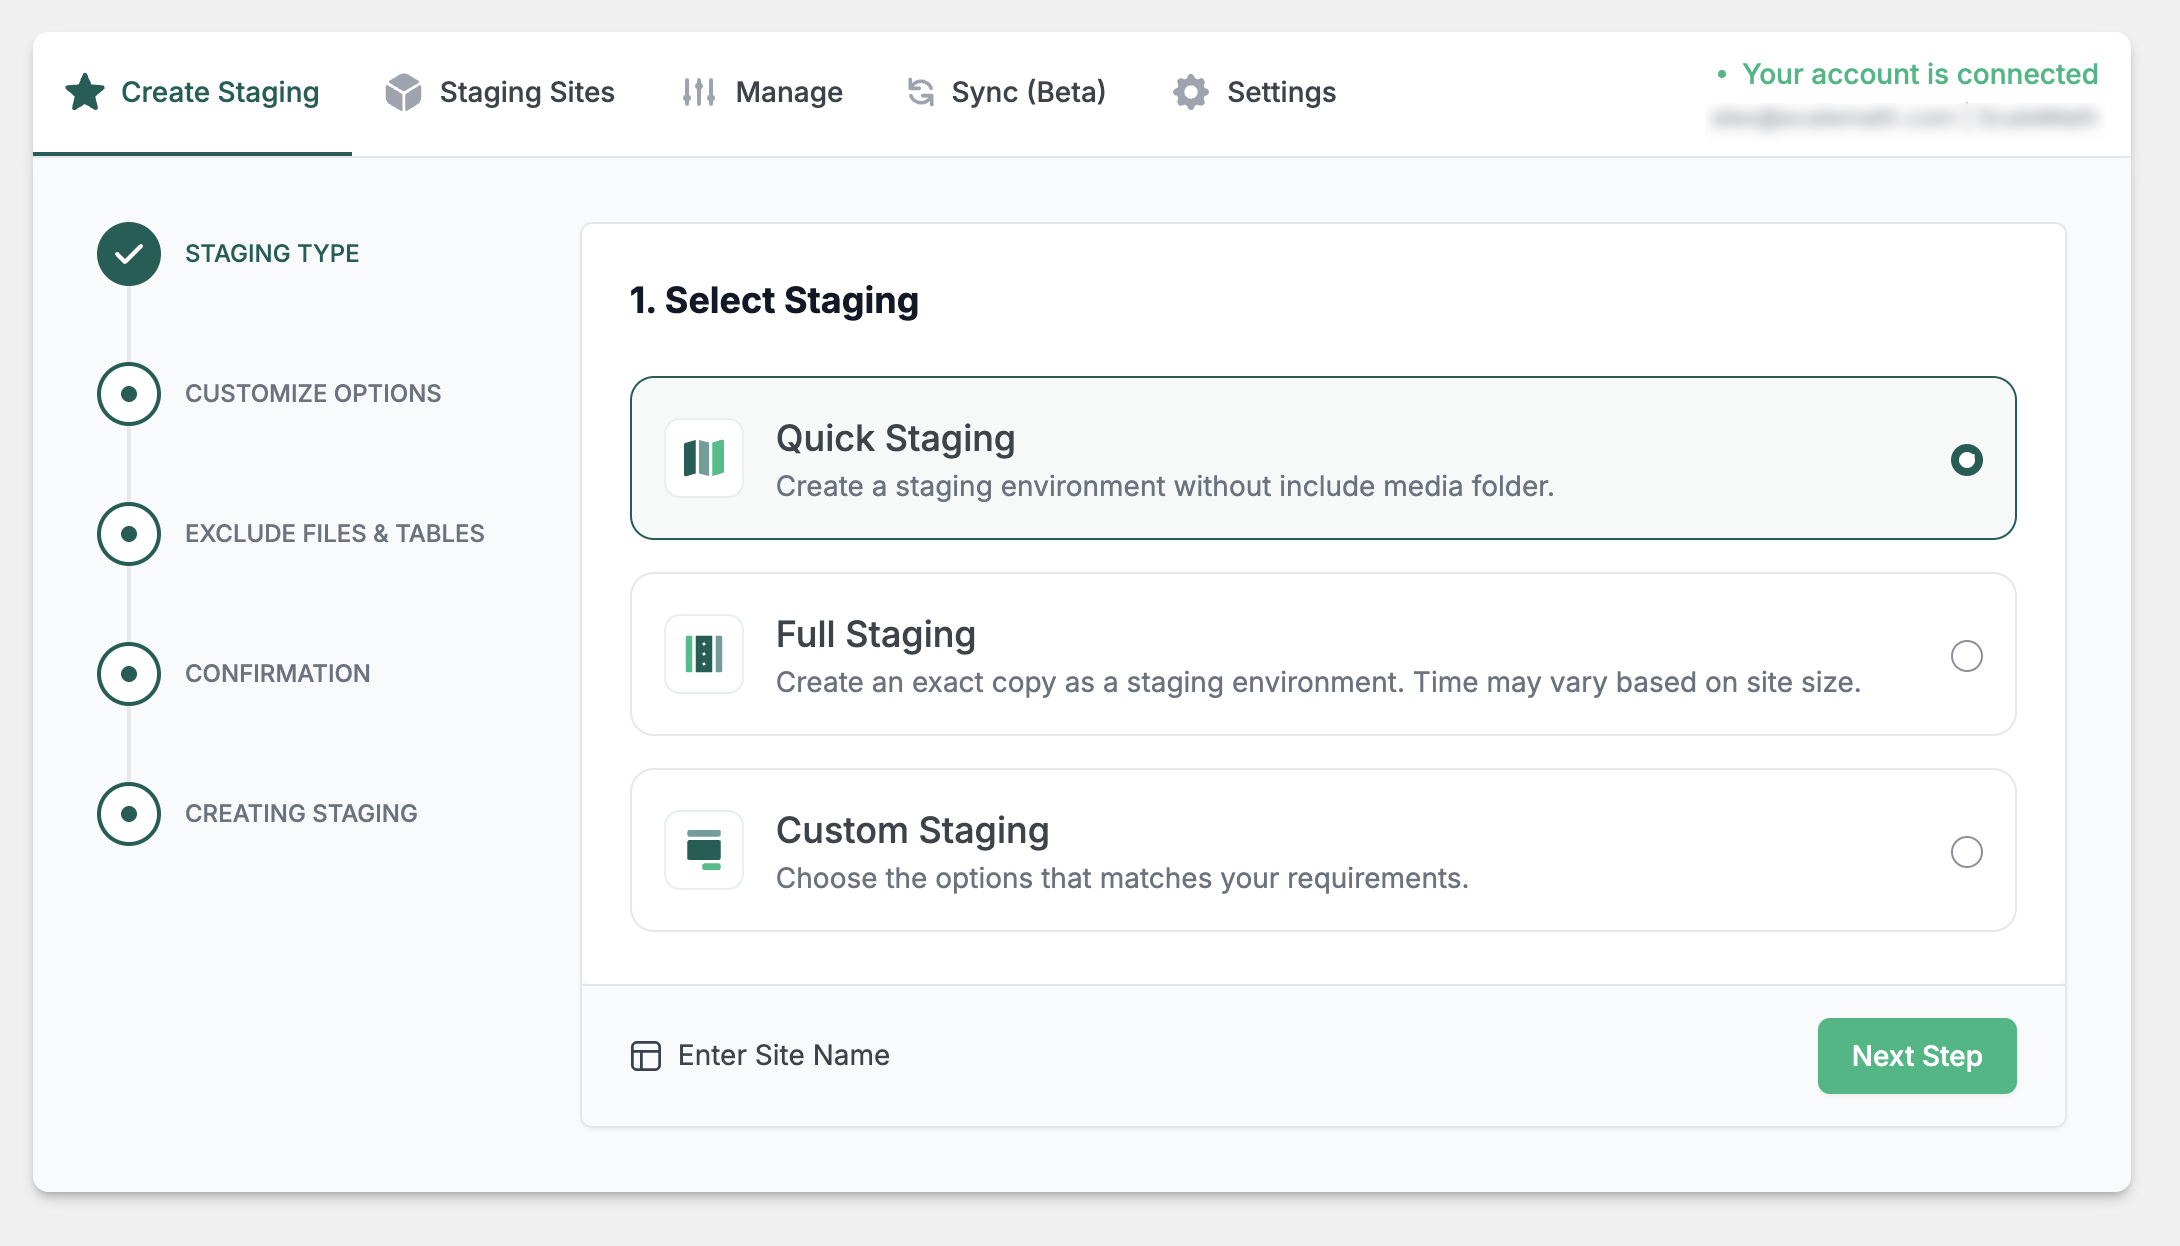
- Click Next Step to proceed.
- Click Create Staging to confirm and begin the cloning process.
- Wait a few moments for the progress bar to complete.
- Click Auto Login when the success screen appears.
The Auto Login button takes you directly into the WordPress dashboard of your new staging site.
Once you’re safely inside your staging environment, you can update LifterLMS, test new add-ons, or change your theme. Your live students will not see any of these actions.
When you’re happy with the results of your tests, you can confidently apply those same updates to your live site.
To learn how to sync changes between sites, please refer to InstaWP’s Getting Started documentation.
Once you’ve set up your staging site, you may want to take these additional steps to avoid some common issues and pitfalls.
Disable Recurring Payments
If you have any recurring payments scheduled, you’ll want to ensure you stop those so that your students are not double-charged.
If you’re using LifterLMS recurring payments or WooCommerce Subscriptions, you don’t have to do much but pay attention to the warnings on your admin panel.
Both LifterLMS and WooCommerce Subscriptions attempt to detect when your site is cloned, but a recurring payment could slip through if the detection methods fail for some reason. Check out these guides on how to disable payments in LifterLMS and WooCommerce Subscriptions.
Disable E-Mail
If you have scheduled engagements, you don’t want your students getting duplicate emails. After setting up your staging site, consider installing and enabling a stop-emails plugin, such as Disable Emails. Note that if you forget your password, you won’t be able to reset it on your staging site if you install this plugin. You’ve been warned!
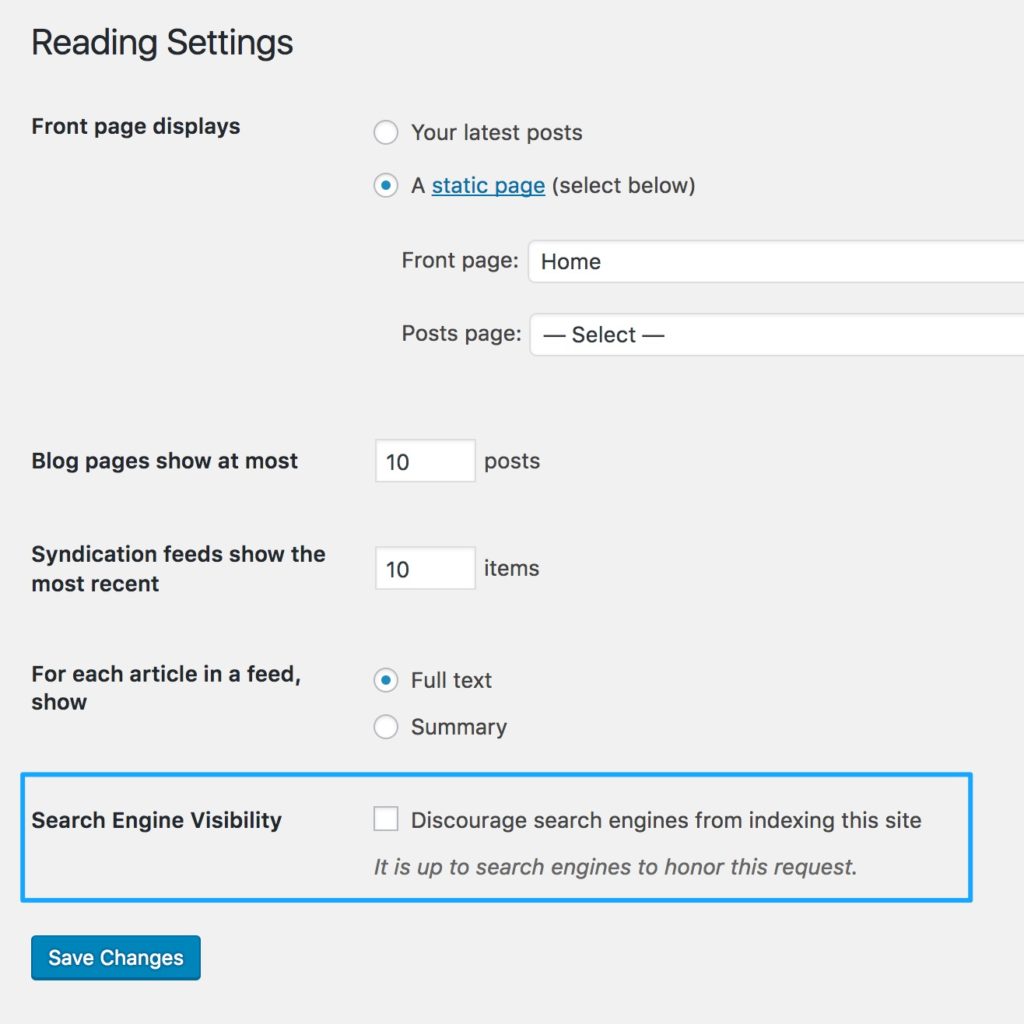
No Index / Password protection
To prevent potential SEO issues caused by duplicate content and to ensure your students and visitors access only your live site, you should no-index your site and consider adding password protection to your entire site.
You can set up no-index by navigating to WordPress > Reading Settings and checking the box to “Discourage search engines from indexing this site.”
You can also add a password wall to your entire site, ensuring that only you (or anyone you’ve given the password to) can access it. We recommend this very simple, free plugin, Password Protected.
Licenses for Premium Plugins and Themes
If you’re using any paid plugins or themes (any LifterLMS add-on, for example), you may not be able to activate these plugins and themes in both your production and staging sites unless your license provides you with multiple activations.
For LifterLMS add-ons, we recommend either “juggling” your licenses or never activating your staging site and manually updating the add-ons there.
Juggling your keys means deactivating your license on your production site, reactivating it in your staging site, updating your plugins in staging, deactivating your license in staging, and then reactivating it in production. There are a lot of steps there, but if you don’t want to manually update plugins (upload via FTP) and you don’t want to spring for a multi-site license, this is your only solution!
Please note that LifterLMS add-ons are always fully functional regardless of your license key status. Your license enables you to get support and receive automatic plugin updates!
If you don’t want to setup a manual staging site and your host doesn’t offer a staging site you can use a third-party staging application like WP Stagecoach. This paid service provides you with the tools and infrastructure to easily setup and sync to a staging site with minimal effort.


