An Introduction to Learning Management Systems
So, you expanded your WordPress website into a membership site using MemberPress and are now ready to grow even more by adding in Learning Management System (LMS) features like:
- Courses
- Progress Tracking
- Student Dashboards
- Quizzes
- Assignments
- Social Learning
- Groups
- Grading
- Reporting
- and much, much more.
Fortunately, you have come to the right place! In 5 simple steps we’ll show you how to integrate the best WordPress LMS plugins made by LifterLMS seamlessly with MemberPress to provide exactly the functionality you’re looking for.
Step 1: Install LifterLMS
As a go-to for WordPress professionals looking to add all the power an LMS has to offer without coding it all from scratch, LifterLMS has invested in streamlining the setup process. With a detailed Knowledge Base, live virtual customer onboarding meetings with screen-sharing, and helpful tutorials, the team is there to help you every step of the way.
Ready to go?
Start by logging into your WordPress website’s Dashboard. Once there, go into the Plugins area on the left and search for LifterLMS. Click “Install Now” and then “Activate”.
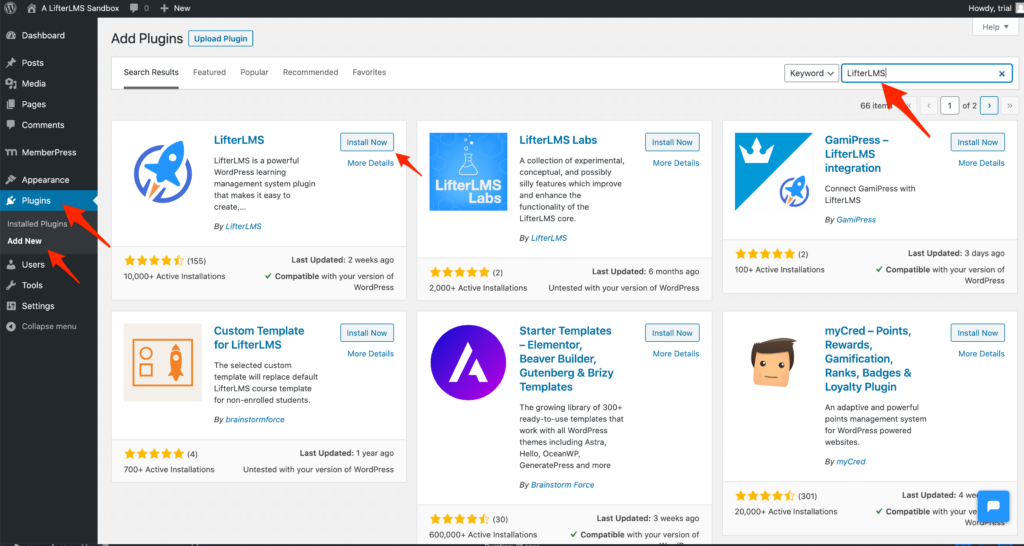
After installing and activating LifterLMS, you will be prompted to go through the setup wizard to configure LifterLMS settings to fit your unique needs.
While the setup wizard should have you up and running in no time, remember there are also lots of other resources available to help. If additional questions arise, simply check out the detailed Knowledge Base or contact the friendly support staff.
Step 2: Create a Course in LifterLMS
Now that the plugin’s configured, your next step is to create your very own course with LifterLMS’s innovative course builder.
You don’t need fancy tools or equipment, or special computer skills. The course builder allows you to create a course from just one screen, walking you through the process in no time. Remember, people from all different backgrounds and from all over the world have created courses with LifterLMS and you can, too!
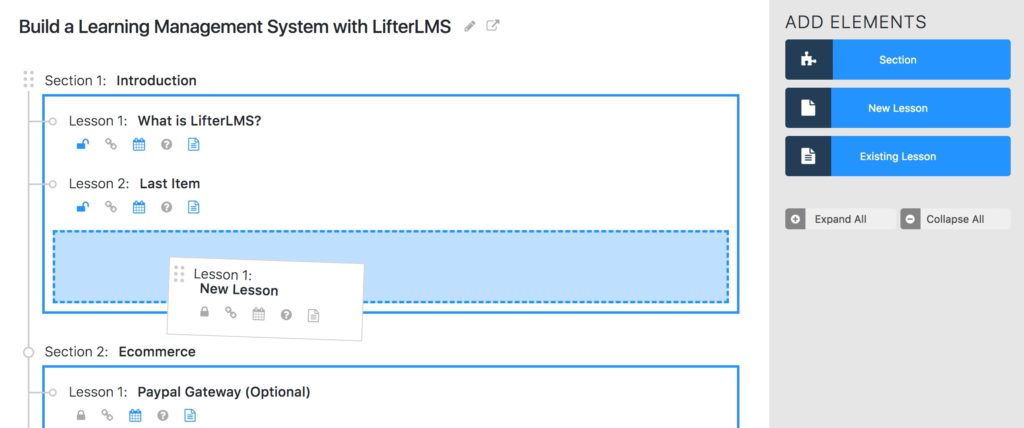
Want to take a peek at how the process works? Dive into this video demonstration of how you can build an entire course from one screen with LifterLMS:
Step 3: Create a Free Access Plan for the LifterLMS-powered Course
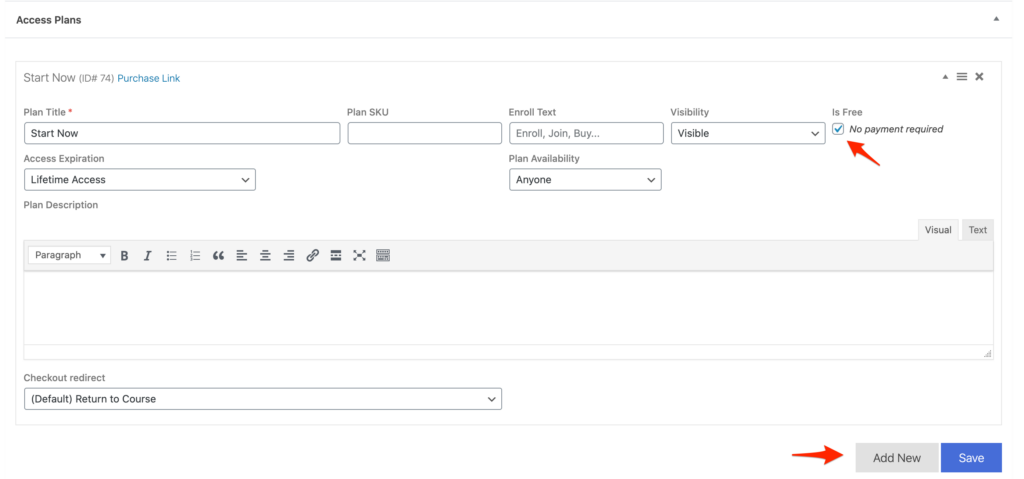
Next up, you’ll create a free access plan to allow for enrollment in the course.
Note, this does not mean you can’t charge for the course. It simply means you’ll use something other than LifterLMS to charge for the course. In this partnership, MemberPress’s functionality will be managing payments and access.
That covered, it’s time to set up your free access plan by navigating to the Access Plan area of the course and clicking the “Add New” button. Remember to check the box that says “Is Free?” so MemberPress can handle payments and grant users access to this course.
Step 4: Create a MemberPress Membership Level
Now, it’s time to put MemberPress to work!!
Here’s where we’re going to create a membership in MemberPress to control access to your course page.
In order to view the course page that we created, a person will need to purchase this membership we set up in MemberPress. Once they do, they can get started with the course by enrolling in the free access plan you set up in Step 3.
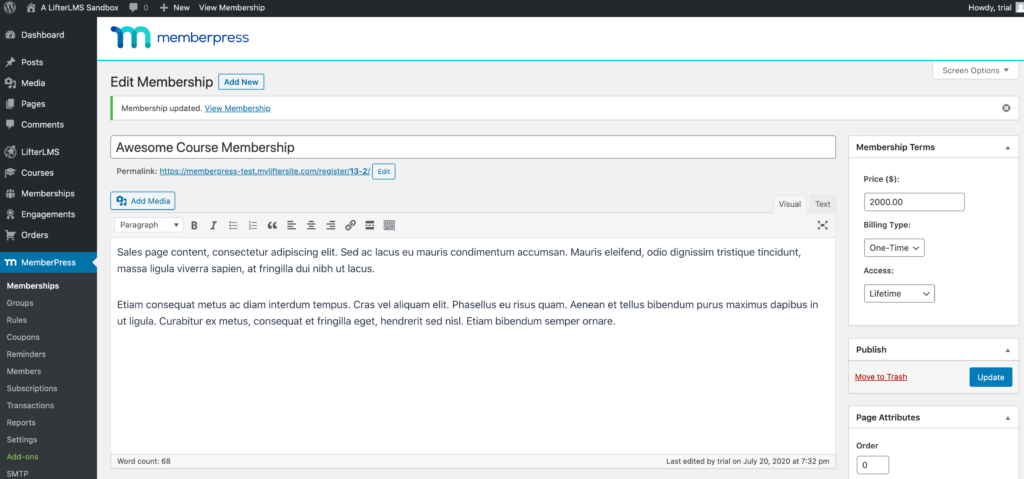
Creating a membership in MemberPress is very similar to creating a Page or Post in WordPress — in fact the memberships are shown on your site as pages. To set up a Membership with MemberPress do the following.
- Set a title for the membership (Example: Basic Course Membership). The title is required and should have some value.
- Set a price and subscription term for the Membership.
- You can select One-Time payment for lifetime access, or that expires after a set number of days, weeks, months, years, or on a fixed date.
- You can also enable Recurring subscriptions that bill Weekly, Monthly with the option of every 3 or 6 Months, Yearly, or a custom interval — any interval of days or weeks you choose.
- As a simple example, say you chose Recurring subscriptions set for every Month. This would mean that your members will be charged the amount of the Membership every month.
Here is a video with further information:
For even more options in setting up a Membership in MemberPress, follow these instructions.
Step 5: Restrict Access to the Course to the MemberPress Membership Level
Way to go! You’ve made it to the final step. All you have left is to create the rule for that membership to grant users access to the course.
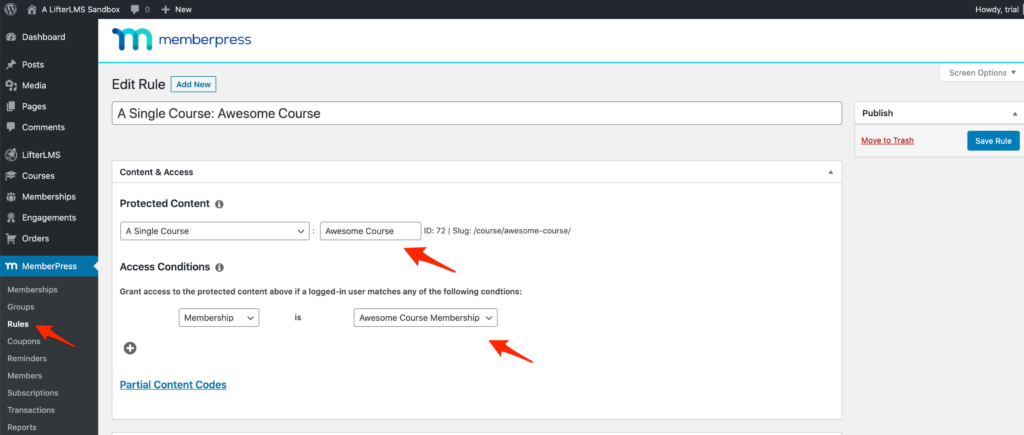
Once you’ve created at least one Membership, you can then set up Rules to protect certain pieces of site content from non-subscribed members. After all, controlling access to your content is the point of a membership site.
Your rules can be as simple as the example above that associates one membership with one specific course. You could also get more complex and create a rule that allows a specific membership to grant access to all courses or only courses in certain course categories.
Whatever fits your vision, the power is at your fingertips.
Harnessing These WordPress Tools to Expand Your WordPress Site’s Reach
One of the best reasons to build with WordPress is the ability to combine powerful tools to expand your website, reach new users, and increase your income possibilities.
By pairing two companies that are known for their excellent software and support, you can relax and allow them to do what they do best — MemberPress is great at and focused on Memberships. LifterLMS shines at and is focused on eLearning and the needs of WordPress LMS — all while boosting the functionality of your existing WordPress site in just 5 easy steps!
Where to go from here:
Don’t think that once you’ve installed the best WordPress LMS plugin, LifterLMS, you have to go it alone.
Join the active LifterLMS Facebook group and meet other course creators just like you. Learn from their wealth of experience and see what new ideas your conversations with this new group of friends might spark. Once in, the possibilities are endless!


