The need for adaptable and easily available learning has never been higher in the ever-changing field of education. In online education, you can share your expertise and knowledge with a worldwide audience and make a living in the process. Creating an online course can be challenging if you don’t select the right tools.
In this comprehensive guide, we will walk you through the process of building your online course website using two powerful tools: the Astra Theme (one of the top online learning WordPress themes) and the LifterLMS Plugin.
Table of contents
Theme Setup
To install Astra theme, follow the below steps:
Visit your WordPress Dashboard > Appearance > Theme > Search for “Astra” > Install > Activate.
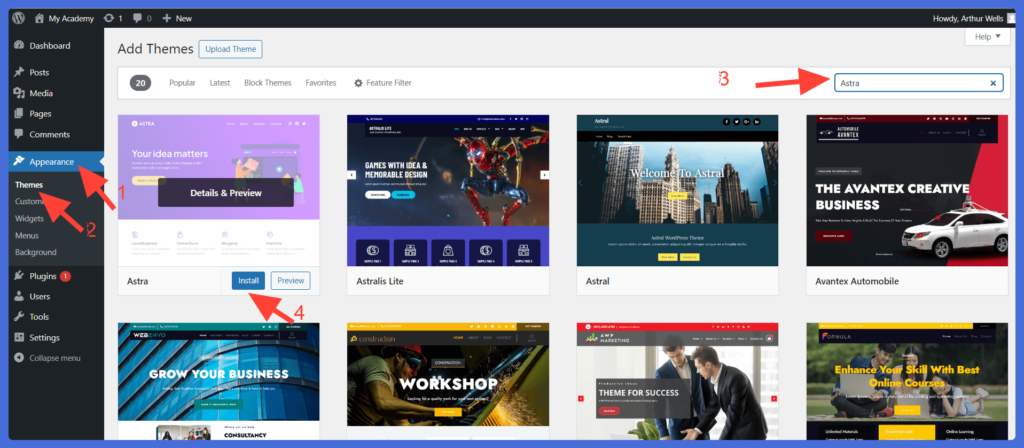
Note: You can also install the Astra free theme from WordPress.org.
Set up LifterLMS
Installing Plugin
Now, it’s time to install and set up the LifterLMS plugin. If you don’t know how to install the LifterLMS plugin, you can follow our guide on how to install LifterLMS.
The Setup Wizard for LifterLMS
After you install LifterLMS, the plugin guides you through the setup wizard once you activate it.
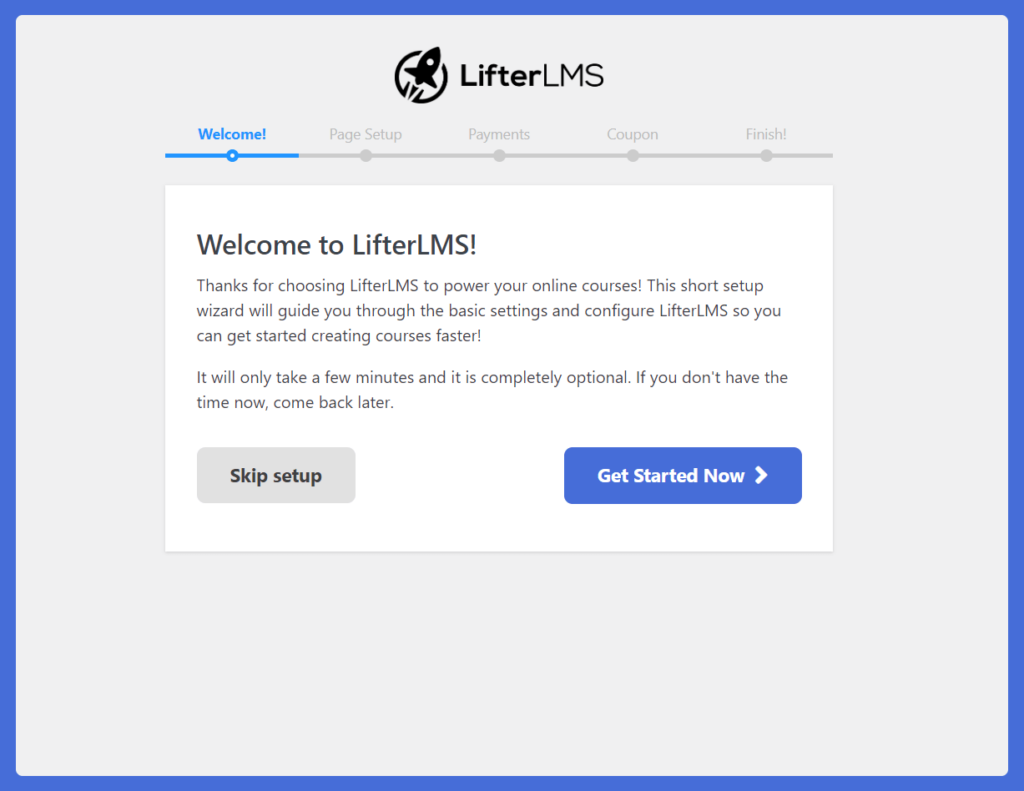
Follow all the steps in the LifterLMS setup wizard. Select Get Started Now > Save & Proceed > Choose your currency and country. After selecting, press Save & Continue > Allow > Start from Scratch, and make sure the “Enable offline payment” option is checked.
Add a License Key
If you use the paid version of LifterLMS, after installing the LifterLMS plugin, you must add the license key. When you visit your LifterLMS Account > Licenses, you will receive your product license. You should copy and paste it into your WordPress Dashboard.
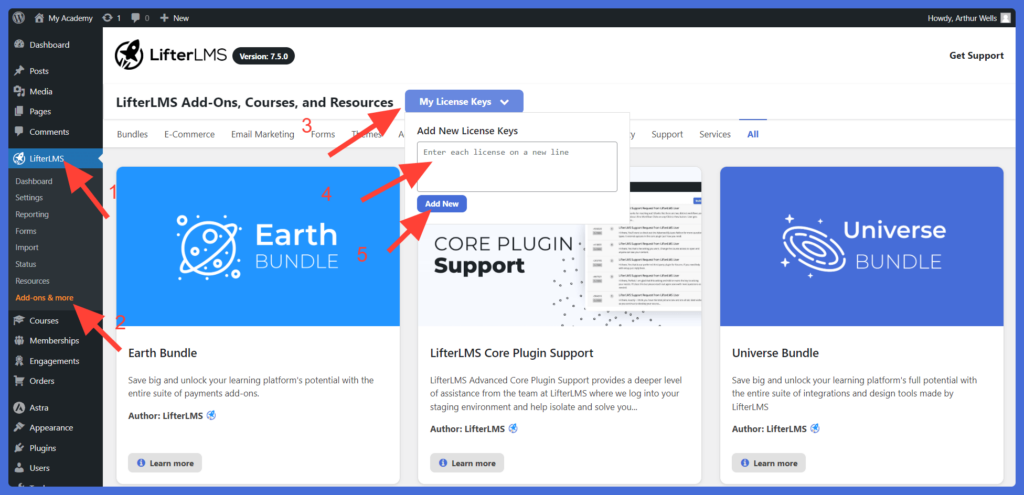
To add the license key to your dashboard visit your WordPress Dashboard > LifterLMS > Add-ons & more > My license > Add the key > Add New.
Create Menu
To create a menu, visit your WordPress Dashboard > Appearance > Menus. You will find an option “Create New Menu.” Click on that and choose a location, then save.
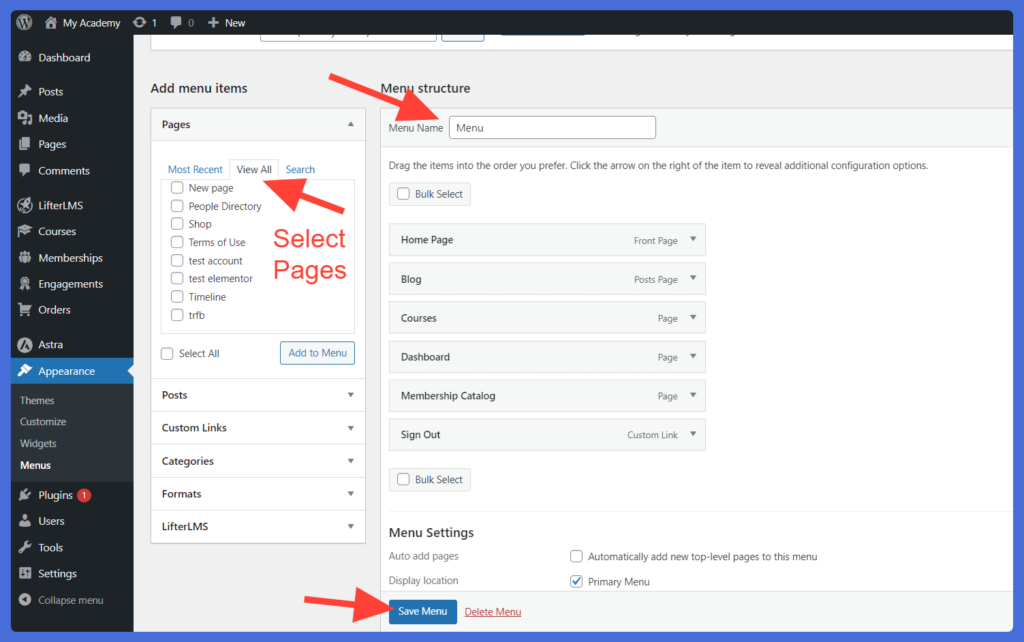
After creating the menu, you need to select all the pages that you want to display in the menu area.
Creating a Course
Course Information
The first step in selling your course is to make it available to the public, where anyone can enroll or purchase it. To add a course, follow the steps below:
First, go to your WordPress Dashboard > Courses > Add New on your dashboard. Complete the fields (Title, Description, Featured Image) and click Publish.

Here you can add your course title, information, course description content, and everything you would like to add to your course page.
Create an Access Plan
It’s important to add an “Access Plan,” which is the course pricing and access details. If you scroll a bit you will get the “Access Plan” option > click on “Add New” to add the access plan > Add all the information you want to add in terms of pricing and access.
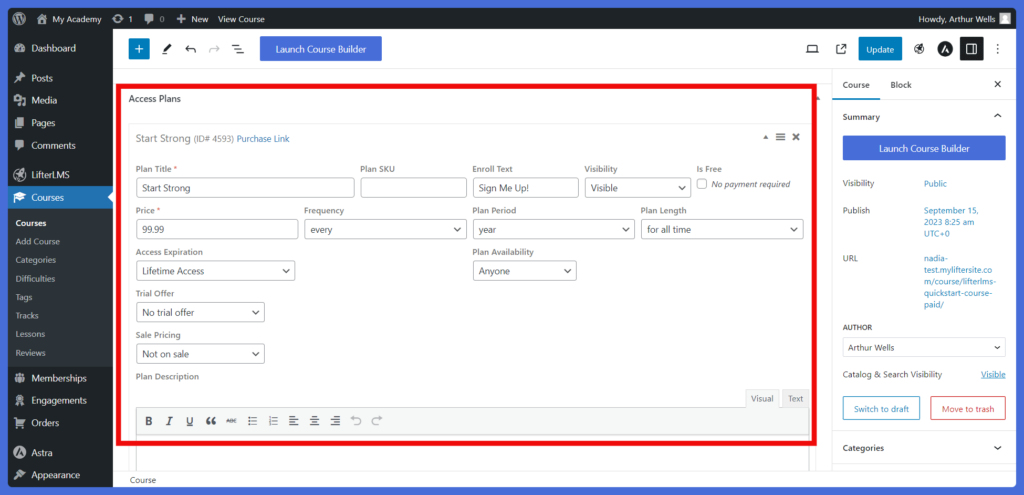
In LifterLMS, there are many pricing options such as Trial Offer, Plan Period, Frequency, and more.
LifterLMS has more details about working with Access Plans here.
Create Course Restrictions
In LifterLMS, you can optionally enable an enrollment time period, course time period, and set the course capacity. You can select the number of students allowed to enroll in the course and set the prerequisites.
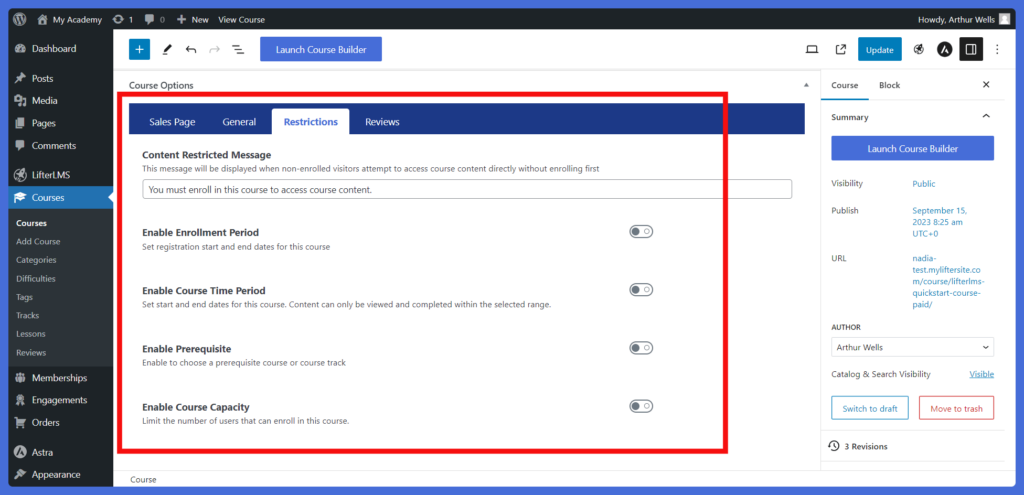
You can easily add all of these restrictions from the Course options > “Restrictions” tab.
Create Lesson Content with the Course Builder
In a course, it’s crucial to include videos, quizzes, and assignments to improve the learning experience for students. These elements not only aid understanding but also empower students to apply the knowledge they acquire effectively.
To simplify the process of adding lessons, quizzes, assignments, and other features from the backend, LifterLMS has developed an interface known as the Course Builder.
To use the Course Builder, click on “Launch Course Builder” in the course editor.
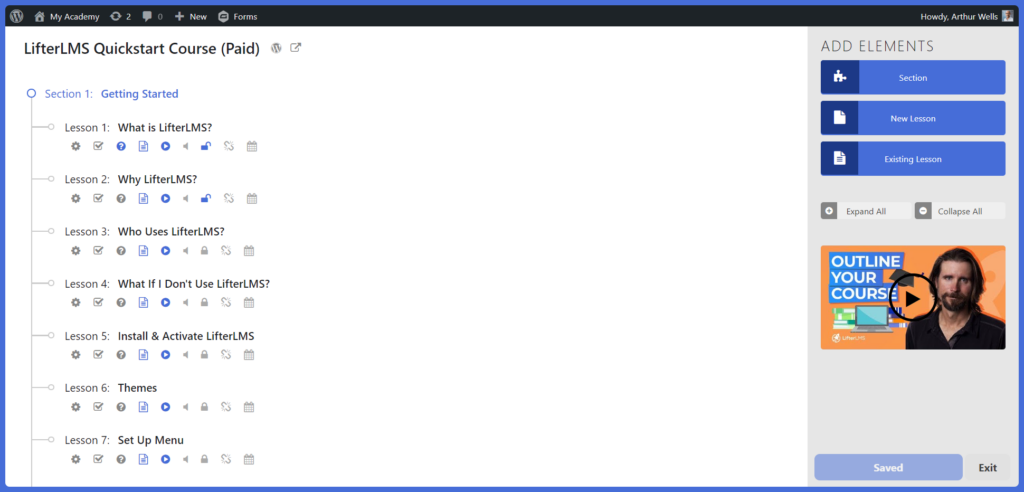
Now you can create sections, lessons, quizzes, and assignments. Here is more information on how to use the course builder.
Note: The Course Builder is a core feature, and you will have access to it in our free version. Additionally, the basic quiz is also available in the free version. However, the Advanced Quizzes and Assignments are only available in our Infinity Bundle or through individual add-ons.
Drip Lessons Over Time
You can include drip lessons in your LifterLMS courses. For instance, if you want a particular lesson to become visible on a specific date or 15 days after a student enrolls, you can achieve this with drip lessons.
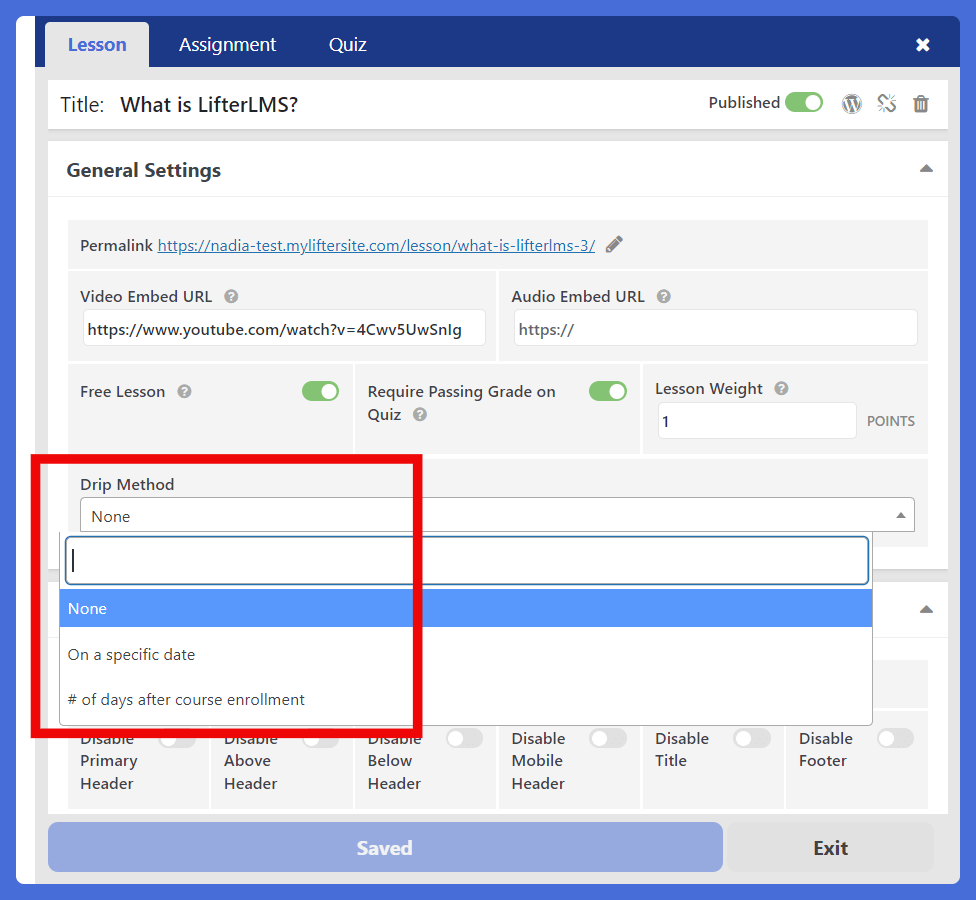
Dripping lessons is possible with the free LifterLMS plugin. You can learn more about driping lessons from our documentation on how to use drip content in LifterLMS lessons.
Course and Lesson Sidebars
In the course sidebar, you can include the course syllabus and other essential widgets for easy student access to course content.
To add the course sidebar and lesson sidebar, navigate to your WordPress Dashboard > Appearance > Widgets. There, you’ll find the “Course Sidebar” option. In this course sidebar, you can place the course syllabus, progress bar, or any preferred widgets.
Simply click on the “+” icon and add your chosen widgets.
Note: If the sidebar doesn’t appear on your course page, go to Appearance > Customize > LifterLMS > Course/Lesson sidebar layout, and select the right/left sidebar option.
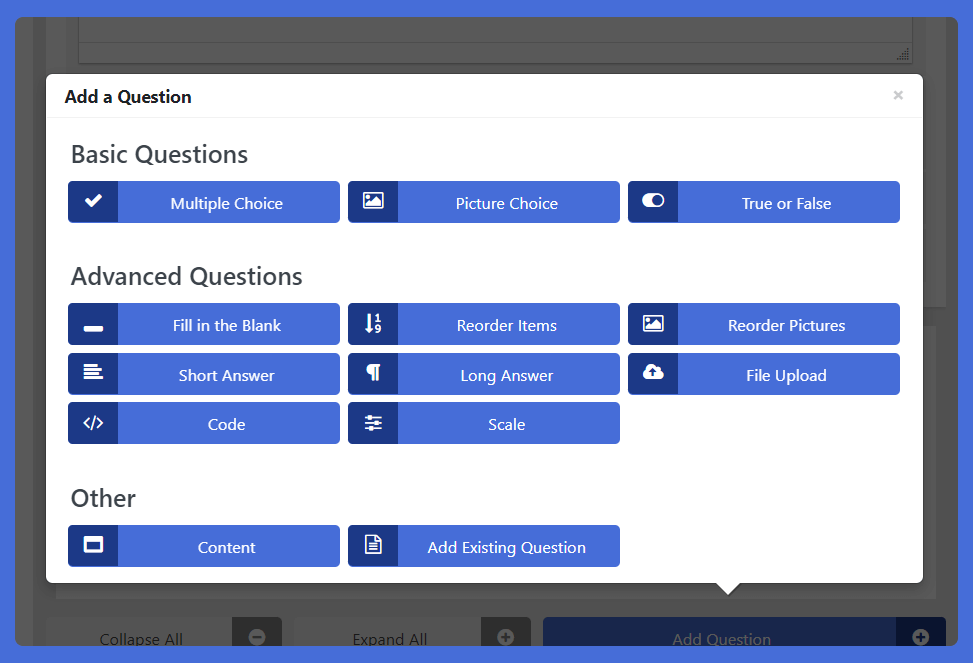
Create Quizzes
LifterLMS provides you the ability to add quizzes to your lessons. In LifterLMS we have 2 types of quiz questions: “Basic Questions” and “Advanced Questions.”
The Advanced Quiz Question Types are available in the LifterLMS Infinity bundle and the LifterLMS Advanced Quiz add-on.
To add a quiz, follow the steps below:
- Step 1: Navigate to your course builder.
- Step 2: Click on the section from the right side.
- Step 3: Choose or create a new lesson from the right side.
- Step 4: Click on the “?” icon to add the quiz.
- Step 5: Select “Create New Quiz.”
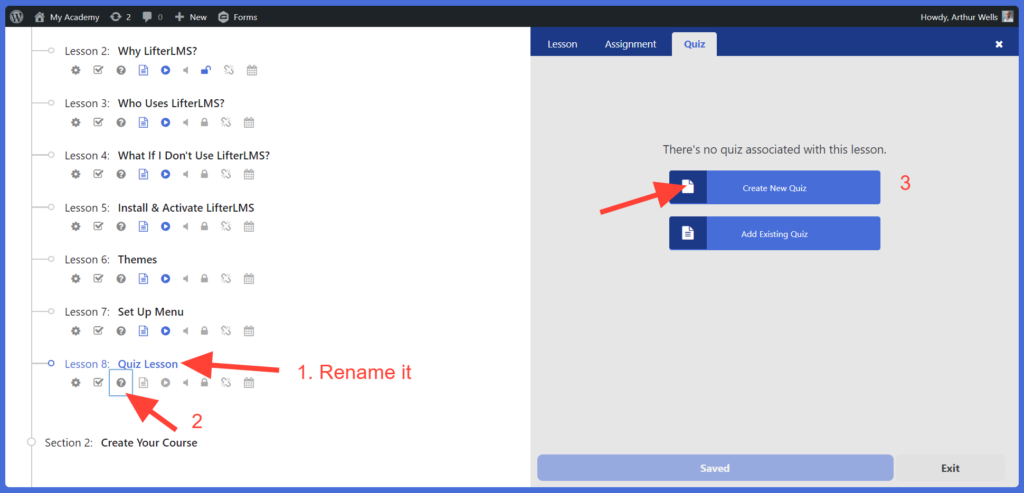
- Step 6: Scroll down a bit and click on “Add Question.”
Now you can add your quiz questions.
Create a Membership
Creating a membership is almost the same process as creating a course.
A membership in LifterLMS is for creating course bundles and selling access to other website content outside of courses.
Auto Enroll Courses
Using auto-enroll courses, you can create a series of courses that members will automatically join upon becoming members through auto-enrollment.
For instance, if you have a membership and you’ve added 6 courses as auto-enroll courses. It implies that when a student enrolls in that membership, they will be automatically enrolled in those courses. For further details on this feature, you can refer to our documentation on membership auto-enrollment.
Payment Gateways
To sell your courses you also need to add a Payment gateway. LifterLMS payment gateways include Stripe, PayPal, Authorize.Net, or the LifterLMS + WooCommerce extension. You can get all of these in any bundle plan or you can go with individual payment gateway add-ons.
If you are using a premium payment gateway integration from LifterLMS, you can add those from your dashboard.
Connect Your Payment Gateway
To link your payment gateway, follow these steps:
- Go to your WordPress dashboard > LifterLMS > Settings > Checkout.
- Scroll down a bit to find the “Payment Gateway” options.
- Click on a specific payment gateway.
- Enable the payment gateway and provide all the required card and payment information.
Build Online Courses With High-Quality Tools
By selecting the right tools, such as the free LifterLMS plugin and Astra Theme, you equip yourself to create a beautiful powerful online course website on a platform you own and control.