

Giving learners immediate access to an entire course can seem like the obvious choice. They’ve paid for the material, so why not let them decide how quickly to work through it?
For some courses, that’s the right approach. For others, full access creates problems.
Learners may open the curriculum, see several hours of lessons and assignments ahead of them, and struggle to know where to begin. Some move too quickly, skipping the practice needed to understand later material. Others complete the first lesson, intend to return, and never do.
Drip content gives course creators another option. Instead of making every lesson available on day one, you release material according to a schedule.
Used well, this can create a clearer path through the course and give learners time to practice what they have learned. Used badly, it can feel like an artificial restriction that prevents motivated students from continuing.
The question is not simply whether drip content is useful. It’s whether a scheduled release supports the purpose of your course and the needs of your learners.
What is Drip Content?
Drip content is course material that becomes available gradually according to a schedule rather than being released all at once.
A lesson might unlock:
- On a specific calendar date
- A set number of days after the learner enrolls
- A set number of days after the course begins
You can drip individual lessons, groups of lessons, or complete course sections. Depending on the course, the scheduled material might include videos, assignments, quizzes, downloads, coaching prompts, or discussion activities.
In LifterLMS, course creators can schedule lessons using all three of the methods above. The platform also allows dripping to be configured for individual lessons, across a course, or by section.
Drip content describes how material becomes available. It doesn’t describe the type of course.
An evergreen course can use a schedule based on each learner’s enrollment date. A cohort course can release lessons to everyone on the same dates. A membership can publish a new training module each month. A short reference course may not need drip content at all.
A Simple Drip Content Example
Consider a four-week course on creating and launching an online workshop.
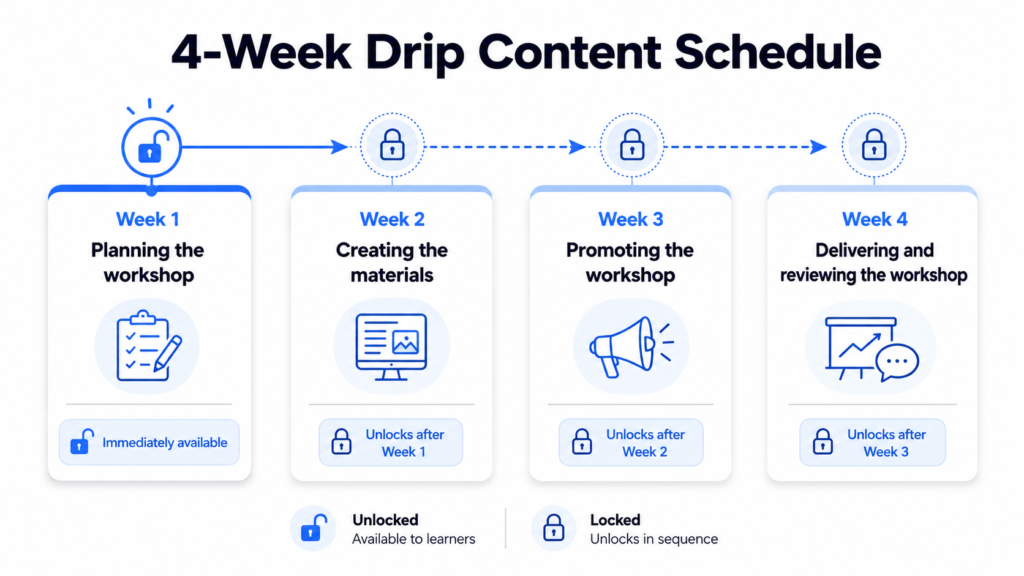
The release schedule might look like this:
| Time | Content released |
| Immediately after enrollment | Welcome lesson and workshop planning module |
| Day 7 | Creating slides, handouts, and supporting materials |
| Day 14 | Promotion and enrollment |
| Day 21 | Delivery, follow-up, and review |
This schedule may make sense because each stage depends on work completed during the previous week. Learners need time to choose a workshop topic before creating materials, and they need a finished offer before promoting it.
The same schedule would make less sense for a library of short tutorials. Someone looking for help with webinar follow-up emails shouldn’t have to wait three weeks because that tutorial happens to appear in the final module.
The content itself doesn’t determine whether dripping is suitable. Its purpose and the way learners need to use it do.
Drip Content vs. Self-paced Learning
A self-paced course usually gives learners access to all available lessons as soon as they enroll. They decide what to study, when to study it, and how quickly to move through the material.
A drip course gives the creator more control over when lessons become available.
| Factor | Drip content | Self-paced access |
| Availability | Content unlocks gradually | All content is available immediately |
| Pace | Partly controlled by the course creator | Controlled by the learner |
| Best suited to | Sequential learning, cohorts, scheduled activities, and courses with practice between modules | Reference material, short courses, urgent training, and learners who need flexibility |
| Main strength | Provides a clear structure | Gives learners freedom to move at their own pace |
| Main risk | Learners may feel restricted | Learners may feel overwhelmed or rush ahead |
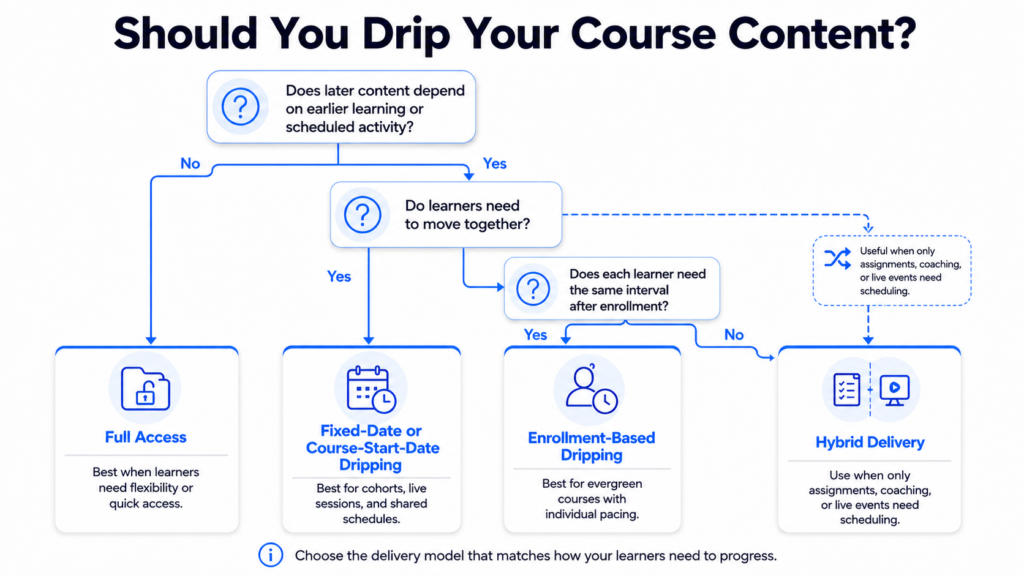
Neither model is inherently better. Drip content may suit a six-week coaching program with weekly assignments and live calls. Full access may suit a software training library where learners need answers to specific problems.
Many courses benefit from a hybrid approach. Core lessons can remain available from the start, while assignments, coaching prompts, live sessions, or bonus content follow a schedule.
Drip Content vs. Prerequisites
Drip content and prerequisites both control access, but they do so in different ways.
Drip content is time-based. A lesson becomes available when its scheduled date or delay has been reached.
A prerequisite is progress-based. A learner must complete a specified lesson or course before gaining access to the next item.
For example:
- A dripped lesson might unlock seven days after enrollment.
- A prerequisite lesson might remain unavailable until the learner completes the previous module.
Prerequisites can support a drip schedule, but they aren’t themselves a form of scheduled release. A course can use either method or both. You might release a new module every Monday, then require learners to complete its lessons in order before moving ahead.
Types of Drip Content Schedules
Not all drip schedules work in the same way.
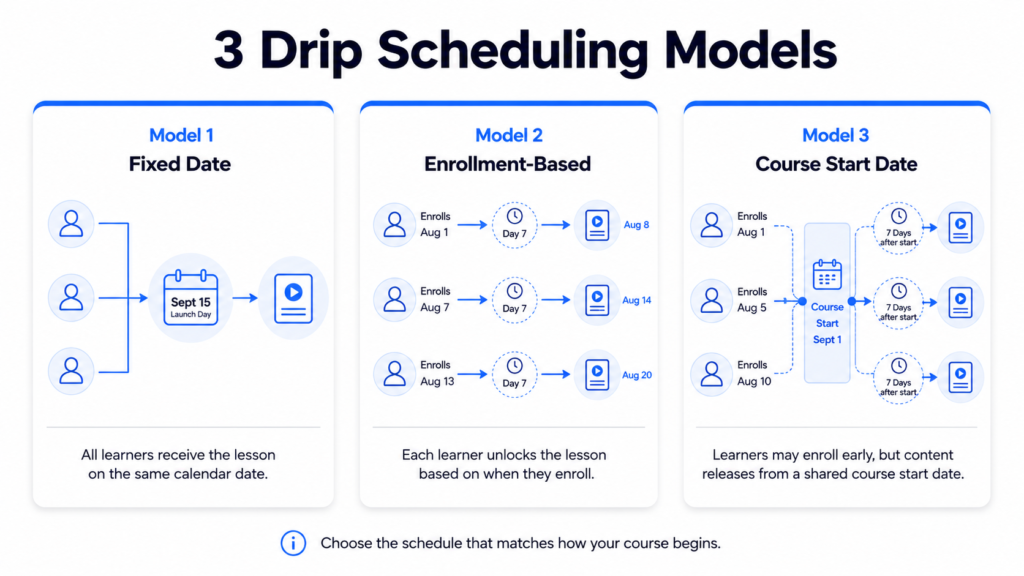
The right method depends on when learners enroll, whether they should progress together, and whether the course has a shared start date. LifterLMS offers three time-based drip methods, each suited to a different course structure.
Fixed-date drip content
With a fixed-date schedule, a lesson becomes available on a specified calendar date.
Every enrolled learner gains access at the same time, regardless of when they joined the course.
This method works well when the learning experience follows a shared calendar, such as:
- A cohort course
- A semester or term
- A program with weekly live calls
- Training linked to an event
- A course with scheduled group discussions
For example, a six-week cohort might begin on 7 September, with a new module released every Monday.
| Release date | Content |
| 7 September | Orientation and Module 1 |
| 14 September | Module 2 |
| 21 September | Module 3 |
| 28 September | Module 4 |
The main advantage is coordination. Learners can discuss the same topic, attend related calls, and complete activities together.
The drawback is that late enrollment can become difficult. Someone who joins after several release dates have passed may receive multiple modules immediately or enter a course that is already underway. The enrollment window and late-joiner experience therefore need careful planning.
Enrollment-based drip content
With an enrollment-based schedule, the release date is calculated separately for each learner.
A lesson might become available seven days after enrollment, regardless of the calendar date on which that enrollment occurred.
This method is usually the best fit for evergreen courses that accept new students throughout the year.
| Time after enrollment | Content |
| Immediately | Welcome lesson and Module 1 |
| After 7 days | Module 2 |
| After 14 days | Module 3 |
| After 21 days | Final project |
Each learner receives the same sequence and the same amount of time between releases. Someone enrolling in March follows the same pattern as someone enrolling in October.
This makes the course easier to automate and avoids the need to maintain a calendar of fixed release dates.
The trade-off is that learners move through the course on different schedules. One learner may be starting Module 1 while another is completing the final project. That can make shared discussions, group calls, and peer feedback harder to coordinate.
Course-start-date drip content
A course-start-date schedule releases content a set number of days after the course’s defined start date.
This differs from an enrollment-based schedule because the timing is tied to the course, not to the individual learner.
Suppose enrollment opens on 1 August, but the course officially begins on 1 September. Learners can enroll throughout August and gain access to orientation materials, while the main lessons follow a schedule based on the September start date.
| Time relative to course start | Content |
| Before the start date | Welcome and orientation |
| Start date | Module 1 |
| 7 days after start | Module 2 |
| 14 days after start | Module 3 |
This option suits programs where learners can register in advance but should begin the main course together.
It is also useful when enrollment dates vary slightly, but the course still needs a shared rhythm.
A course-start-date schedule requires a clearly defined start date. Learners must also understand the difference between enrolling in the course and beginning the course.
Progress-based access controls
Time is not the only way to control access.
Progress-based access keeps later content unavailable until the learner completes a required step. Depending on the course setup, that might mean finishing an earlier lesson, passing a quiz, or completing another course.
For example:
- Time-based rule: Module 2 opens seven days after enrollment.
- Progress-based rule: Module 2 opens after the learner completes Module 1.
These controls solve different problems.
A drip schedule manages pace. A prerequisite checks progress.
They can also work together. A module might become available on Monday, while its final assessment remains locked until all lessons in that module have been completed.
Which LifterLMS Drip Method Should You Choose?
Use a specific date when learners should receive content together on a shared calendar.
Use a number of days after enrollment when the course is evergreen, and every learner needs their own schedule.
Use a number of days after the course start date when enrollment can happen in advance, but the main course follows a shared start date.
A useful test is to ask:
What event should start the clock?
- A calendar date
- The learner’s enrollment
- The official course start
Choose the method that matches that event. Don’t choose based only on which setting is easiest to configure.
Benefits, Drawbacks, and When Drip Content Makes Sense
Drip content can improve a course, but only when the release schedule supports the way learners need to progress.
It shouldn’t be used simply because the platform offers the feature, because competitors use it, or because withholding content appears to create more value.
The strongest reason to drip a course is educational. The schedule should help learners understand, practice, and apply the material.
When Drip Content Can Help
It can create a clearer learning path
A large course can feel difficult to navigate when every lesson, quiz, download, and assignment is available from the start.
Releasing material in stages can reduce that initial burden. Learners see what they need to work on now, rather than the full weight of the course ahead.
This works best when the course has a clear sequence. The learner completes one stage, then moves to the next.
The schedule should still remain visible. Hiding the full course structure can create uncertainty. Learners should know what is coming, when it will become available, and how each section contributes to the overall outcome.
It can provide time for practice and reflection
Some learning requires more than watching a video and clicking “Complete.”
A learner may need time to:
- Apply a process
- Complete an assignment
- Test a technique
- Gather feedback
- Reflect on the result
- Revisit an earlier lesson
In these cases, a delay between modules can be useful.
The timing must reflect the work involved. A two-hour practical assignment may justify a week before the next module opens. A short introductory lesson probably does not.
A drip schedule can create space for learning. It cannot guarantee that learners use that space well. The course still needs clear tasks, reminders, and support.
It can support sequential learning
Some subjects depend on knowledge or skills taught earlier in the course.
A learner may need to understand the basics before moving to more advanced material. Releasing sections gradually can discourage them from jumping ahead before they are ready.
This doesn’t mean every sequential course needs time-based restrictions. Prerequisites may provide better control when progress matters more than elapsed time.
Ask whether the learner needs to wait or whether they simply need to complete something first.
It can coordinate a cohort
Fixed-date releases are useful when a group is working through a course together.
They can keep:
- Live calls focused on the current module
- Discussions centered on the same topic
- Assignments due at similar times
- Peer feedback easier to organize
- Facilitators aware of what learners have reached
This shared pace can strengthen the group experience.
It also reduces flexibility. Learners who miss a week may fall behind, while faster learners may become frustrated if they can’t continue.
It can create recurring contact points
Each new release gives the course creator a reason to contact learners.
A release email can:
- Announce the new material
- Remind learners what they have already completed
- Explain the purpose of the next module
- Direct them to an assignment or discussion
- Encourage them to return
This can support ongoing participation, but the schedule alone doesn’t create engagement. A generic email saying “New content is available” is unlikely to rescue a course that lacks useful material or clear direction.
Main Drawbacks and Risks
Drip content can also damage the learner experience.
Common problems include:
- Fast learners can’t move ahead.
- Learners feel they’re being denied content they’ve paid for.
- Long gaps cause people to lose momentum.
- Locked lessons generate support requests.
- Late joiners struggle to understand the schedule.
- Fixed dates create problems across time zones.
- Learners forget earlier material before the next release.
- The schedule reflects the creator’s preference rather than the learner’s needs.
The greatest risk is artificial delay.
If a learner is ready to continue and there’s no educational reason to stop them, locking the next lesson may feel arbitrary. It may protect a subscription period or imitate a cohort structure, but it doesn’t necessarily improve the course.
When to Use Drip Content
Drip content is a strong option when:
- Later material depends on practice completed earlier.
- The course includes weekly assignments or live sessions.
- Learners benefit from moving through the material together.
- The course has a defined start and finish.
- Each release represents a meaningful stage of progress.
- The creator provides support between modules.
- Learners need time to apply what they have learned.
Examples include coaching programs, cohort courses, professional development, structured onboarding, and practical skills training.
When Not to Use it
Full access is usually better when:
- Learners use the course as a reference library.
- The information may be needed urgently.
- Experienced learners may need only selected lessons.
- The course is short and easy to navigate.
- The learner must complete training before an external deadline.
- The content doesn’t depend on a fixed sequence.
- Delaying access would serve no clear learning purpose.
A troubleshooting course is a good example. Someone dealing with a specific problem shouldn’t have to wait for the relevant lesson to unlock.
When a Hybrid Model Works Better
Many courses don’t need to choose between full access and strict dripping.
A hybrid model can make core learning available immediately while scheduling the parts that benefit from timing.
For example:
- Release all lessons, but drip weekly assignments.
- Give access to the core course, but schedule coaching prompts.
- Make reference material available from the start, while releasing live session recordings each week.
- Open the first two modules immediately, then drip the advanced modules.
- Allow self-paced study, but use fixed dates for group discussions and assessments.
| Model | Best fit | Main benefit | Main risk |
| Drip content | Sequential courses, cohorts, scheduled practice | Creates structure and shared pacing | Can feel restrictive |
| Full access | Reference libraries, short courses, urgent training | Gives maximum flexibility | Learners may rush or feel overwhelmed |
| Hybrid | Courses needing both flexibility and scheduled activity | Balances access with structure | Requires clearer planning and communication |
The best choice is the one that helps learners progress with the least unnecessary friction.
How to Plan a Drip Content Schedule
A drip schedule should begin with the learner’s needs, not with the calendar.
It’s easy to start by deciding that a new module will open every Monday. That may be convenient, but it doesn’t tell you whether learners need a week, whether the modules are equal in difficulty, or whether the delay supports the course outcome.
Plan the learning first. Set the release dates afterward.
1. Define the learning outcome
Start with the result the learner should achieve by the end of the course.
Avoid broad outcomes such as “understand email marketing.” Use something observable:
- Write and schedule a five-email welcome sequence
- Build a working sales page
- Deliver a 30-minute online workshop
- Configure a secure WordPress site
- Complete a recognized assessment
The final outcome helps you decide what learners must know, what they must practice, and which activities need time between releases.
It also helps you remove content that doesn’t contribute to the result.
2. Identify dependencies
List the knowledge, decisions, and practical work required before each part of the course.
Ask:
- Does this lesson rely on an earlier concept?
- Must the learner complete an assignment before continuing?
- Would seeing the next lesson too early cause confusion?
- Is waiting necessary, or would a prerequisite be enough?
- Can experienced learners safely skip this stage?
A dependency doesn’t always justify a timed delay.
Suppose learners must write a course outline before recording lessons. You could release the recording module seven days later, but some learners may finish the outline in two days. A completion requirement may work better than making everyone wait.
Use time-based dripping when learners need space to practice, reflect, collect results, or take part in a scheduled activity.
3. Divide the course into meaningful release units
A release unit might be:
- One lesson
- A small group of lessons
- A complete module
- An assignment and its supporting resources
- A live session and preparation materials
Don’t drip every lesson separately unless there’s a good reason. Too many small releases can make the course feel fragmented and produce an unnecessary stream of notifications.
Group content around a clear stage of progress.
For example:
- Define the offer
- Create the workshop
- Promote the workshop
- Deliver and review it
Each release should give learners enough material to make meaningful progress without presenting more work than they can reasonably complete.
4. Estimate the learner workload
Video duration alone is a poor measure of workload.
A 15-minute lesson may require two hours of practical work. A 45-minute demonstration may need no follow-up at all.
Estimate the total time needed for:
- Watching or reading
- Taking notes
- Completing assignments
- Practicing the skill
- Gathering information
- Receiving feedback
- Revising the work
Also consider who the learners are.
A full-time student may have more study time than a business owner completing the course between client work. A beginner may need much longer than someone with prior experience.
These estimates don’t need to be exact, but they should influence the release interval.
5. Choose the release method
Once you understand the course structure, choose the event that starts the schedule.
Use:
- Fixed dates when learners should progress together
- Enrollment-based delays when each learner needs an individual schedule
- Course-start-date delays when enrollment opens early, but the main program begins on a shared date
A hybrid course may use more than one form of access control. Core lessons might be available immediately, while assignments and live activities follow fixed dates.
6. Set suitable intervals
Don’t assume that every release should be weekly. Match the interval to the work.
Examples:
- One or two days for a short lesson with a simple task
- Three to five days for a focused practical exercise
- One week for a substantial module
- Two weeks for work that requires testing, feedback, or real-world results
Varying the intervals is acceptable. Equal gaps can look tidy while making little educational sense.
Avoid long silent periods. When learners finish early, give them something useful to do, such as a recap, checklist, optional practice task, or discussion prompt.
7. Decide what is available immediately
Learners should rarely encounter an empty course after enrollment.
Make the essential starting material available straight away:
- Welcome lesson
- Course overview
- Expected schedule
- Learning outcomes
- Technical instructions
- Support information
- Community guidance
- First useful lesson or task
The learner should know what to do next and when further content will become available.
If the main course begins on a future date, use the period before it for orientation rather than leaving learners with nothing.
8. Plan release notifications
A release schedule needs a communication schedule.
Each notification should explain:
- What has opened
- Why it matters
- What the learner should do
- How long the work may take
- When the next release is due
Avoid sending only a generic “New lesson available” message.
A more useful notification might say:
Module 2 is now available. You will turn your workshop idea into a clear session outline and draft the materials you need. Allow about two hours for the lessons and planning task. Module 3 opens next Tuesday.
Notifications can also remind learners of unfinished work, but they shouldn’t make people feel punished for falling behind.
9. Explain locked content
Locked content should never feel mysterious.
Where possible, show:
- The lesson or module title
- The release date or condition
- Why it is not yet available
- What the learner can work on now
Use direct wording:
“This module opens seven days after you enroll.”
Avoid vague messages such as:
“Content unavailable.”
Clear explanations reduce confusion and support requests.
10. Test the learner experience
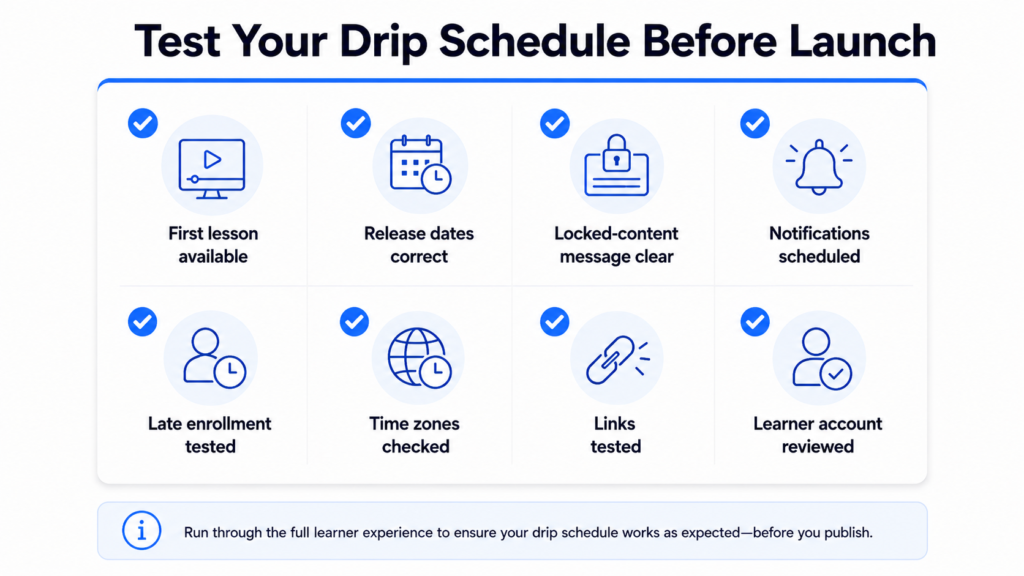
Test the schedule using a learner account before launch.
Check:
- What is visible immediately after enrollment
- Whether release dates calculate correctly
- What locked lessons display
- Whether notifications arrive at the right time
- How the course behaves for late enrollment
- What happens when a release date is changed
- Whether time zones affect fixed-date access
- Whether links from emails lead to available content
| Release | Timing | Main activity | Estimated workload |
| Welcome and Module 1 | Immediately | Choose a workshop topic and outcome | 90 minutes |
| Module 2 | Day 5 | Create the workshop structure | 2–3 hours |
| Module 3 | Day 12 | Build the promotional plan | 2 hours |
| Module 4 | Day 19 | Prepare delivery and follow-up | 2–3 hours |
Don’t test only from the course administrator’s view. Administrators often see content that learners can’t access.
| Release | Timing | Main activity |
| Orientation | One week before start | Set up accounts and review the schedule |
| Module 1 | Monday, Week 1 | Complete the foundation lessons |
| Live session | Thursday, Week 1 | Discuss questions and review work |
| Module 2 | Monday, Week 2 | Apply feedback and begin the next stage |
A good drip schedule should be easy for learners to understand, realistic to complete, and clearly connected to the course outcome.
How to Set Up Drip Content in LifterLMS
LifterLMS lets you set drip schedules from the Course Builder, from an individual lesson’s settings, or across a course using global controls.
The three available time-based methods are:
- A specific calendar date
- A set number of days after enrollment
- A set number of days after the course start date
The best place to configure the schedule depends on whether you’re changing one lesson, several lessons, or an entire course.
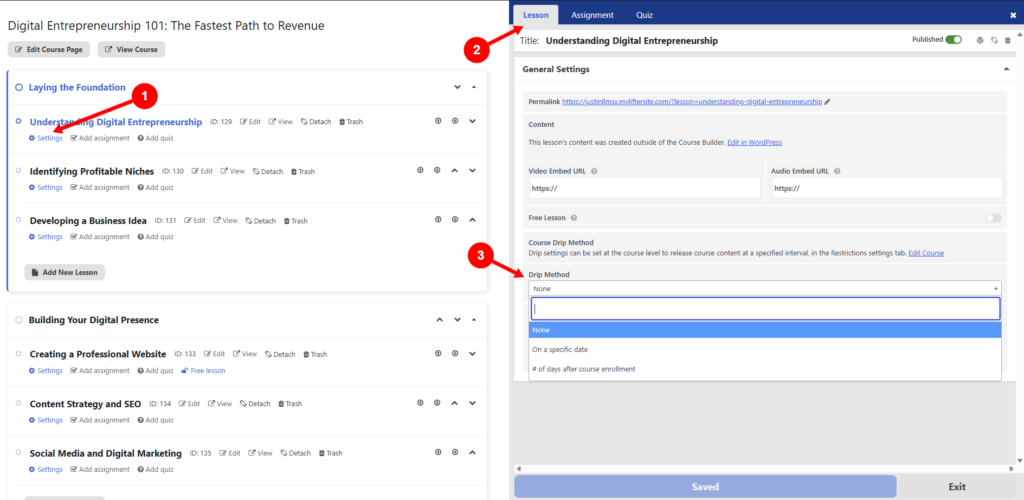
Add drip settings from the Course Builder
The Course Builder provides the quickest way to edit a lesson’s release settings while viewing the complete course structure.
Open the course in WordPress, then launch the Course Builder. Find the lesson you want to schedule and open its settings panel.
In the lesson settings panel, open the Lesson tab and scroll to Drip Method. Choose the required option from the dropdown.
Depending on the method selected, you can then:
- Choose a calendar date
- Enter the number of days after enrollment
- Enter the number of days after the course start date
Save the changes before moving to another lesson.
This approach is useful when you are building or reviewing the course because you can see where each lesson sits within its section. It also makes it easier to spot inconsistent release intervals.
Set drip content from an individual lesson
You can also configure dripping from the lesson editing screen.
Open the lesson in WordPress, then scroll to the Lesson Settings panel. Select the Drip Settings tab and choose the required method from the Method dropdown.
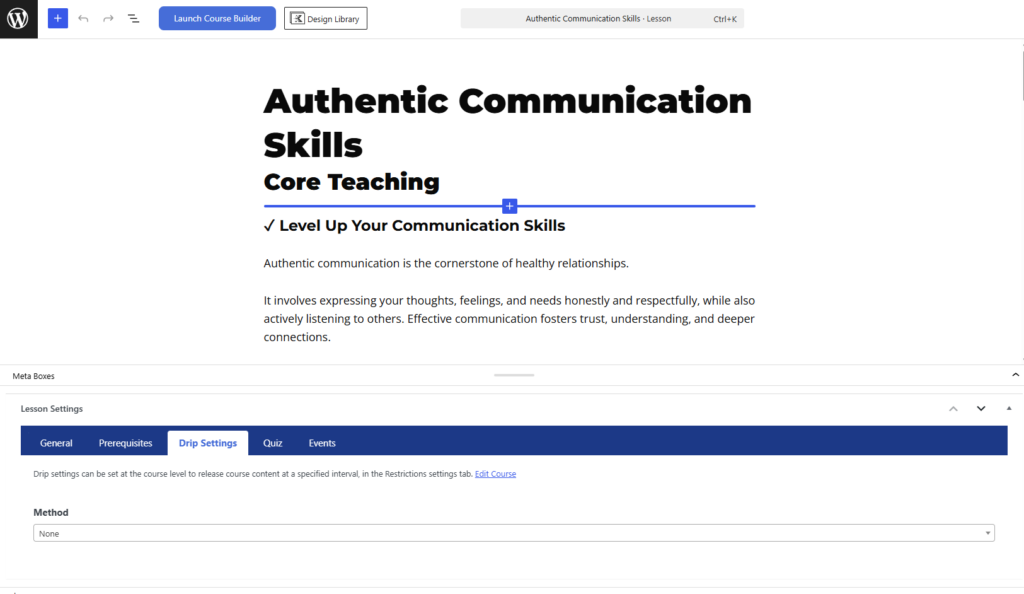
Enter the date or number of days required, then update the lesson.
This route is helpful when you’re already editing the lesson’s content, video, assignment, or other settings. It gives you direct access to the drip controls without reopening the full Course Builder.
The result is the same as setting the schedule from the Course Builder. These are two routes to the same lesson-level controls, not separate drip systems.
Apply course-wide lesson drip settings
Setting each lesson separately gives you precise control, but it can be time-consuming in a large course.
LifterLMS also provides course-wide lesson drip settings. From the course editing screen, open the Restrictions tab and switch on Enable Lesson Drip.
You can then choose the drip method, decide how many lessons should be available when the course begins, and set the interval between later releases.
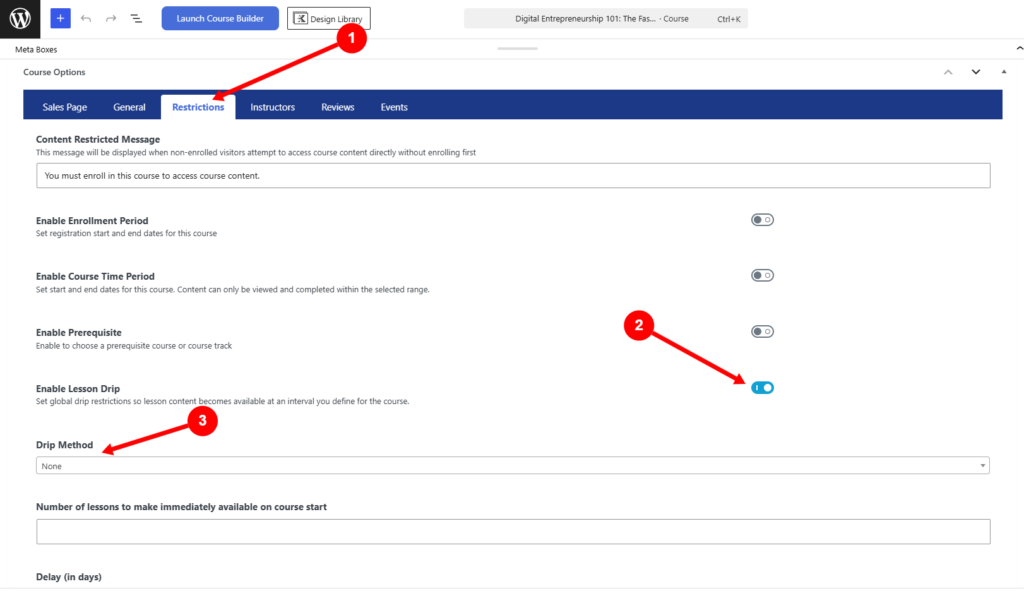
This is useful when the course follows a consistent pattern, such as:
- One lesson each day
- One lesson every seven days
- A sequence based on the course start date
- A fixed calendar schedule for a cohort
Review the resulting dates or delays before publishing. A bulk pattern may not suit every lesson. Orientation content, assessments, live-session instructions, and bonus resources may need separate settings.
Drip lessons by section
Courses don’t always need every lesson to unlock separately.
You may want all lessons in a section to open together, followed by the next section several days later. LifterLMS can apply a drip schedule based on course sections, allowing the lessons within each section to become available together.
For example:
- Section 1 opens immediately.
- Section 2 opens seven days after enrollment.
- Section 3 opens 14 days after enrollment.
- Section 4 opens 21 days after enrollment.
The same section-based pattern can be calculated from the course start date instead.
This approach works well when each section represents a complete module. It gives learners enough material to work through without generating a new release for every lesson.
Which method should you choose?
- Use a specific date for cohorts, scheduled programs, or material tied to an event.
- Use days after enrollment for evergreen courses where learners join at different times.
- Use days after the course start date when learners may enroll early, but should follow a shared schedule once the course begins.
- Use individual lesson settings when release timing varies. Use global course settings when the course follows a regular pattern. Section-based dripping is often the better choice when several related lessons should become available together.
After setting the schedule, test it from a learner account. Confirm that unavailable content displays clearly and opens when expected.
For detailed instructions and videos covering each setup route, see the LifterLMS guide to using drip content in lessons.
Drip Content Best Practices
A drip schedule works best when learners understand it before they enroll and can see how each release supports the course outcome.
Use these principles when planning and reviewing the course.
- Make the first useful content available immediately.
- Explain the release schedule on the sales page and in the welcome lesson.
- Show learners what’s coming, even when later lessons remain locked.
- State the exact release date or access condition wherever possible.
- Match each interval to the work involved.
- Give learners something useful to do between releases.
- Pair new content with a clear email or course notification.
- Avoid delays that serve no educational purpose.
- Provide a route for learners who fall behind.
- Review the schedule after the first group has completed the course.
Don’t assume that a weekly schedule is automatically suitable. A learner who finishes a short lesson in ten minutes shouldn’t always have to wait another seven days before continuing.
The schedule should feel deliberate rather than mechanical.
How to Measure Whether the Schedule Works
Course completion is useful, but it doesn’t tell the whole story. Review how learners behave around each release.
| Metric | What it may indicate |
| Lesson completion after release | Whether learners return when new content opens |
| Time from release to completion | Whether the workload and interval feel realistic |
| Drop-off between modules | Where learners may be losing momentum |
| Assignment submission rate | Whether learners have enough time to complete the work |
| Release email opens and clicks | Whether notifications are bringing learners back |
| Support questions about access | Whether the schedule and locked-content messages are clear |
| Course completion rate | Whether learners continue through the full sequence |
| Refund reasons and feedback | Whether learners feel restricted or misled |
Treat these figures as clues rather than proof.
A low completion rate may point to a poor drip schedule, but it may also reflect difficult content, unclear assignments, weak onboarding, or the wrong audience.
Ask learners direct questions as well:
- Did the pace feel too fast, too slow, or about right?
- Were you ever unsure when content would become available?
- Did the gaps give you enough time to complete the work?
- Were there points where you wanted to continue but couldn’t?
- Would immediate access to any section have improved the course?
Use the answers to adjust future enrollments.
Common Drip Content Mistakes
Delaying content without a clear reason
A locked lesson should protect the learning sequence or create useful time for practice. It shouldn’t exist only to make the course appear longer.
Hiding the schedule
Learners should know what they are buying. Surprising them with locked modules after enrollment can damage trust.
Making every interval identical
Different modules may require different amounts of work. A regular pattern is easy to manage, but it shouldn’t override the learner’s needs.
Dripping too little content at once
Releasing one short lesson every week can make the course feel slow and fragmented. Group related lessons into useful units.
Failing to account for late enrollment
A fixed-date course needs a clear policy for people who join after it begins. Decide whether they receive earlier material immediately, start with the next cohort, or follow a separate path.
Testing only as an administrator
Administrators may see content that learners cannot. Test the full course using a learner account before launch.
Frequently Asked Questions
Usually, yes. Learners should have access to the welcome material, schedule, support details, and at least one useful lesson or task after enrollment.
It depends on the drip method. Enrollment-based schedules begin from that learner’s enrollment date. Fixed-date schedules may give the learner immediate access to content whose release dates have already passed. Test this before accepting late enrollments.
That depends on the course display and access settings. In most cases, showing the course structure helps learners understand what’s coming. Pair visible locked lessons with a clear availability message.
You can change lesson settings, but the effect on current learners depends on whether the new date is earlier or later. Test the revised schedule carefully and tell learners about any change that affects their access.
No. Drip content releases lessons according to time. Prerequisites release access after a learner completes a required action. A course can use both.
Yes. A hybrid course might make the core lessons available immediately while drip-feeding assignments, coaching prompts, live sessions, or advanced material.
Not in every case. Drip content suits structured, sequential, or cohort-based learning. Full access works better for reference material, urgent training, and learners who need more control over pace.
Build the Schedule Around the Learner
Drip content isn’t valuable because it delays access. It’s valuable when the timing helps learners focus, practice, and progress.
Start with the course outcome. Decide what learners need to do between releases. Choose the LifterLMS drip method that matches the course structure, then test the experience from enrollment to completion.
A simple, well-explained schedule will usually work better than a complicated one.
Ready to build a structured online course? Create your course with LifterLMS and control when each lesson becomes available.
Need step-by-step setup instructions? Read the LifterLMS documentation on using drip content in lessons.