Using the LifterLMS REST API and n8n for Automated Student Enrollment
The LifterLMS REST API is an incredibly powerful tool that unlocks a wide range of possibilities for managing your courses, students, and enrollments beyond the standard WordPress interface.
This flexibility allows you to build custom integrations and complex automation workflows, and enables you to do almost anything the core LifterLMS plugin can do. However, even if you’re not highly technical, the API can be used with user-friendly automation platforms like n8n (or Zapier), which enable you to create set-and-forget systems for mundane tasks, such as automatic student enrollment after an external purchase.
This guide explains how to use the LifterLMS REST API to automatically enroll students in your courses after they make a purchase on a different website.
This allows you to use LifterLMS for hosting your content while using a different platform for your e-commerce needs.
This guide is for LifterLMS site owners, course creators, and developers who want to connect LifterLMS to an external platform (such as Paddle, Shopify, or ThriveCart) that is not directly integrated with the plugin.
You don’t need to be a developer, but you should be comfortable following step-by-step instructions and using a third-party automation tool.
The following workflow shows the basic API calls (creating a student and enrolling a student) that can be easily translated into other scripting languages or automation tools.
While Zapier is often the most popular entry point for API automation, this guide uses n8n because it offers a more powerful, self-hosted, and flexible solution suitable for high-volume or complex workflows. However, regardless of the platform you choose, the core steps and overall logic will remain the same.
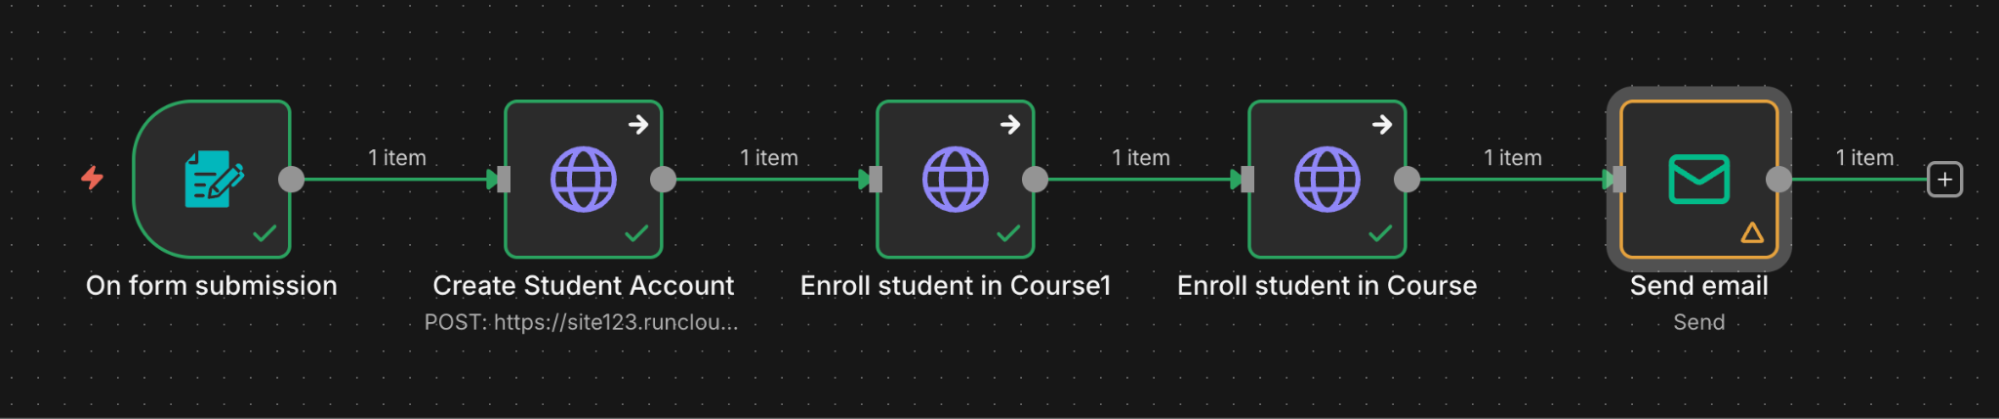
After adding all the nodes, your complete automation workflow will display a sequence of operations to be performed.
The process begins with the Trigger, which is the initial purchase event from your e-commerce platform. This trigger then initiates a series of Actions, first creating the student account in LifterLMS and then enrolling that student in the correct course via API calls.
The entire process concludes with a final Notification, typically an email, confirming the student’s access and providing login details.
Prerequisites
- A WordPress site with LifterLMS installed.
- An account with n8n.
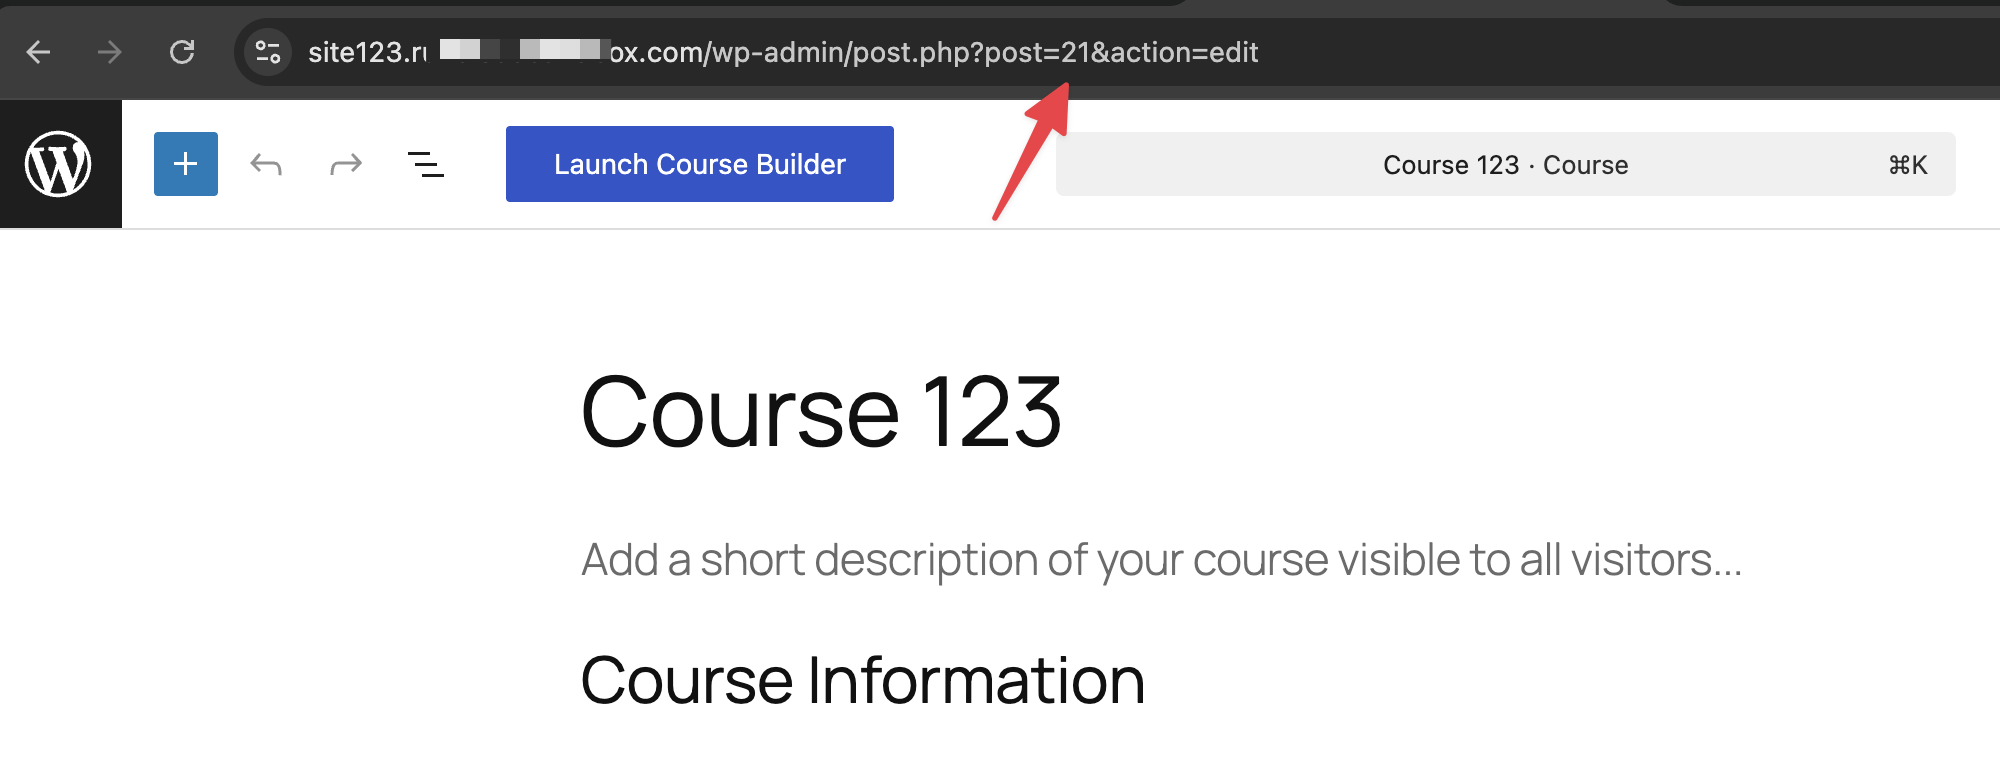
- The “Course ID” of the course you want to enroll students into (found by looking at the URL when editing a course in WordPress).
If you’re new to APIs or automation tools, it can help to think about this workflow in plain terms before diving into the technical setup.
Using a tool like Zapier, the same process would look like this:
- A customer completes a purchase on an external platform like Stripe, Shopify, or ThriveCart.
- That purchase triggers an automation.
- The automation creates a student account in LifterLMS.
- The student is enrolled in the correct course.
- The student receives an email with their login details.
Zapier handles most of the technical details for you behind the scenes, using prebuilt actions and triggers. The logic, however, is identical to the workflow shown in this guide.
This tutorial uses n8n because it provides more flexibility and control, especially for advanced or high-volume setups. If you can understand the steps in this guide, you can apply the same thinking in Zapier or any similar automation platform.
Before your external site can communicate with LifterLMS, you must create new API keys.
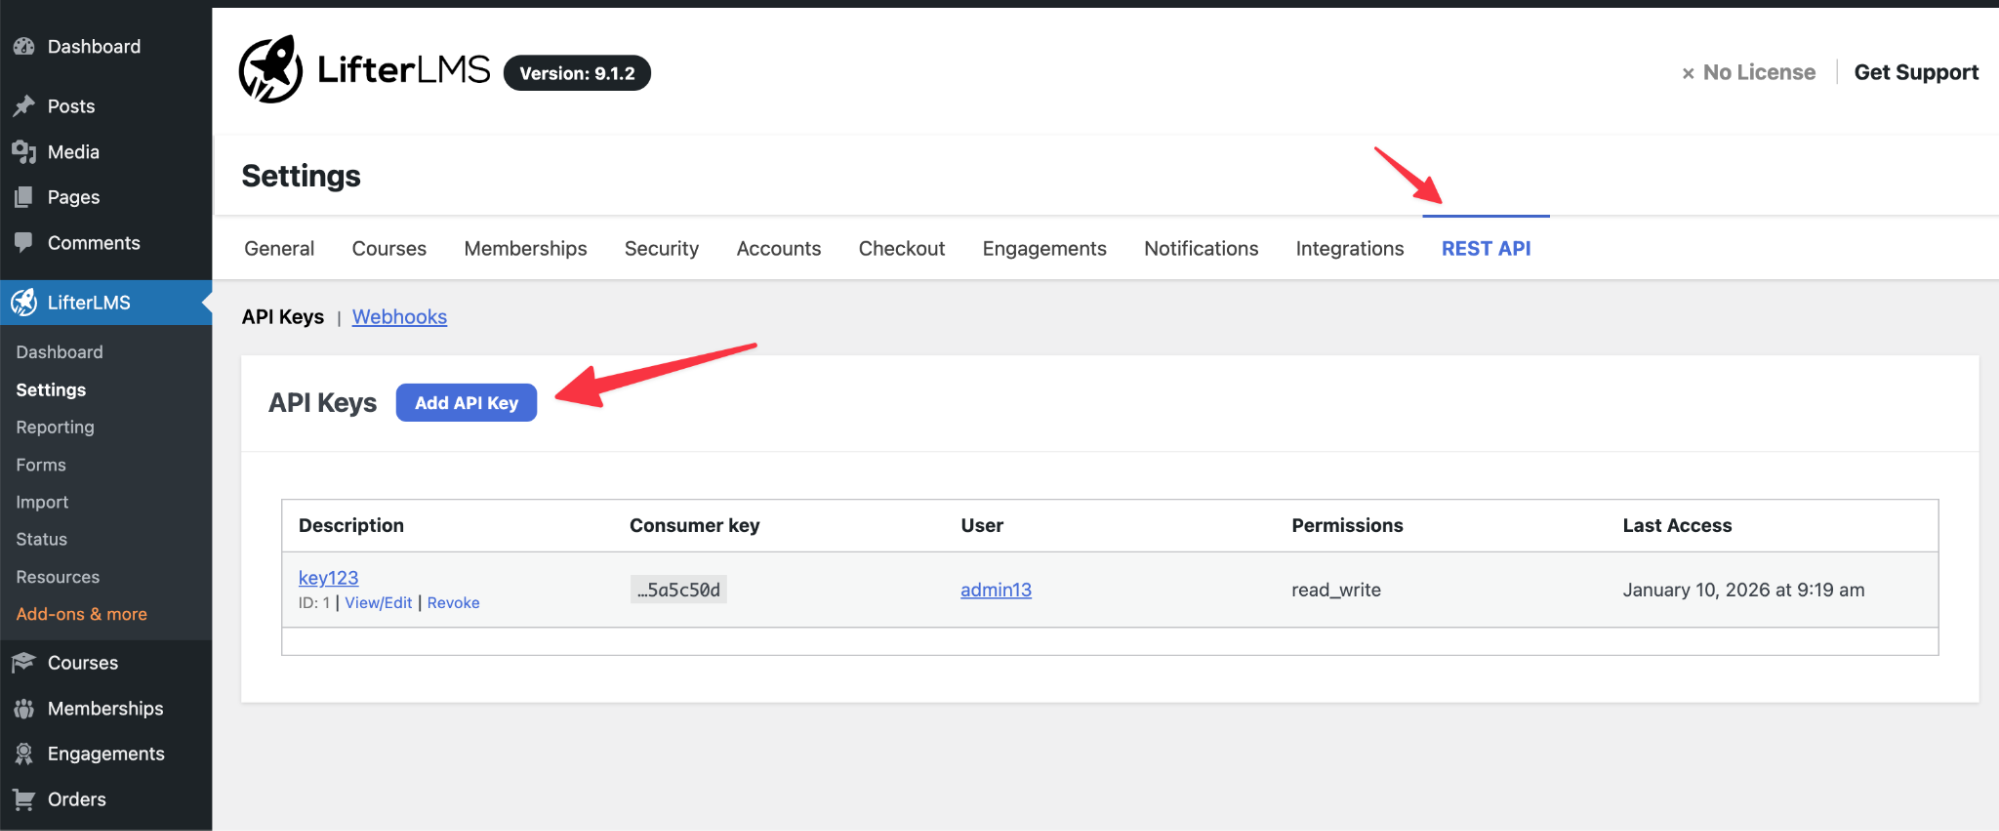
- Log in to your WordPress dashboard and navigate to LifterLMS > Settings.
- Click on the “REST API” tab.
- Click on Add API Key.
- Give the key a “Description” such as “n8n Integration,” and ensure permissions are set to “Read/Write.”
- Click Save.
- Copy the “Consumer Key” and “Consumer Secret” and save them in a safe place.
Protecting Your API Keys
The “Consumer Key” and “Consumer Secret” you created above can be used as a master password for your LifterLMS site. They give Read/Write access to most of your course and student data.
- Never share these keys publicly.
- Store them securely, ideally in a password manager.
- Only grant Read/Write permissions to applications you fully trust, such as your automation platform.
You need to give n8n permission to access your site using the keys you just created.
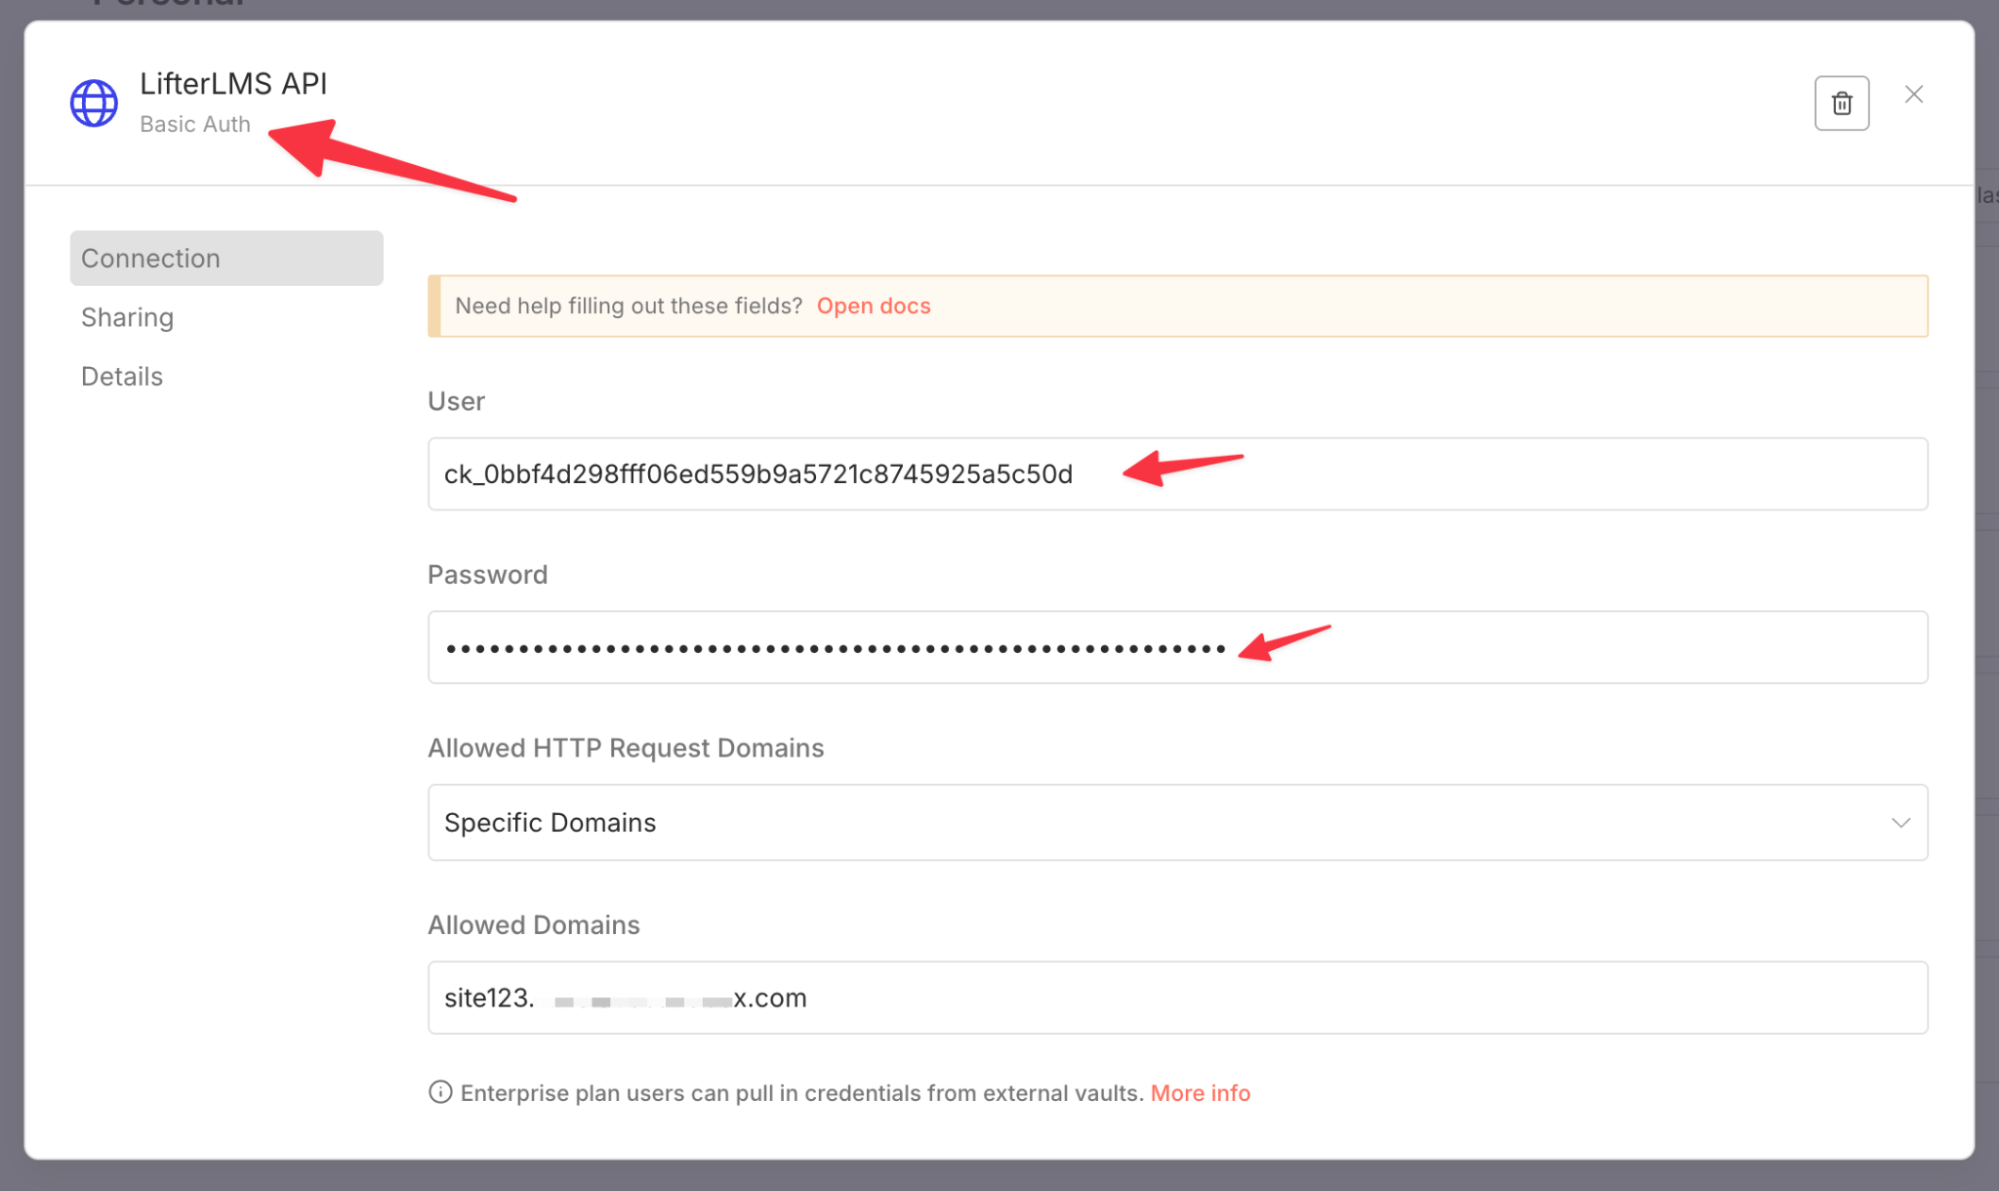
- In your n8n dashboard, click on the “Credentials” tab.
- Click Create Credential and search for “Basic Auth”.
- In the “User” field, paste your “Consumer Key.”
- In the “Password” field, paste your “Consumer Secret.”
- Give the credential a name, such as “LifterLMS API”, to make it easy to identify.
- Optionally, you can also specify the domain where you want to use this credential, which makes sure you don’t accidentally use these credentials on a different LifterLMS site.
- After you have added the credentials, click Save.
Storing this key in a credential allows you to reuse the same authentication details across multiple HTTP Request nodes in your current workflow and in any future workflows.
Additionally, if you ever need to update or revoke the key (e.g., for security reasons), you can simply update the information in the single LifterLMS API Credential entry, and the change will automatically apply everywhere it is used.
Once you have added the credentials, you can start using them to create API requests.
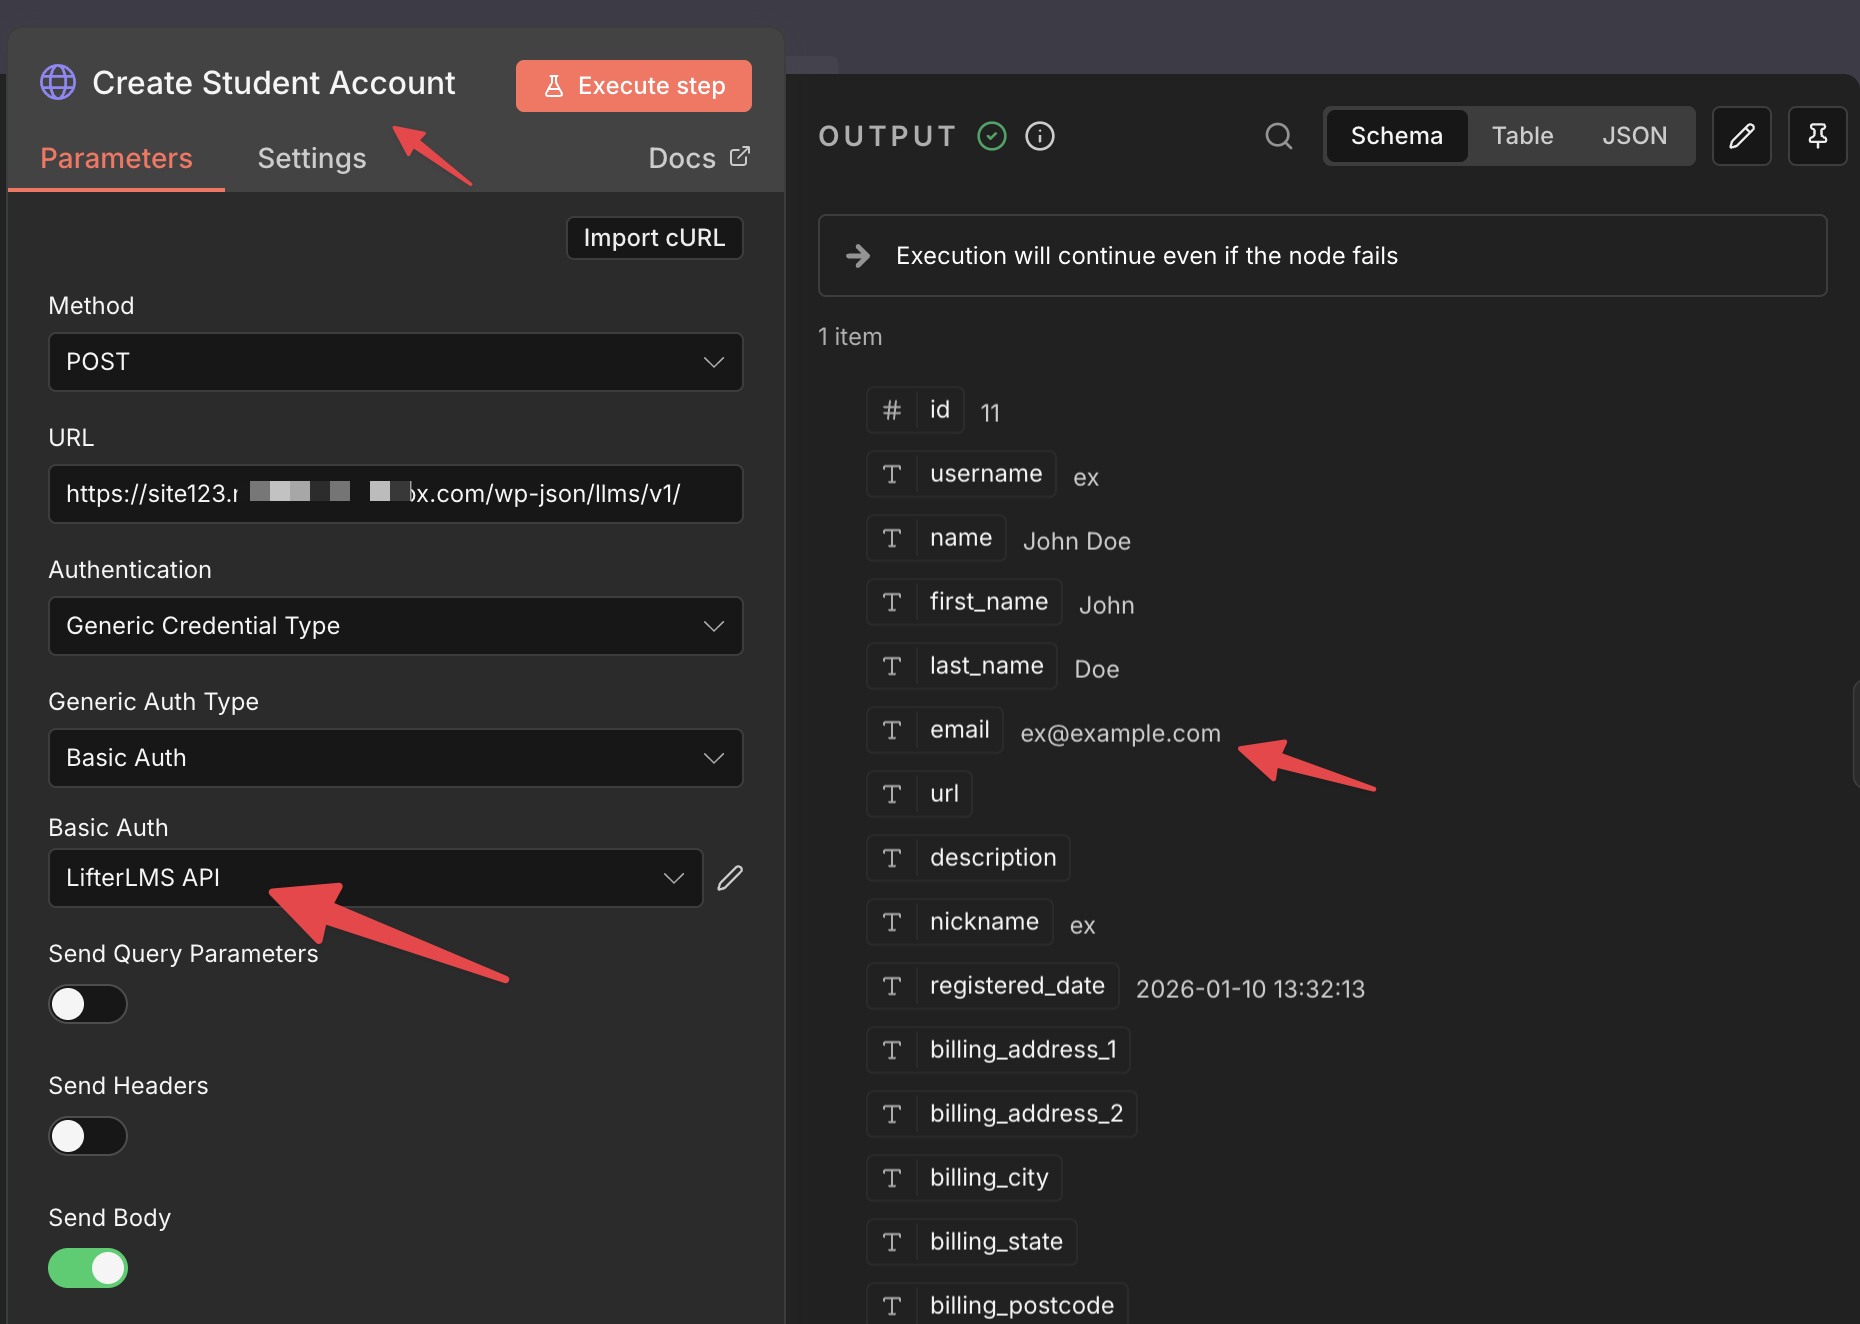
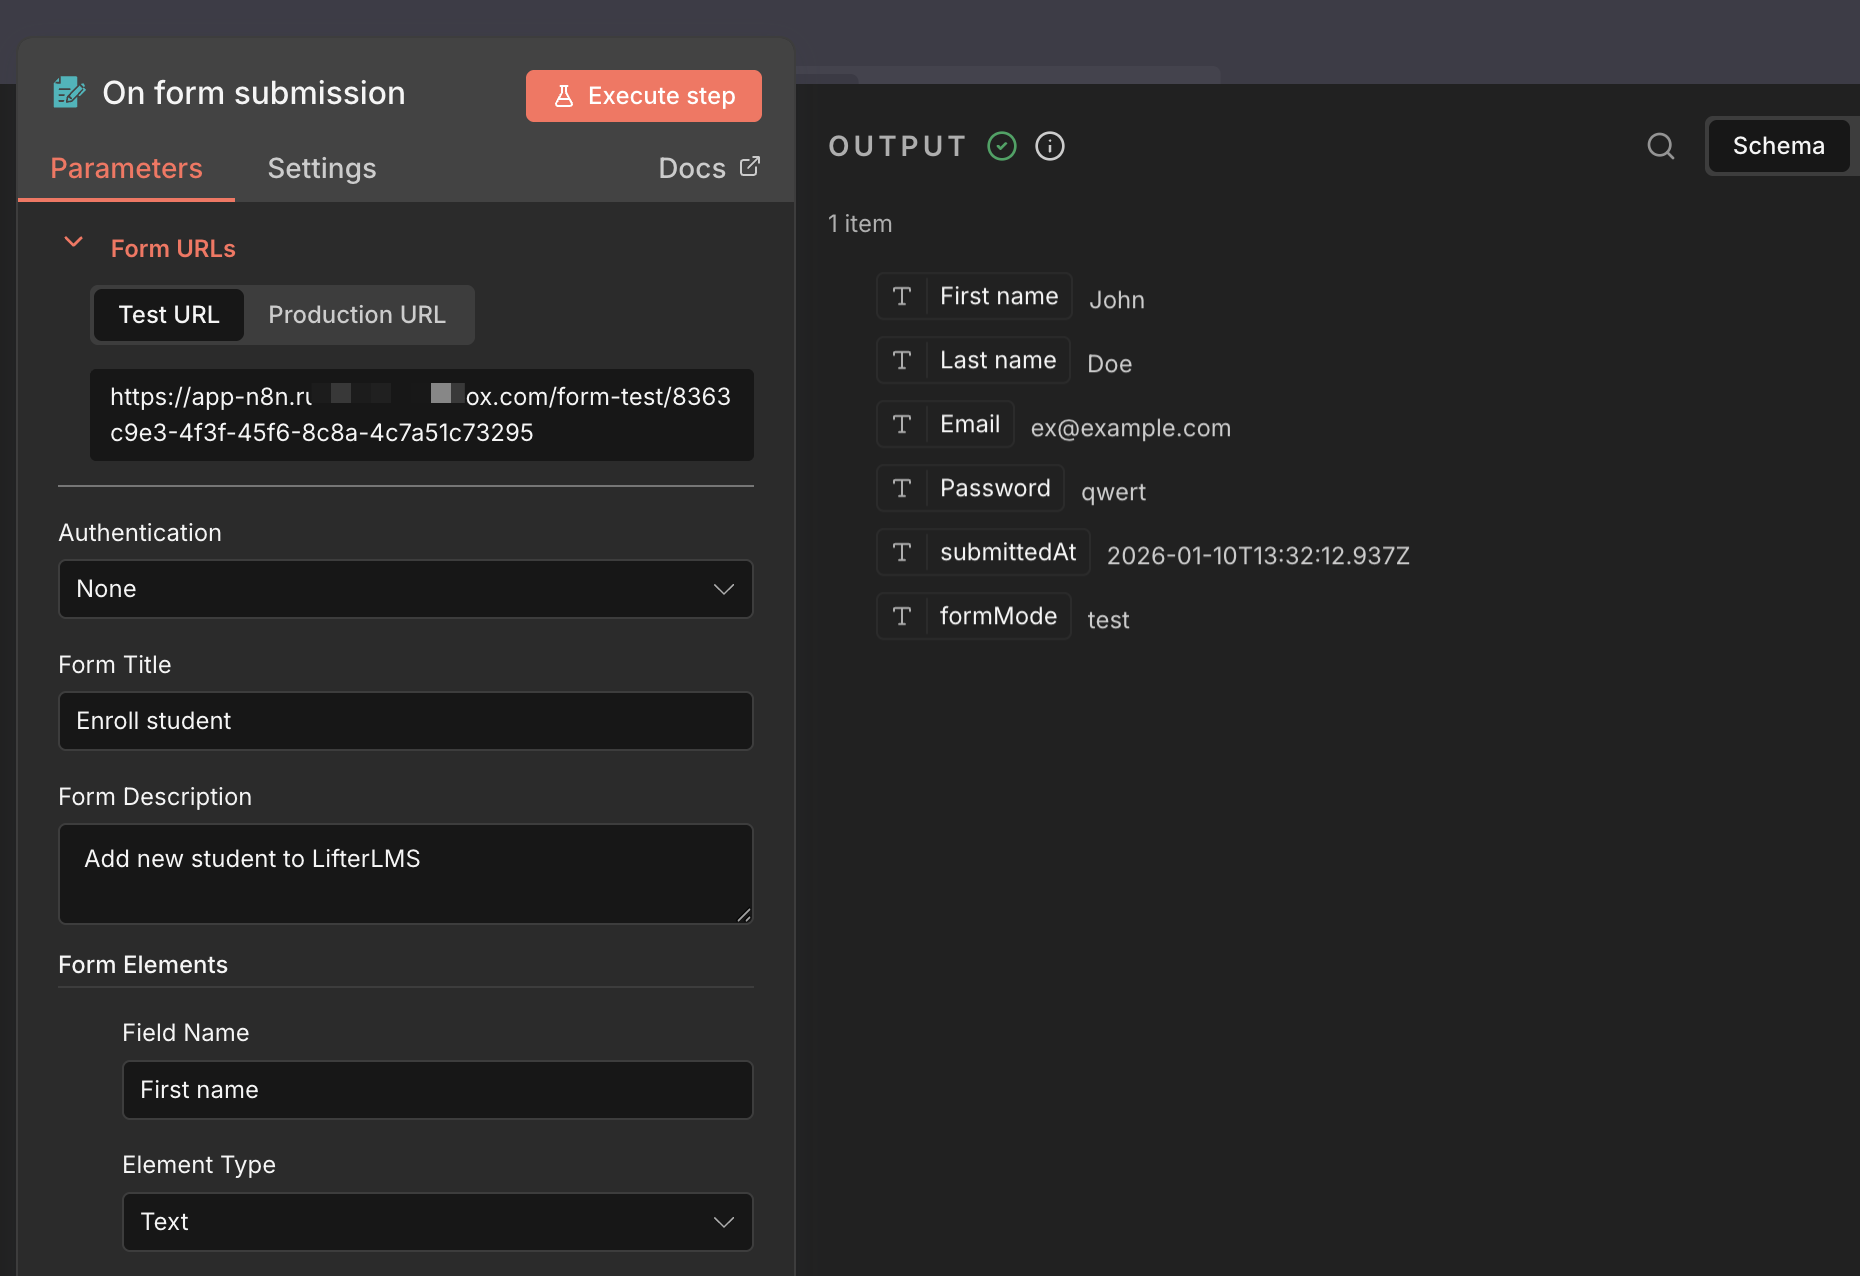
The first step in our automation will be to create a student record on your site. Follow the steps below to create this node:
- Add a new “HTTP Request” node to your n8n workflow and rename it to “Create Student Account”.
- Set the “Method” to POST.
- In the “URL” field, enter https://yourdomain.com/wp-json/llms/v1/students (replace yourdomain.com with your actual site address).
- Set “Authentication” to “Generic Credential Type”.
- Select “Basic Auth” and choose the “LifterLMS API” credential you created in Step 2.
- Toggle the Send Body switch to “On.”
- Choose “JSON” as the “Body Content Type.”
- In the “Body Parameters” or “JSON” area, provide the following data by pulling it from your purchase trigger (Webhook):
When building complex JSON bodies, you can switch to Expression Mode in n8n (look for the toggle switch in the Body area) to dynamically generate the JSON structure, allowing you to use variables and logic.
For a new student account, you would input the following data:
{
"email": "{{ $input.item.json.Email }}",
"first_name": "{{ $input.item.json['First name'] }}",
"last_name": "{{ $input.item.json['Last name'] }}",
"password": "{{ $input.item.json.Password }}"
}
LifterLMS also allows you to set other details, such as the billing address and display name, at the time of account creation by passing them as additional parameters. To view a complete list of these parameters, read the LifterLMS API documentation.
A Note on Passwords and Security
In real-world setups, it’s usually best not to pass a user-chosen password directly through an automation.
A common and safer approach is to:
- Generate a strong, random password automatically when creating the student account.
- Immediately send the student a welcome email with a password reset link.
This avoids storing or transmitting plaintext passwords and gives students full control over their login credentials.
LifterLMS supports standard WordPress password reset flows, so this approach works well with the automation shown in this guide.
Now that the student exists in your system, you must link them to the specific course they purchased.
- Add another “HTTP Request” node immediately after the previous one.
- Set the “Method” to POST.
- In the “URL” field, you must build a dynamic link. It should look like this:
https://yourdomain.com/wp-json/llms/v1/students/{{ $node["Create Student Account"].json["id"] }}/enrollments/21
In the above URL, make sure to update the following fields:
-
- Domain: Replace yourdomain.com with your WordPress site’s actual domain.
- Student ID (Dynamic): The expression {{ $node[“Create Student Account”].json[“id”] }} automatically inserts the ID of the student created in Step 3. If you renamed the “Create Student Account” node, you must update the name within the brackets (e.g., {{ $node[“New Student“].json[“id”] }}).
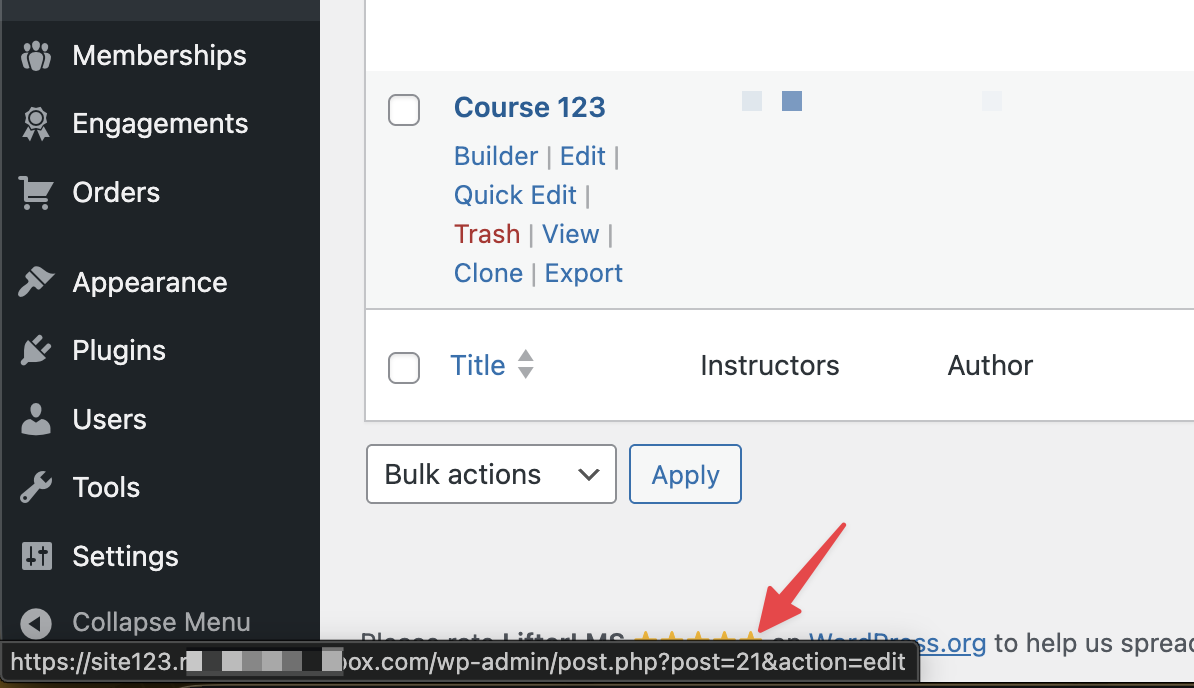
- Course ID: Replace 21 with the actual Course ID of the LifterLMS course you want to enroll the student into. This ID can be found in your LifterLMS dashboard when editing the course.
- Set the “Authentication” to Basic Auth using your saved credentials.
- This request does not require a body; the enrollment is completed entirely through the URL structure.
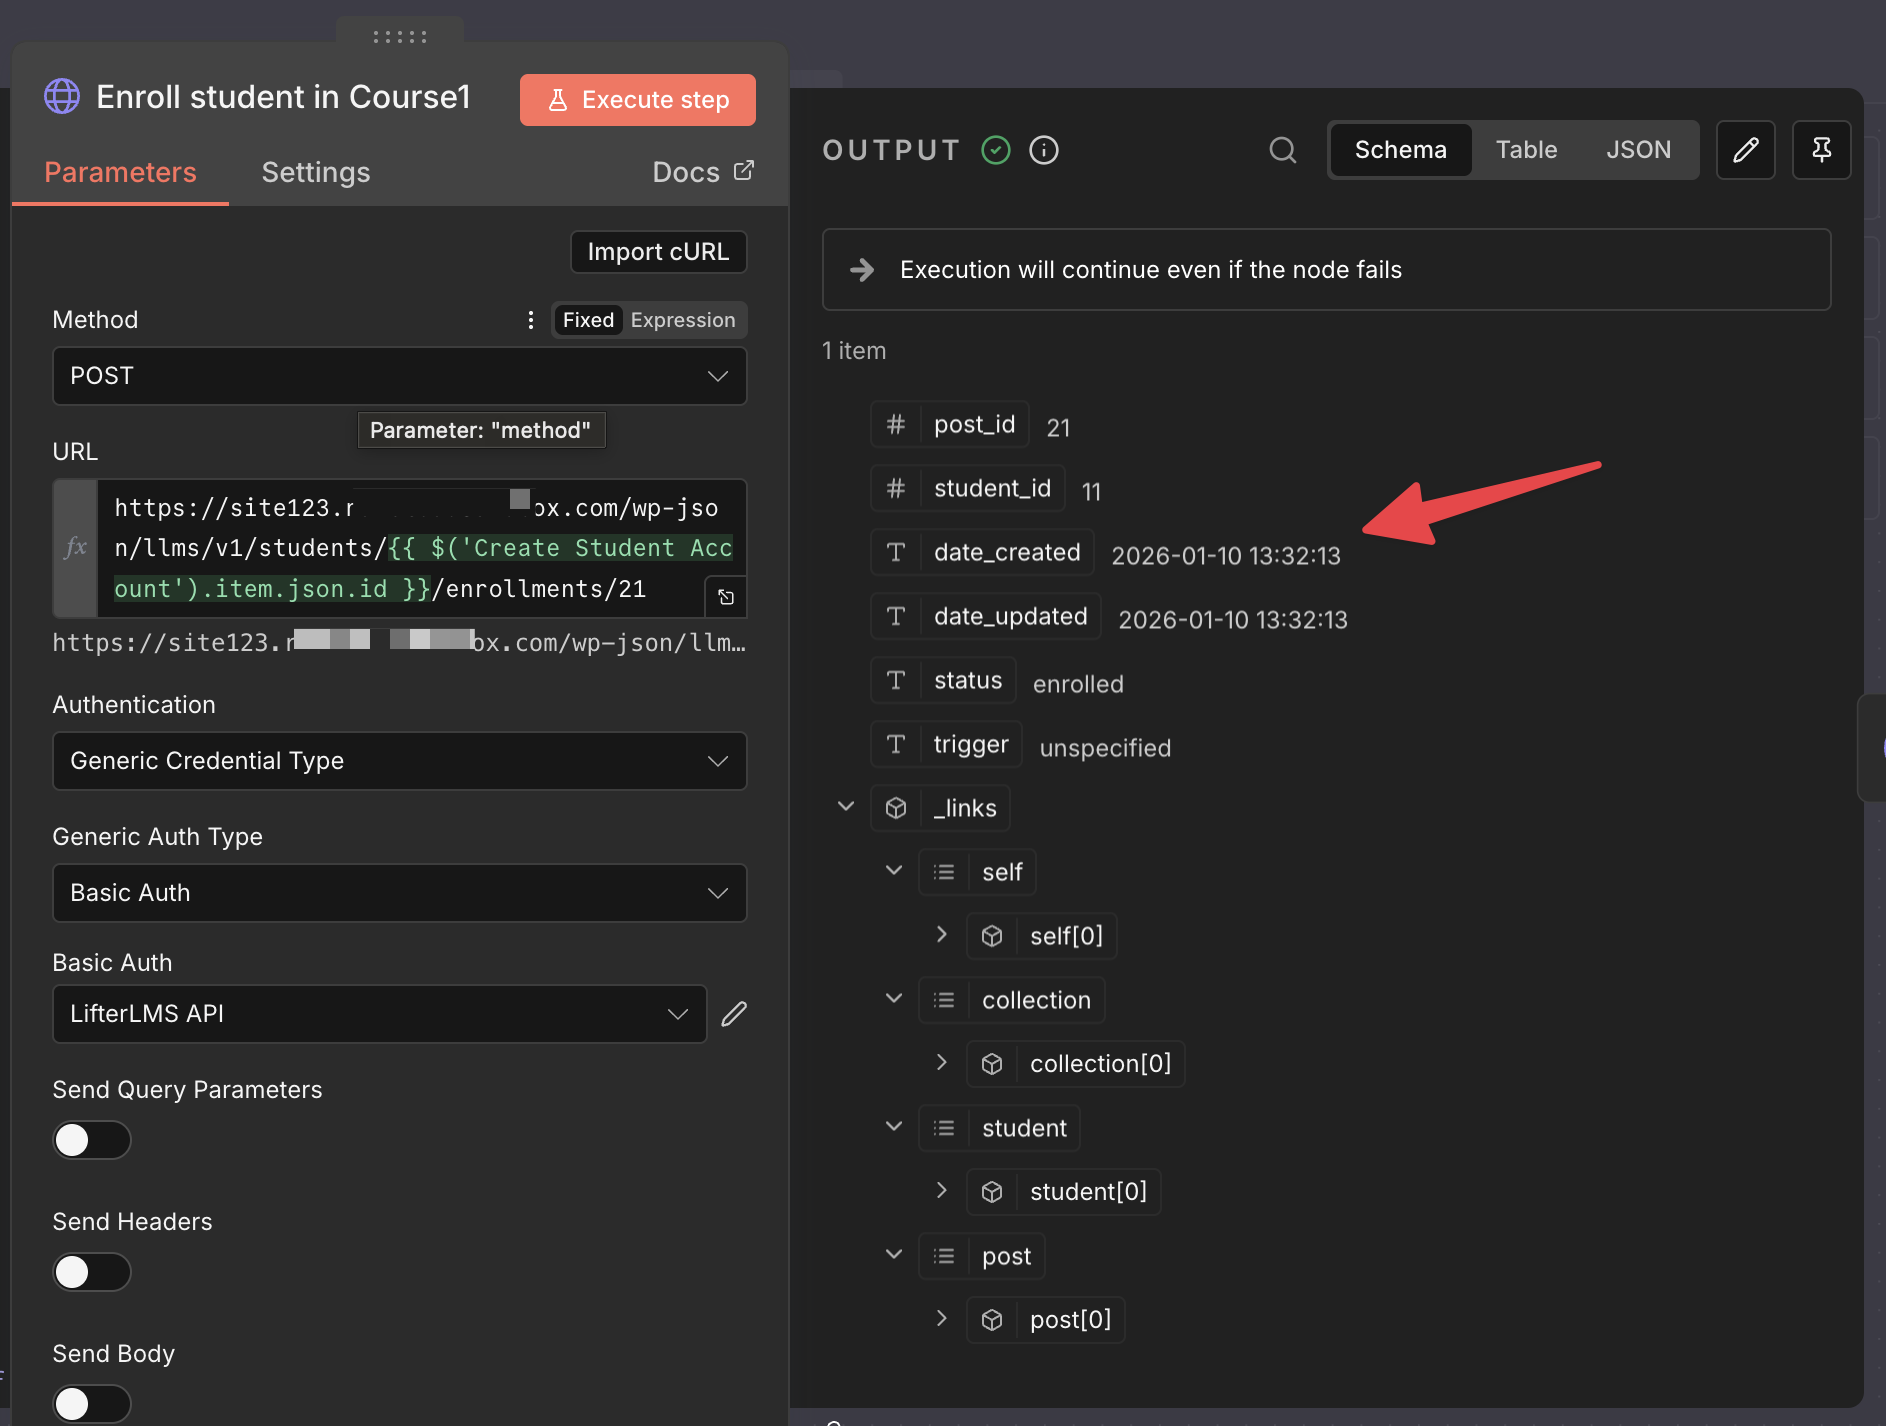
After creating the node, you can execute it to test it. If the student enrollment was successful, you will see the output on the right as shown in the previous example.
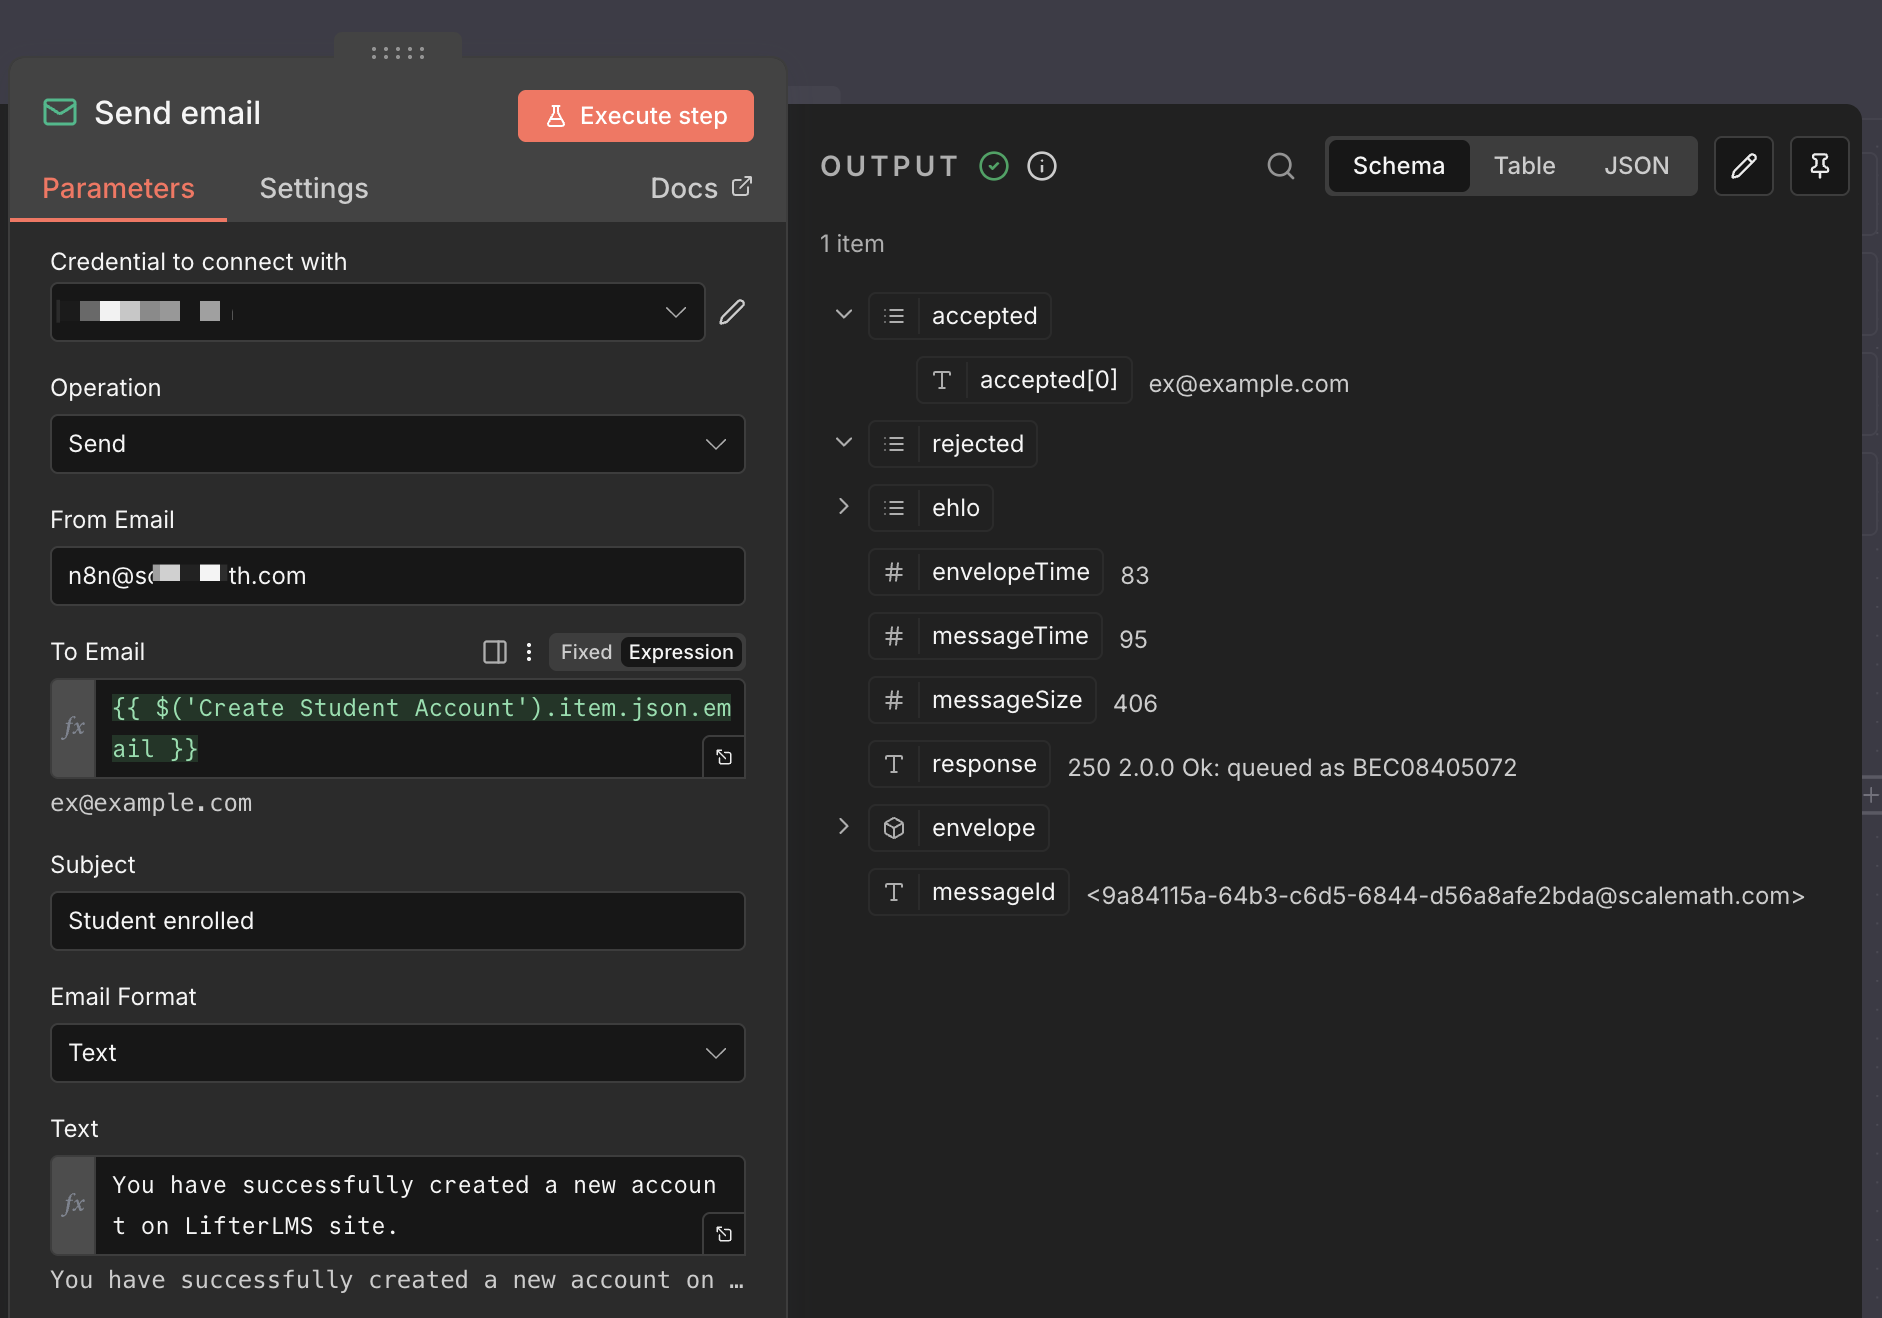
It is best practice to notify the student that their account is ready.
- Add a “Send Email” node to the end of your workflow.
- Select your preferred email service (such as Gmail, Postmark, or SMTP).
- In the “To Email” field, use the dynamic expression to select the student’s email address from Step 3.
- Enter a “Subject” like “Welcome to your Course.”
- In the “Text” or “Body” area, write a message welcoming the student and providing them with the link to log in to your site.
- Click the Execute step to test the email delivery.
Every automation requires a “start” signal, commonly called a trigger. This event triggers n8n to begin the enrollment process.
This approach is intended for situations where payments happen outside of LifterLMS. If you’re using LifterLMS’s built-in payment gateways, enrollment is handled automatically, and this workflow isn’t required.
This node will automatically listen for the purchase event and provide the necessary customer data (email, name, etc.) to Step 3: Create the Student Account, streamlining the entire automation setup.
For this tutorial, we will use a Web Form Trigger. This is the simplest way to learn because it lets you manually enter a student’s name and email to see the automation work in real time.
However, if you want to build a more professional and complex system, such as enrolling a student automatically when a payment is received on a site like Stripe, Shopify, or ThriveCart, you would use a Webhook Trigger. A webhook is a listener that waits for the external e-commerce site to “push” the customer’s purchase data into n8n as soon as the transaction is complete.
Option 1: Set up A Simple Form Trigger
Follow these steps to create a test form that will kick off your automation:
- Click the + icon on the n8n canvas to add a new node.
- Navigate to Trigger > n8n Form.
- In the “Form Title” field, type “Student Enrollment Test”.
- Click on Add Field to create the input for “First Name”.
- Click on Add Field again to create the input for “Last Name”.
- Click on Add Field a third time to create the input for “Email”.
- Click on Add Field a third time to create the input for “Password”.
- Click the Test Step button.
- n8n will provide a “Test URL.” Copy this URL and paste it into your browser to see your enrollment form.
When you fill out this form and click Submit, the data will be sent to the next step in your workflow to create the student account in LifterLMS.
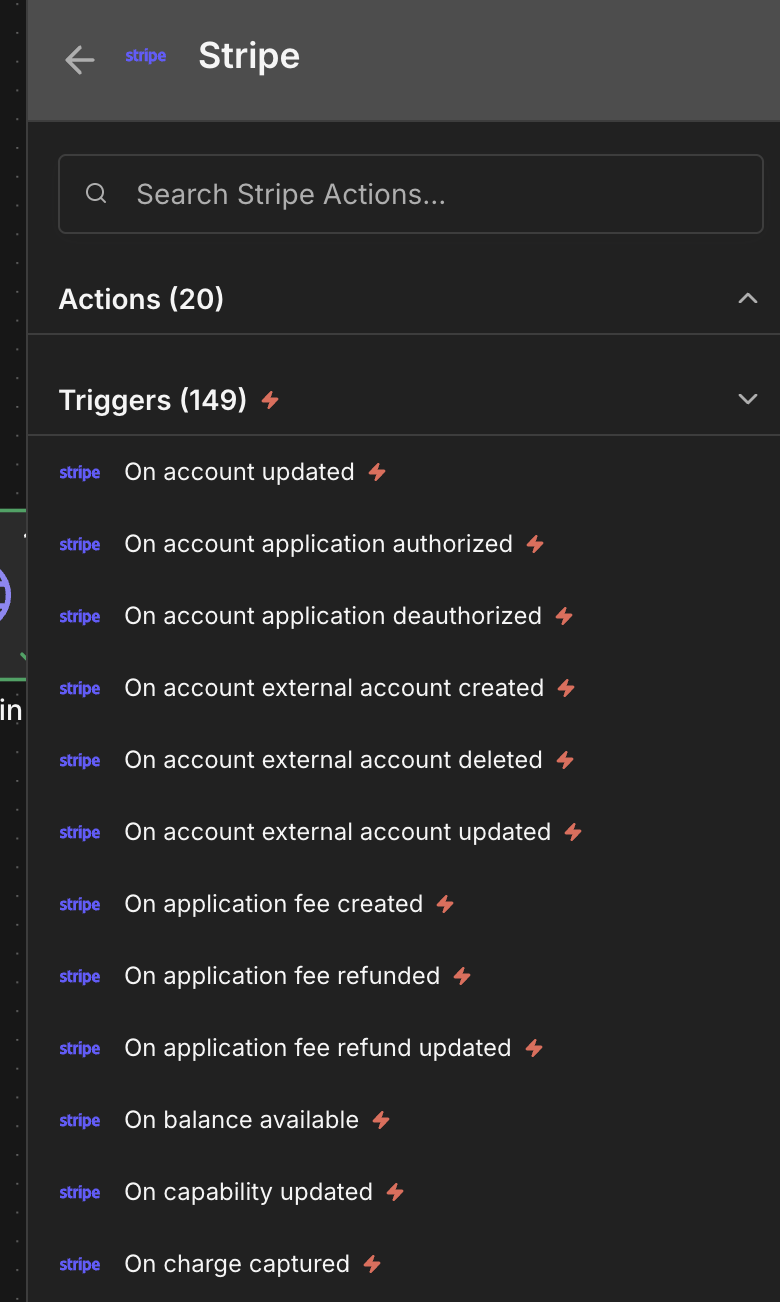
Option 2: Using a Built-in Payment Trigger Node
Instead of a Web Form Trigger or a generic Webhook Trigger, you can often use a more specialized node for your e-commerce platform.
Note: If you are using LifterLMS’s payment gateways (PayPal, Stripe, Authorize.net, or WooCommerce via the add-on), you will not need to use this external API automation flow, as LifterLMS handles enrollment automatically. This approach is primarily for connecting to external e-commerce platforms.
- Click the + icon on the n8n canvas to add a new node, then search for your platform (e.g., Stripe, PayPal, Shopify, Wise).
- Select the corresponding node (e.g., Stripe Trigger).
- Configure the node using your platform-specific credentials (which you will need to set up in n8n’s Credentials section).
- Set the Trigger Event to an appropriate signal, such as “Checkout Session Completed” (for Stripe) or “Payment Captured” (for PayPal).
The steps outlined in this guide show just one use case for the LifterLMS REST API. The API supports almost every action available within the core LifterLMS plugin, opening the door to countless custom integrations and automation scenarios.
You can use the API to:
- Manage lessons, quizzes, and sections.
- Retrieve or update student progress and achievements.
- Create or revoke access to memberships.
- Handle group enrollments.
For a complete and detailed exploration of all available endpoints, required parameters, and response structures, please refer to the official LifterLMS API documentation.


