Course creators often want to add live instructor-led training to their self-paced online courses. Blended learning combines live sessions with your digital training to improve student engagement and deliver better results. Whether that involves:
- Hosting a weekly virtual coaching call.
- Organizing an in-person training workshop.
- Running an exclusive online mastermind group.
The goal is simple. Running those live sessions smoothly often is not.
Most online learning platforms treat event management as a completely separate task.
Creators are pushed to install complex third-party calendar plugins, manually email meeting links to students, or answer endless questions about when the next session starts.
What should feel like an engaging learning experience quickly turns chaotic. And that friction matters because it:
- Creates confusion for your enrolled students.
- Increases support requests about missing links.
- Quietly lowers your live attendance rates.
The LifterLMS Events add-on can help you manage virtual or in-person schedules directly inside your WordPress LMS without having to juggle different apps.
Why You Need the LifterLMS Events Add-On
The LifterLMS Events add-on is designed to bridge the gap between static content and real-time student engagement. There are many benefits of integrating this tool into your WordPress learning management system:
- Attach events directly to learning material: You can attach live events directly to your lessons, courses, or memberships to create a blended learning experience. This integration allows you to combine traditional online learning modules with real-time webinars, weekly coaching calls, or physical workshops.
- Protect your links with dynamic visibility: This feature prevents non-enrolled students from viewing your event locations and digital meeting links. If an unenrolled user views your course page, the system automatically hides your private meeting links and displays the schedule as a promotional teaser. This built-in security measure prevents unauthorized access to your premium virtual classes and protects the value of your LMS program.
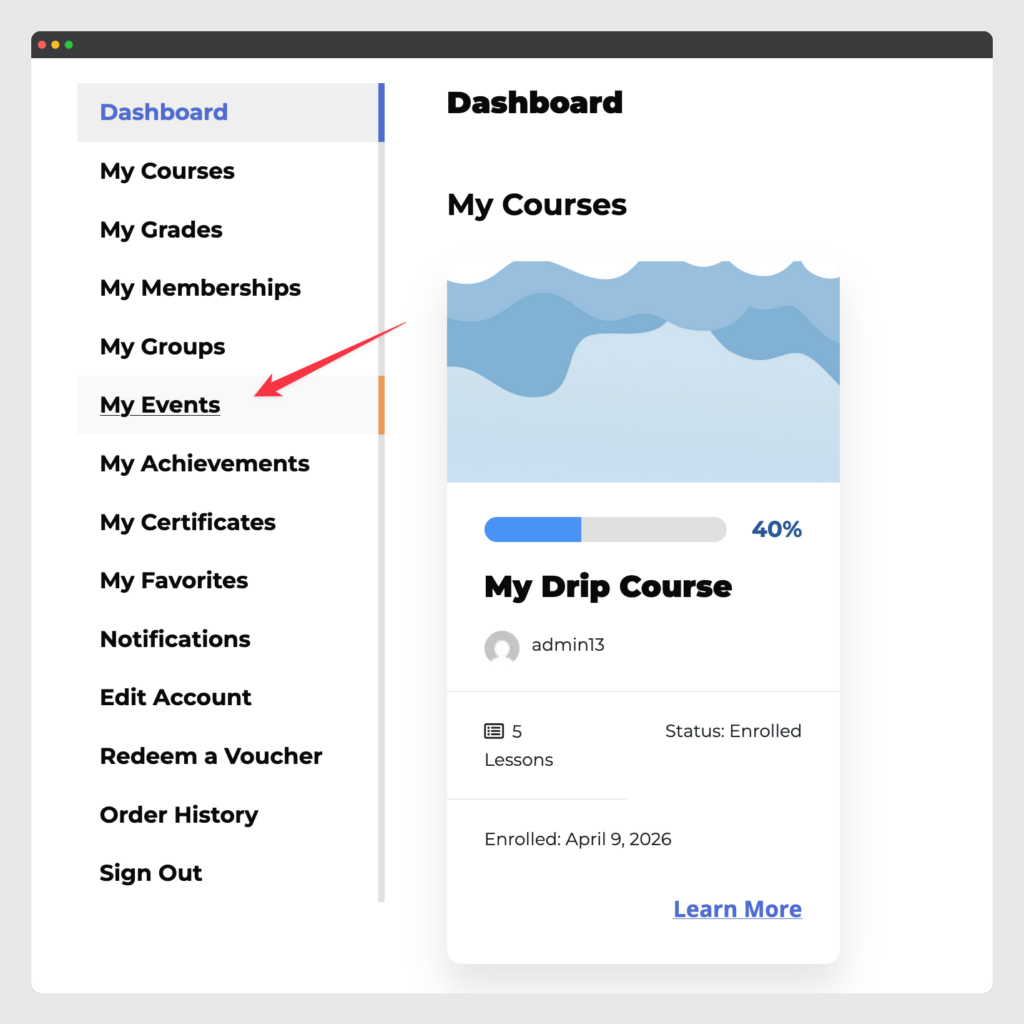
- Track schedules in a dedicated dashboard: After installing the add-on, your students can easily view their upcoming and past training sessions by navigating to Student Dashboard > Events to view their personalized schedule. This reduces student confusion, decreases your daily support emails, and ensures your learners never miss an important live lesson.
How to Connect Your Zoom Account
Managing multiple live classes manually can cost course creators hours of administrative work every month. The direct Zoom integration saves you time by generating unique meeting links automatically for every new event.
When you connect your Zoom account directly to LifterLMS, you won’t need to manually create meetings and paste links into WordPress. This automation can help reduce manual errors, and makes it easier for students to access the correct virtual classroom.
Follow these steps to set up your Zoom connection:
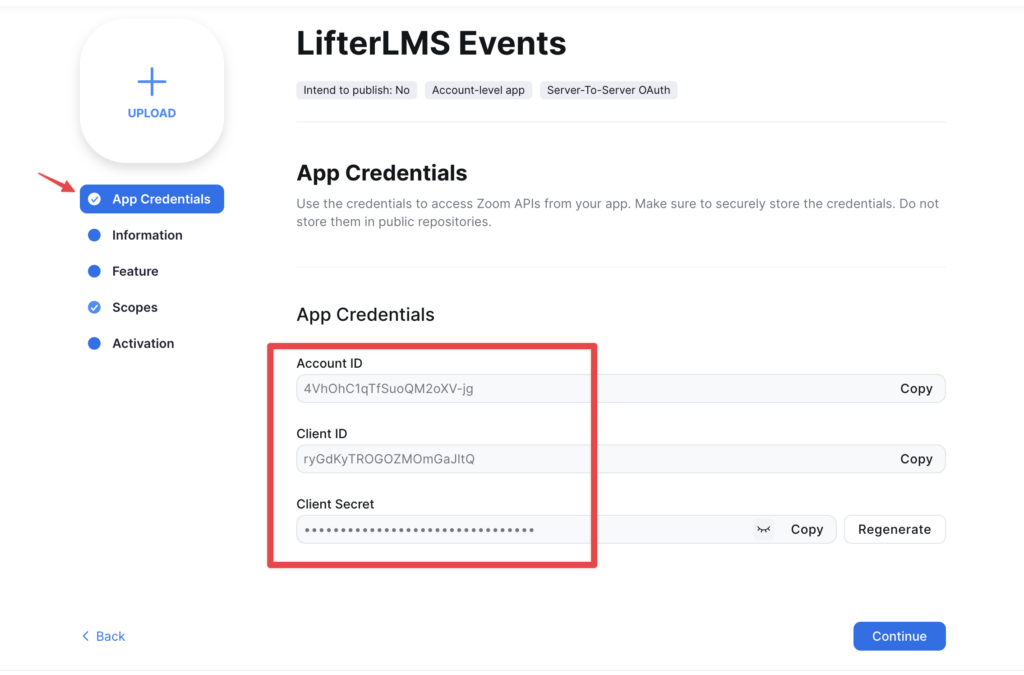
- Open your Zoom developer account and create a new Zoom app.
- Grant the required meeting permissions and activate your app to generate your secure credentials.
- Open your WordPress dashboard and navigate to LifterLMS > Settings > Integrations.
- Click on the “Events” link to open your event settings.
- Paste your Zoom credentials into the provided boxes.
- Click the Save Changes button to authorize the connection and activate the integration.
Building Your First Live Learning Event
Creating a new event is very easy because the LifterLMS Events add-on lives directly in your WordPress website. You don’t need to learn a complicated new software platform to schedule your coaching calls or webinars.
This helps you launch live training sessions quickly and keeps your daily workflow entirely inside your WordPress dashboard.
Whether you plan to host a physical workshop in your city or a virtual global masterclass, the setup process takes only a few minutes.
Follow these steps to create and publish your first live session:
- Open your WordPress dashboard and navigate to Events > Add New Event.
- Type a descriptive name for your session into the main title box so your students instantly understand the topic.
- Select your start and end dates using the calendar and clock fields.
- Type a physical street address into the “Location” box for an in-person gathering, or check the “Generate Online Meeting” box to use your active Zoom integration.
- Scroll down your screen to the “Linked LifterLMS Product” section and search for the course or membership you want to associate with this new event.
- Click the Publish button to save your work and automatically update the calendars for your enrolled students.

Showcasing Your Event Schedule on Your Website
Once you create your live sessions, you’ll need to make sure your students and potential customers can find them easily.
LifterLMS automatically displays your upcoming schedule at the bottom of any connected course or membership page. This ensures your students can immediately see their upcoming virtual classes or workshops without having to navigate away from their primary learning material.
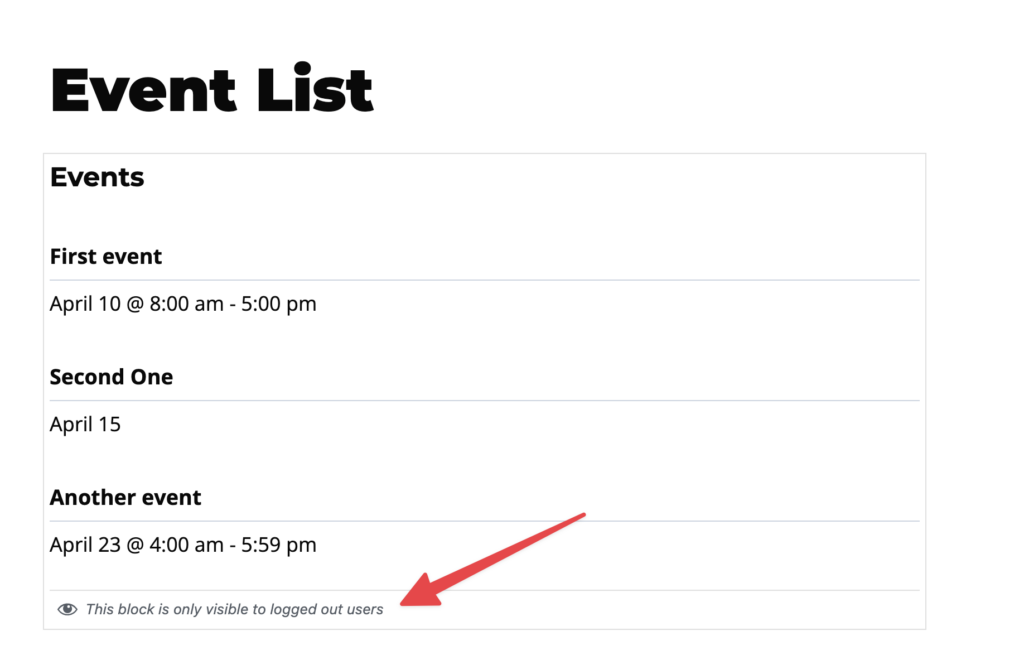
However, you might want to display your calendar elsewhere on your website, such as your homepage or a dedicated public schedule page. You can easily achieve this using the LifterLMS Events block to show your schedule on any standard WordPress page.
The block settings also include an “Enrollment Visibility” option that controls who can see your event list. This feature allows you to customize the user experience based on their enrollment status. You can show the block exclusively to “Enrolled users” to maintain a private schedule for your active students.
Alternatively, you can use the calendar as a highly effective marketing tool by showing it only to “Non-enrolled users or visitors” to demonstrate the active community they will join when they purchase your LMS program.
Follow these steps to display your events on a custom page:
- Open your WordPress dashboard and navigate to Pages > Add New.
- Click the block inserter icon to add a new element and search for “LifterLMS Events”.
- Select the block to place it on your page.
- Look at the block settings on the right side of your screen and find the “Enrollment Visibility” section.
- Choose either “Enrolled users” or “Non-enrolled users or visitors” from the dropdown menu to set your audience.
- Click the Publish button or the Update button to save your changes and make your calendar live.
Conclusion and Next Steps: Make Running Live, Instructor-Led Training Easy
The LifterLMS Events add-on gives you flexible tools to keep your students organized and engaged throughout their learning journey. By combining your standard LMS courses with real-time webinars, group coaching calls, or physical workshops, you can create a highly valuable blended learning environment.
- If you already use LifterLMS, you can add Events to your LMS today:
Learn more & get started with the LifterLMS Events Add-on. - If you’re still evaluating WordPress LMS plugins:
This is one more way LifterLMS removes barriers between interest and purchase.
There are two ways to start using LifterLMS Events Add-On:
You can purchase the add-on individually or as part of the Infinity Bundle.
The Infinity Bundle provides the best overall value because it grants you instant access to all of the advanced LifterLMS functionality, including but not limited to Events, and…
- All Ecommerce Add-Ons (Stripe, PayPal, and WooCommerce)
- The Sky Pilot Theme
- The Cart Abandonment Recovery Add-On
- Email Marketing & CRM Add-Ons
- Form Integration Add-Ons
- Weekly Mastermind Calls & Private Facebook Group Access
Get LifterLMS Gifts and everything else LifterLMS has to offer as a part of the Infinity Bundle: