
Getting Started with LifterLMS Course Cohorts
This guide explains the benefits of course cohorts and how they function within LifterLMS. It also includes step-by-step instructions for installing and using the Course Cohorts add-on.
A cohort is a group of people who share a characteristic over a specific, shared period of time. For example, the graduating class of Course 2 at MIT in 2024 represents a cohort. The defining characteristic is Course 2, and the shared period spans from 2020 to 2024.
When a group of learners begins and progresses through a LifterLMS course together, we call that a course cohort.
You can encourage students to progress through a course together by requiring them to enroll during a specific enrollment period and complete the lessons within a set access period. The Course Cohorts add-on prompts you to configure these dates when you create a cohort, but both settings are optional and can be added later.
A course cohort uses the same underlying course structure as any other LifterLMS course. The difference lies in how the course is used and managed.
The Course Cohorts add-on creates a separate copy of the course for each cohort. For example, you might create ‘Course 2 – 2024 Cohort’ and ‘Course 2 – 2028 Cohort.’ Each course has its own enrollments, student progress, dates, and settings, allowing each group to complete the course independently.”
This preserves the intended explanation while removing the confusing claim that learners taking the same course together do not form a cohort. The add-on creates separate courses, each with a different post ID, for each cohort.
Follow these instructions to get the Course Cohorts add-on running on your website.
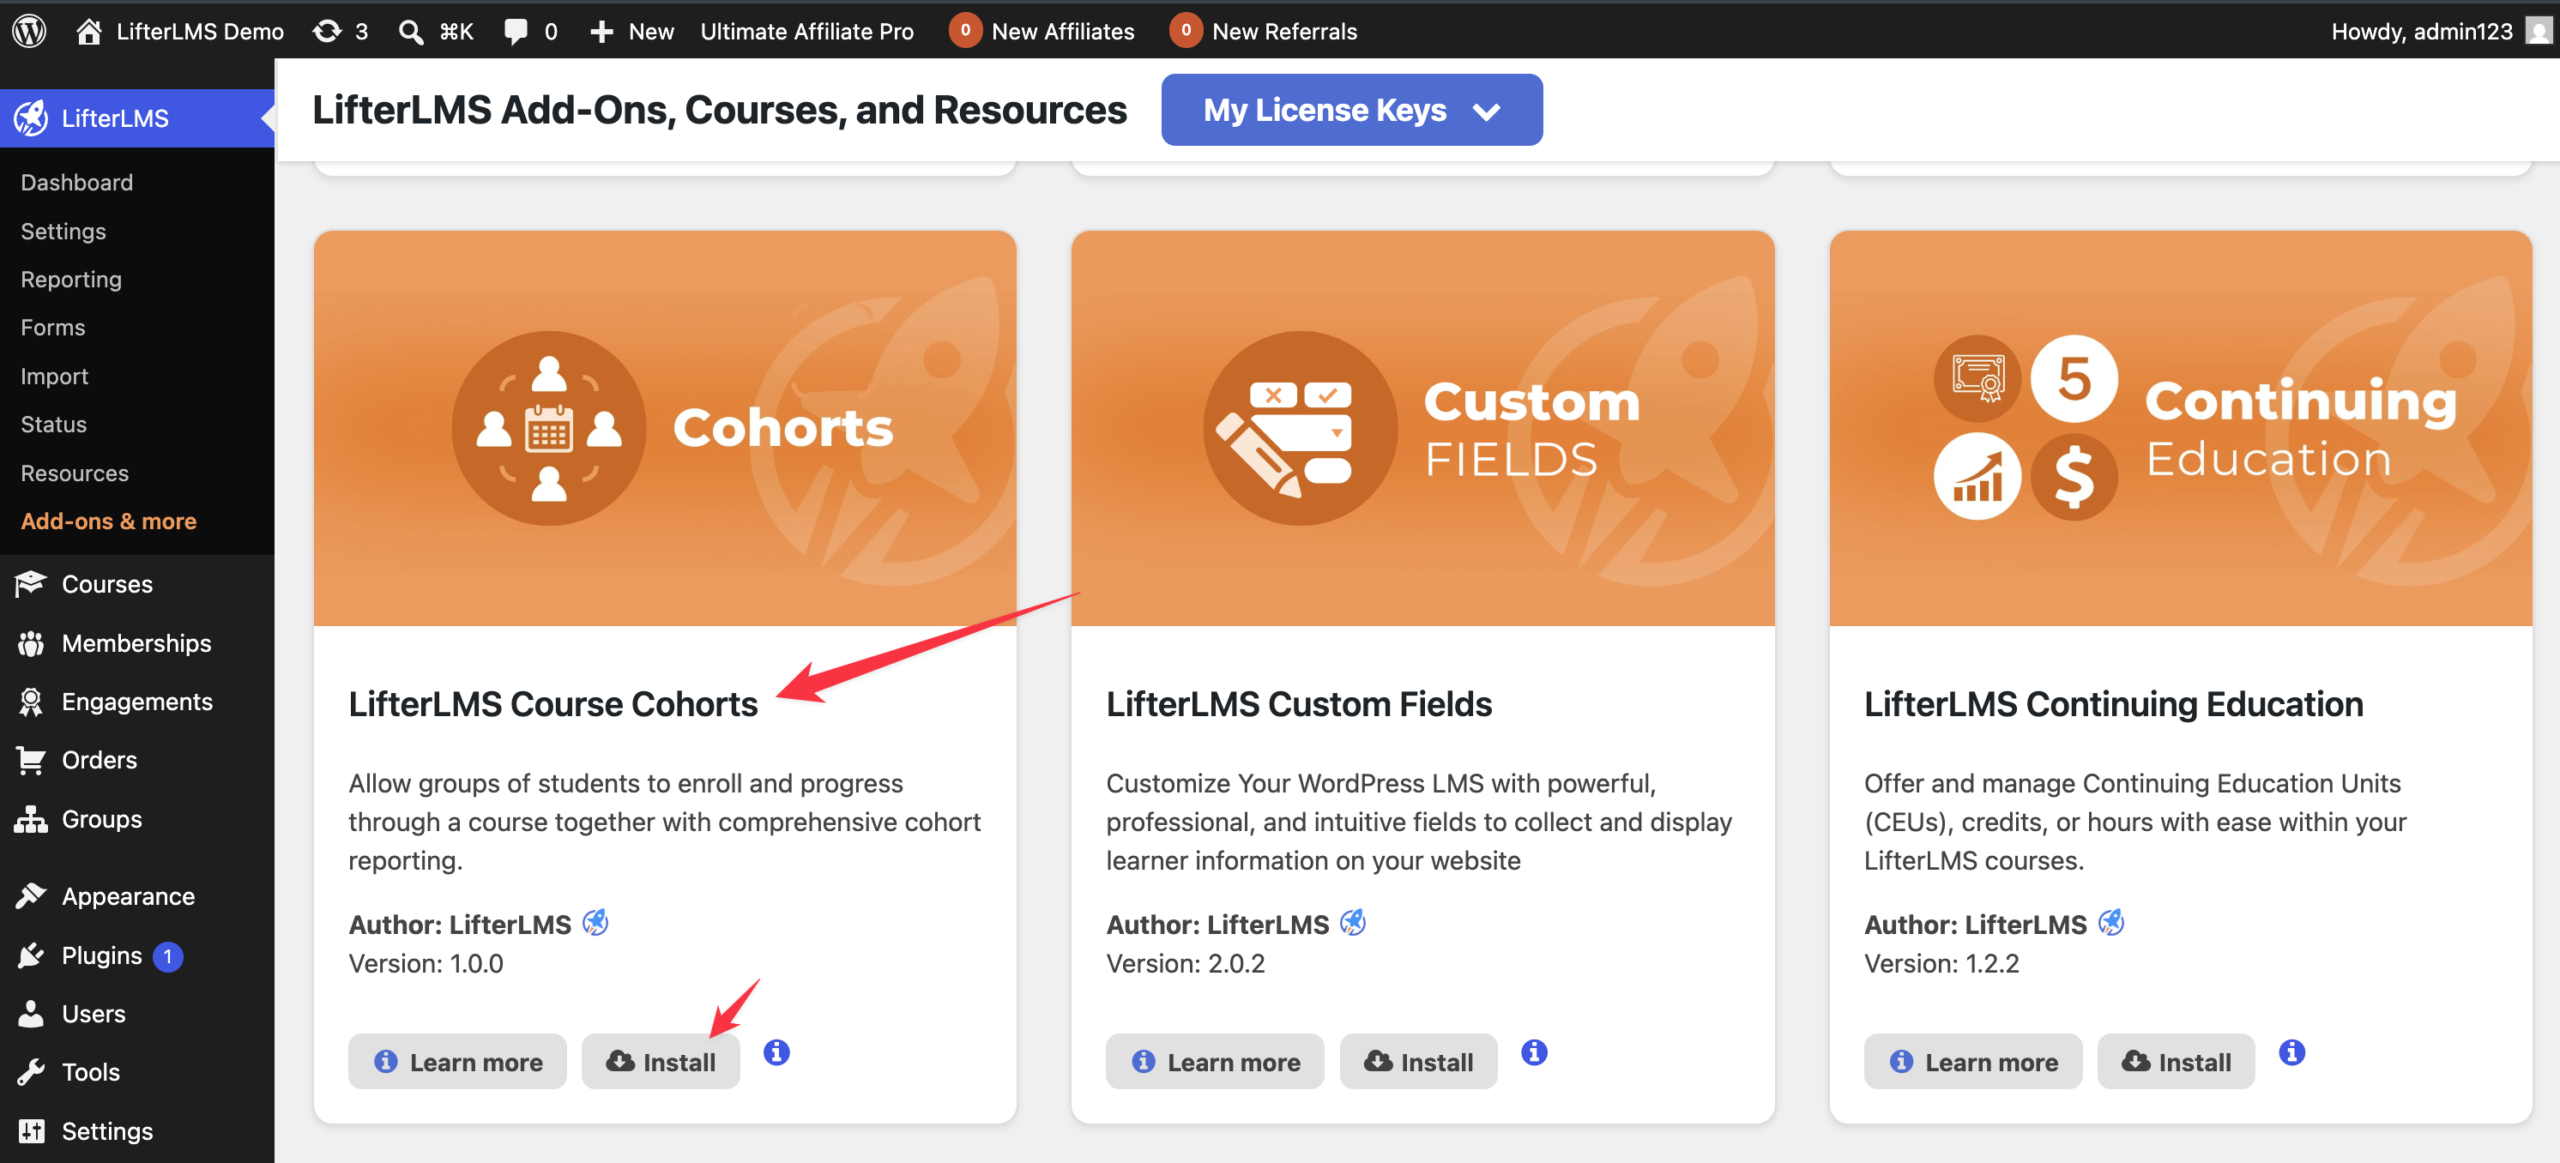
- In your WordPress dashboard, navigate to the LifterLMS > Add-Ons & More tab and look for the “LifterLMS Course Cohorts” add-on. Click the Install button, then the Activate button next to it. Alternatively, you can download the add-on as a ZIP file from your LifterLMS account and upload it to your website.
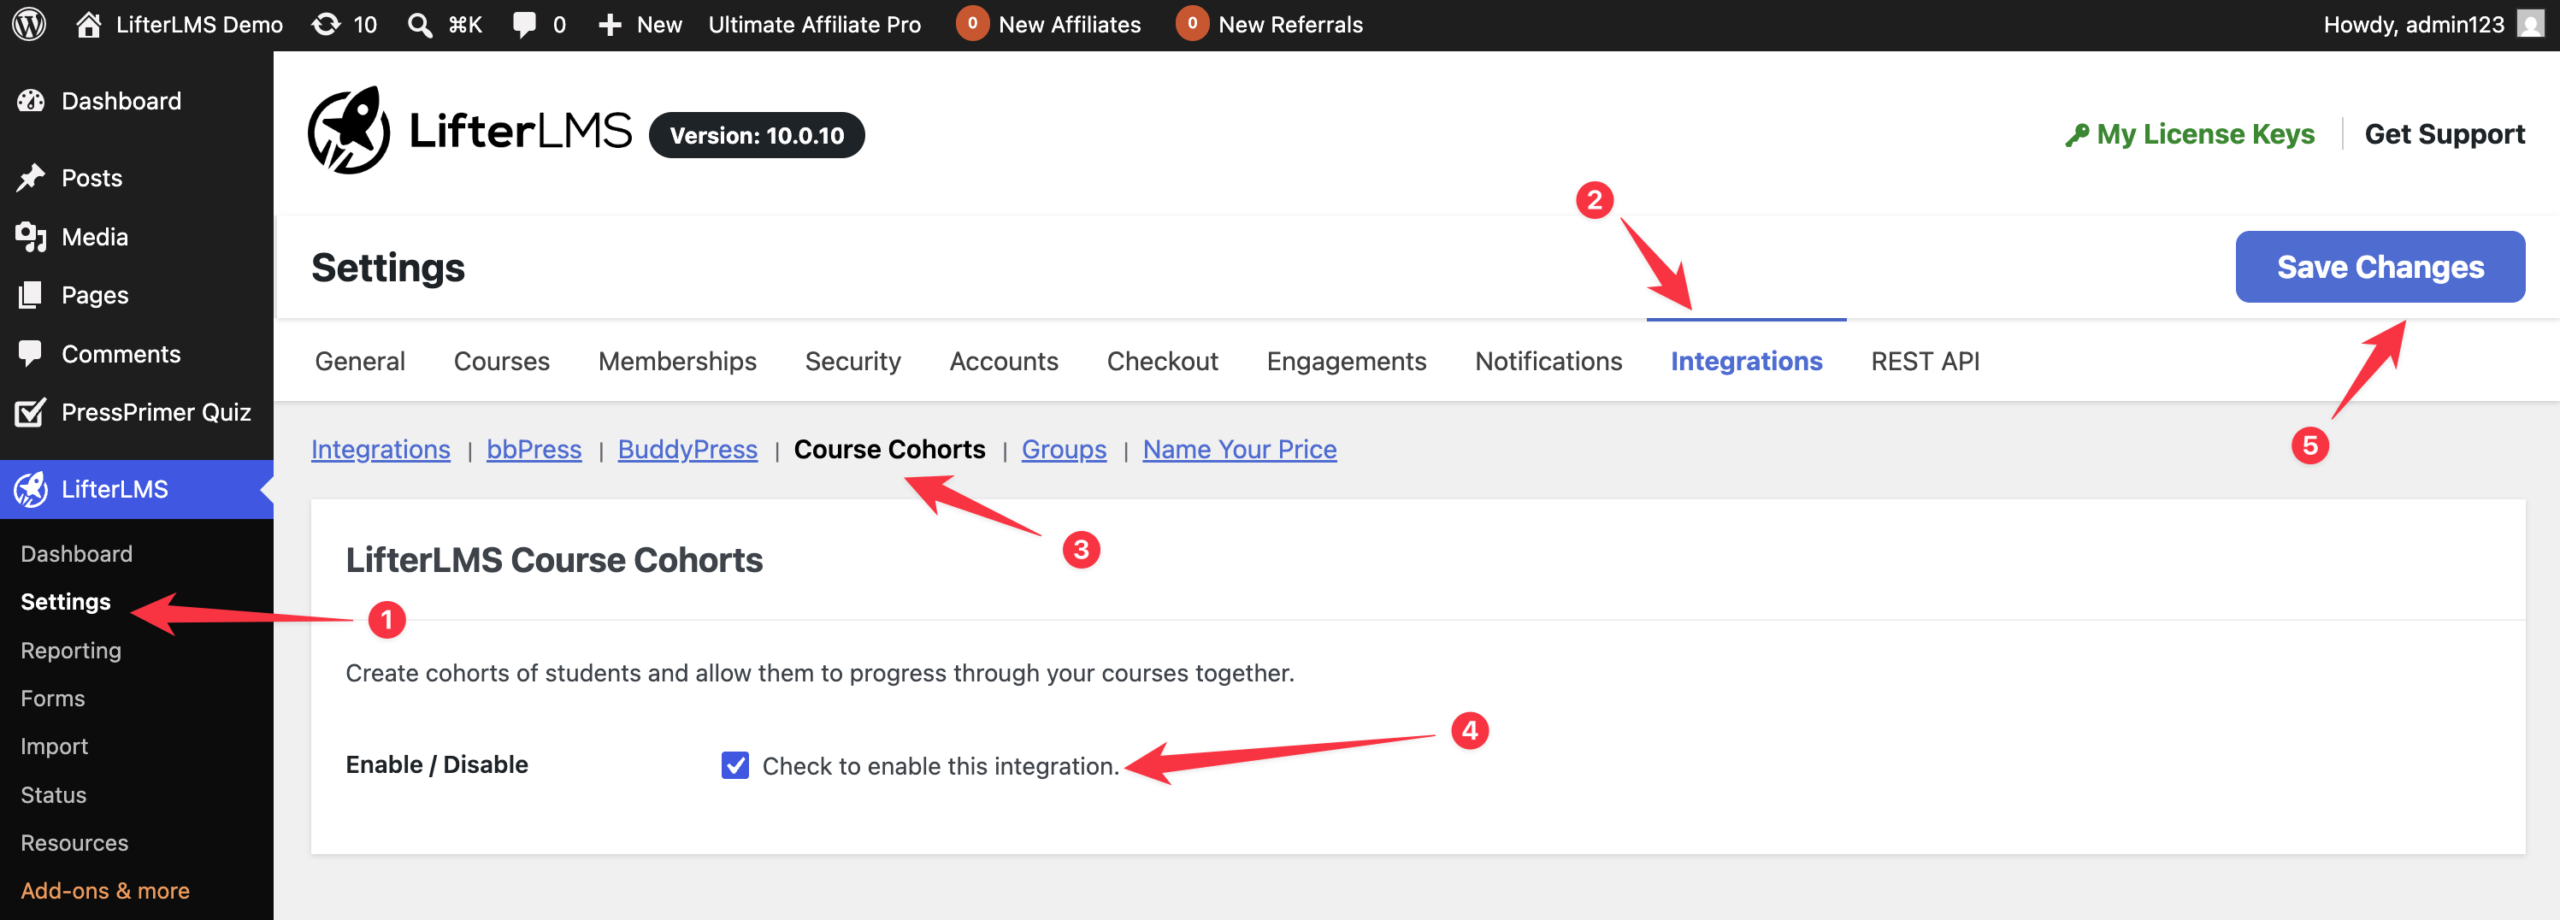
- Navigate to LifterLMS > Settings > Integrations > Course Cohorts.
- Check the box next to “Enable / Disable” to turn on the integration.
- Click the Save Changes button.
Follow these steps to create your first cohort from an existing course.
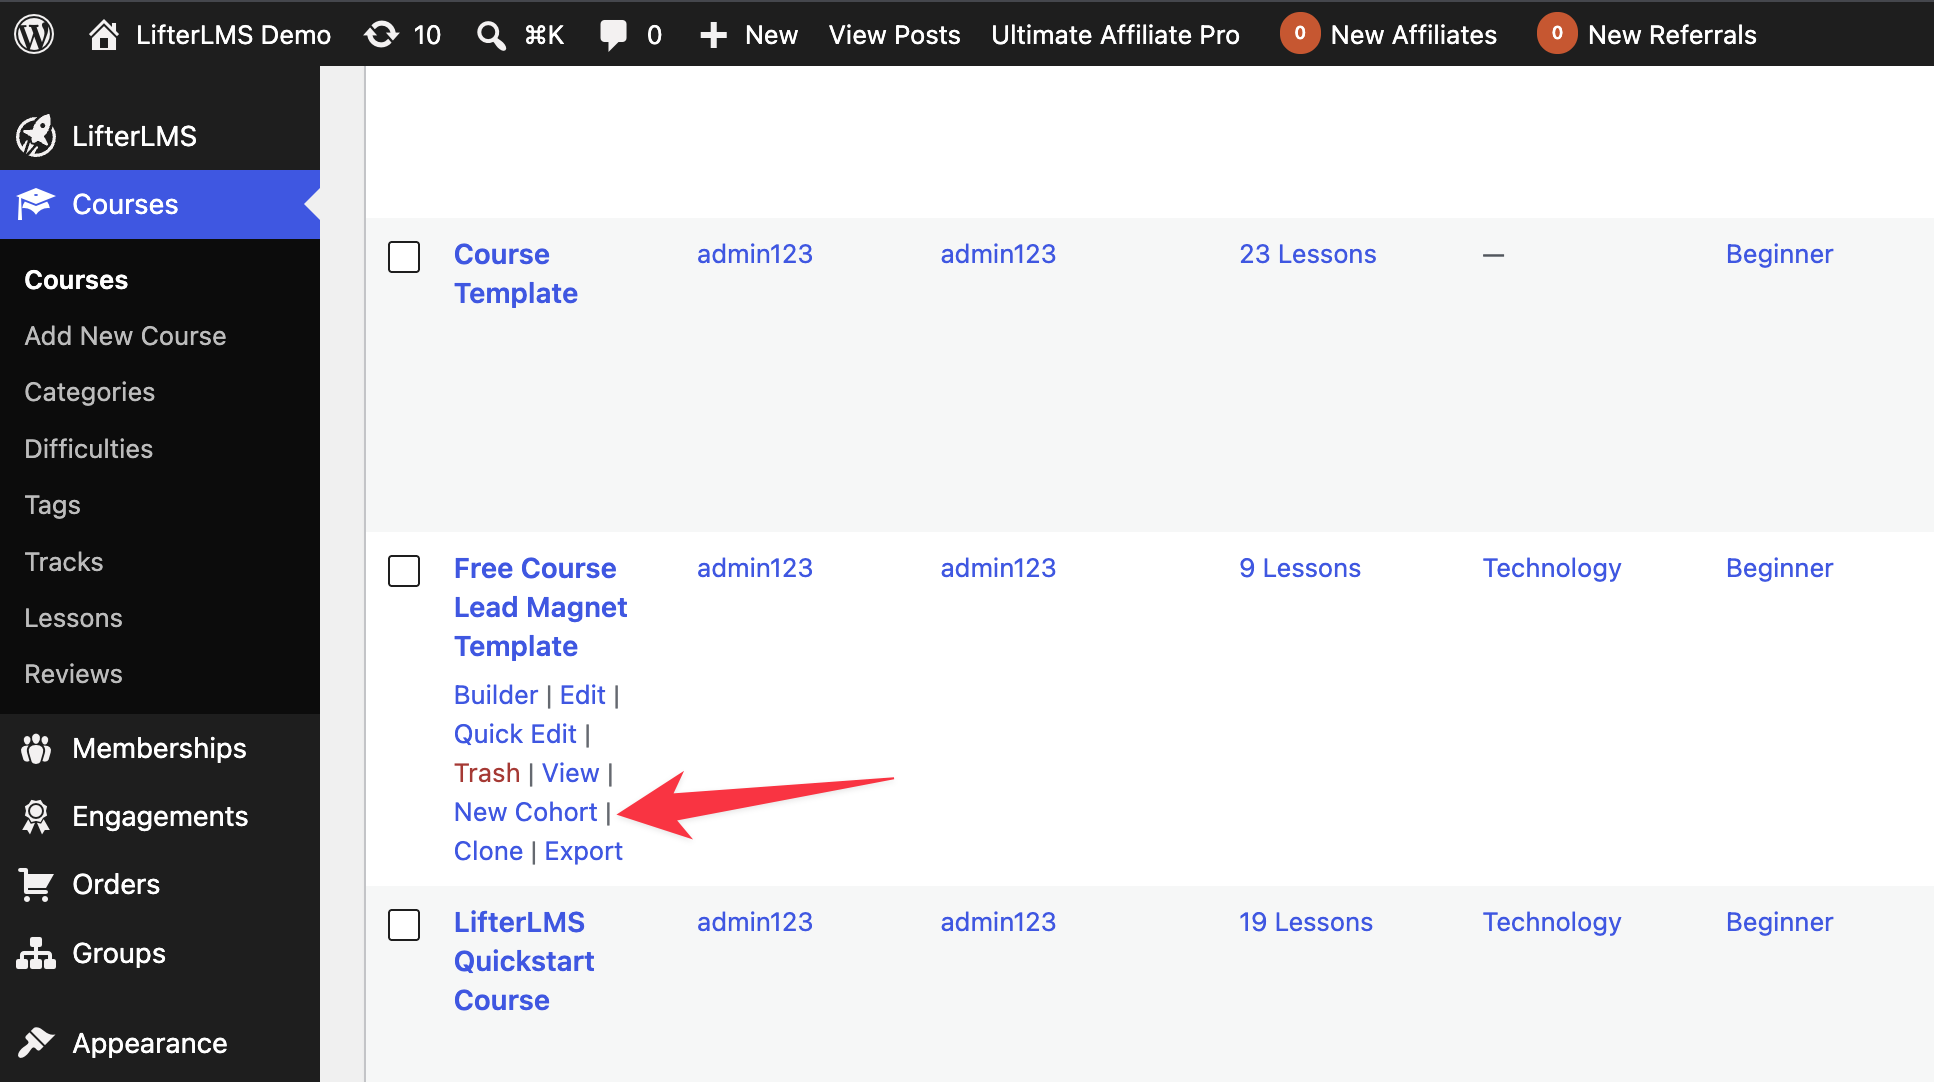
- Navigate to WordPress Dashboard > Courses.
- Hover your mouse over the name of the course you want to use.
- Click the New Cohort button.
- On the next screen, click the Create Cohorts Now button.
- Type a name for your new course cohort in the text field. Make sure that your new title clearly communicates that the course is a cohort.
- Click the Save & Continue button.
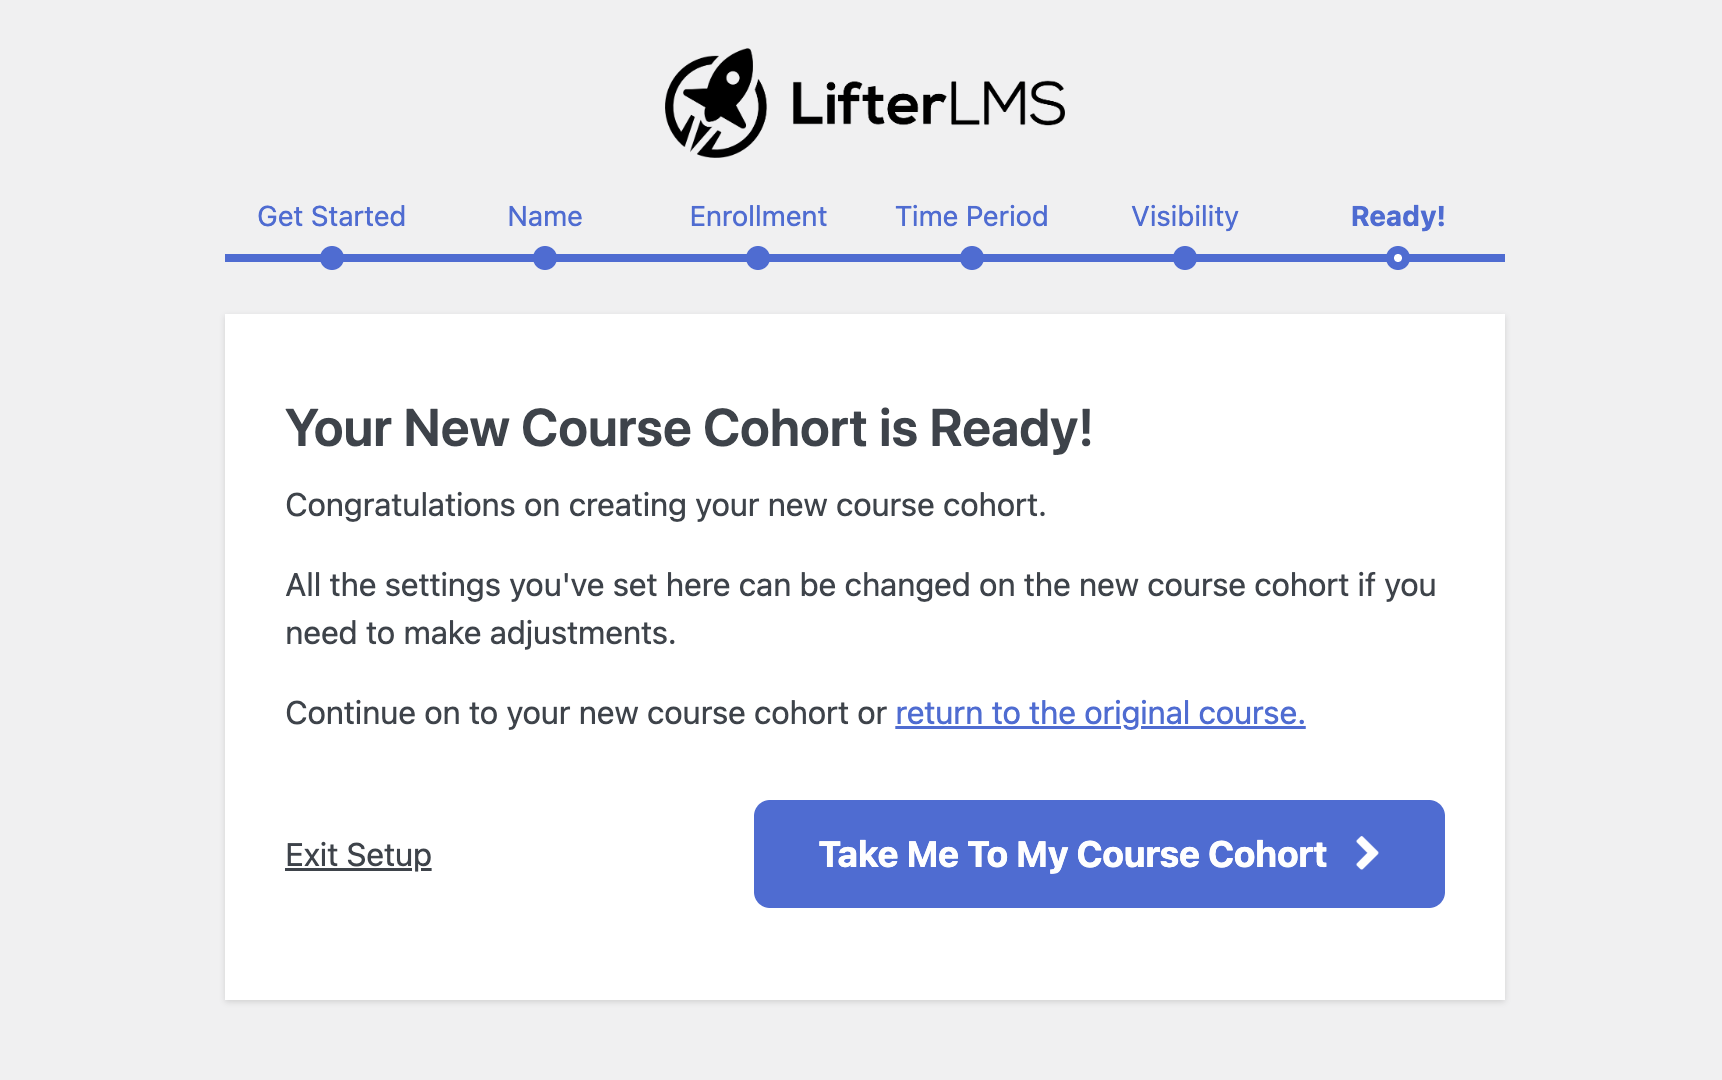
- On the next screen, you can choose an enrollment period by entering a start date and an end date. You can skip this step and add an enrollment period later if you prefer.
- After that, you can choose a course access period by entering a start date and an end date. You can skip this step and add an access period later if you prefer.
- Optionally, you can reset the lesson drip settings if the original course uses drip settings that start on a specific date.
- If you want new visitors to see only the cohort in the course catalog, hide the original course from the catalog.
- Finally, you can select the check box to disable new enrollments for the original course.
- Click the Take Me To My Course Cohort button to finish creating your new cohort and open it in the WordPress block editor.
Sometimes students need to retake the same course multiple times to earn a new certificate each time they complete it. To achieve this, you need to create a new course cohort every time you run the course. This process ensures that students start each new attempt from scratch and cannot rely on past progress.
The instructions below assume you already know how to create engagements and use them to award certificates.
- Create a new cohort by following the steps in the “How to use the add-on” section above.
- Navigate to WordPress Dashboard > Engagements > Certificates. You can skip this step if you plan to reuse an old certificate template.
- Edit your existing certificate template, or use a duplicate post plugin to clone an old template and make your changes.
- After that, navigate to WordPress Dashboard > Engagements and locate the engagement that awards the certificate upon completion of the original course.
- Create a new engagement for the cohort. You can configure it from scratch or use a duplicate post plugin to copy the original engagement and then update the copy.
- Locate the “Triggering Event” dropdown menu.
- In the ‘Triggering Event’ dropdown menu, select the event that should award the certificate. For example, select ‘Student Completes a Course.’
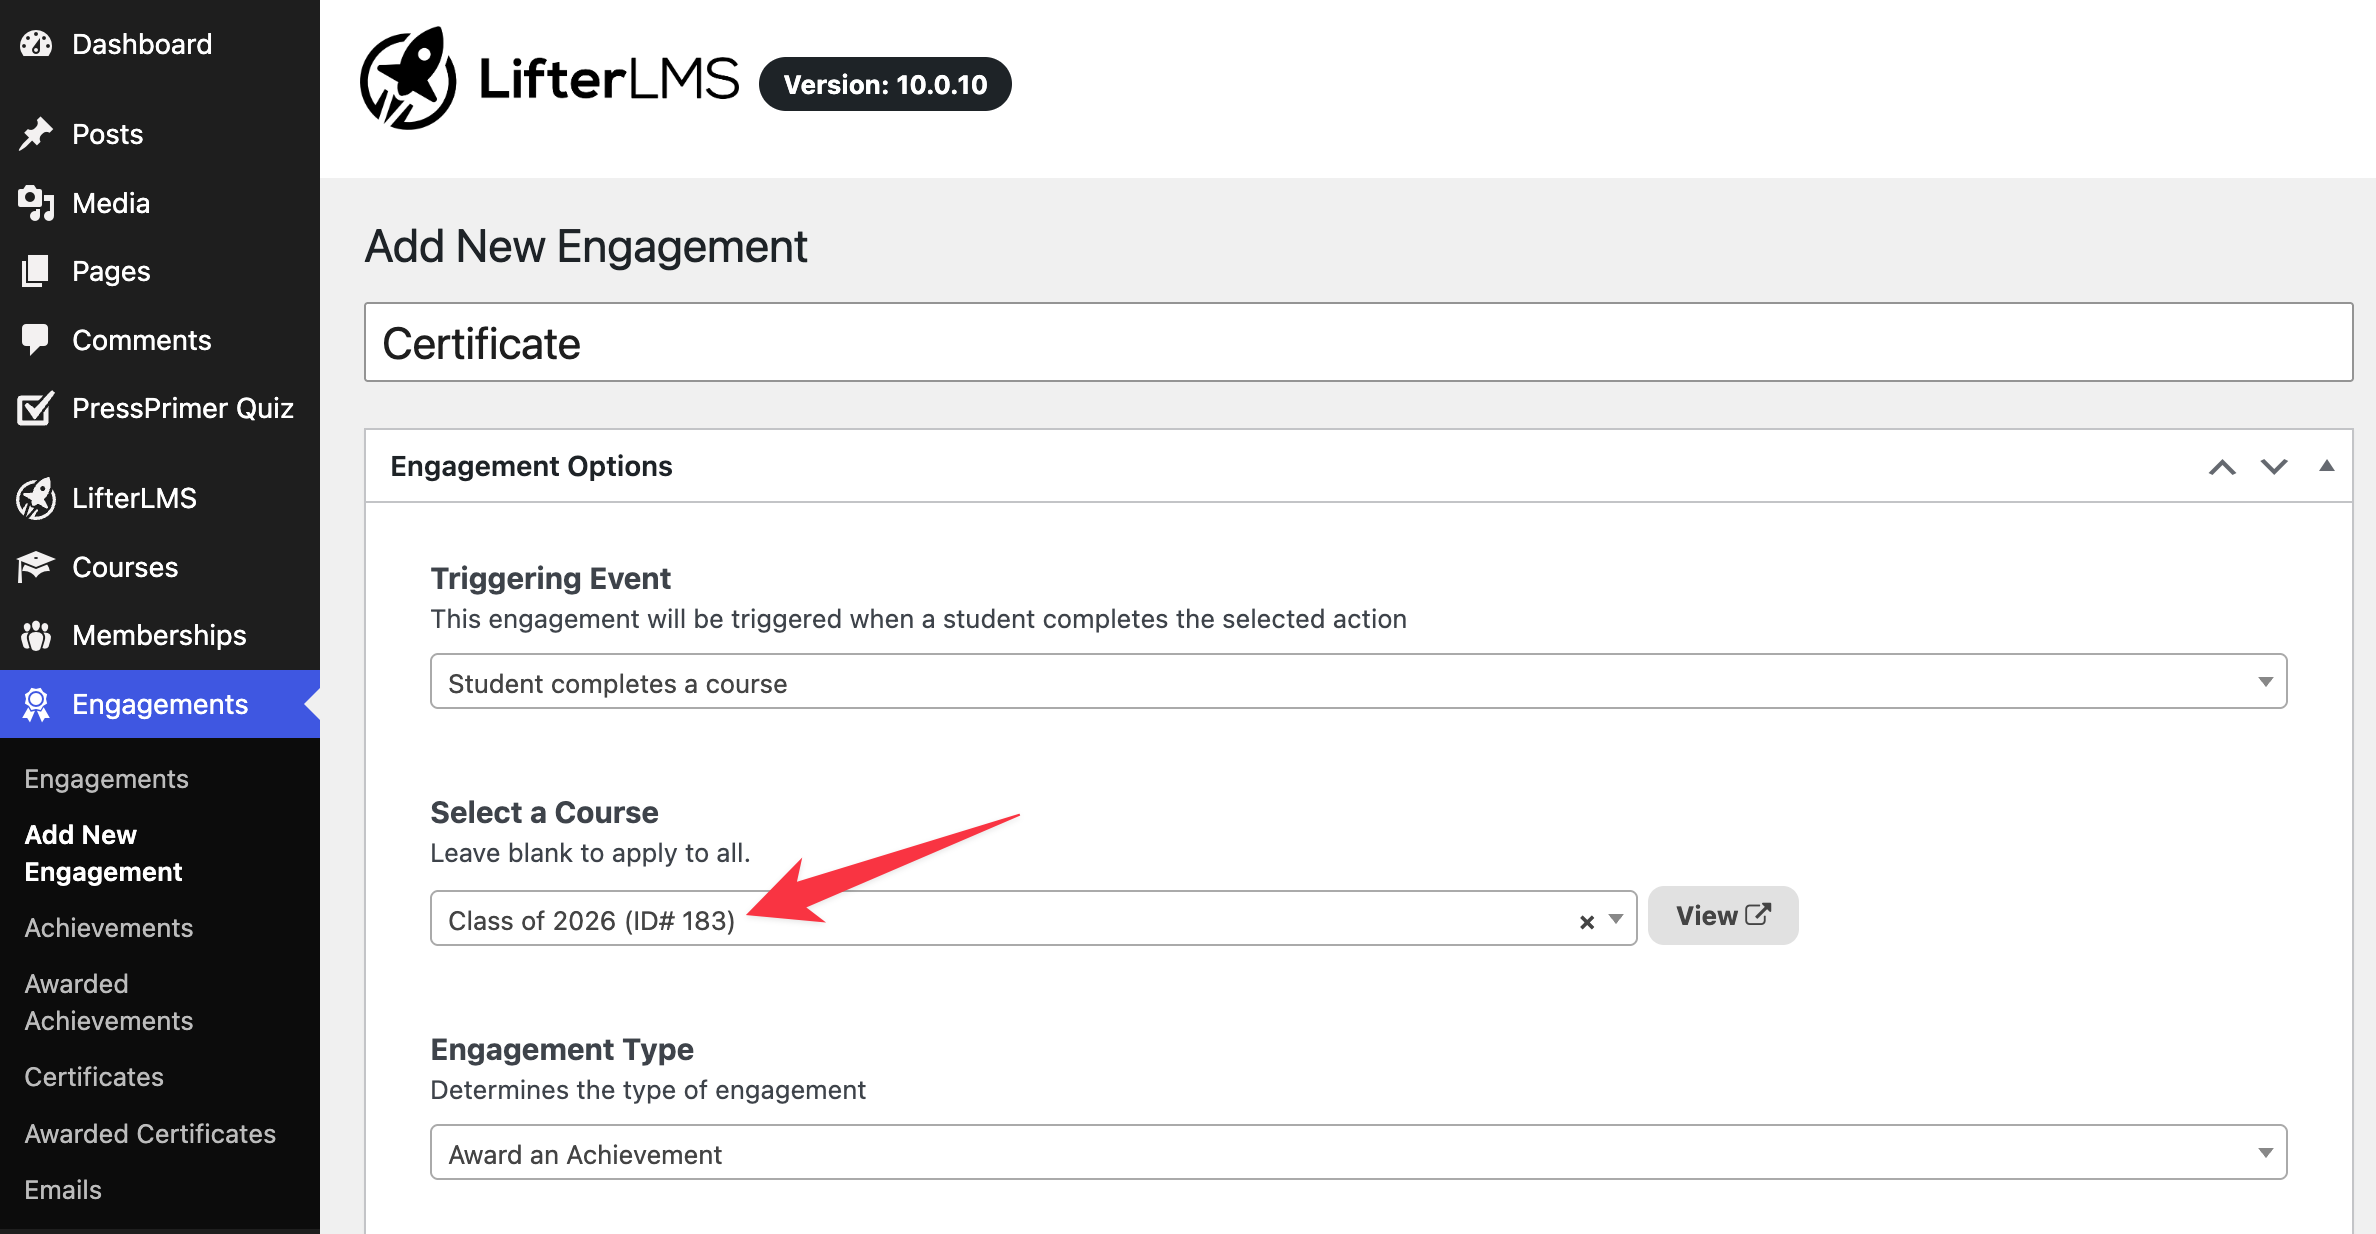
- In the dropdown menu that appears beneath the triggering event, select the relevant quiz, section, lesson, or course. For a course-completion trigger, select your new cohort in the ‘Select a Course’ dropdown menu.
- In the ‘Engagement Type’ dropdown menu, select ‘Award a Certificate.’
- In the ‘Select an Engagement’ dropdown menu, select the certificate template that students should receive. This can be either a new template or an existing one.
If you prefer a visual demonstration, watch the Course Cohorts recertification video to see these steps in action.
You can find more helpful information by reviewing these related topics: