
How to Edit LifterLMS Courses and Lessons With Elementor
You can use Elementor to edit the main content and layout of individual LifterLMS courses and lessons. LifterLMS and your WordPress theme continue to control other parts of the learning interface.
To get started, install and activate Elementor, then enable it for the LifterLMS course and lesson post types.
Elementor may not be enabled for LifterLMS courses and lessons by default. Enable both post types before trying to open them in the Elementor editor.
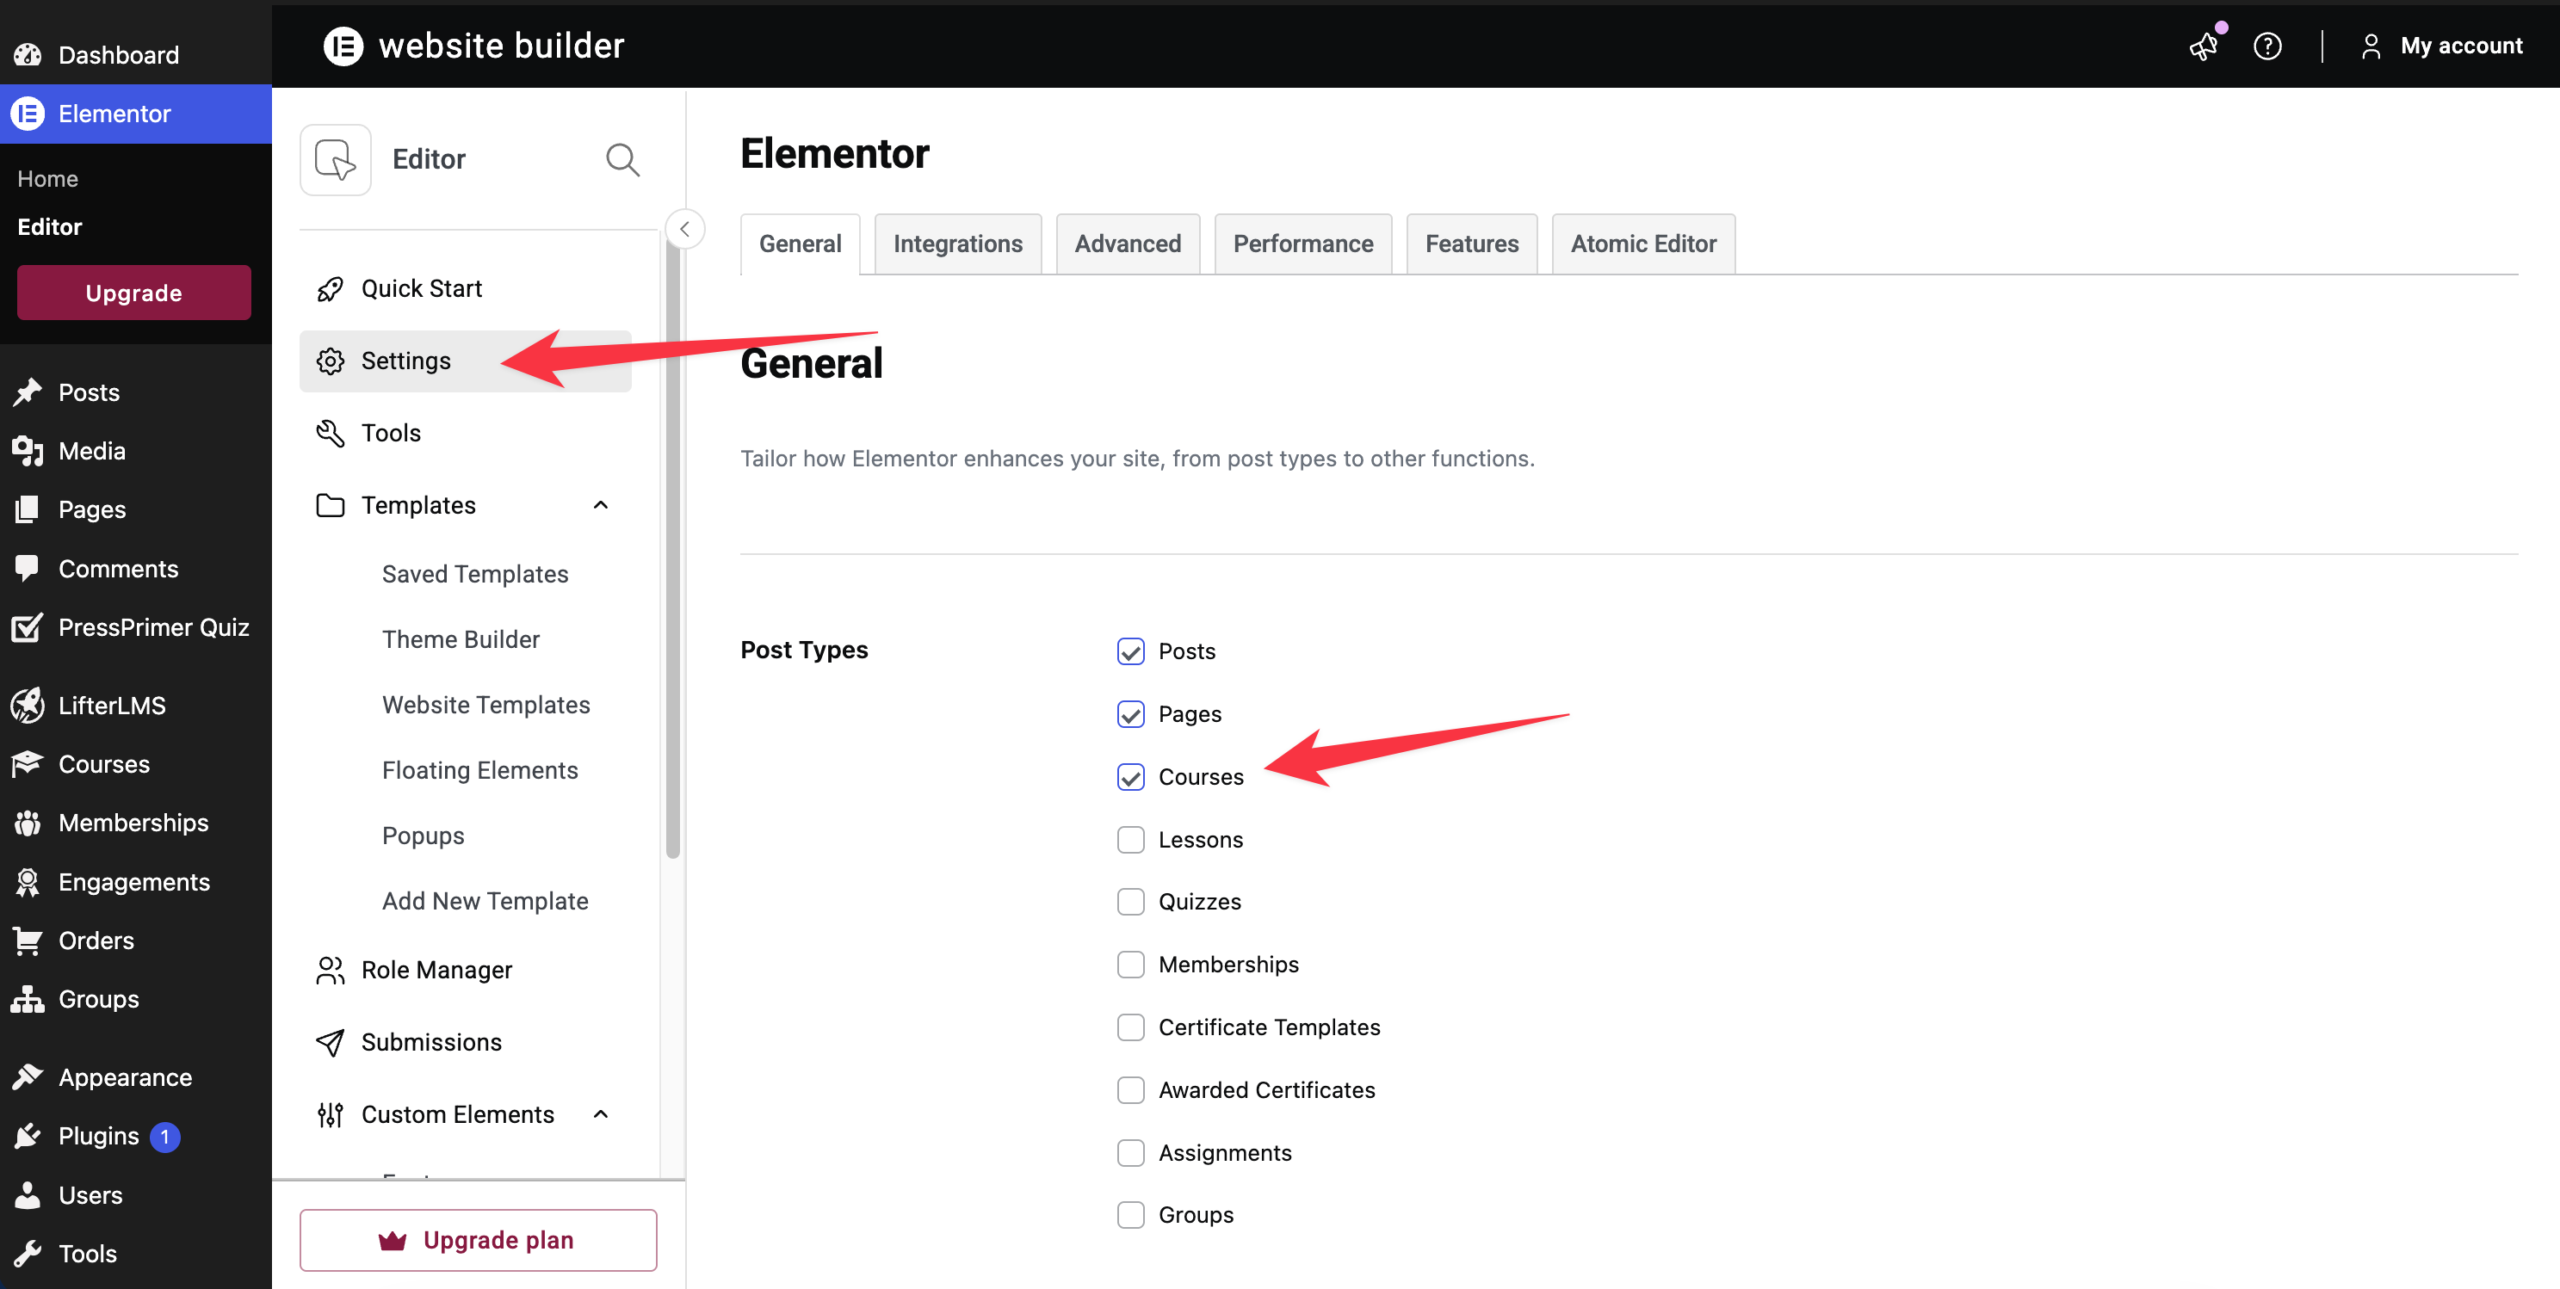
- Navigate to Elementor > Settings in your WordPress dashboard.
- Look for the “Post Types” section.
- Check the boxes for “Courses” and “Lessons.”
- Click the Save Changes button.
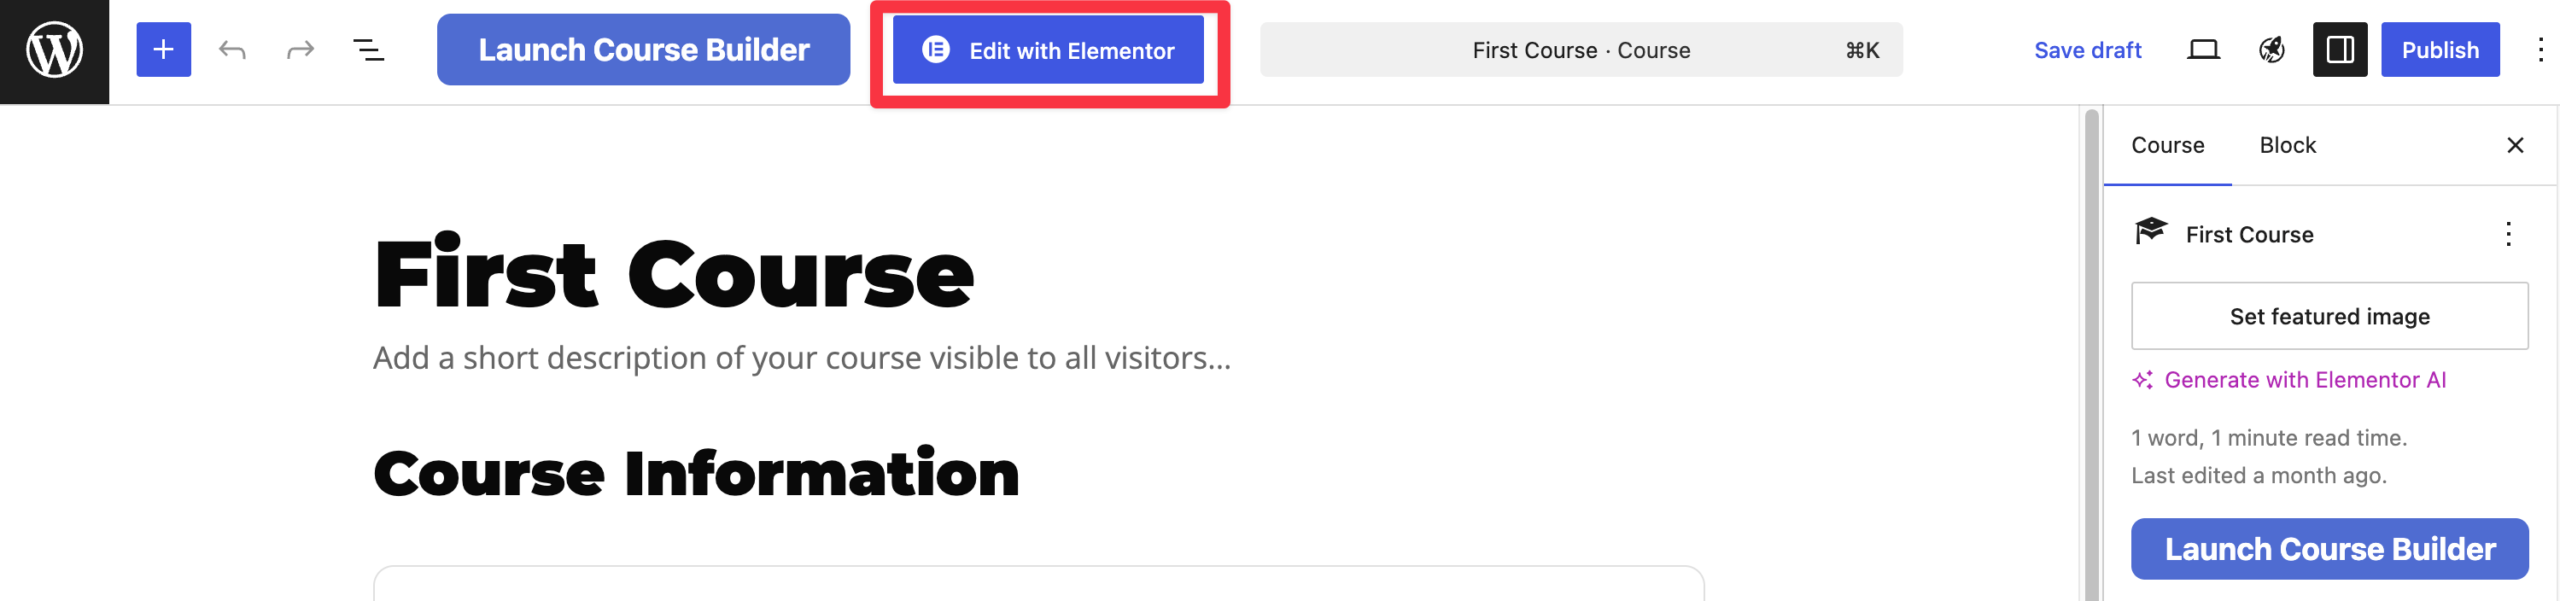
- Open or reload a course or lesson. The Edit with Elementor button should now appear at the top of the editor.
If you want to design one specific course manually, you can use the Elementor editor directly on that page.
- In your WordPress dashboard, go to Courses > Courses.
- Find the course you want to edit and click Edit.
- Click the Edit with Elementor button at the top of the WordPress editor.
- Elementor opens the course page for editing. Depending on your theme, existing course layout, and installed Elementor extensions, the page may already contain LifterLMS course elements.
- Add standard Elementor widgets, rearrange the existing containers, or adjust the widget settings to customize the design.
- Click Publish or Update to save your changes.
Depending on your setup, the course layout may include elements such as Course Meta Information, Course Instructors, Pricing Table, Course Progress, Course Continue Button, and Course Syllabus.
Some elements may appear empty when previewed in Elementor if the course does not yet have the required data. For example, the Course Syllabus will have nothing to display if the course has no sections or lessons.
- In your WordPress dashboard, go to Courses > Lessons.
- Find the lesson you want to edit and click Edit.
- Click Edit with Elementor at the top of the lesson editor.
- Edit the lesson’s main content using Elementor widgets. This changes the content area of that lesson rather than the full LifterLMS lesson template.
- Click Publish or Update to save your changes.
When you edit a lesson with Elementor, Elementor controls the main lesson content. LifterLMS and your theme continue to control the surrounding learning interface, including the course syllabus, progress bar, previous and next lesson buttons, and Mark Complete button.
Elementor Pro users can create reusable layouts through Theme Builder. A Single Post template can be applied to multiple courses or lessons through Elementor’s Display Conditions.
The steps below use lessons as the example. You can follow the same general process for courses where the required LifterLMS post type and Display Condition options are available.
How Elementor Selects a Lesson Template
Elementor uses Display Conditions to determine where each Theme Builder template appears. You can assign a template broadly, such as to all lessons, or restrict it to more specific content when the relevant options are available.
Review your conditions carefully when using more than one lesson template. Overlapping conditions can create conflicts or cause a different template to appear from the one you expected.
After creating or changing a condition, test several lessons on the front end, including lessons inside and outside any selected categories.
How to Create a Default Template for All Lessons
You can ensure every new lesson follows a consistent design by setting up a default template. This feature requires Elementor Pro.
- In your WordPress dashboard, navigate to Elementor > Theme Builder.
- Select “Single Post”, then click the plus icon to create a new template.
- Choose an existing template from the Template Library, or close the library to start with a blank design.
- Build the lesson layout using Elementor widgets.
- Add the Post Content widget where you want the content entered in the WordPress lesson editor to appear.
- Click Publish.
- In the “Display Conditions” window, click Add Condition.
- Select Include, then choose the available condition that applies the template to all LifterLMS lessons.
- Click Save & Close.
Using Lesson Categories in Display Conditions
If lesson categories are registered and available within Elementor’s Display Conditions, you can use them to apply different templates to different groups of lessons. For example, you might want a specific layout for “Video Lessons” and a different design for “Quiz Prep” lessons.
You can set these rules by choosing “In Category” in the Display Conditions window and selecting your specific category.
What to do if a Category is Deleted
If you delete a lesson category used in a template’s Display Conditions, review the template and replace or remove the obsolete condition. The affected lessons may no longer use the intended template.
- In your WordPress dashboard, navigate to Templates > Theme Builder.
- Select “Single Post”.
- Find the template that was assigned to the deleted lesson category.
- Click Edit Conditions.
- Remove the condition that refers to the deleted category.
- Add a replacement condition by selecting another lesson category, all lessons, or the specific lessons that should use the template.
- Click Save & Close.
- Open an affected lesson on the front end and confirm that the intended template now appears.
Elementor’s current Theme Builder interface includes an “Edit Conditions” control for existing Single Post templates.
- Keep the shared template and lesson content separate. Use Theme Builder to edit the layout shared by multiple lessons. Edit the content unique to each lesson through the lesson editor. A Single Post template should contain one Post Content widget to display that lesson’s content.
- For extra LifterLMS widgets and Elementor design controls, you can also use the third-party Lifter Elements plugin. (Note that Lifter Elements is not developed or supported by LifterLMS.)
The video below provides a broader walkthrough of using Elementor with a LifterLMS site. Some interface details may differ from the current versions of Elementor and LifterLMS.