LifterLMS Blocks
Blocks are part of the WordPress block editor, also known as Gutenberg. LifterLMS blocks are special blocks for LifterLMS functionality (previously created using “shortcodes.” These blocks assist you in incorporating various LifterLMS features on your website using the block editor.
LifterLMS blocks are the modern way of what users historically used LifterLMS shortcodes for. LifterLMS shortcodes also still work. Many find blocks much easier to work with than shortcodes.
LifterLMS blocks are easy to use, and help to add functionality to your website with just a few clicks. You don’t need to be a coder or technical person to use blocks.
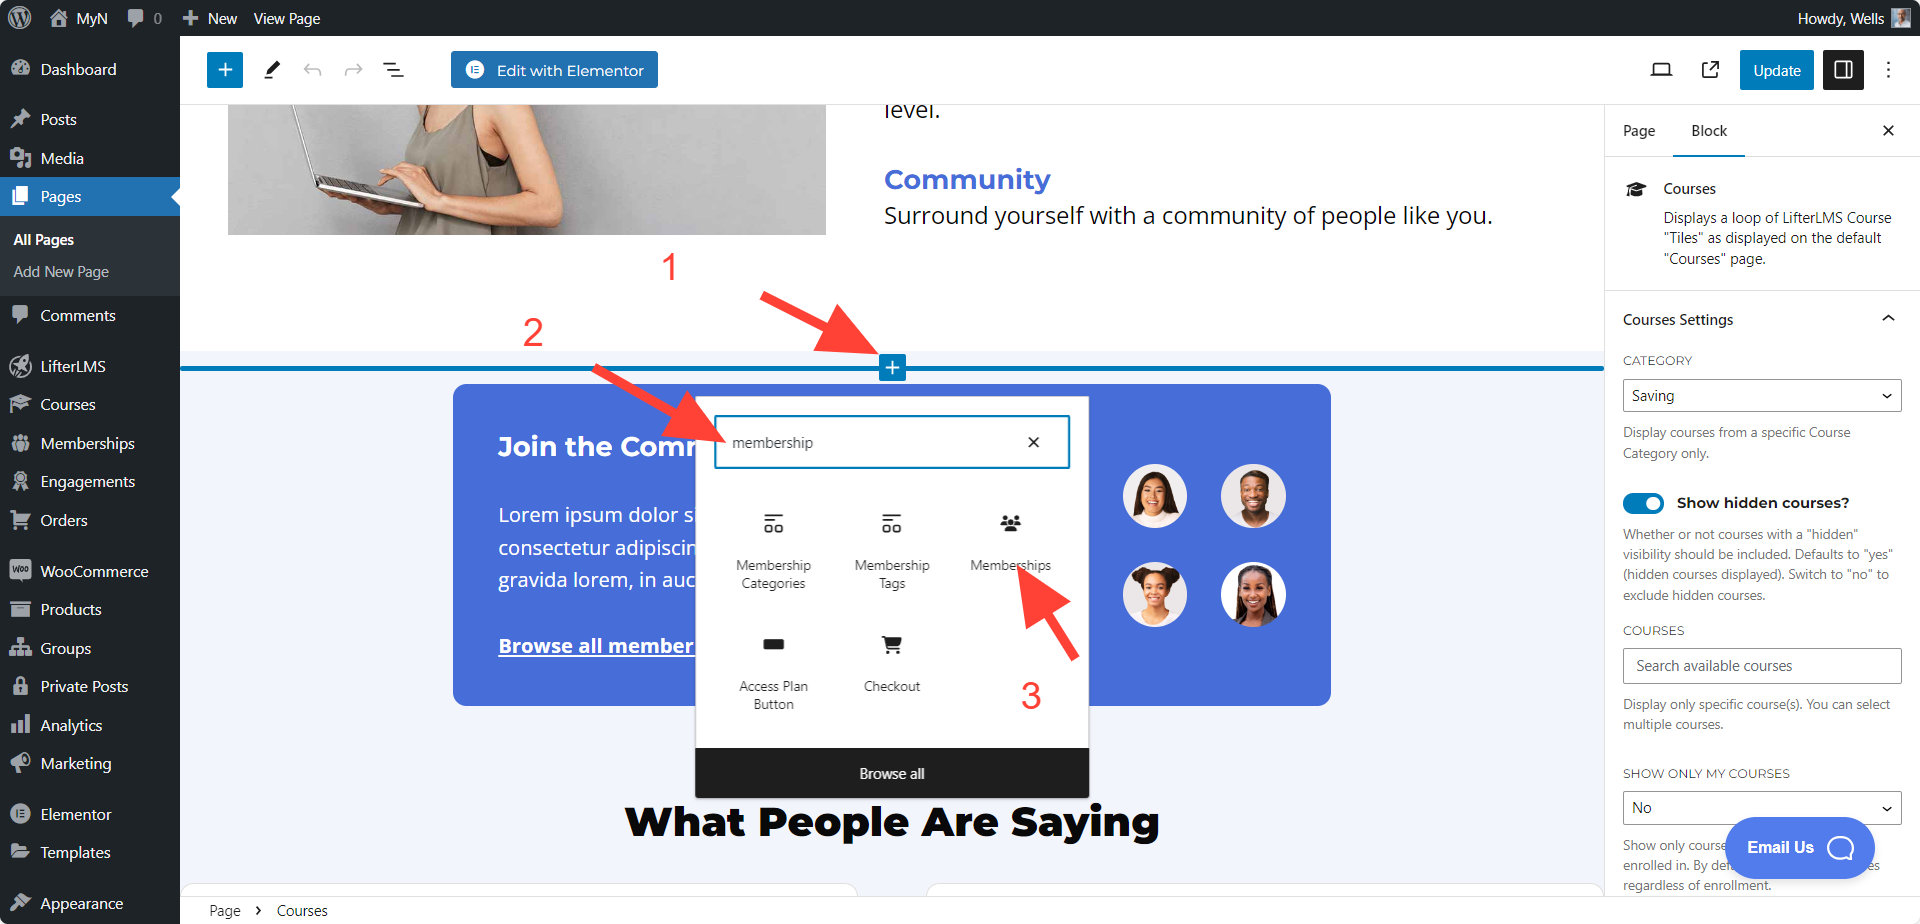
The Courses block will help you display a list of courses. For example, if you want to showcase the course list on your home page or any other page, you can use the Courses block.
To add this block, you have to click on the “+” icon > Search for “Courses” > Add courses block.
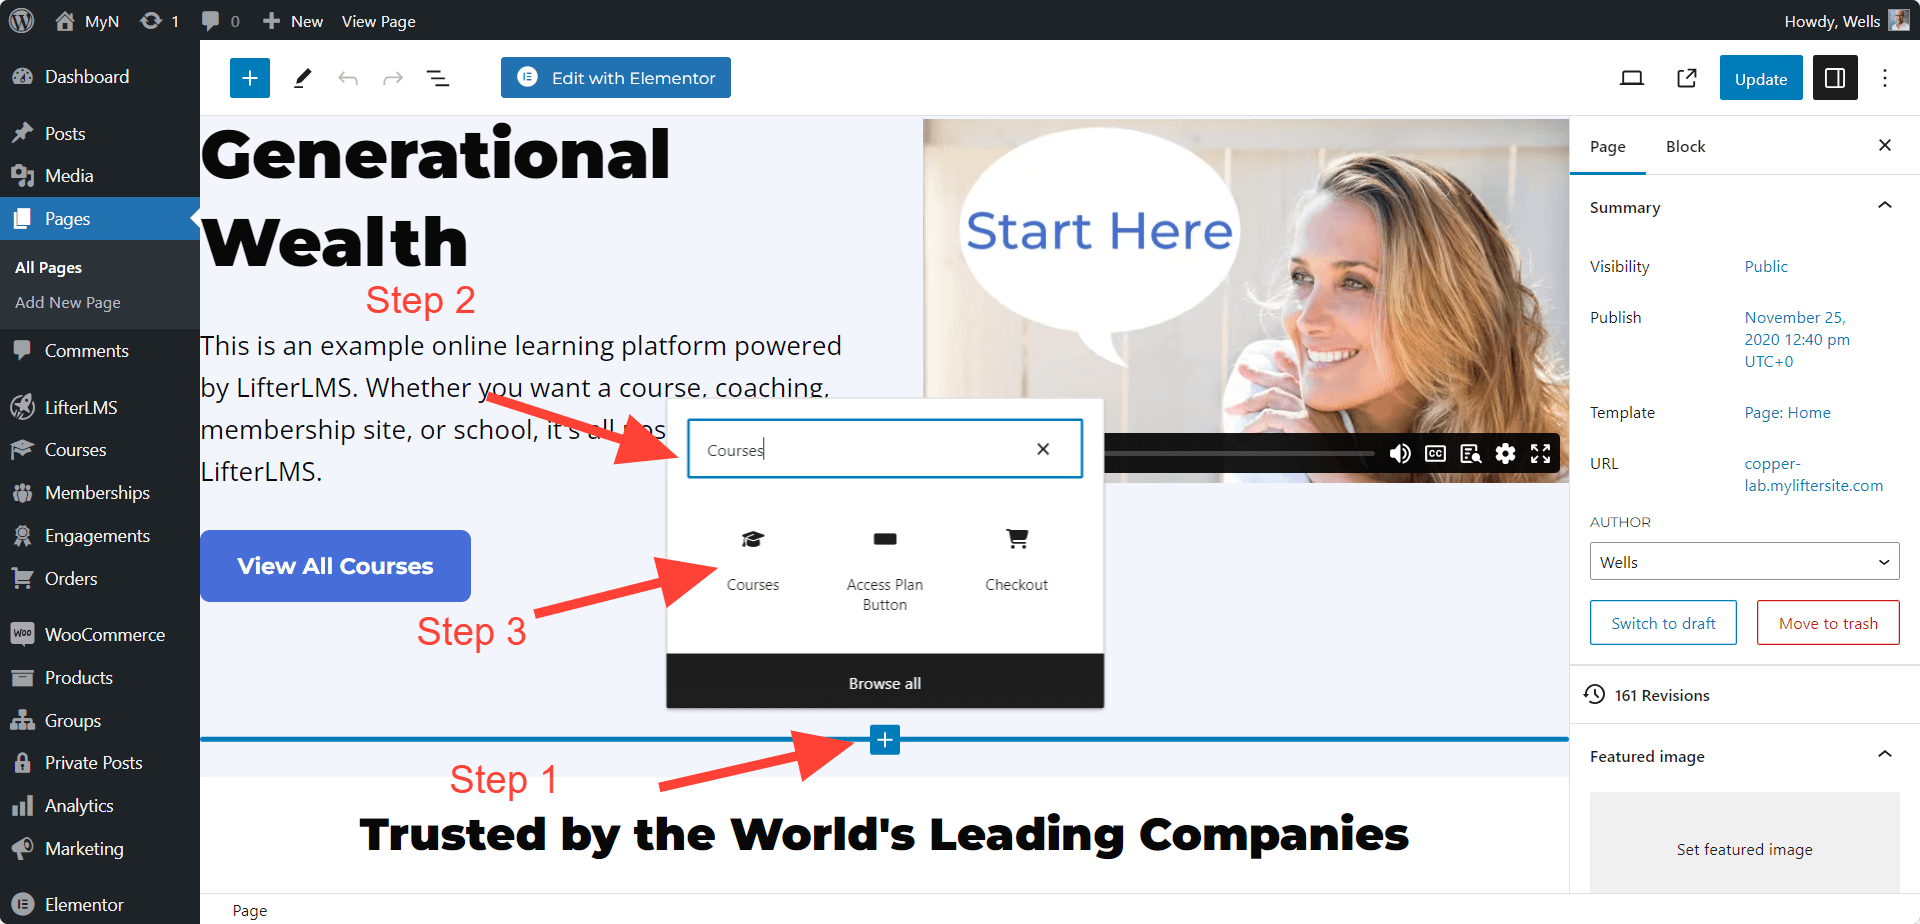
When you add the course block, you can also select a specific category of courses if you want to show a specific category course list.

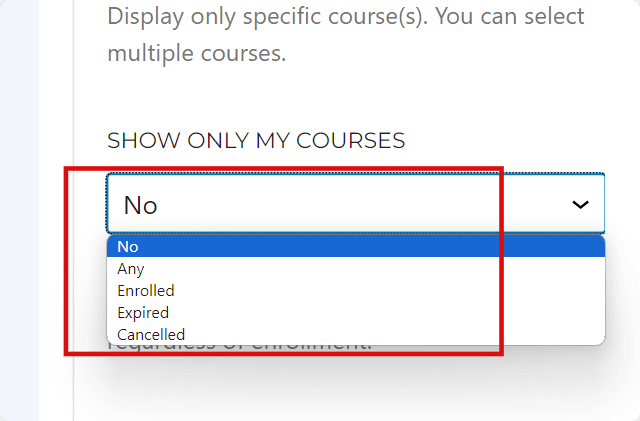
Additionally, you will have another feature called “Show Only My Courses” When you set the “Show only my courses” to “Enrolled,” the system will exclusively display information related to the courses in which the student is officially registered. The default setting, indicated as “no,” ensures that all courses, irrespective of enrollment, are visible by default.
You can use the Courses Block on any page or any area of your website. The front end view of this block will look like this:

Video Tutorial:
We also have a “Courses” shortcode option, if you want to use the shortcode instead. Here is the Courses Shortcode.
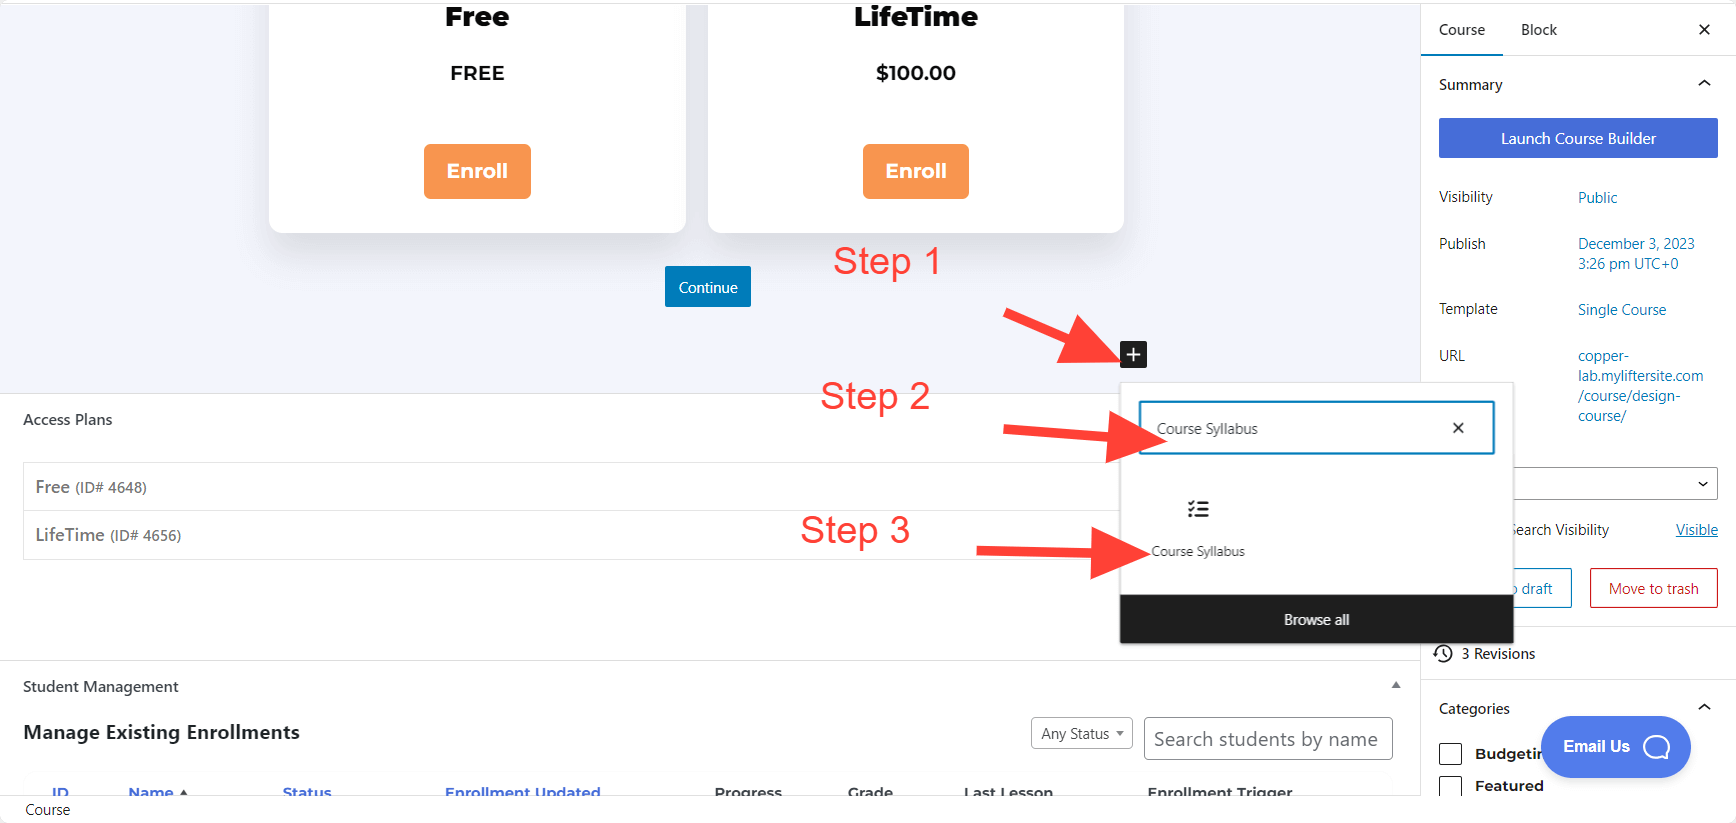
The LifterLMS Pricing Table block displays all of your access plans for a course. It showcases the course price, an Enroll button to facilitate user enrollment or registration for the course, and more.
This is the frontend view of access plans displayed from the Pricing Table block.
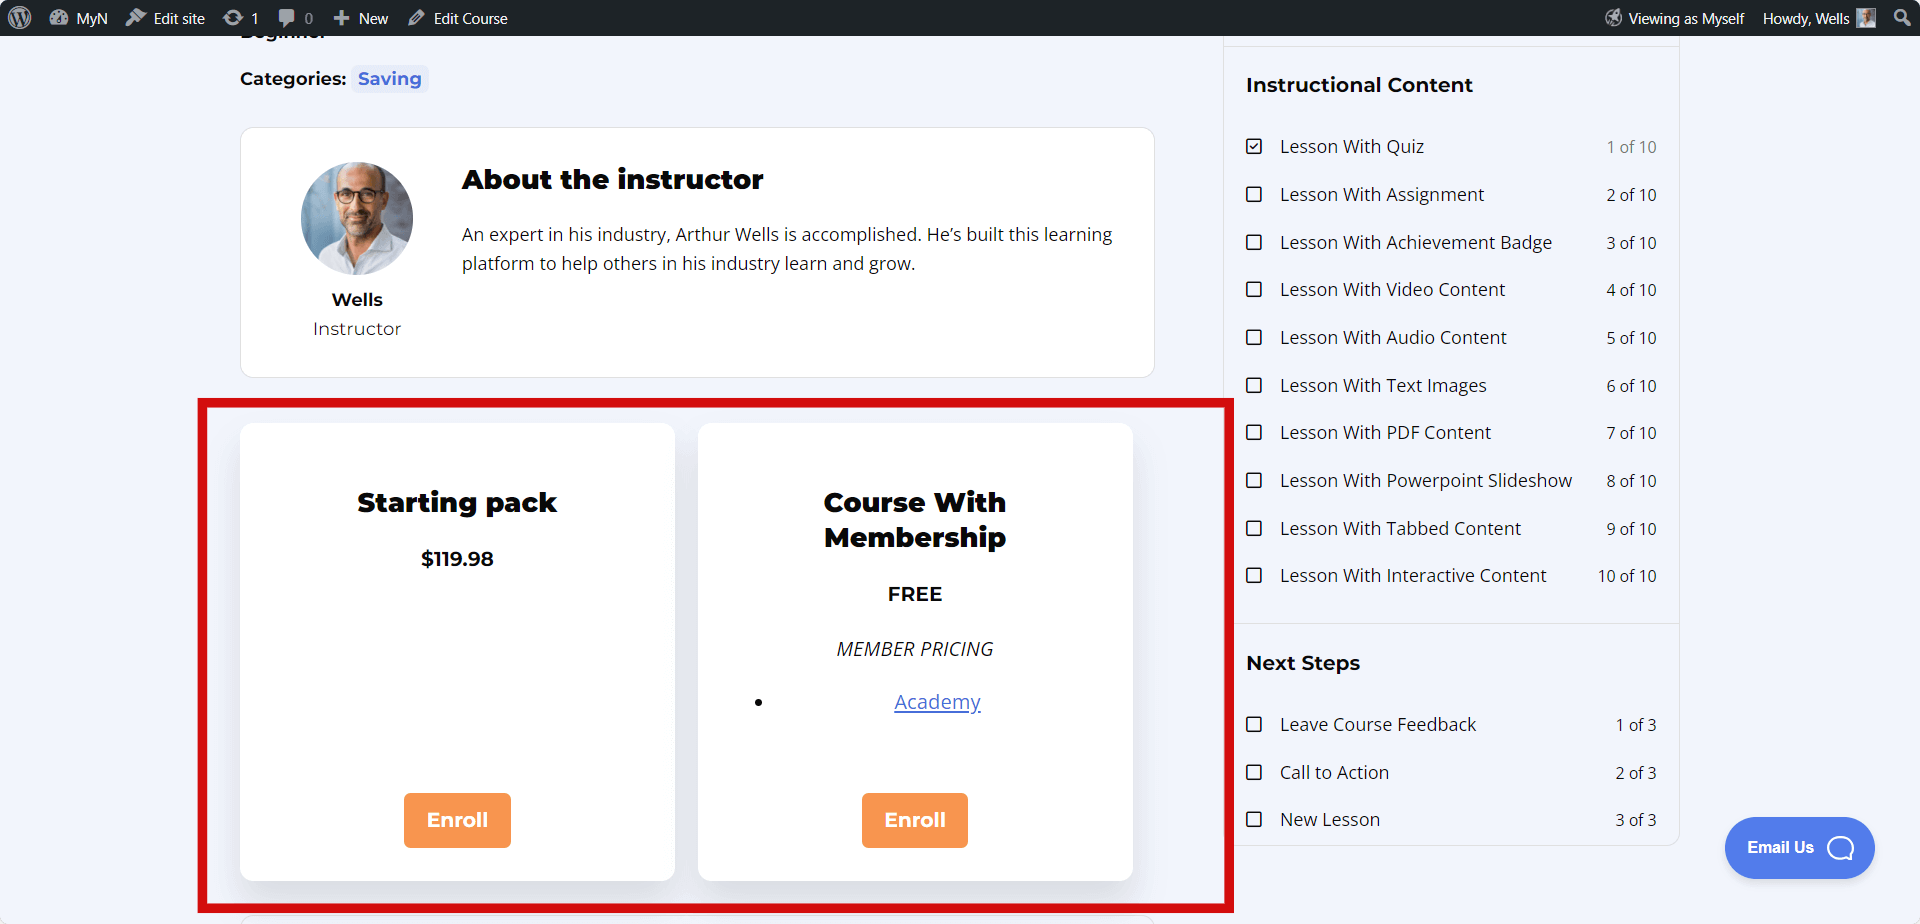
When you create an access plan in a course, by default, the LifterLMS Pricing Table will be present. However, if you accidentally delete it or if the Pricing Table is not there, you can easily add it using the “LifterLMS Pricing Table” block.
To add this block, you have to click on the “+” icon > Search for “LifterLMS Pricing Table” > Add block.
Note: You can only use this block on a course page.
Video Tutorial:
We also have a “Pricing Table” shortcode option, if you want to use shortcode. Here is the LifterLMS Pricing Table Shortcode.
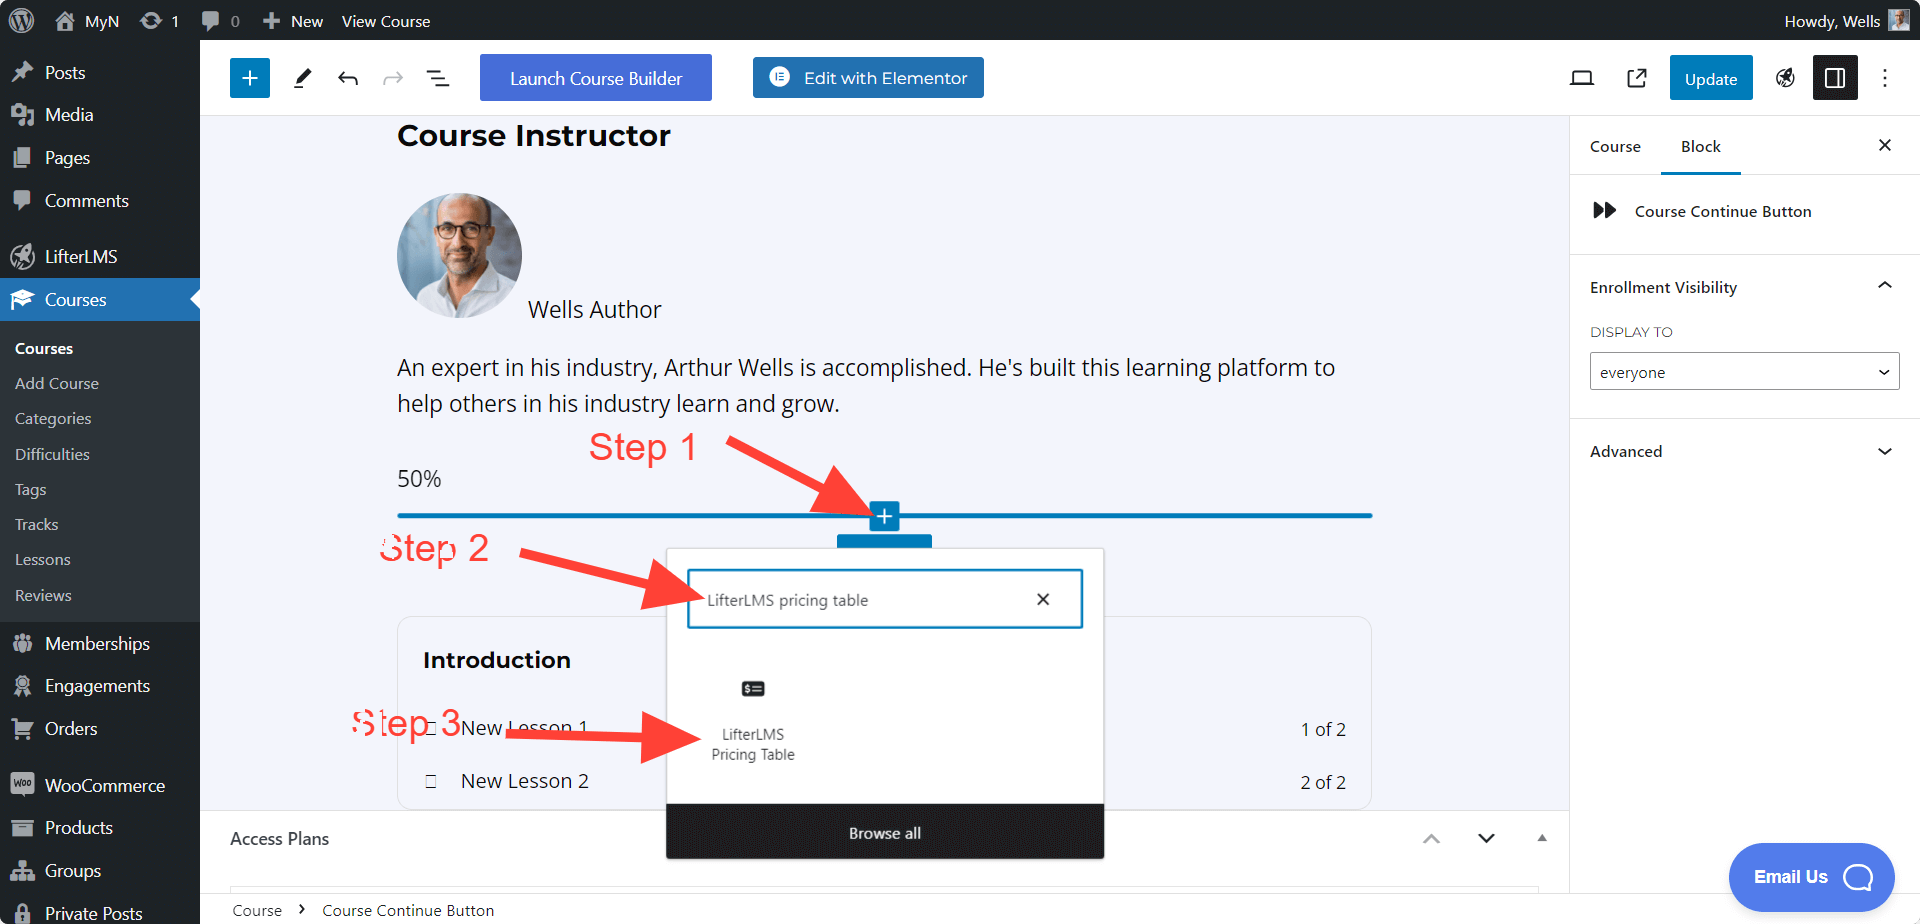
The Course Syllabus helps to showcase all the lessons available in your course. This option assists users in understanding the content of your courses, including which lessons are included and the total number of lessons. It serves as an attractive feature to encourage users to purchase the course.
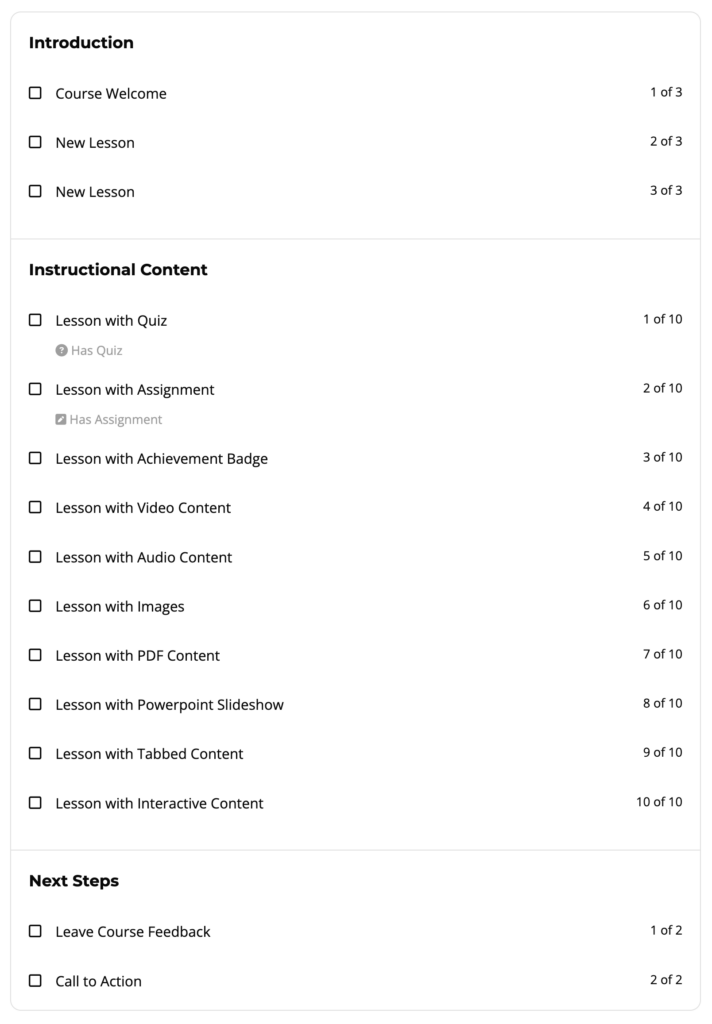
When you add lessons to your course, the Course Syllabus will automatically display those lessons on both the backend and frontend of the course.
However, if the Course Syllabus option is not visible on the backend, you can also manually add the “Course Syllabus” block to ensure its presence.
To add this block, you have to click on the “+” icon > Search for “Courses Syllabus” > Add block.
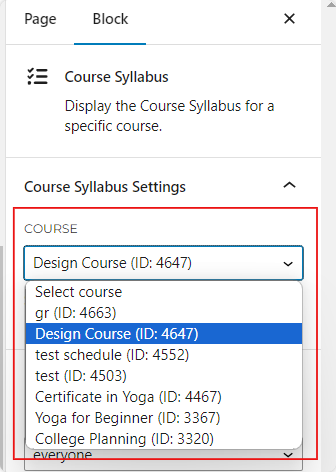
You can add any specific course syllabus on any page on your website using this block. For example, you have a course “A” and you want that “A” course syllabus to display on another page or blog post. You can do that with the Course Syllabus block.
First, add the block, and then you have to select the course name “A” from the “Course” option from right side. It will help you to choose a specific course’s syllabus.
Video Tutorial:
We also have “Course Syllabus” shortcode option, if you want to use a shortcode instead. Here is the Course Syllabus Shortcode.
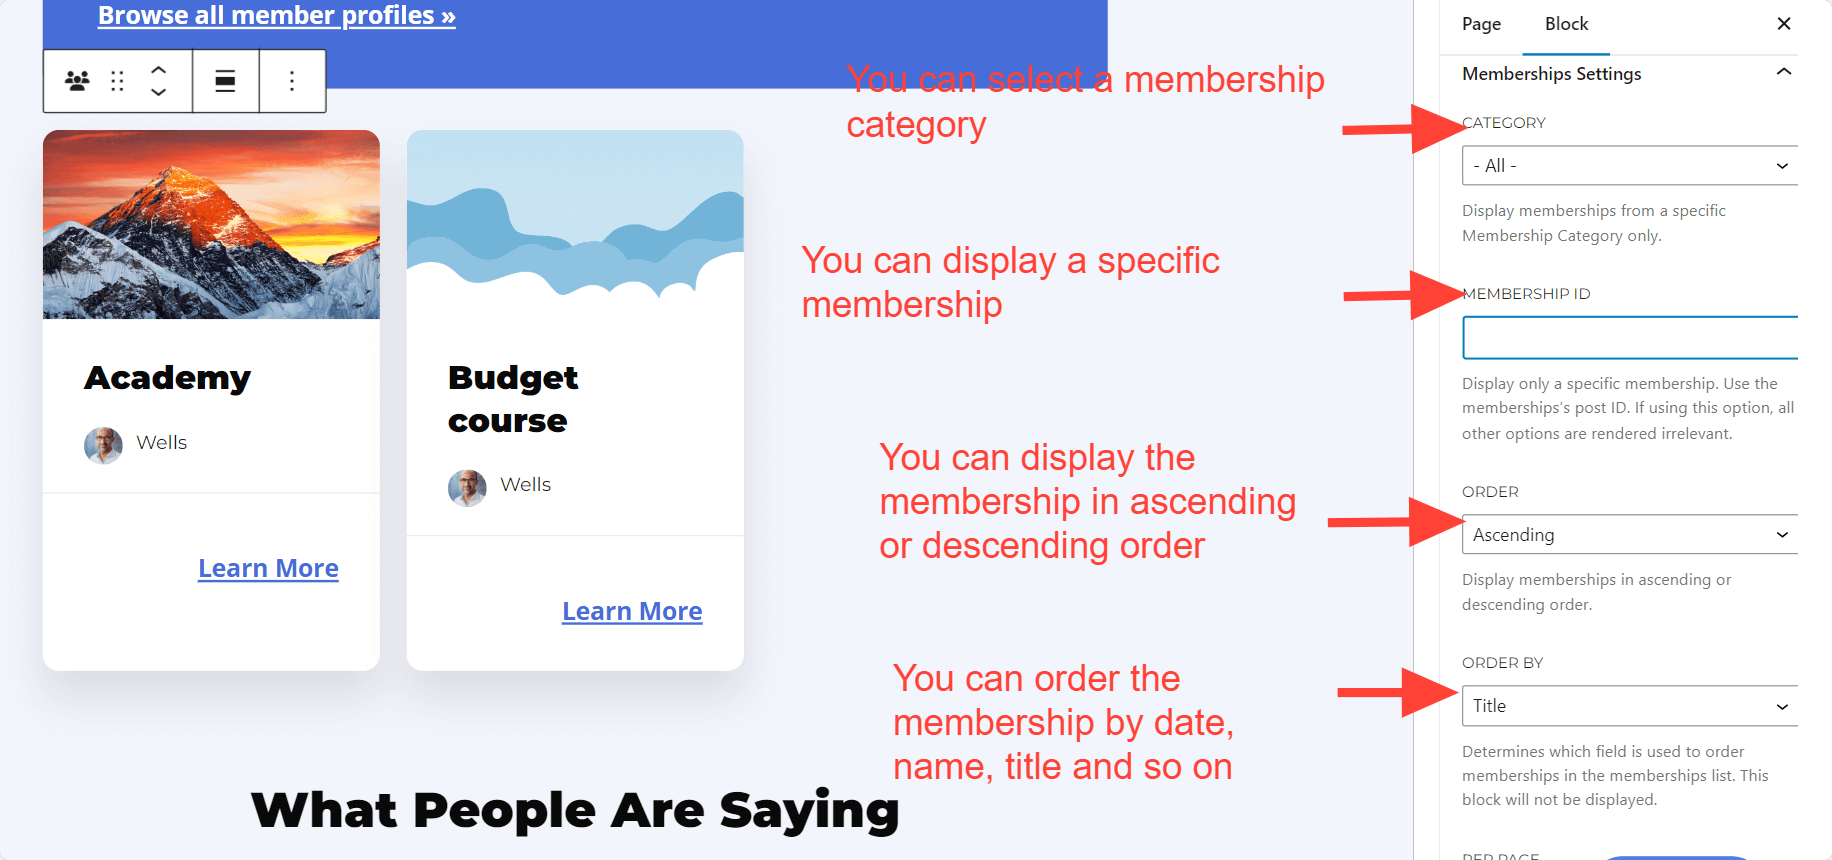
The Membership block is similar to Courses Block, it will help you display a list of Memberships. For example, if you want to showcase the Memberships list on your home page or any other page, you can use the Membership block.
To add this block, you have to click on the “+” icon > Search for “Membership” > Add membership block.
When you add this block, you can also use the “Membership settings.” You can display the memberships based on category, ascending order or descending order, by name, title also you can display a specific membership.
Video Tutorial:
We also have “Memberships” shortcode option, if you want to use a shortcode instead. Here is the Memberships Shortcode.
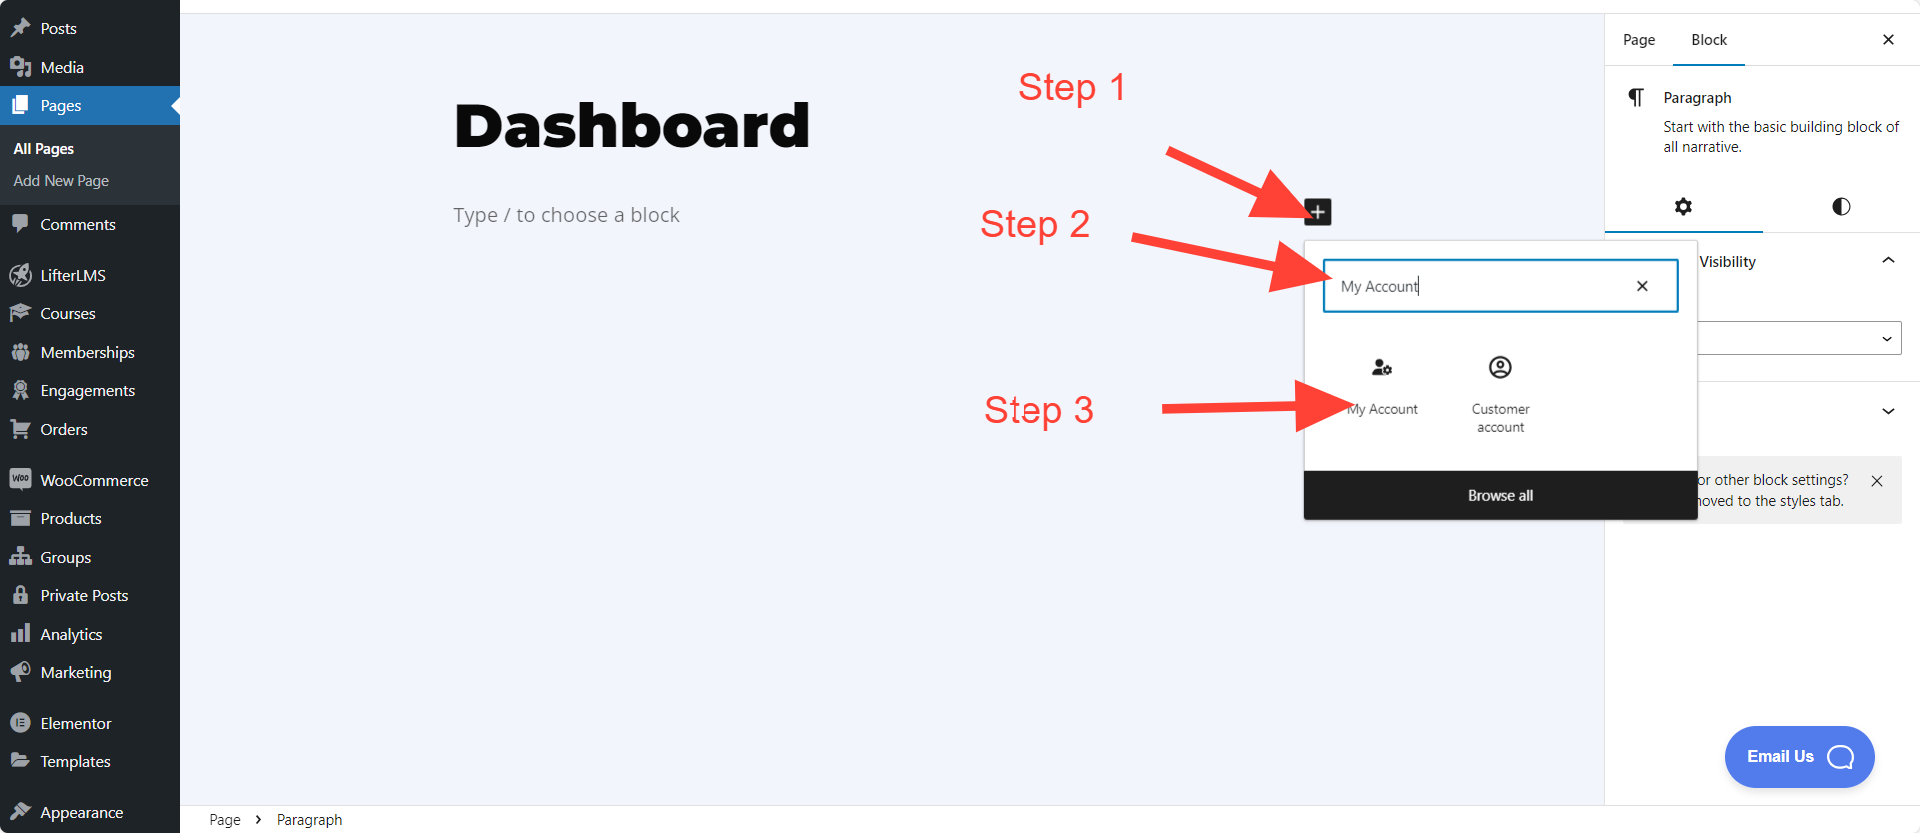
The term ‘My Account’ refers to the student dashboard. Instead of using a shortcode, you can utilize the ‘My Account’ block to showcase your user dashboard. This block displays the entire dashboard page, encompassing features such as my courses, grades, order history, achievements, and other accessible user account functionalities.
Also, you can add this block on any page you want.
The frontend view of the My Account block looks like this:

For instance, if you wish to incorporate a custom dashboard page, you can easily achieve this by using the ‘My Account’ block. Moreover, this block can be employed on various pages as needed.
To add this block, simply click on the “+” icon, search for ‘My Account,’ and then add the ‘My Account’ block to your page.
Video Tutorial:
We also have “My Account” shortcode option, if you want to use a shortcode instead. Here is the My Account shortocode.
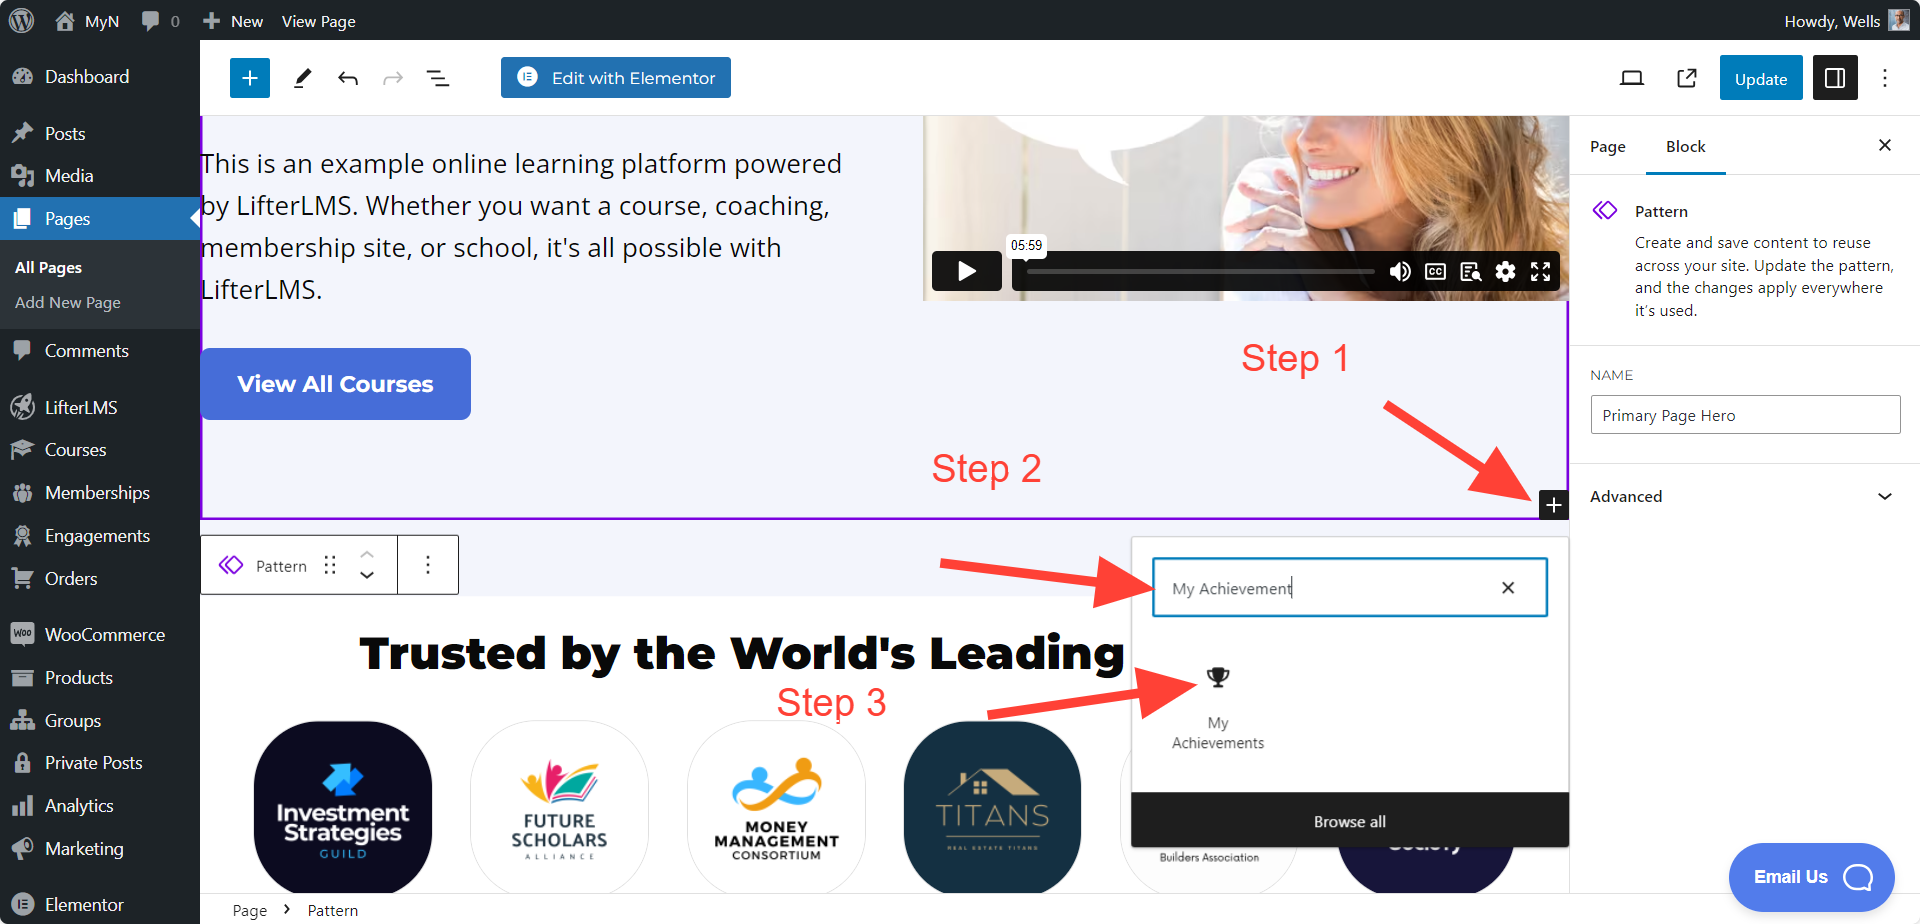
The My Achievements block is designed to showcase a student’s achievement badges. By default, when a student earns an achievement badge, it is displayed on their student dashboard. However, if you wish to create a custom page to showcase student achievements or display a specific student’s achievements, or current user’s achievement badges on a particular page (or part of a page), the ‘My Achievements’ block is the perfect solution.
To add this block, simply click on the “+” icon, search for ‘My Achievements,’ and then add the ‘Achievements’ block to your page.
When you add this block, you will be able to select a specific user or current user. That means you can select which user’s badges you want to show.

Also, you can add the number of achievements to display in the “Count” option. This is the Frontend view of My Achievement block
Video tutorial:
We also have “My Achievements” shortcode option, if you want to use the shortcode version instead. Here is the My Achievements shortocode.
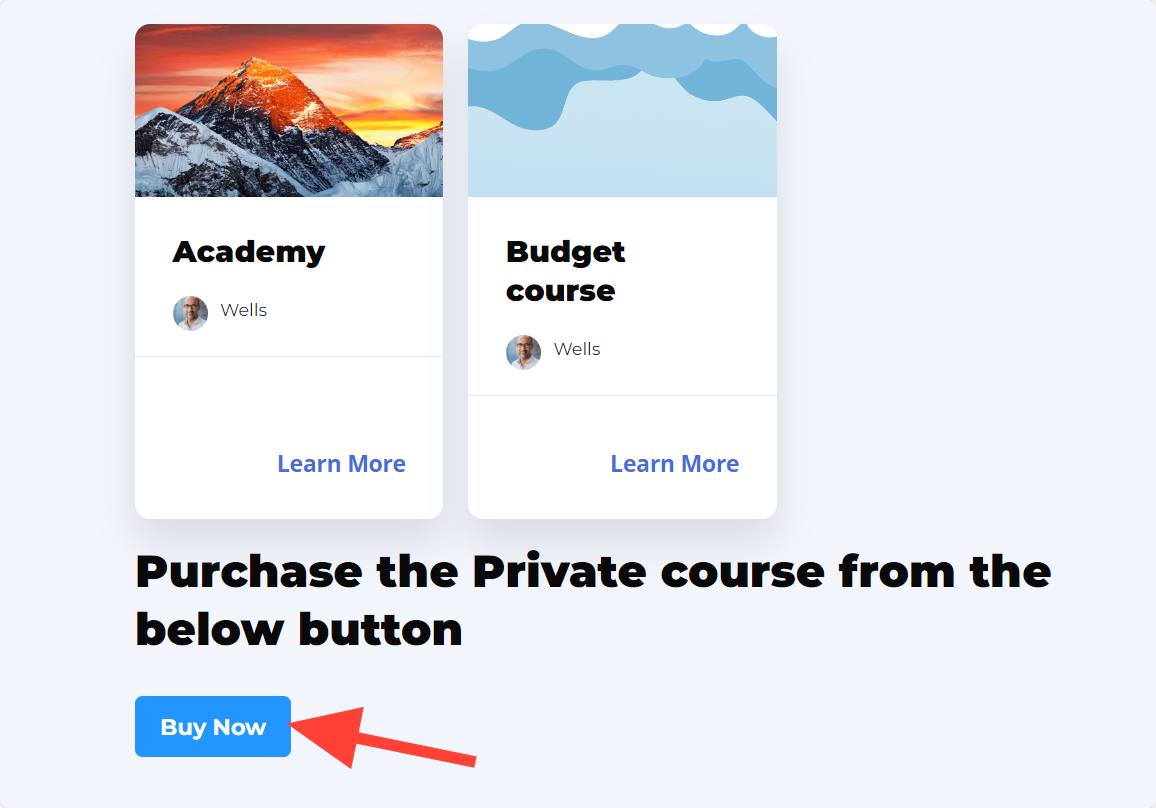
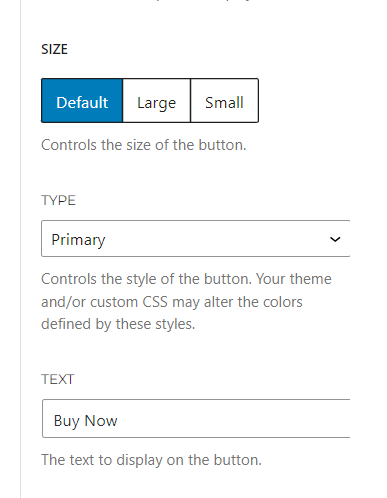
“The Access Plan button” block is a helpful block for displaying a specific access plan. For instance, if you’ve crafted a custom sales page with unique design elements, incorporated course sales content, and now wish to include the access plan button for that course, the ‘Access Plan button’ is a great solution. This allows you to seamlessly add a course access plan button to any page or location of your choice.
This is the Frontend view of the Access Plan button, you can modify it as per your requirements.
To add this block, click on the “+” icon, search for ‘Access Plan,’ and then add the ‘Access Plan button’ block to your page.
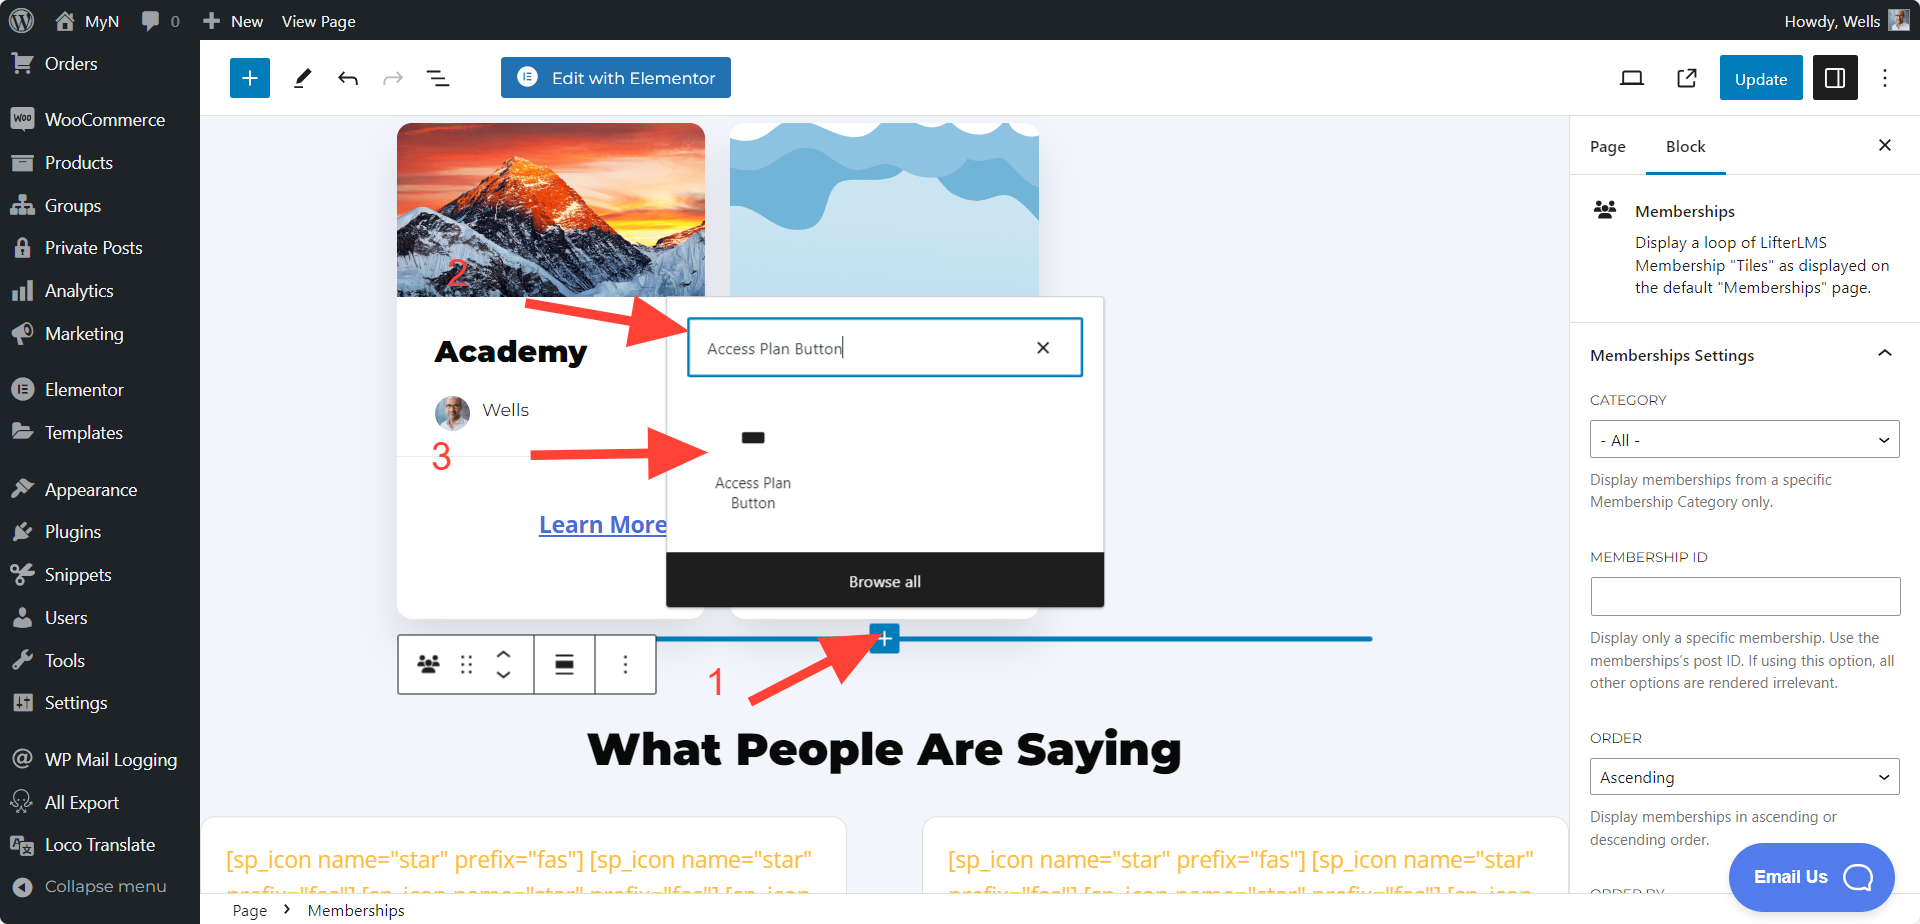
After adding the button you can select the specific access plan you want link with this button. So when someone clicks on this button, they will redirect to that specific access plan to enroll.
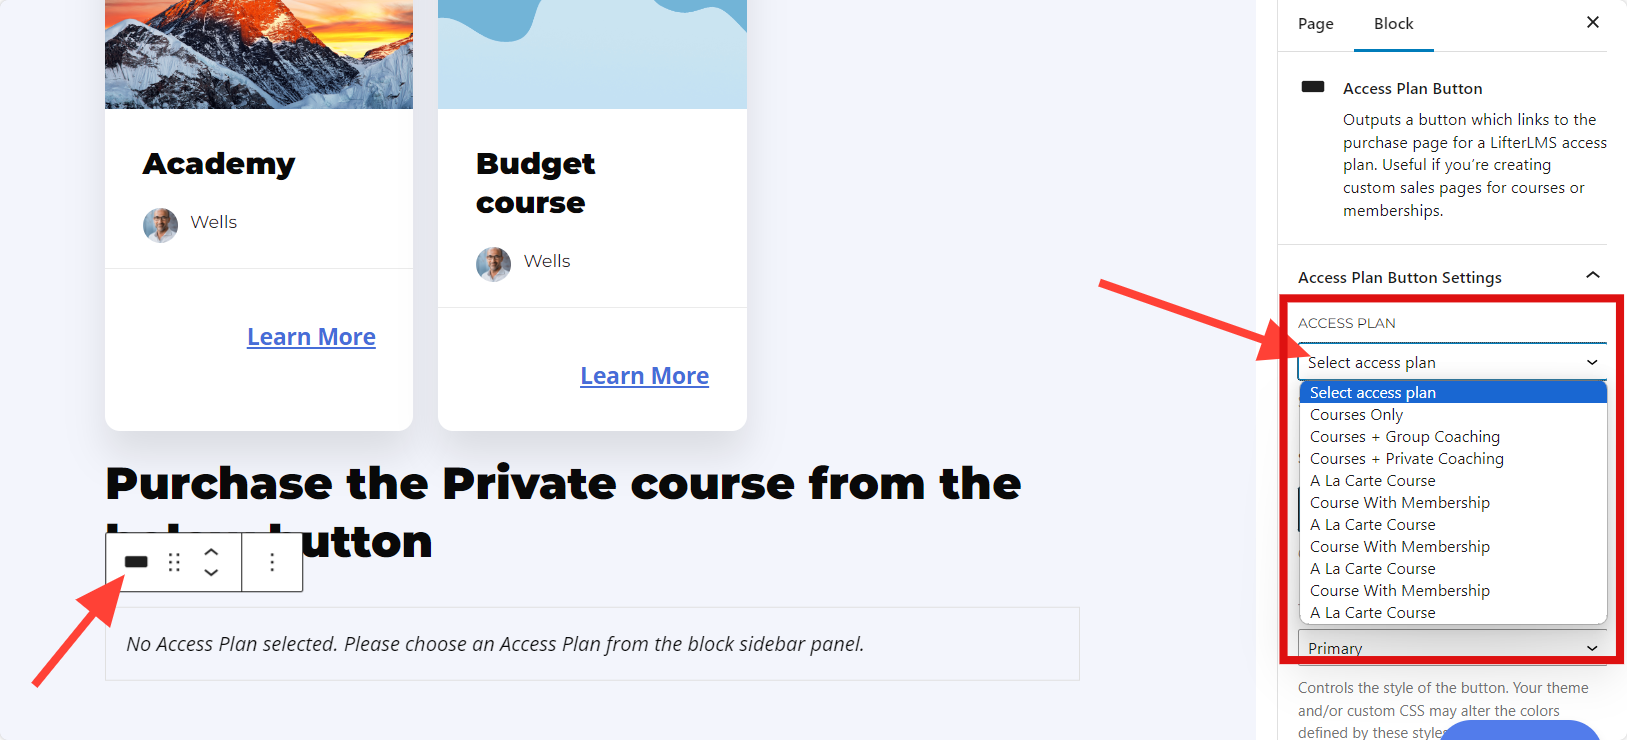
You have the flexibility to customize the size, text, type of the button, allowing you to enhance its visual appeal and seamlessly integrate it into the overall design of your page.
Video Tutorial:
We also have an “Access Plan Button” shortcode option, if you want to use the shortcode instead. Here is the Access Plan Button shortocode.
The Instructors block is designed to showcase the instructors associated with a course. By default, when you create a course, the course author is automatically displayed as the instructor, or you can manually add instructors. Upon course creation or instructor addition, the Instructor block is visible by default. It includes the instructor’s name, bio, and image.
Additionally, if there is no instructor specified on your course page, you can use the ‘Instructor Block’ to manually display the instructor information.
This is the Frontend view of the Instructor Block

To add this block, click on the “+” icon, search for ‘Instructor,’ and then add the ‘Instructor’ block to your page.
Video Tutorial:
We also have a Course Instructors and Membership Instructors shortcode.
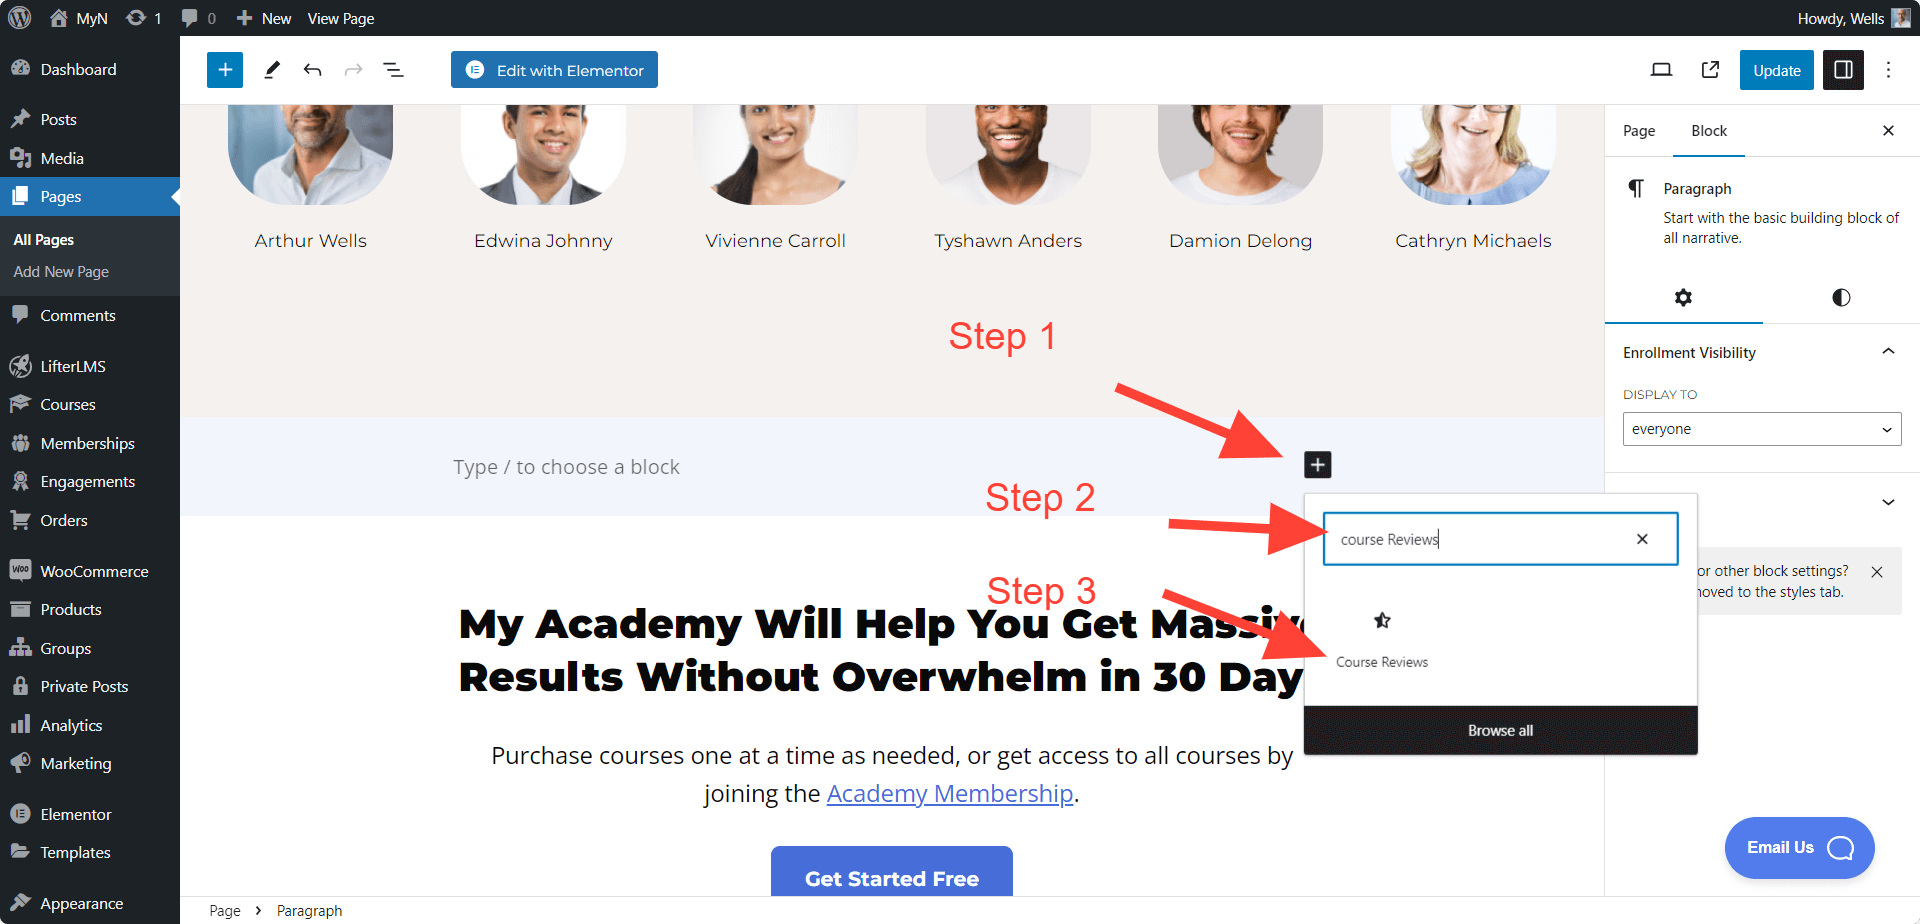
The ‘Course Review’ block helps users leave reviews based on the specific course. However, if you want to add this option to any other page, the ‘Course Review’ block becomes essential.
With this block, you can incorporate a dedicated course review option on your pages. For instance, if you have a course named “A” and you wish only students enrolled in course “A” to leave a review, you can utilize the ‘Course Reviews’ block. Other students will not see the review option; only those who have enrolled in ‘Course A’ can access and leave a review.
To add this block, click on the “+” icon, search for ‘Courses Review,’ and then add the ‘Courses Review’ block to your page.
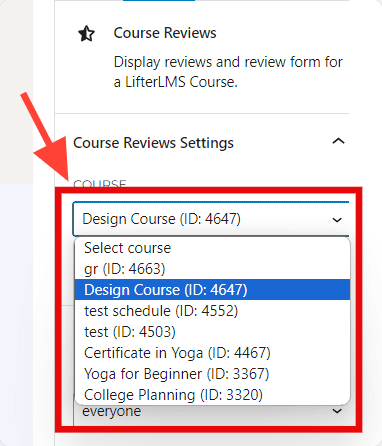
When you add the “Course Review” block you will be able to select a specific course that you want to show the review for.
This is the Frontend view of the Course Review block:
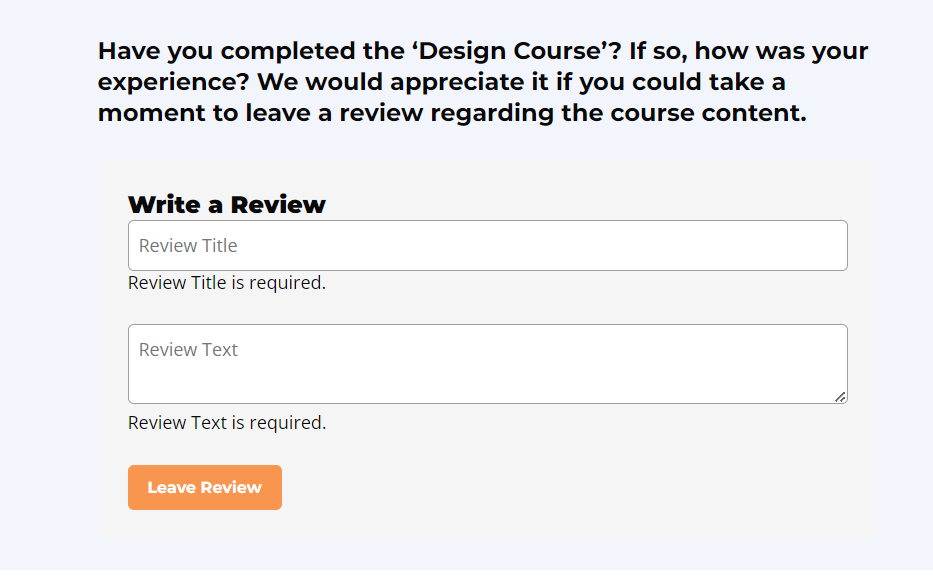
Note: Before adding the “Course Review” block, you have to enable the “Review” option from the course editor. You can follow this option to enable the Review option on your course page.
Video Tutorial:
We also have a “Course Review” shortcode option, if you want to use the shortcode instead. Here is the Course Reviews shortocode.
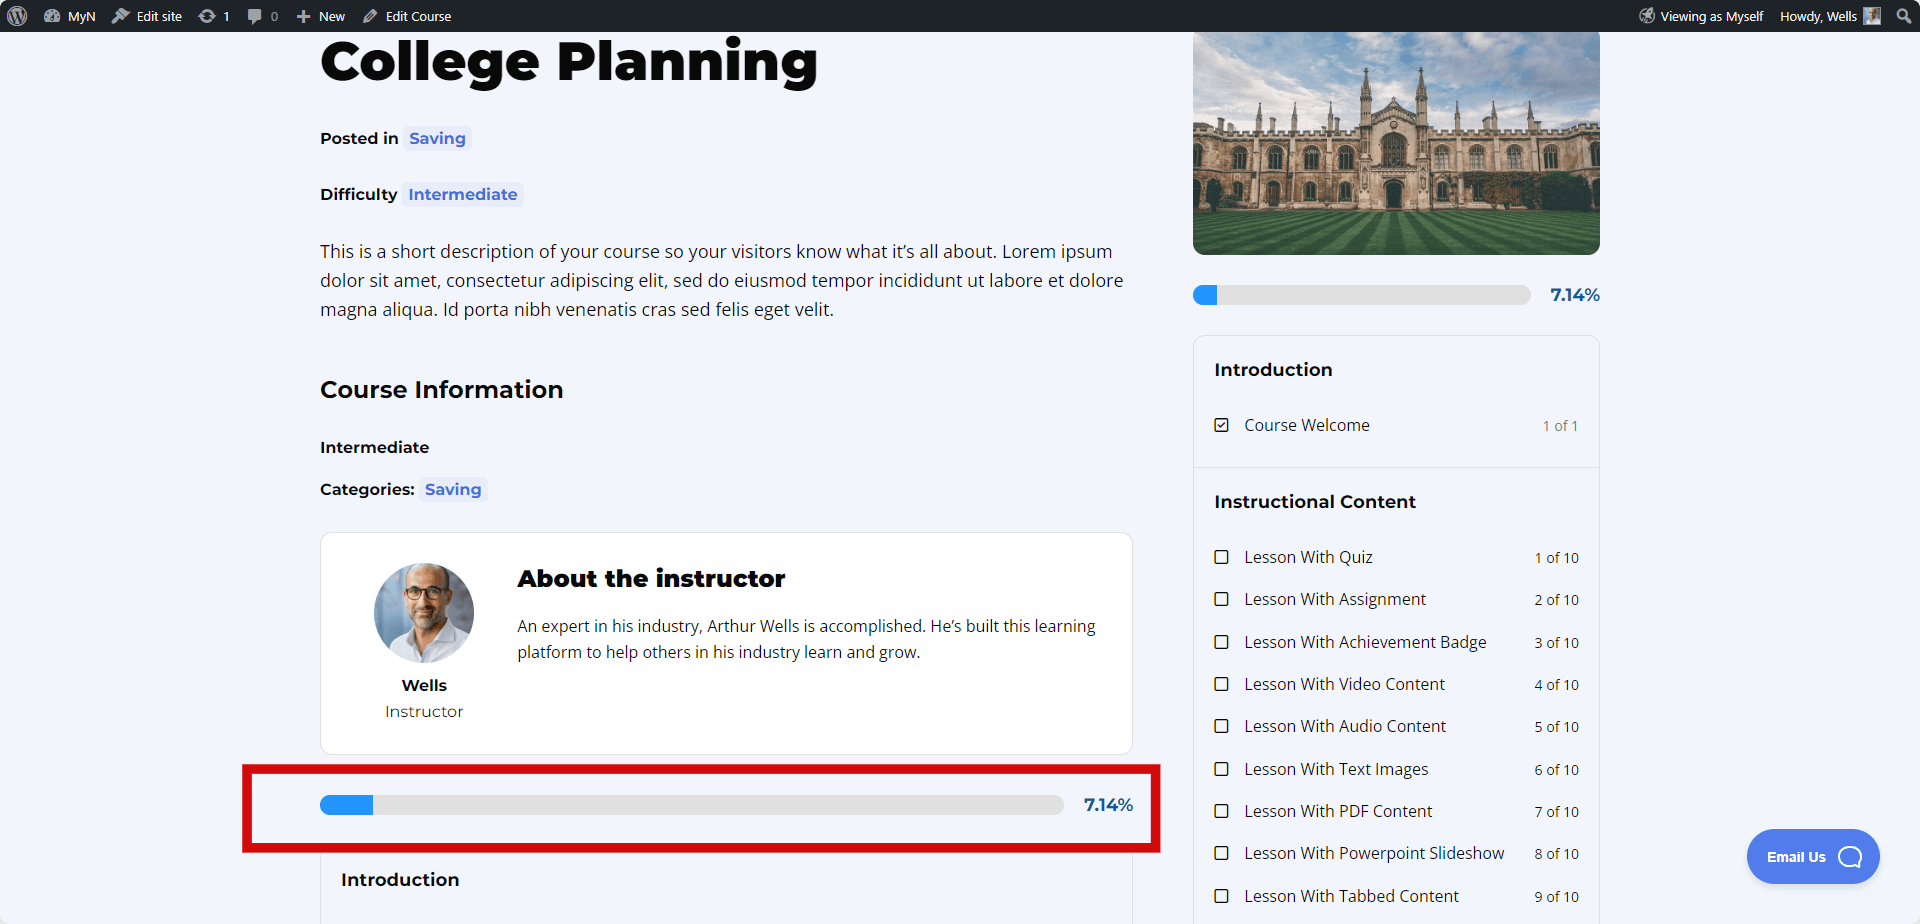
The ‘Course Progress’ block helps display a progress bar for a course, allowing users to track the percentage of completion. By default, when you create a course, the ‘Course Progress Bar’ is included. However, if you wish to add it manually you can do that as well.
You can only add the “Course Progress Bar’ block on the associated course page.
To add this block, click on the “+” icon, search for ‘Courses Progress,’ and then add the ‘Courses Progress’ block to your page.
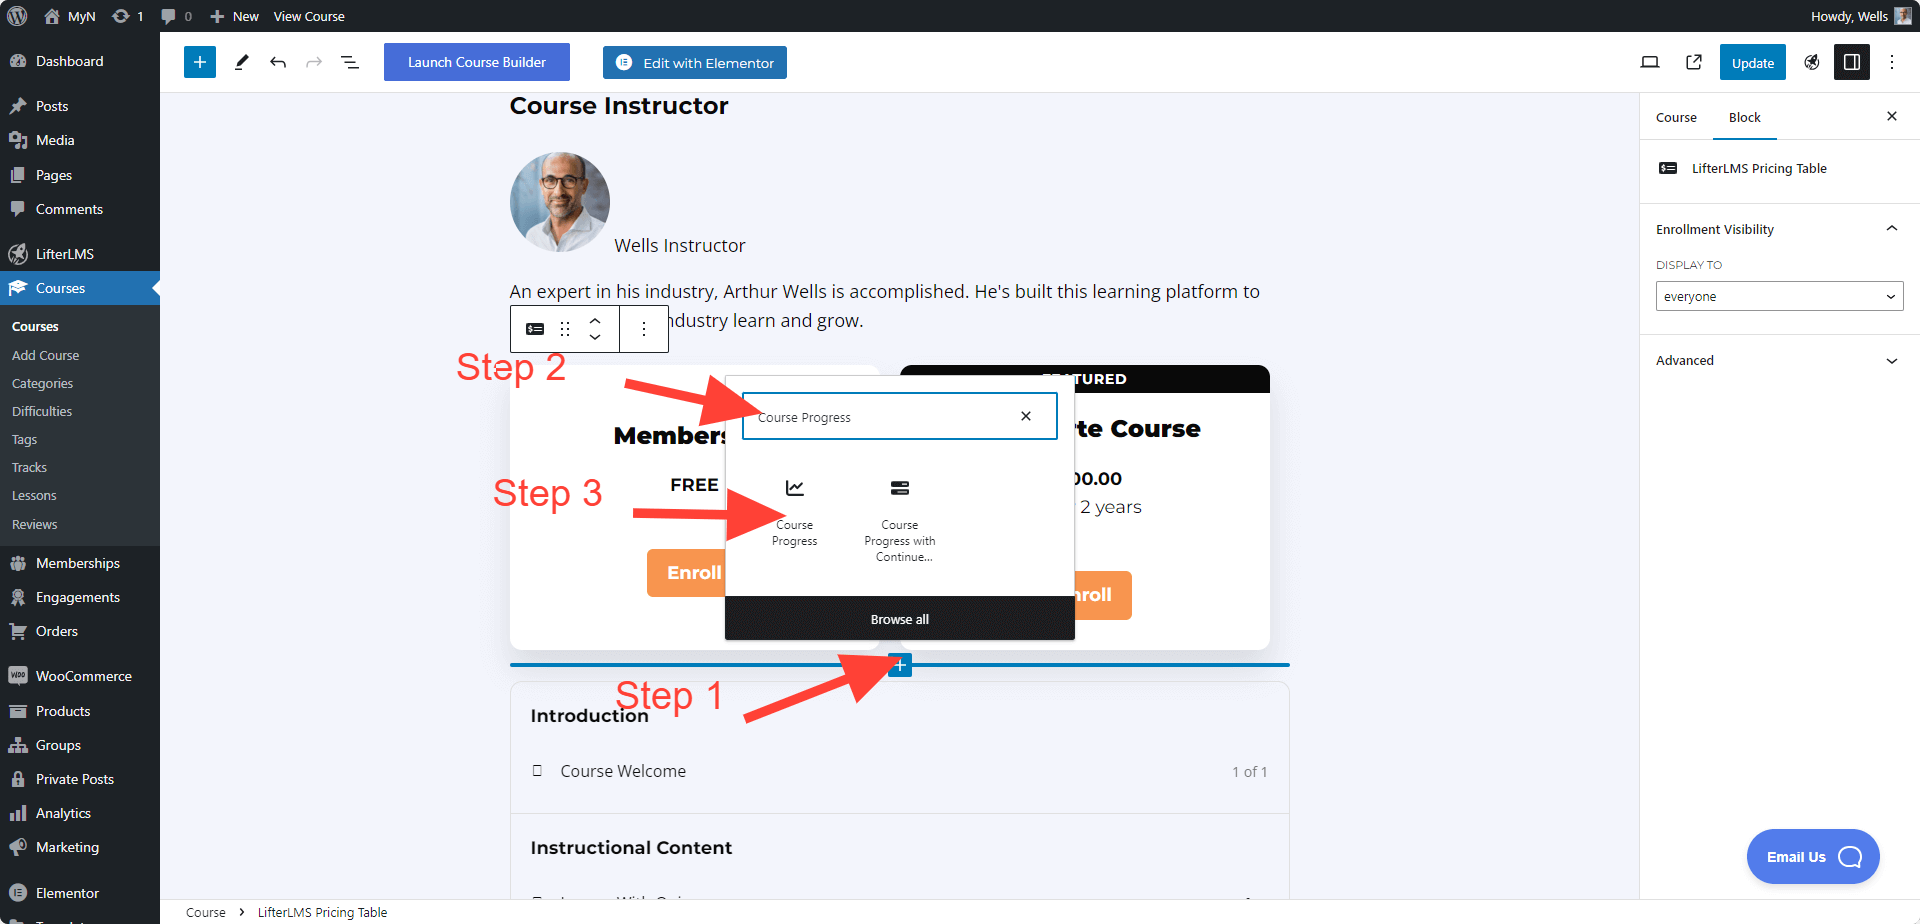
Only enrolled student will be able to see this “Course Progress” bar. This is the frontend view of this block.
Note: You can only use this block on a course page.
Video Tutorial:
We also have “Course Progress” shortcode option, if you want to use the shortcode version instead. Here is the Course Progress shortocode.
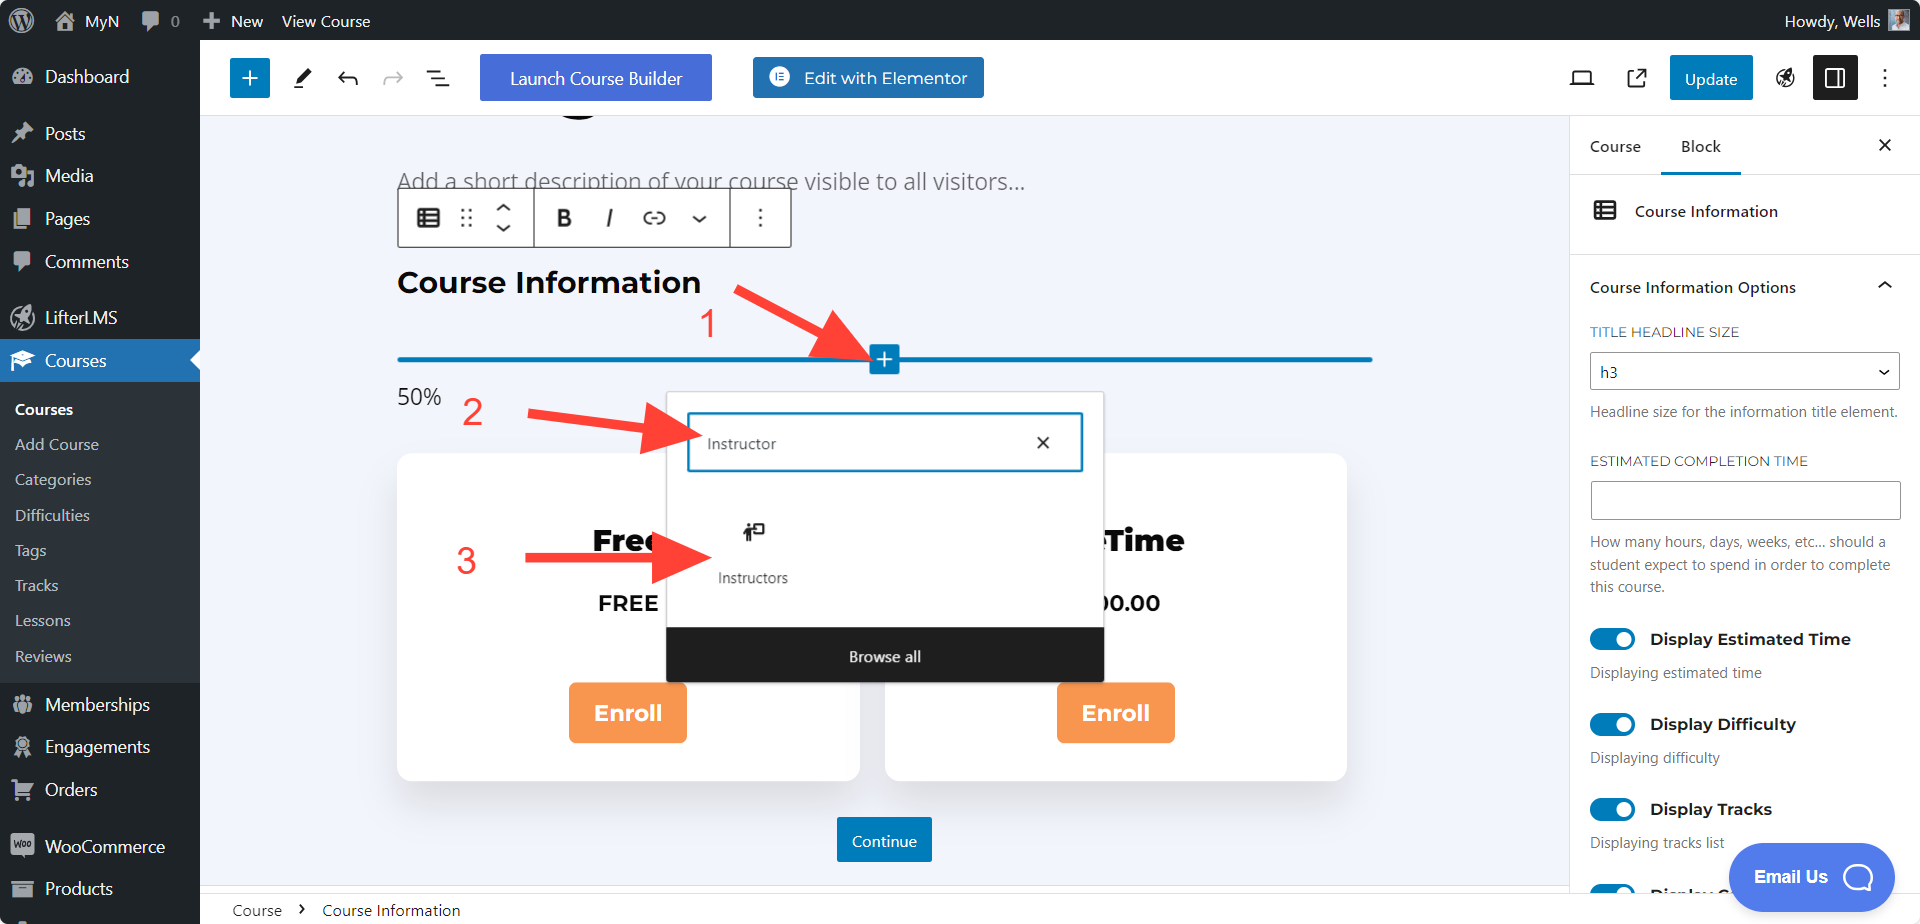
The ‘Course Meta Information’ block is designed to showcase essential details about a course, including difficulty level, estimated time, tags, category, and tracks on various pages. This versatile block can be utilized on any page. For instance, if you are creating sales content for a course, you can leverage the ‘Course Information Meta’ block to seamlessly display all pertinent information about the course.
To add this block, click on the “+” icon, search for ‘Course Meta Information,’ and then add the ‘Course Meta Information’ block to your page.
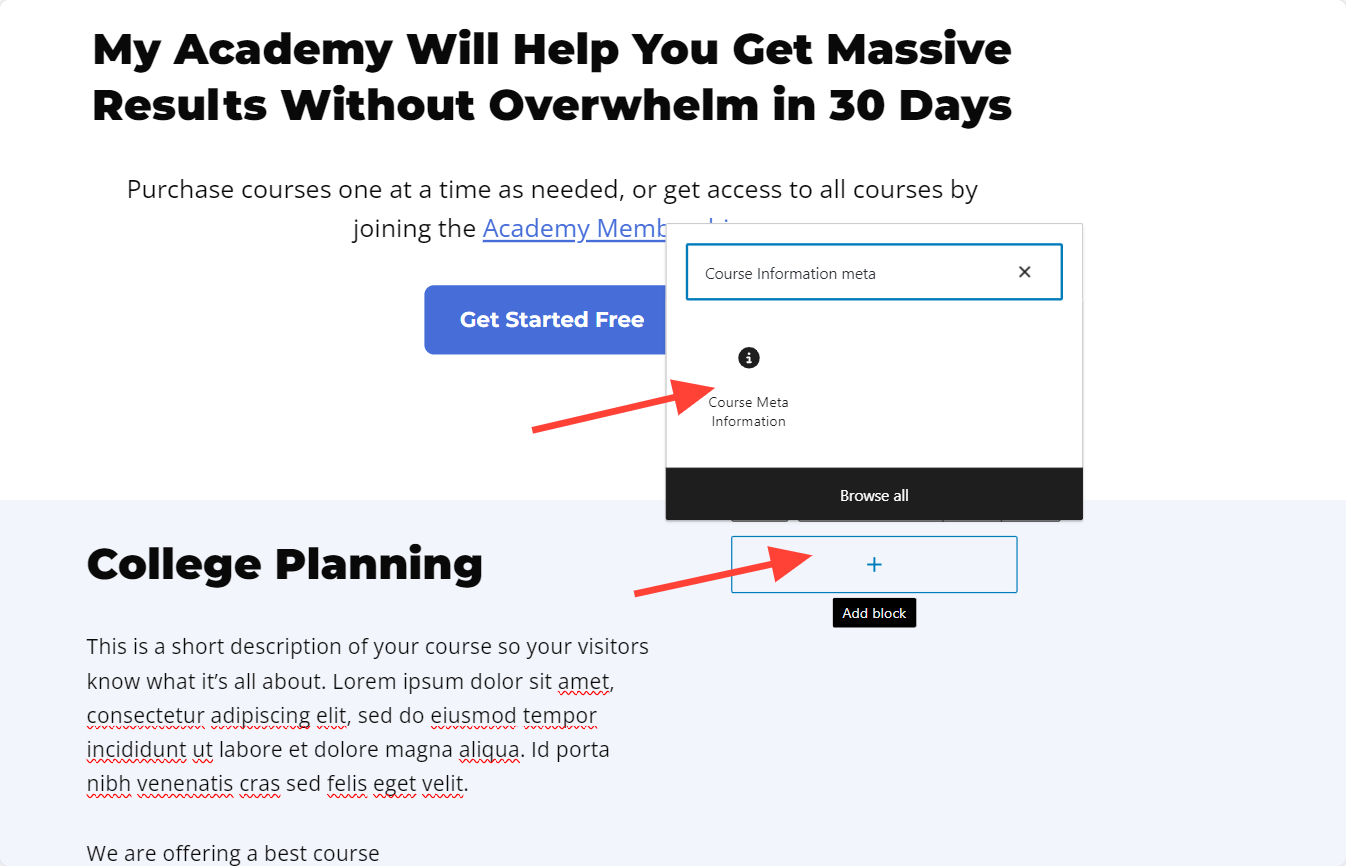
When you add this block, you will have the option to select a specific course for which you want to showcase the information. This allows you to tailor the displayed details to the particular course you are featuring.

This is the Frontend view of this block. You can organize this per your requirements.
Video Tutorial:
We also have “Course Meta Information” shortcode option, if you want to use the shortcode instead. Here is the Course Meta Information shortocode.
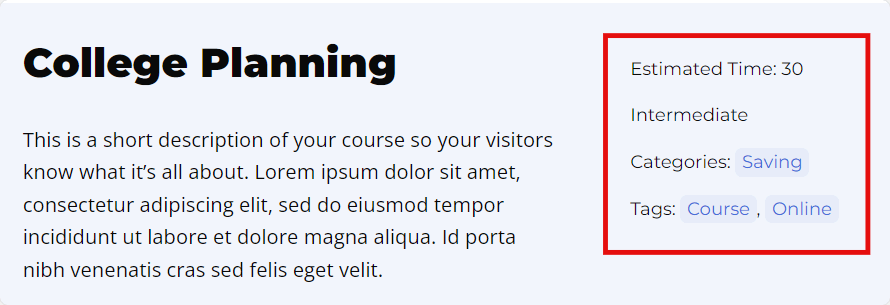
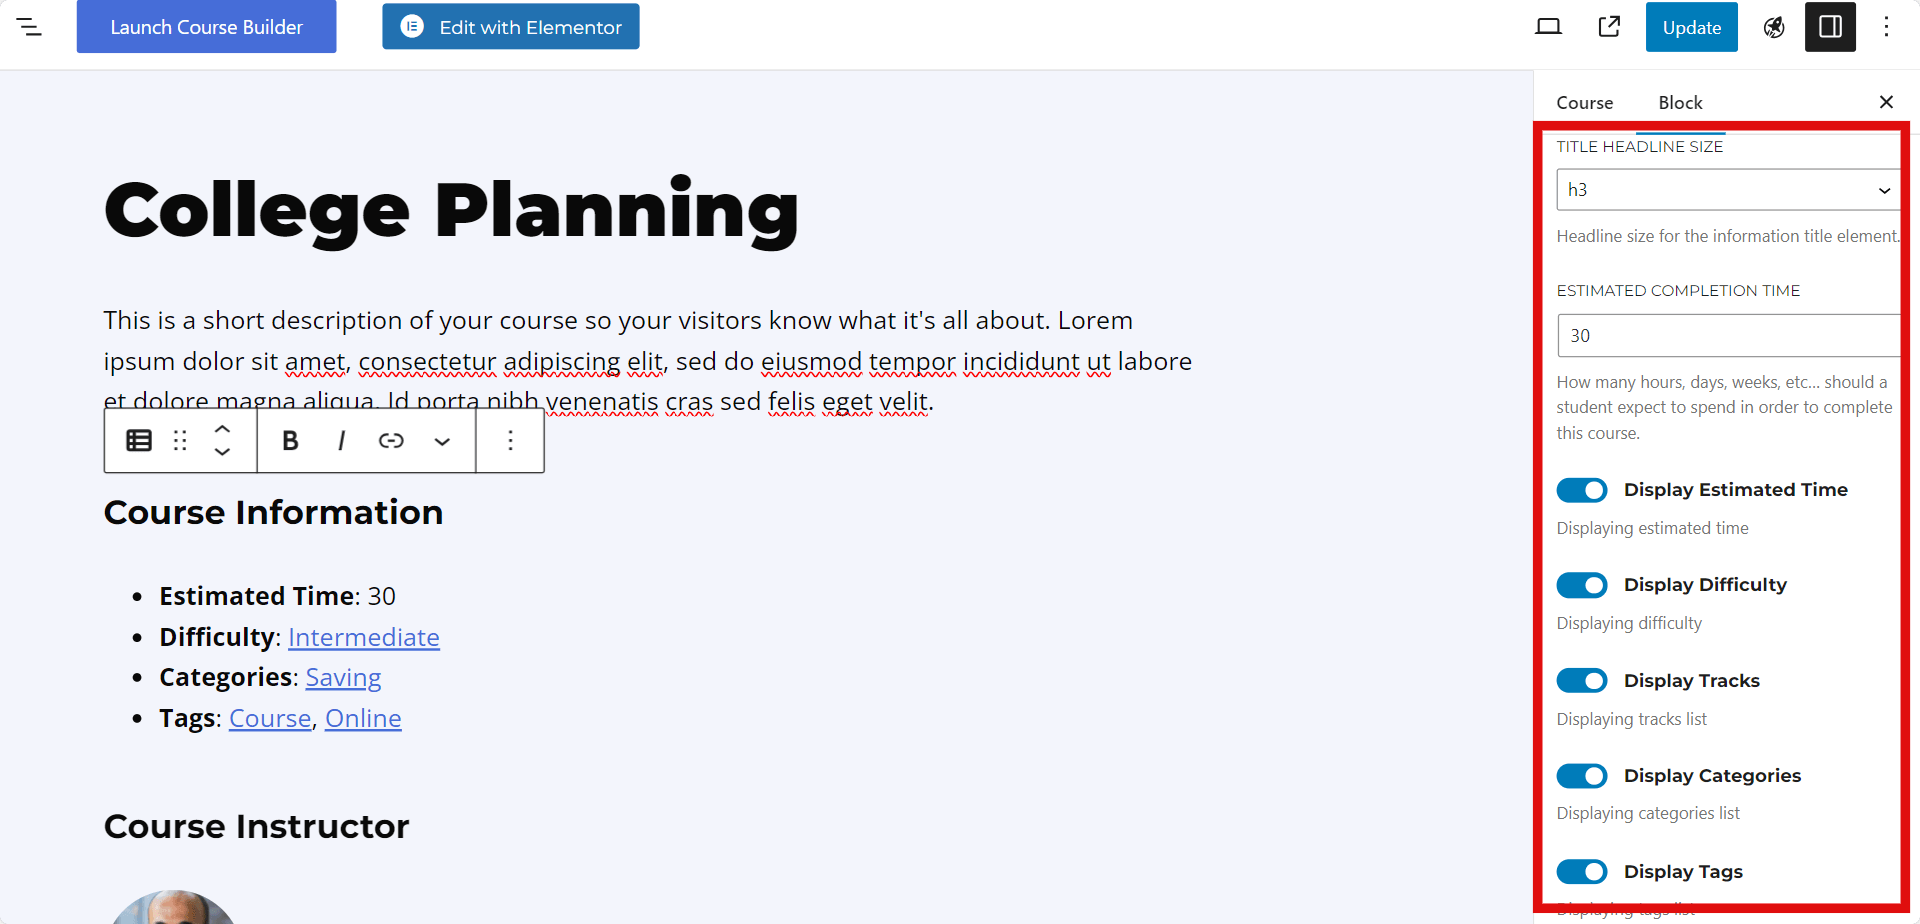
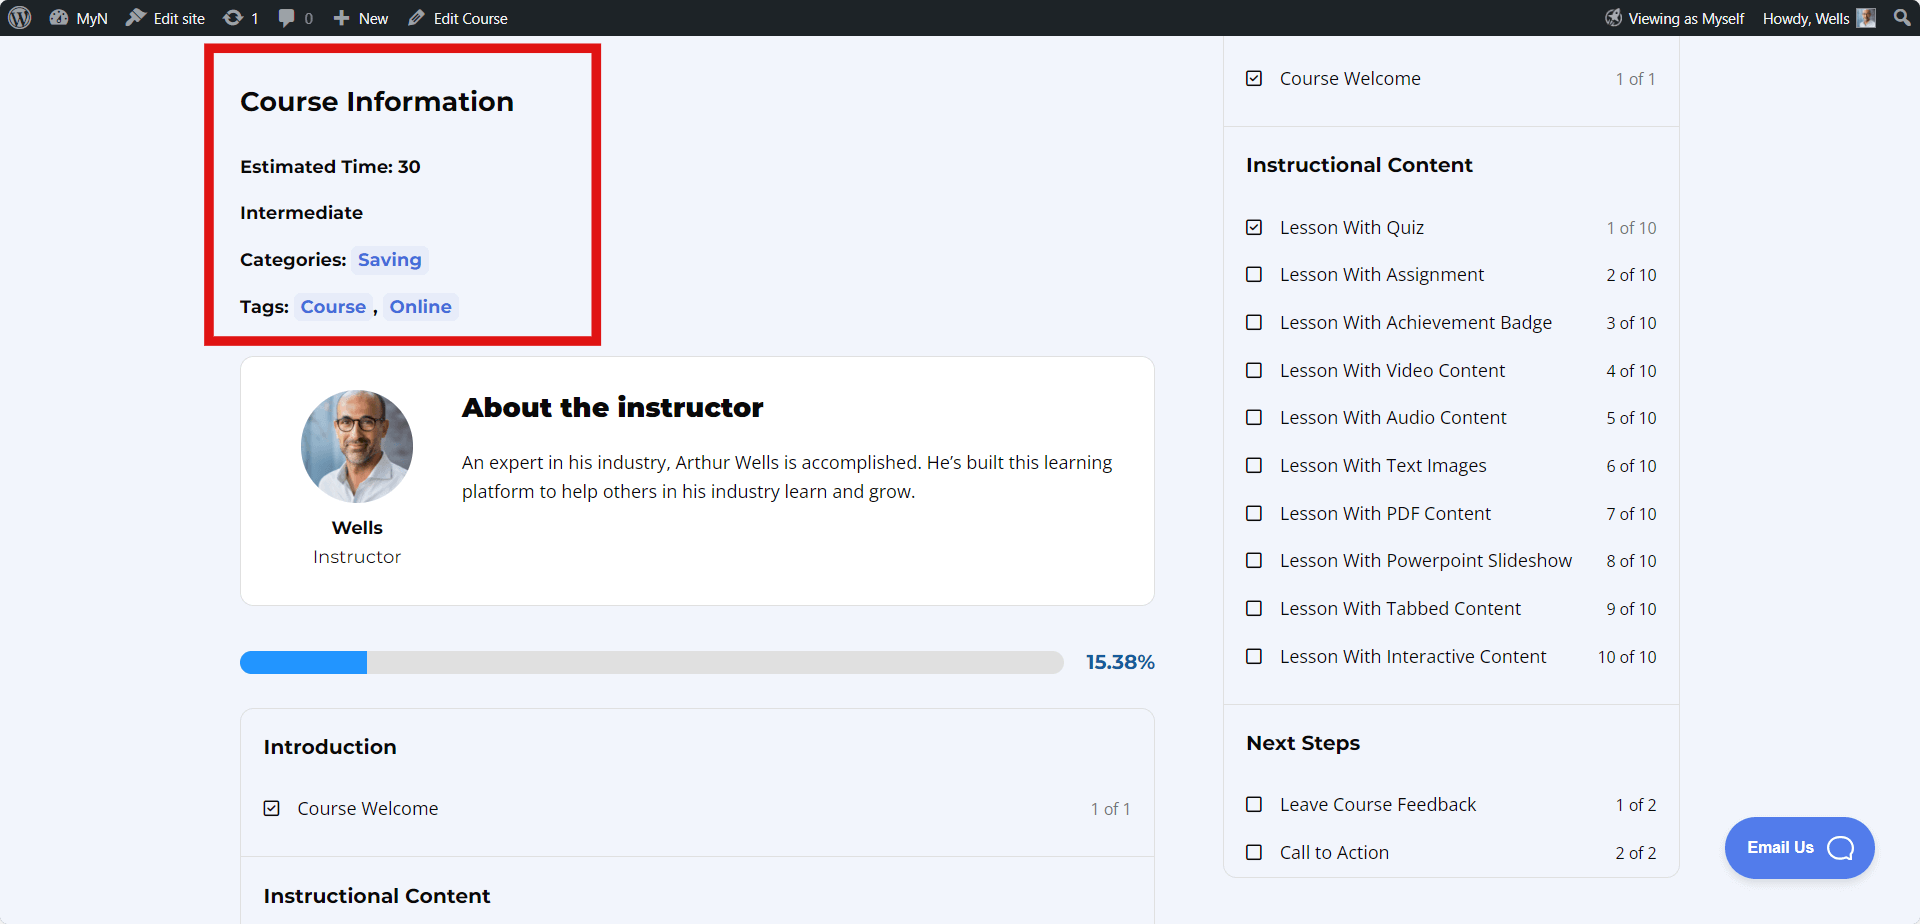
The ‘Course Information’ block is designed to showcase essential details about a course, including difficulty level, estimated time, tags, category, and tracks on a course page.
When you create a course, the ‘Course Information’ block will be visible by default, but you can choose to delete it, re-add it, and customize what information displays.
The ‘Course Information’ block helps course visitors to get an idea about your course time, level, and other characteristics.
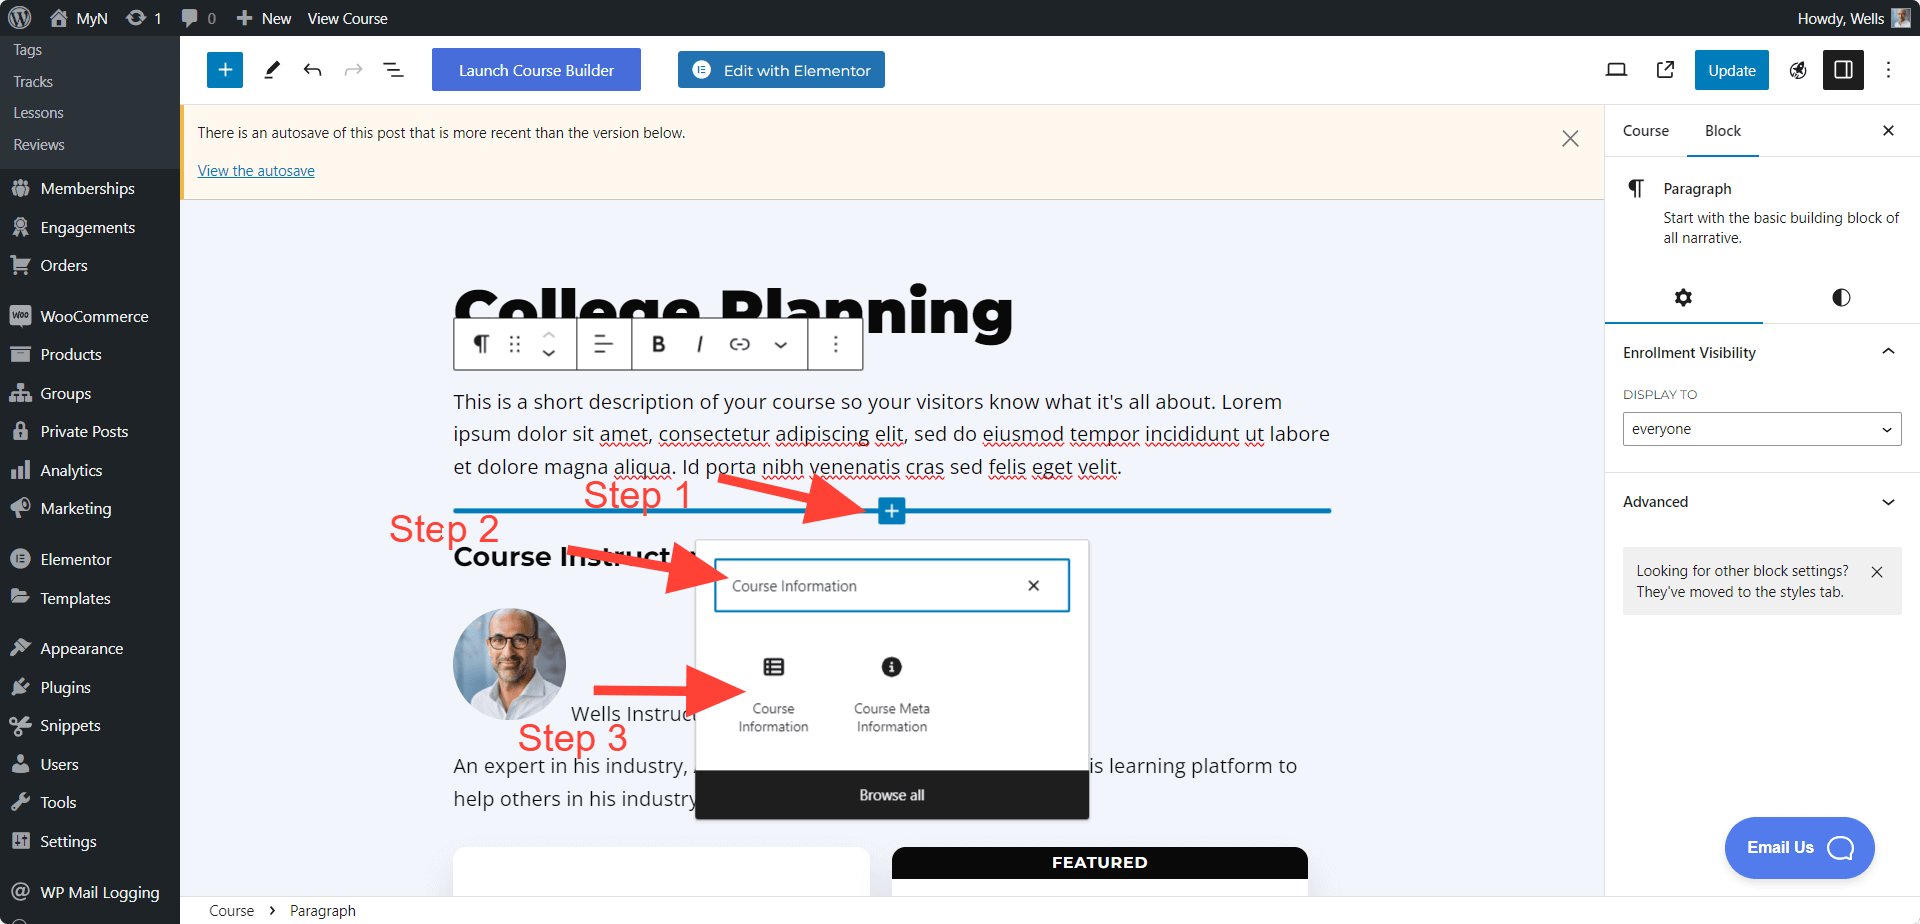
To add this block, click on the “+” icon, search for ‘Courses Information,’ and then add the ‘Courses Information’ block to your page.
Note: You can use the ‘Course Information’ block only on a course page.
This block includes a couple of options. You can change heading styles and choose which course information items to display.
Here is the Frontend view of the “Course Information” block:
Video Tutorial:
We also have a “Course Information” shortcode option if you want to use a shortcode instead. Here is the Course Information shortocode.
“LifterLMS Login” block helps you add a login option to your pages. For example, if you want to create a custom front page and require all logged-out users to log in first to access the front page content, this block allows that.
To add this block, click on the “+” icon, search for ‘LifterLMS Login,’ and then add the ‘LifterLMS Login’ block to your page.
Note: You can add the “LifterLMS Login” and “LifterLMS Register” blocks together for a better scenario. So that visitors have both the option to login and register.
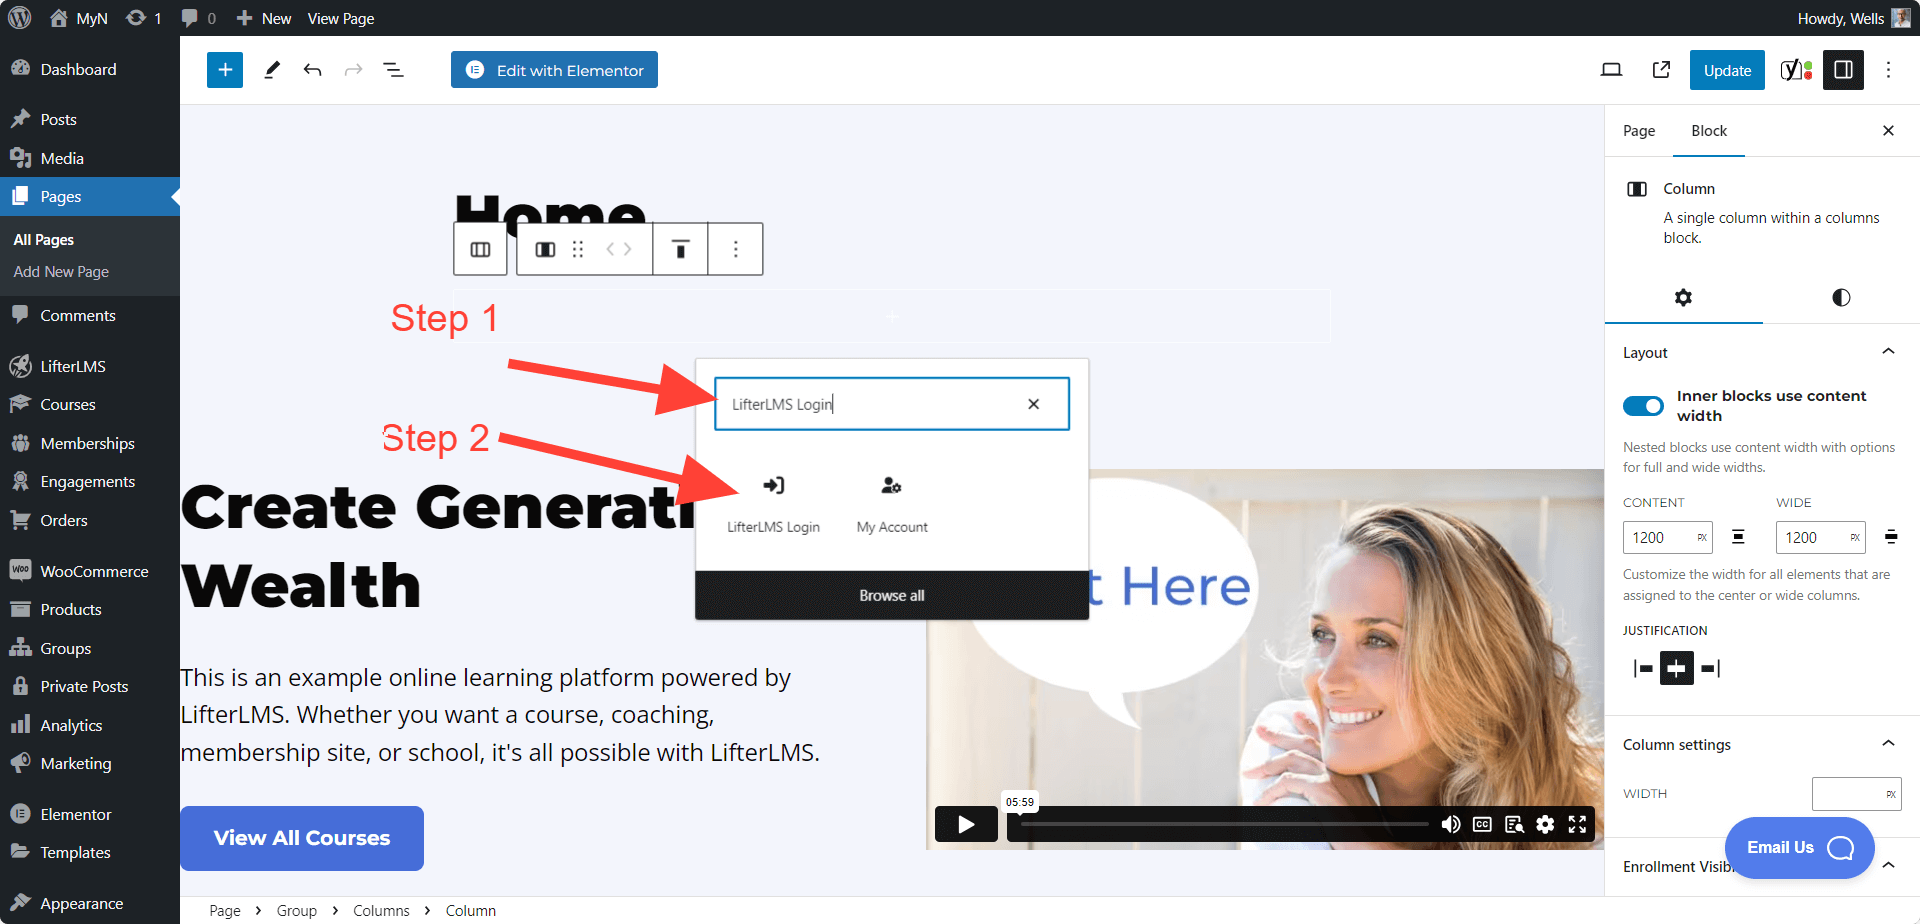
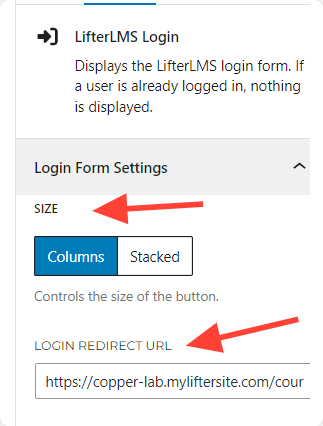
When you add the ‘LifterLMS Login’ block, you will be able to add a link to where you want to redirect people after successful login. By default if you add the ‘LifterLMS Login’ block on the homepage, they will remain on the homepage after successful login, but if you want to, you can redirect them to another page as well.
Also you can select the button size.
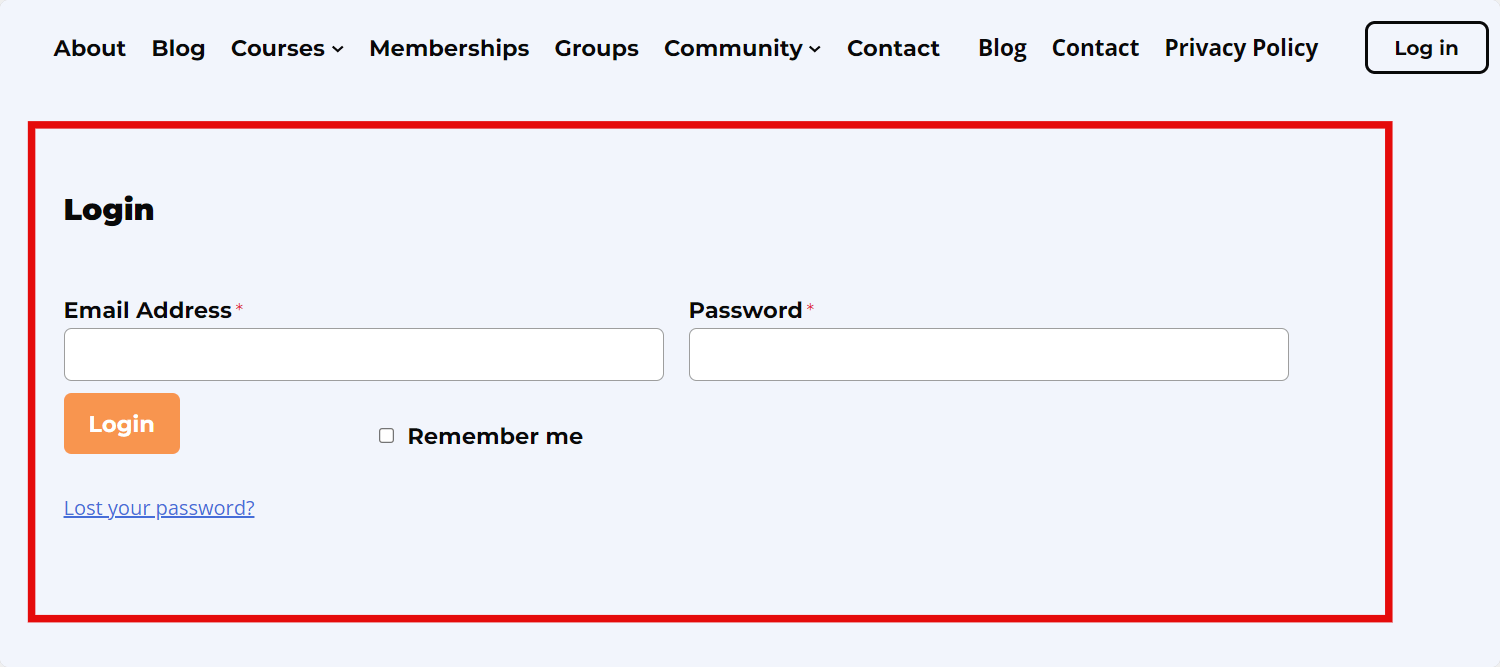
Here is the Frontend look of the ‘LifterLMS Login’ block:
Video Tutorial:
We also have a “LifterLMS Login” shortcode option, if you want to use the shortcode instead. Here is the LifterLMS Login shortocode.
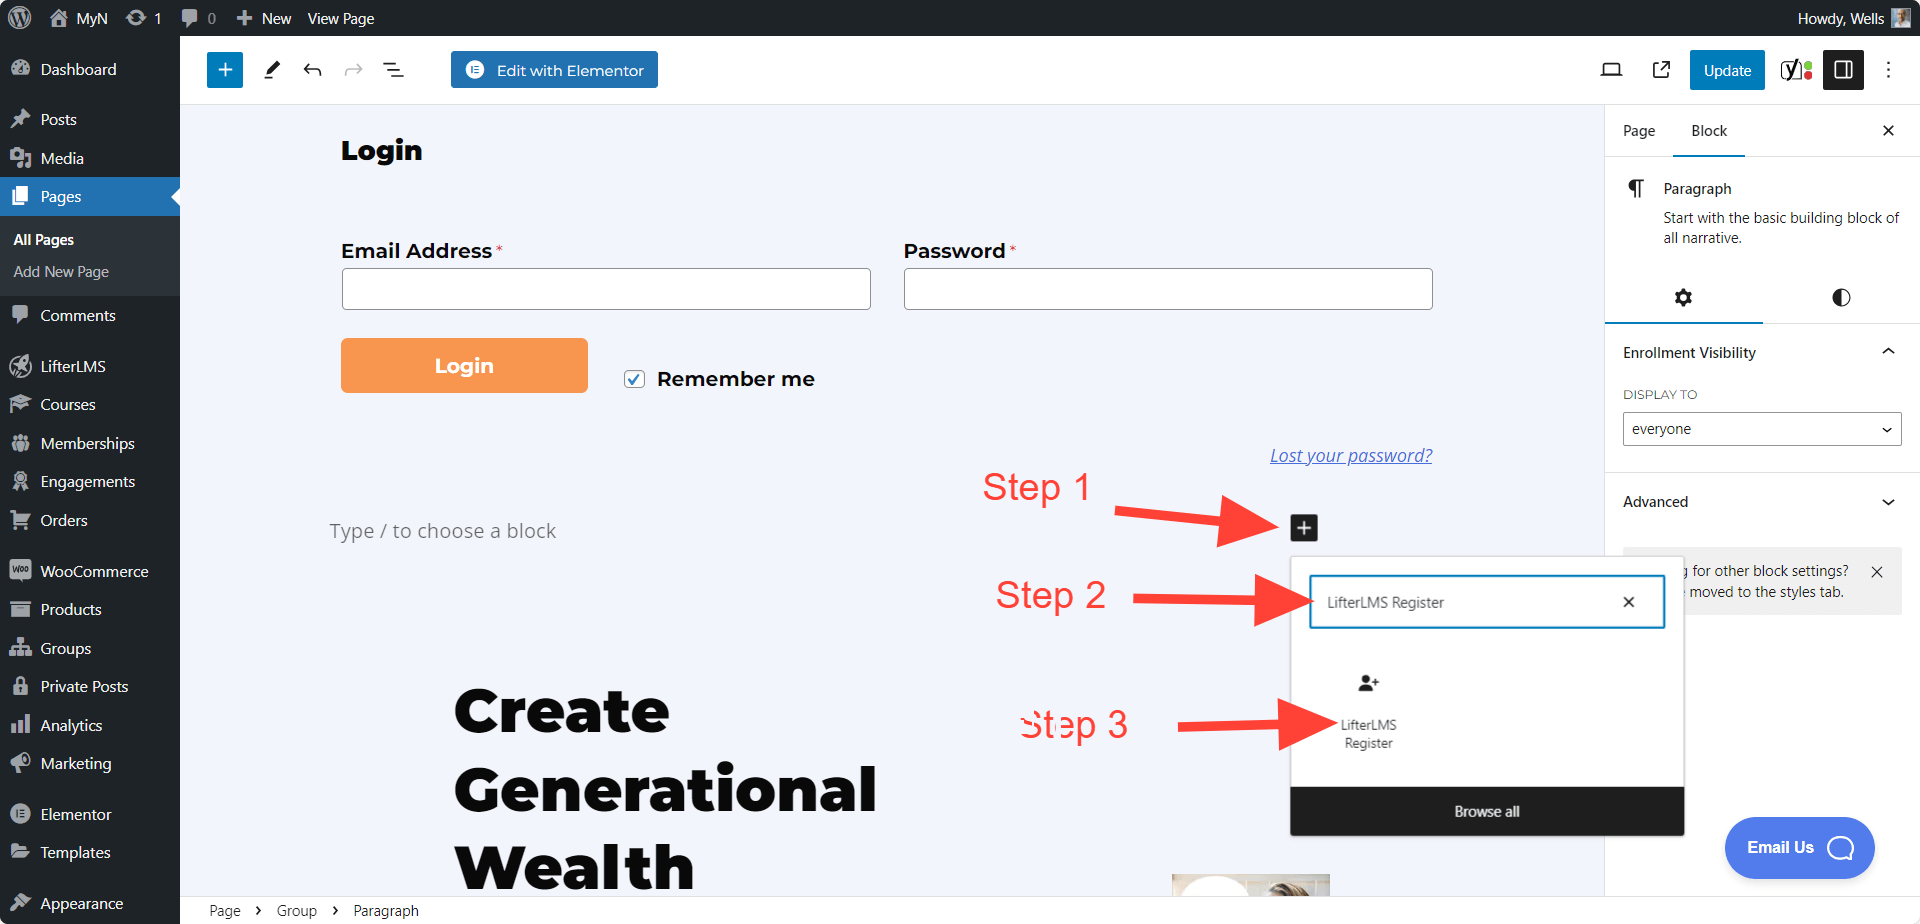
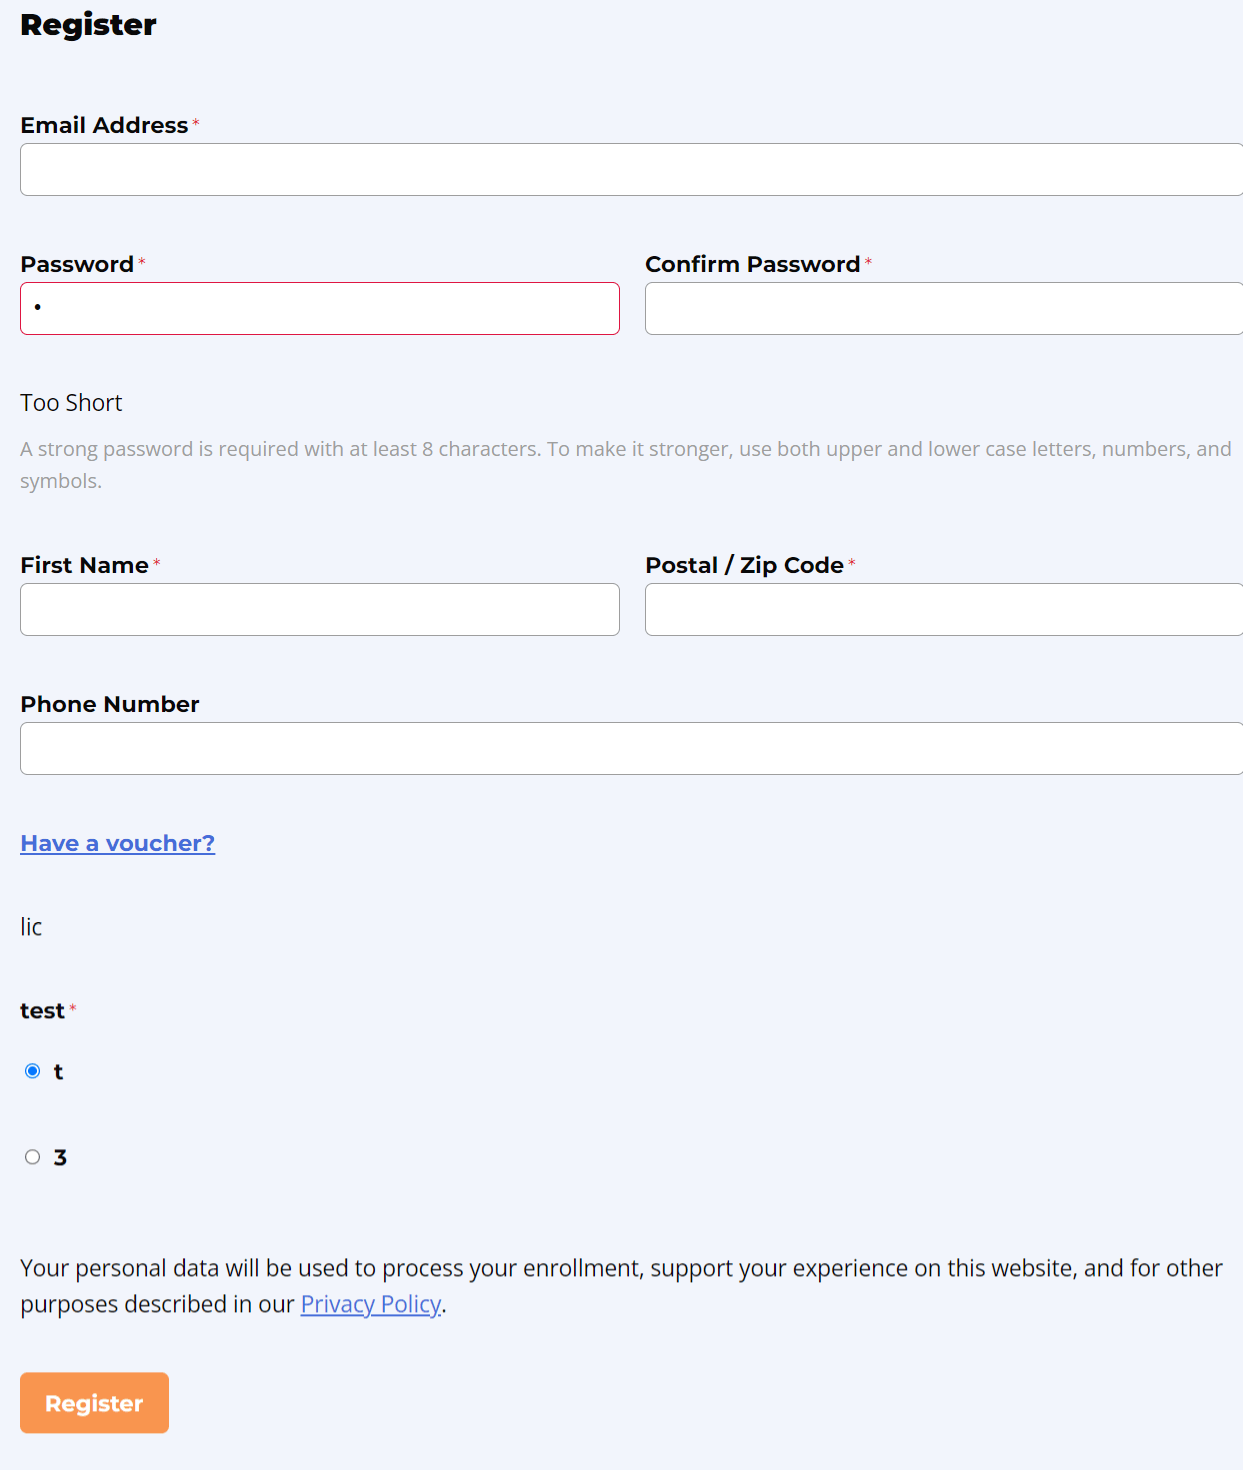
The “LifterLMS Register” block helps you add a user registtation form to your pages. For example, if you want to create a custom front page and require all logged-out users to register first to access the front page content, this block is important.
To add this block, click on the “+” icon, search for ‘LifterLMS Register,’ and then add the ‘LifterLMS Register’ block to your page.
This is the Frontend view of the “LifterLMS Register” block. You can customize the registration form fields as well in LifterLMS > Forms.
Video Tutorial:
We also have “LifterLMS Register” shortcode option, if you want to use the shortcode instead. Here is the LifterLMS Register shortocode.
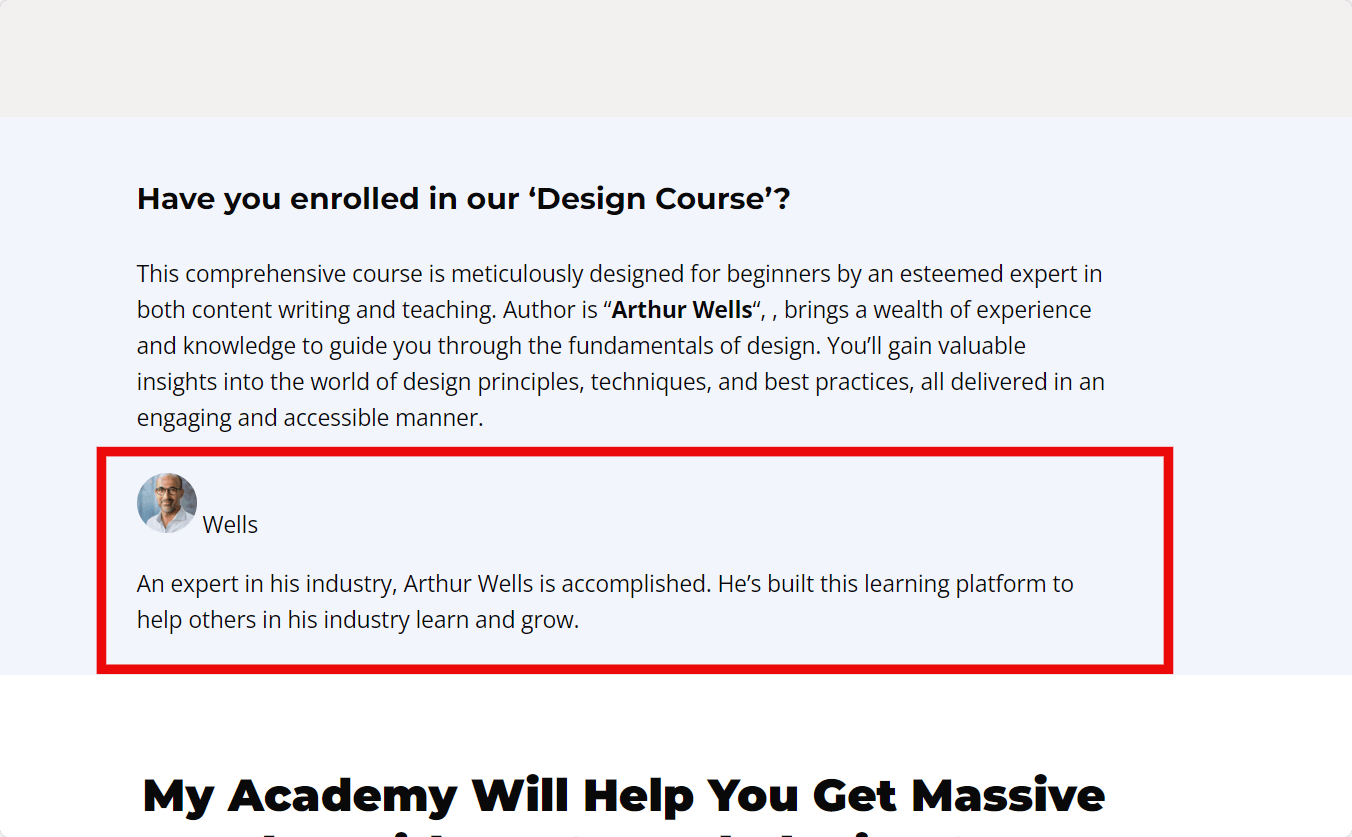
The ‘Course Author‘ block helps display the course author on a page or anywhere you prefer. For instance, if you want to include an author list or showcase course sales content on a page, you can also add the course author. This way, users can easily identify who the author of the course is.
To add this block, click on the “+” icon, search for ‘Course Author,’ and then add the ‘Course author’ block to your page.
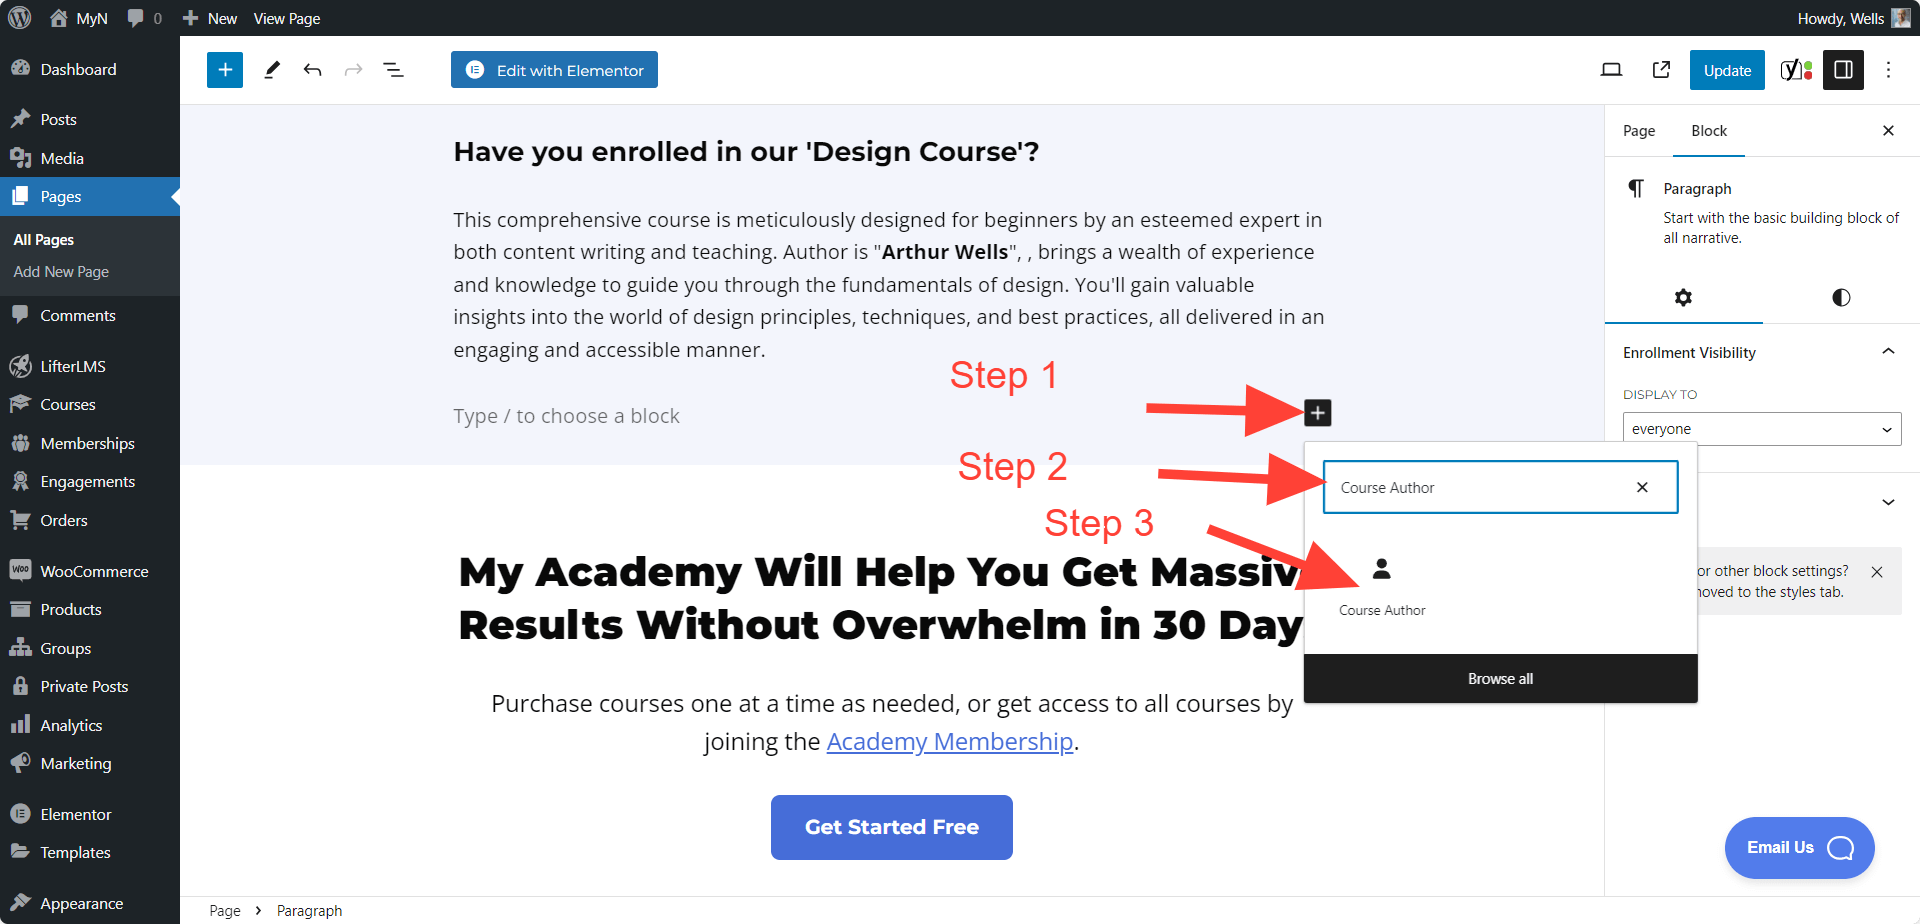
When you add the ‘Course Author’ block, you will be able to select which course author you want to display, avatar size, and you can enable or disable the author bio.
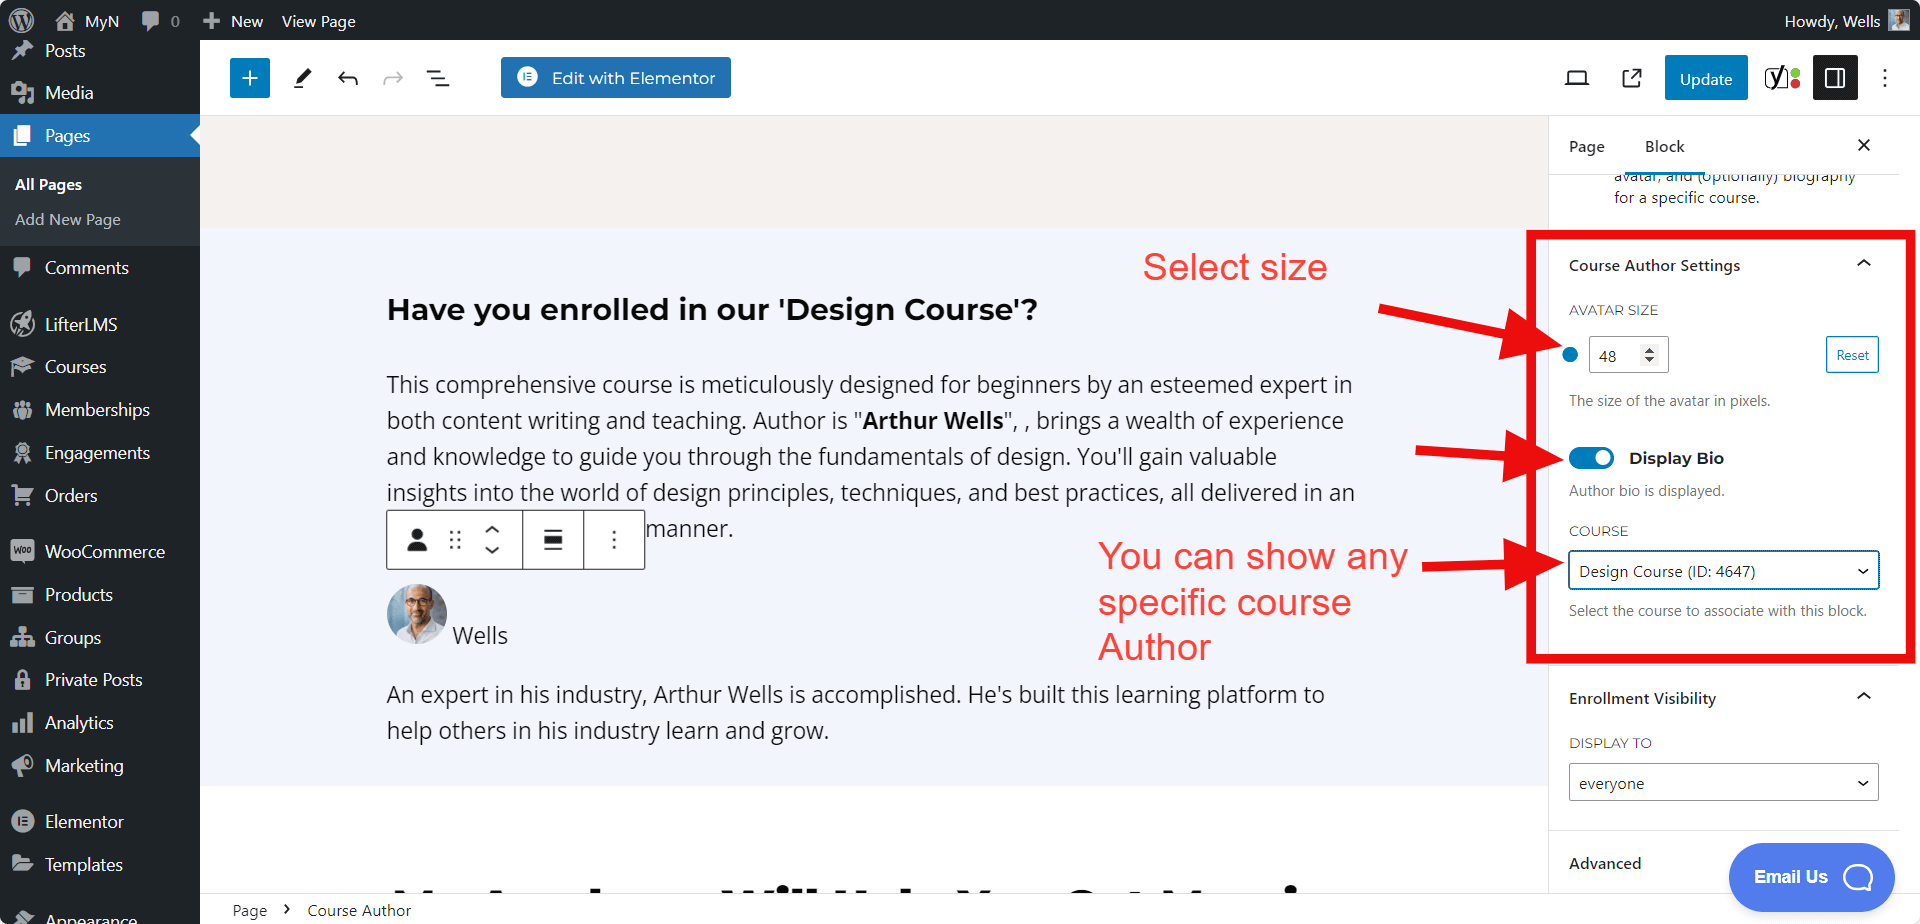
This is the Frontend view for this block.
Video Tutorial:
We also have a “Course Author” shortcode option, if you want to use the shortcode instead. Here is the Course Author shortocode.
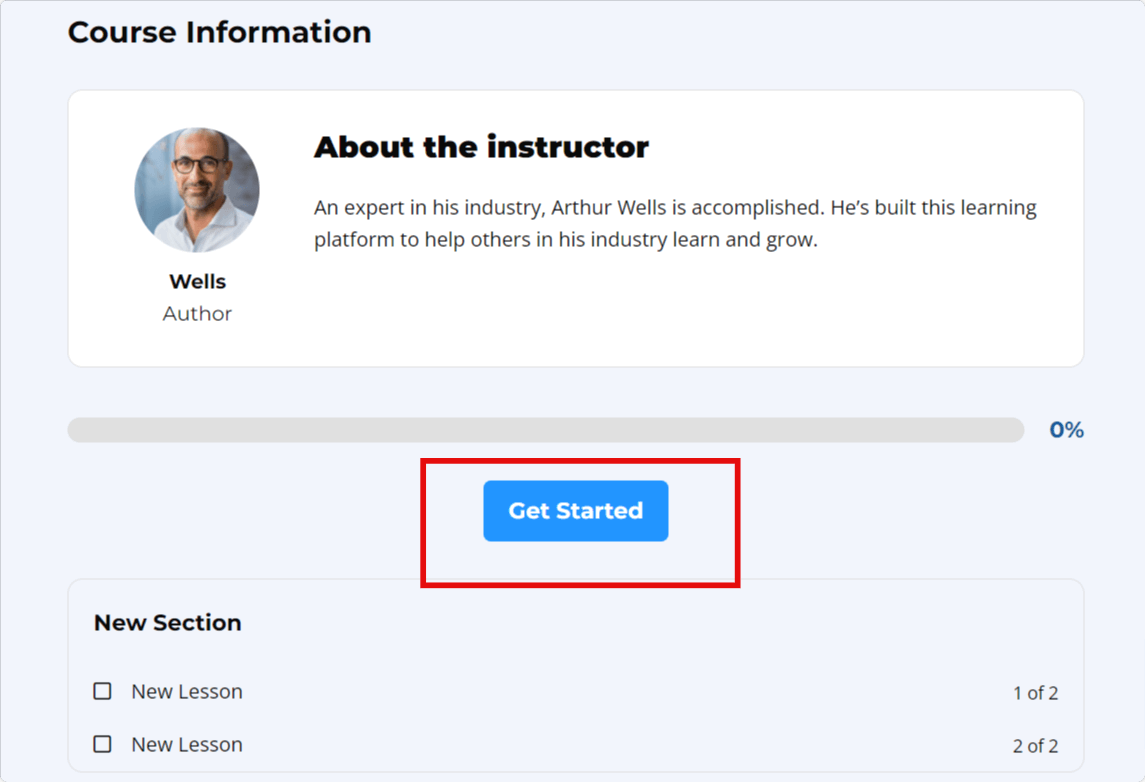
The “Course Continue button” block helps users add a ‘Get Started’ button on the frontend. For example, when you add this block, your users will have a ‘Get Started’ button on the frontend. When they click on it, they will begin from lesson 1. And if you complete lesson 1 and log out and when again you will login and will click on that button it will automatically start from lesson 2.
Without this ‘Continiue’ button, users would need to manually click on a lesson to begin.
To add this block, click on the “+” icon, search for ‘Course Continue button,’ and then add the ‘Course Continue button’ block to your page.
This is the Frontend view of the “Course Continue Button” block.
Note: You only can add this block on your course page
Video Tutorial:
We also have “Course Continue Button” shortcode option, if you want to use shortcode. Here is the Course Continue Button shortocode.
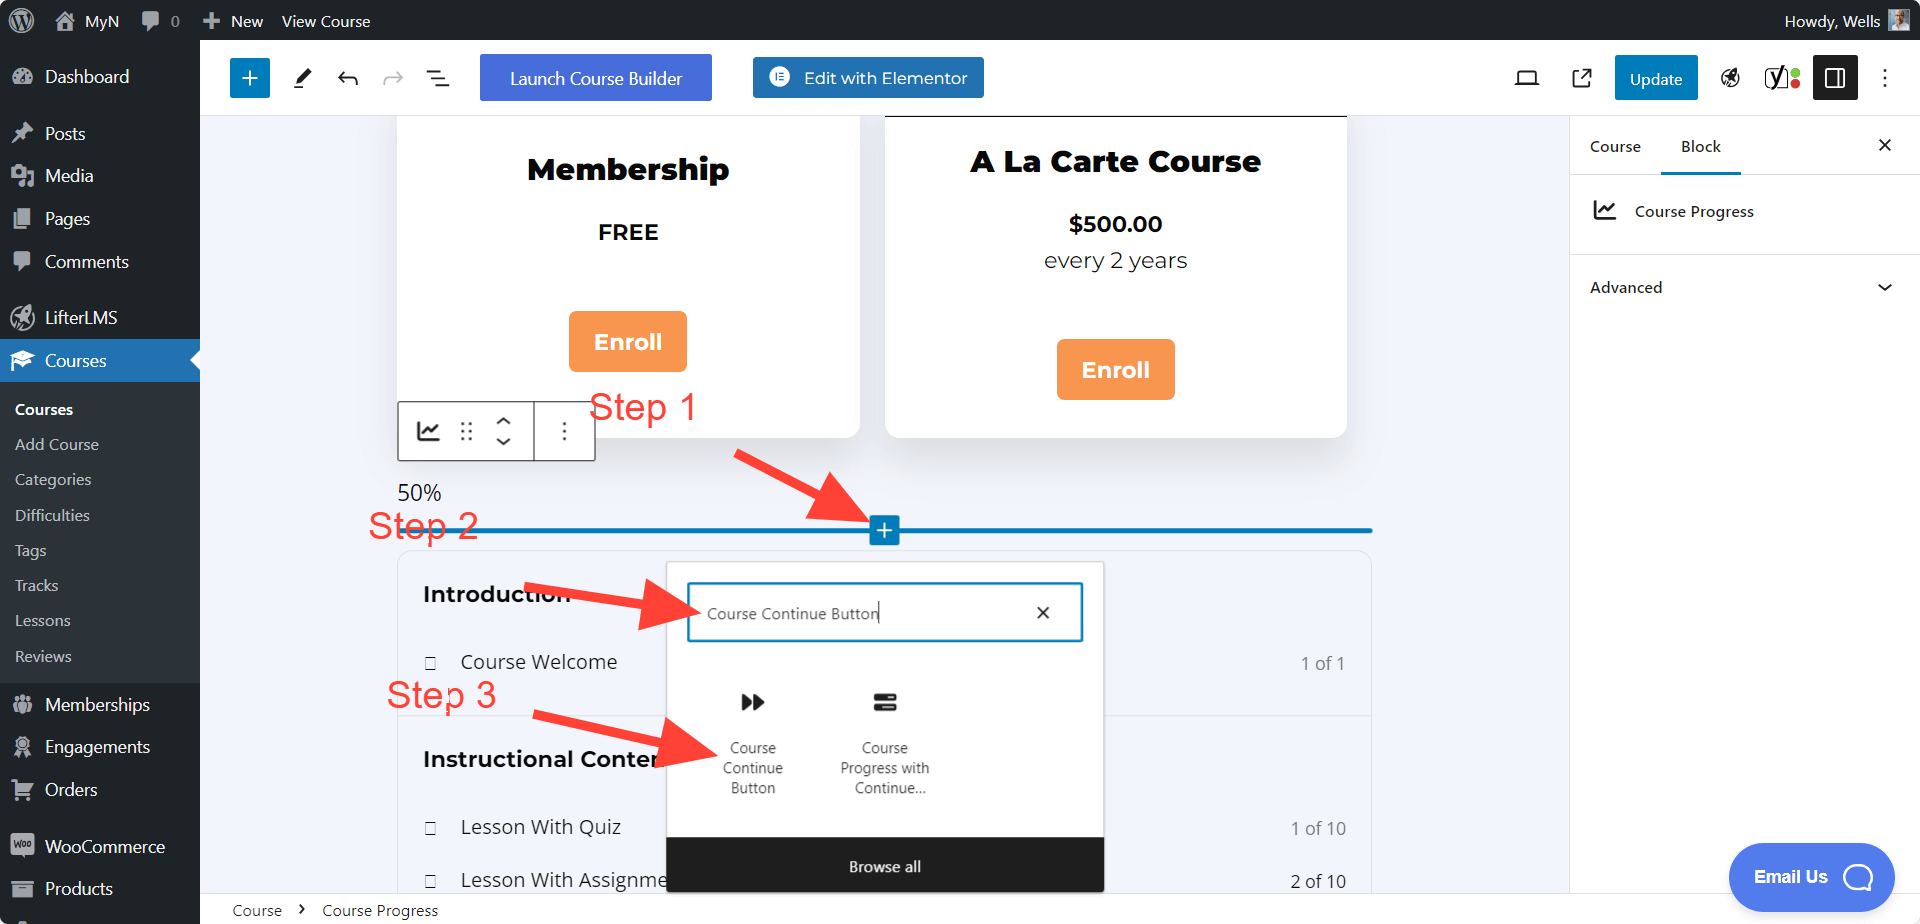
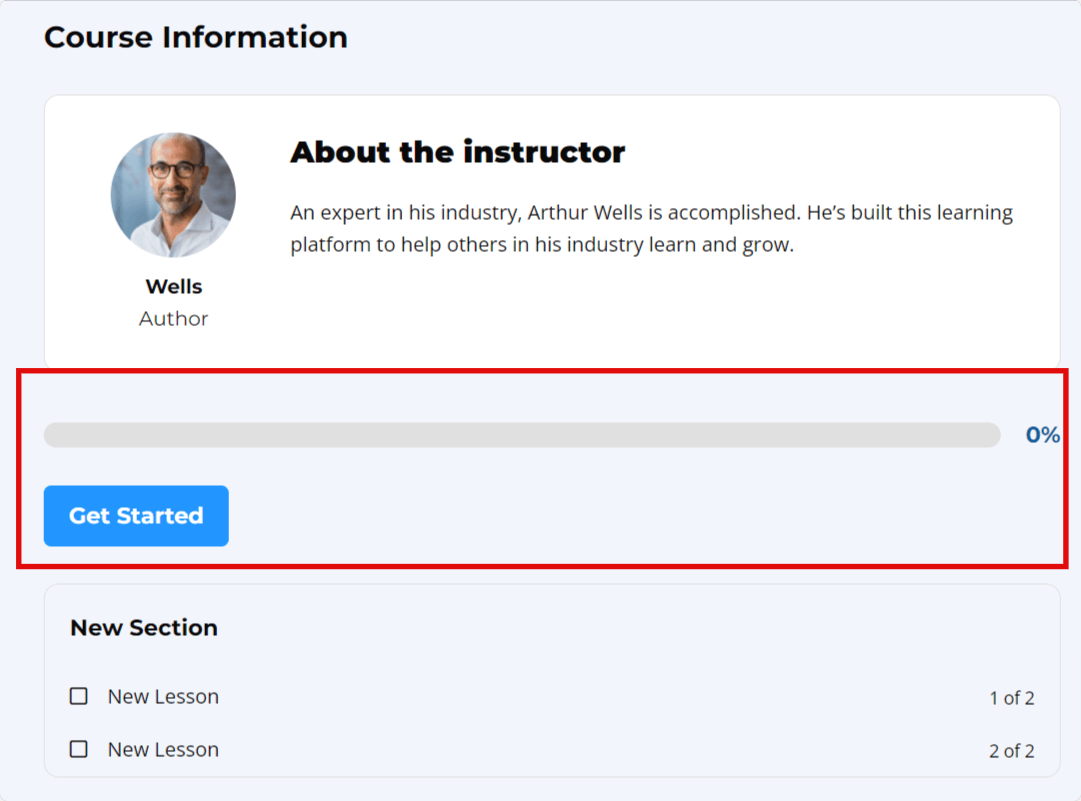
In the LifterLMS blocks, we offer two individual blocks: the ‘Course Progress’ and ‘Course Continue Button’ blocks. These blocks allow users to add a progress bar and a ‘Get Started’ button separately.
Additionally, we provide a combined block called ‘Course Progress with Continue Button.’ This block includes both the progress bar and the ‘Continue’ button, and it can be added to any page.
For instance, if you wish to display the progress bar for an enrolled user in a specific course on any page, and enable them to begin the course directly from that page, then this combined block is the ideal choice.
To add this block, click on the “+” icon, search for ‘Course Progress with Continue Button,’ and then add the ‘Course Progress with Continue Button’ block to your page.
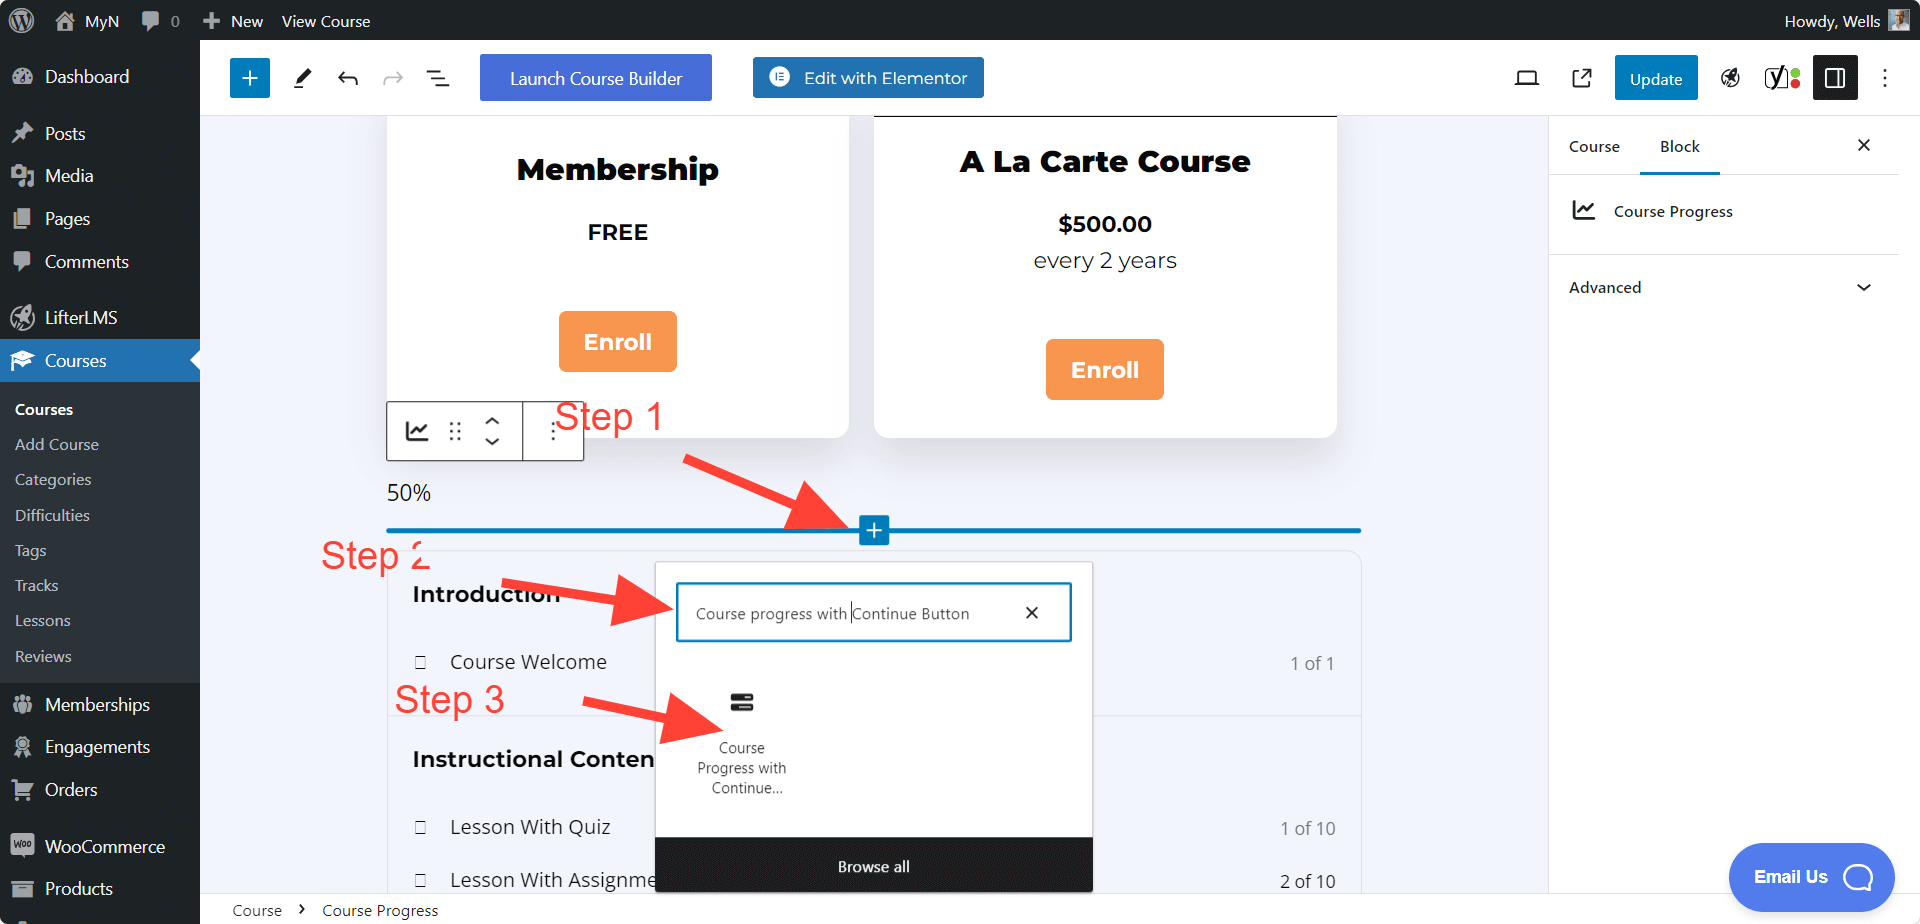
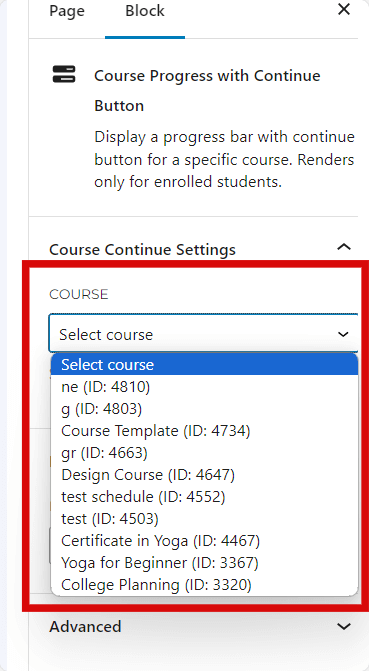
By adding the block and selecting a specific course, only the students enrolled in that course will see their progress and the ‘Continue’ button.
When you add this block to other pages, you will need to select a specific course for which you want to display the progress.
Here is the Frontend view of this block:
Video Tutorial:
We also have a “Course Progress with Continue Button” shortcode option, if you want to use the shortcode instead. Here is the Course Progress with Continue Button shortocode.
The “Course Outline” block helps to display the course outline, and you can use this block on any page you want. This helps users understand your lessons.
To add this block, click on the “+” icon, search for ‘Course Outline,’ and then add the ‘Course Outline’ block to your page.
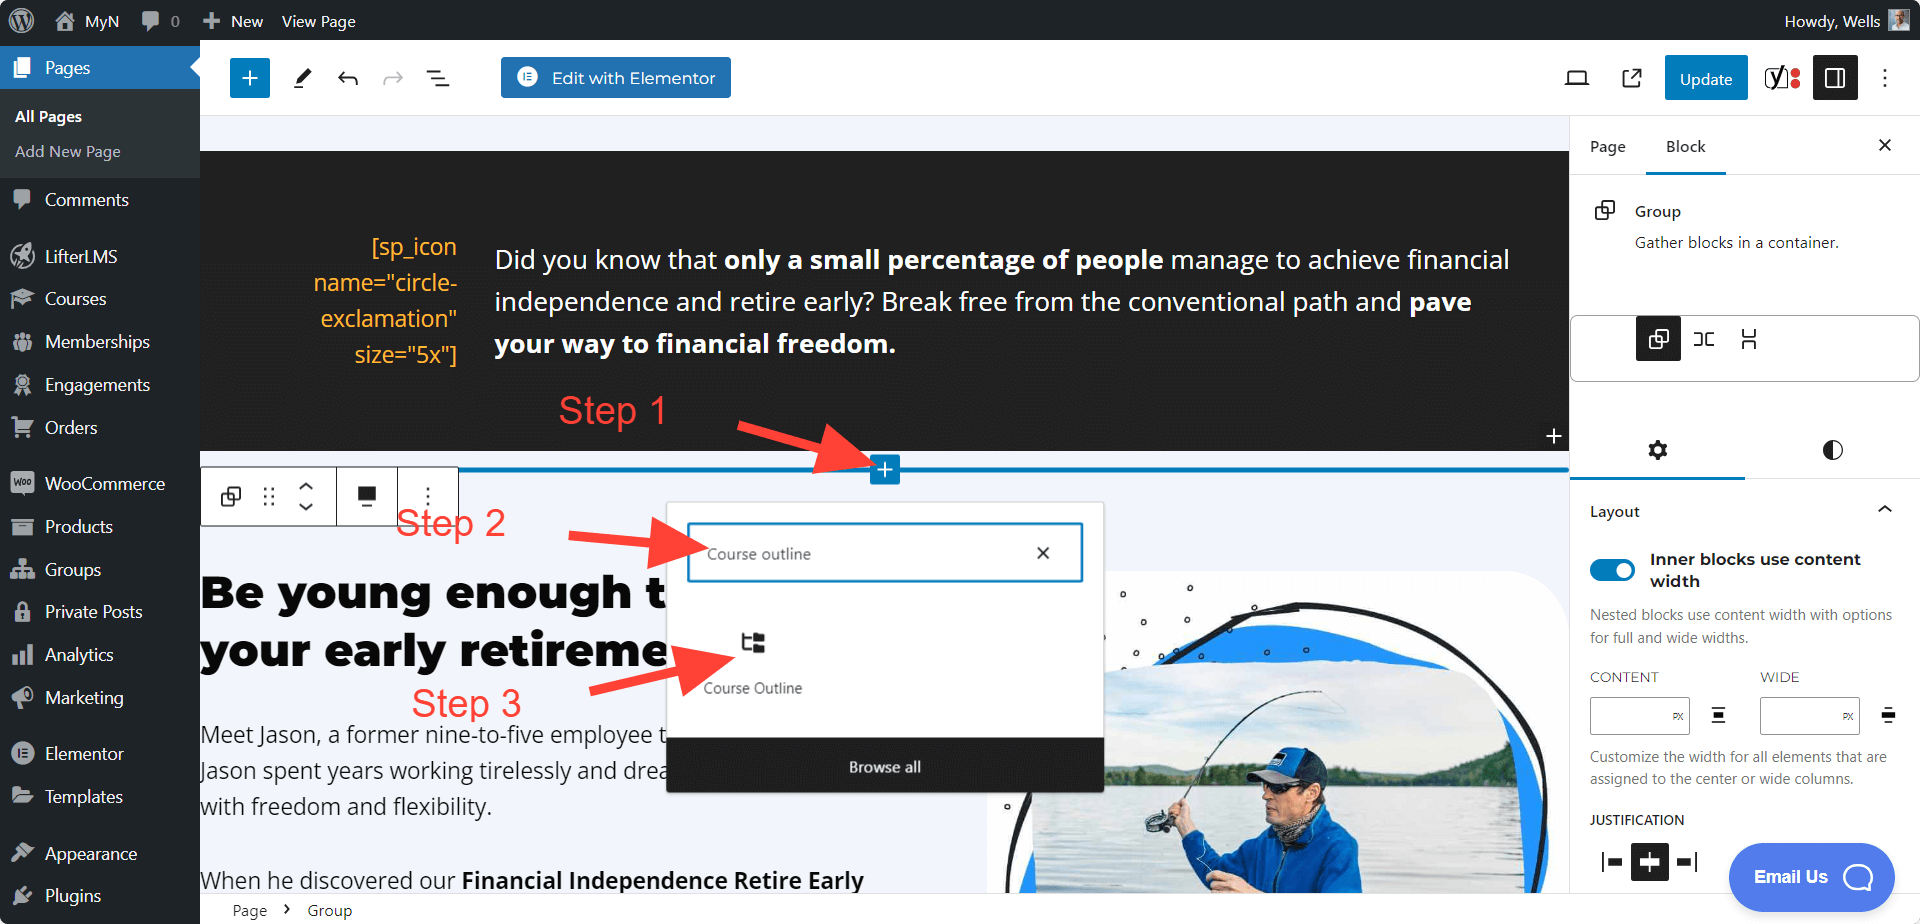
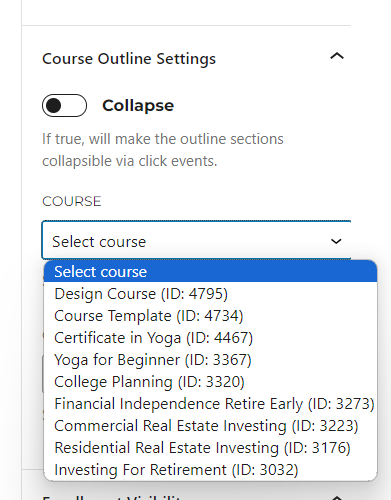
With this block, you can display the full course outline or just the outline of the current section. When you add this block, you will be able to select a specific course. At that time, the specific course outline will be visible on this page.
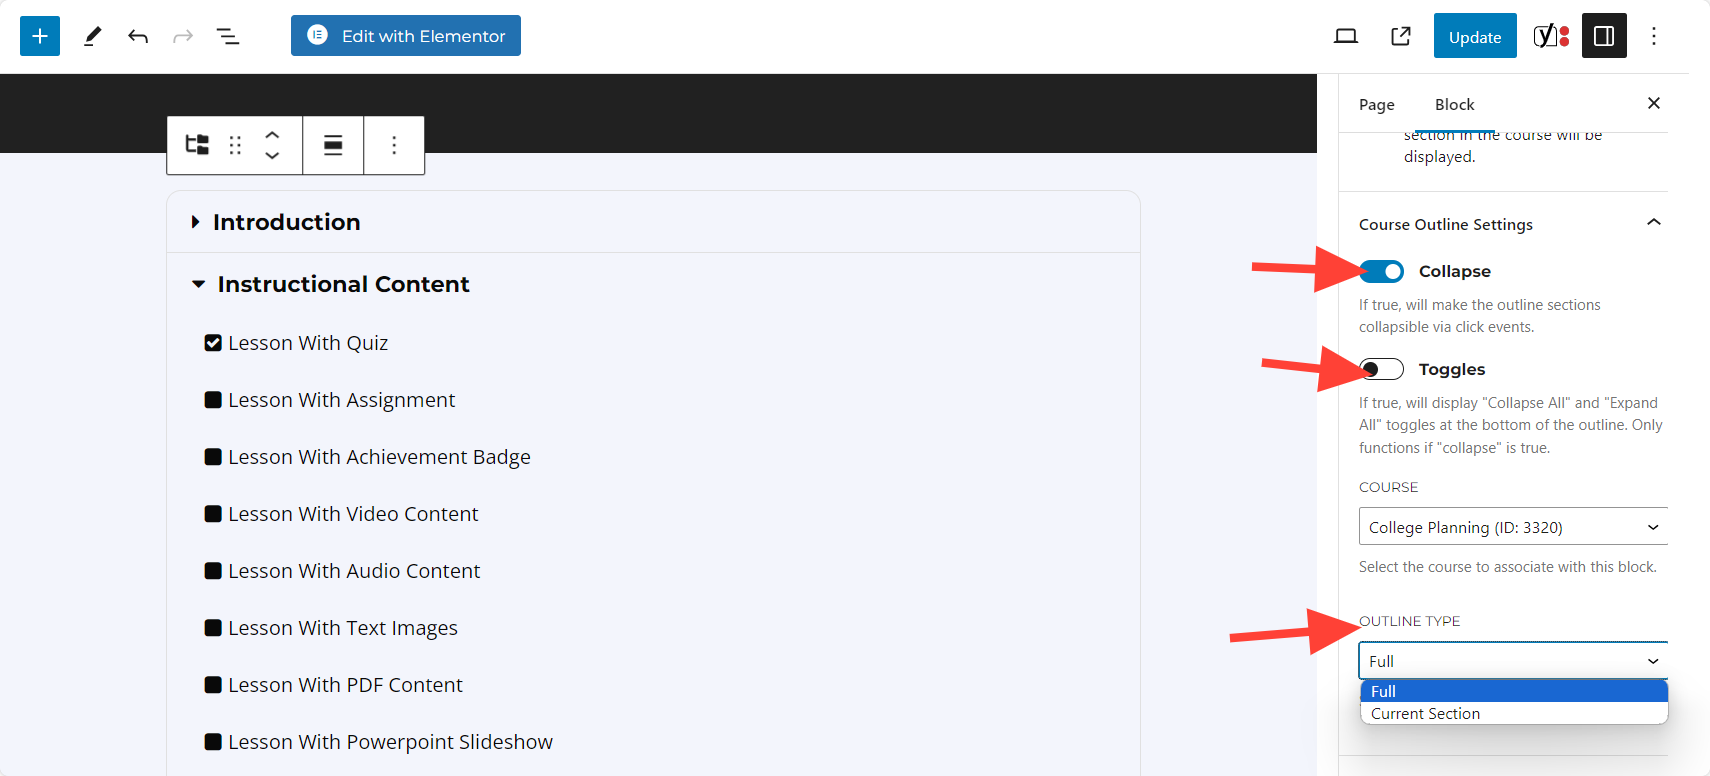
In the course outline settings, there are additional options such as ‘Collapse.’ Enabling this option will make the outline sections collapsible via click events.
If you enable ‘Toggles,’ it will display ‘Collapse All’ and ‘Expand All’ toggles at the bottom of the outline. This function only works if ‘Collapse’ is set to true.
There is also a ‘Course Type’ option. If you want to display the full course outline, you can select that option. Alternatively, you can choose to show only the current section.
Here is the Frontend view of the Course Outline block.
We also have a “Course Outline” shortcode option, if you want to use the shortcode instead. Here is the Course Outline shortcode.
The ‘Course Prerequisite’ block shows a notice describing unfulfilled prerequisites for a course. For example, if you have a course “B” with prerequisite course A, when people visit the course B sales content, you can display a message informing them that they need to complete course A first to access the content of course B.
To add this block, click on the “+” icon, search for ‘Course Prerequisite,’ and then add the block to your page.
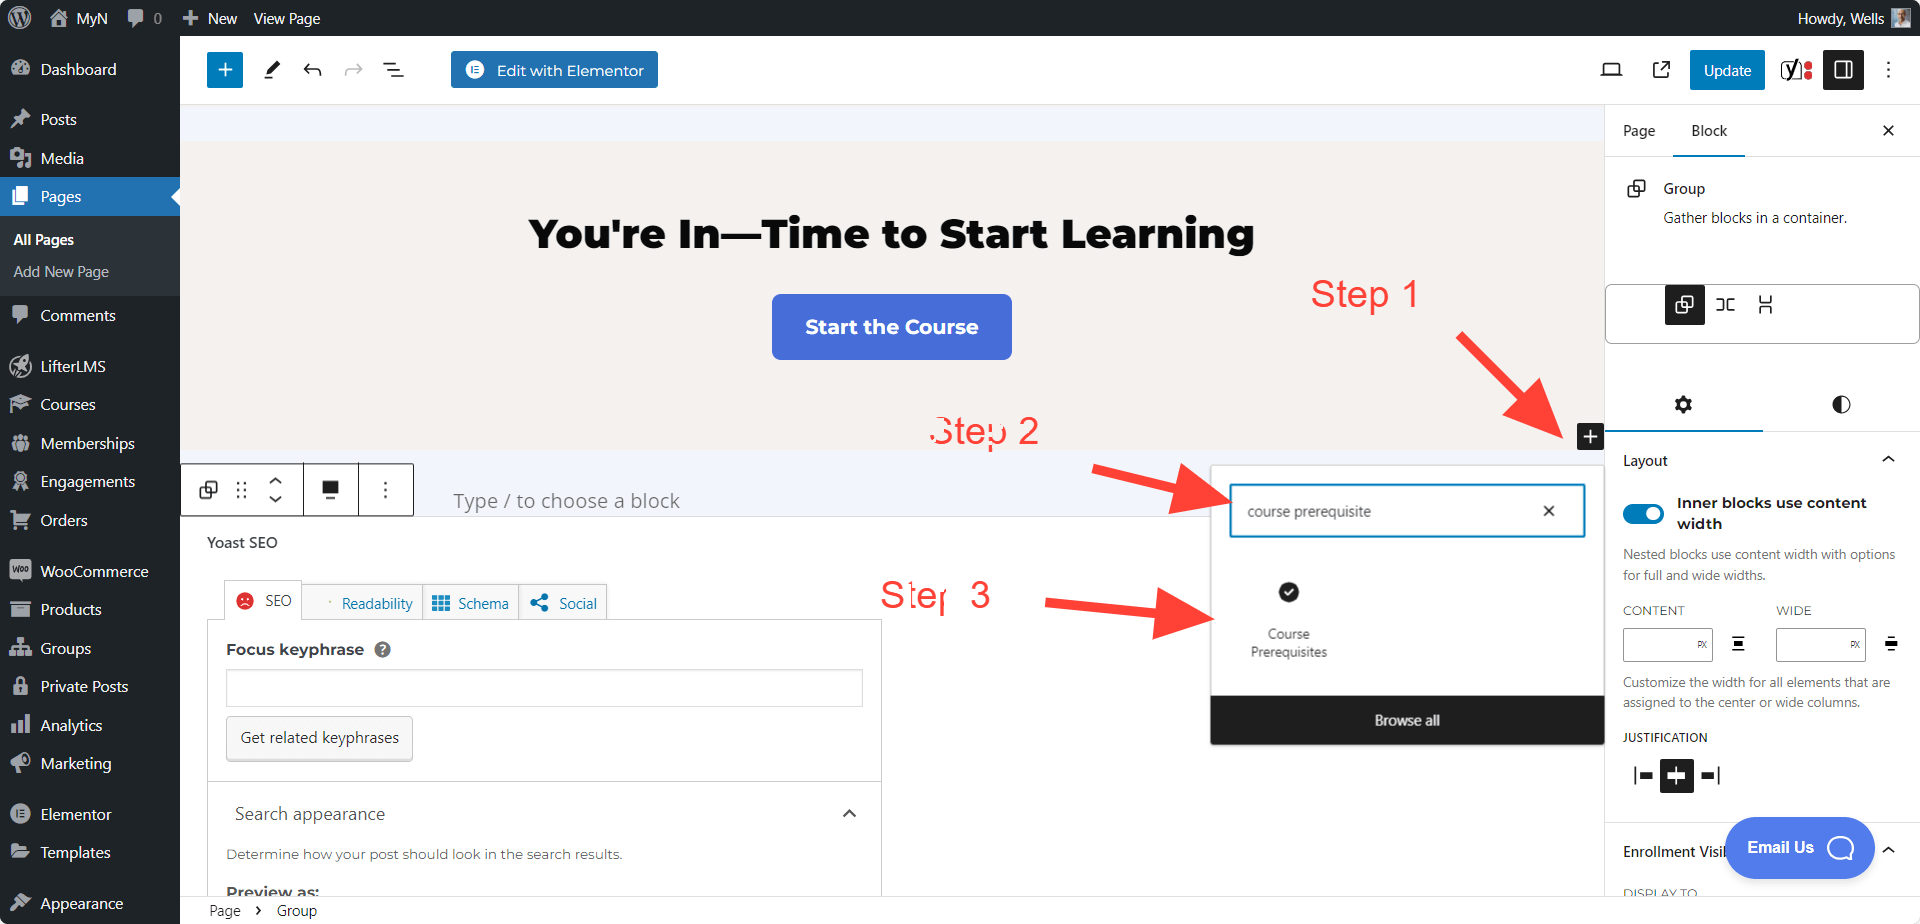
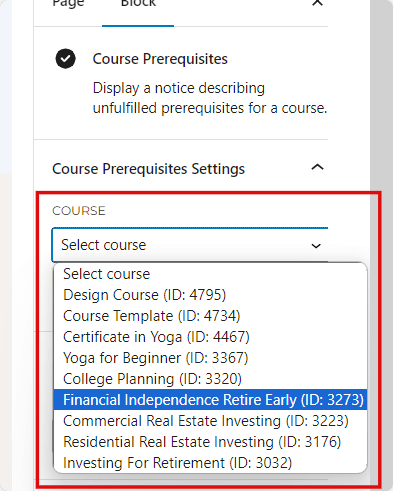
When you add this block, you will be able to select a specific course for which you want to display the prerequisites.
The frontend view will look like this:

Note: Before adding the “Course Prerequisite” block, you have to ensure you added the prerequisite for that specific course in the course page. To do this visit your WordPress dashboard > LifterLMS > Courses > click on “Edit” for a specific course where you want to add the prerequisite > Scroll a bit > Restrictions > Enable Prerequisite.
We also have a “Course Prerequisite” shortcode option, if you want to use the shortcode instead. Here is the Course Prerequisite shortcode.
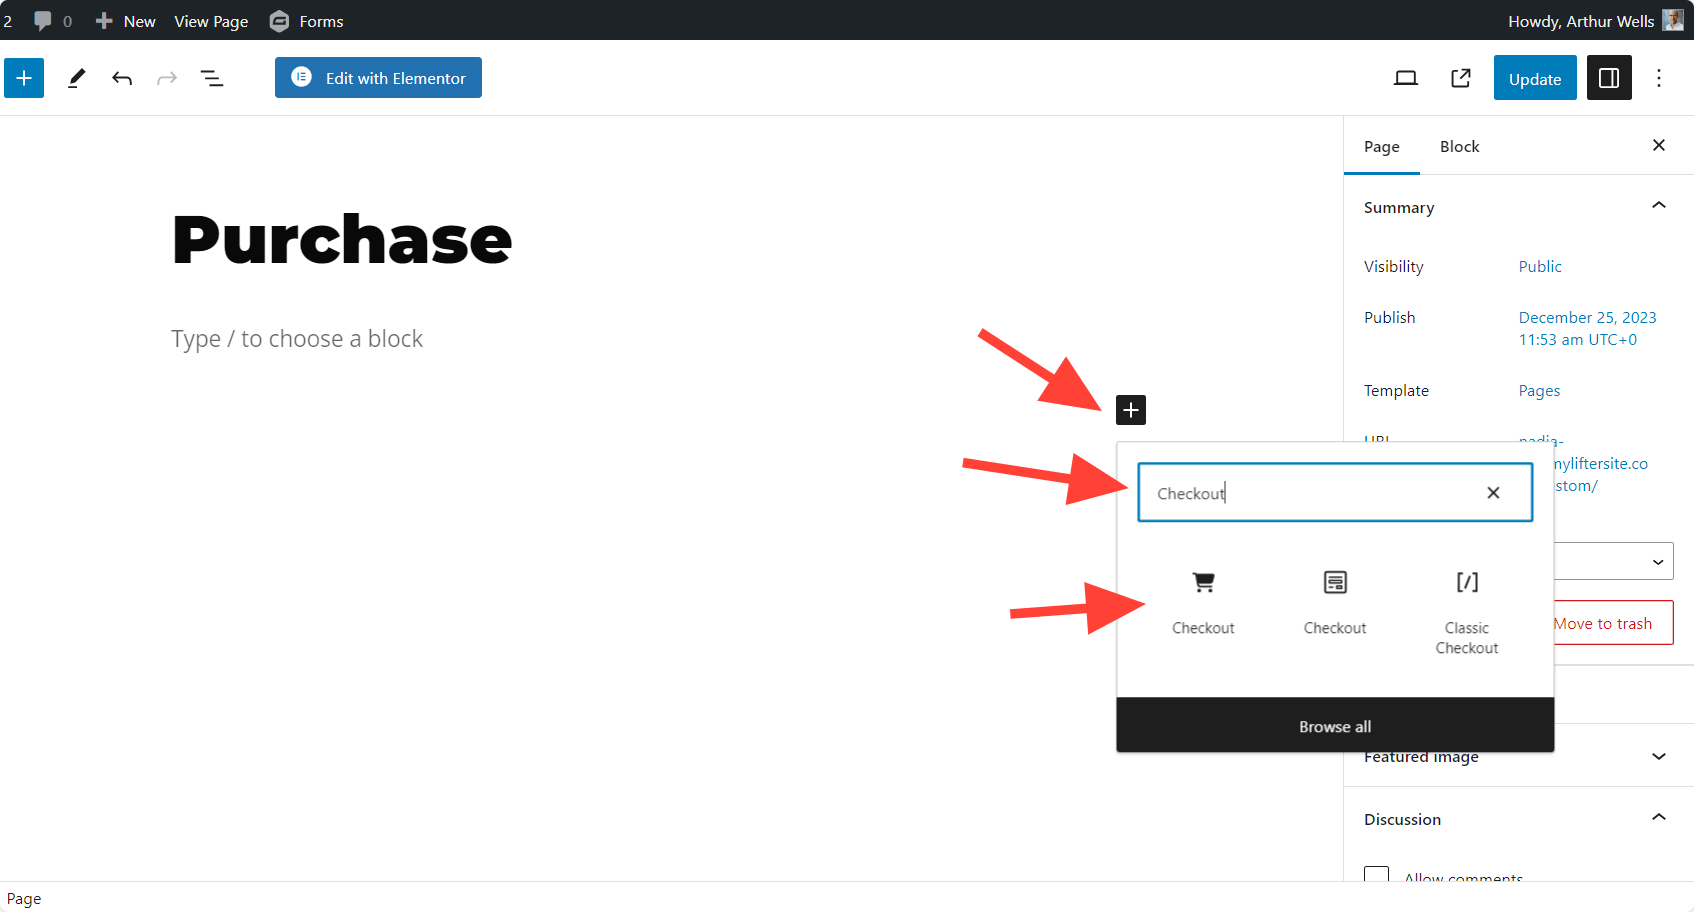
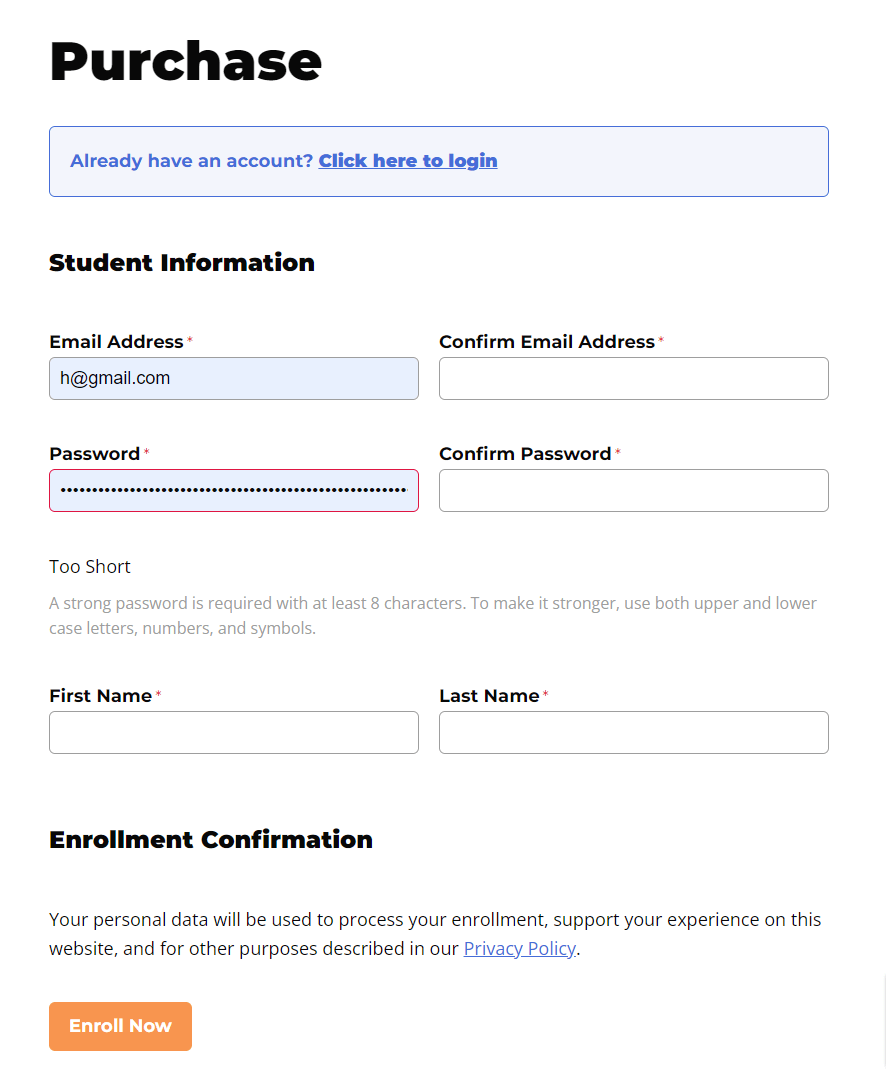
The LifterLMS “Checkout” block adds the checkout experience on a page. This block simplifies the course enrollment process on WordPress.
The “Checkout Block” outputs the checkout page for purchasing courses and memberships in LifterLMS.
To add this block, click on the “+” icon, search for ‘Checkout,’ and then add the block to your page.
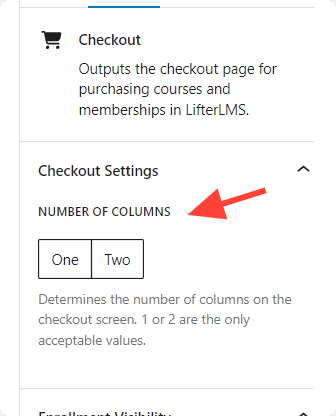
When you wadd this block, you will get a settings option for “Columns.” This determines the number of columns on the checkout screen.
Here is the frontend view for the ‘Checkout’ block:
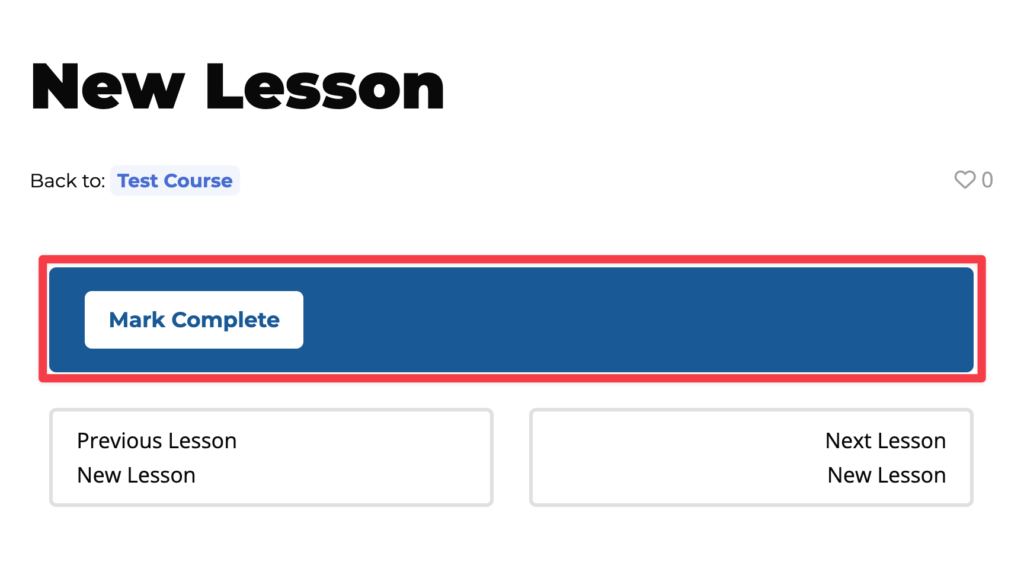
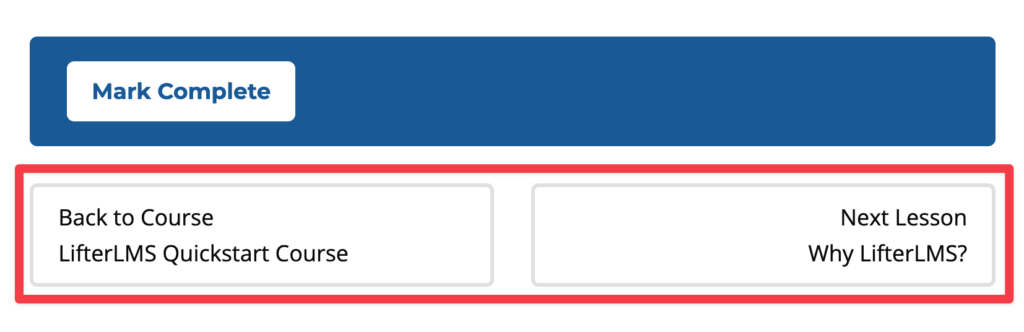
The Lesson Progression (Mark Complete) block adds a “Mark Complete” button for a lesson. If there is a quiz and/or an assignment, this will show here instead.
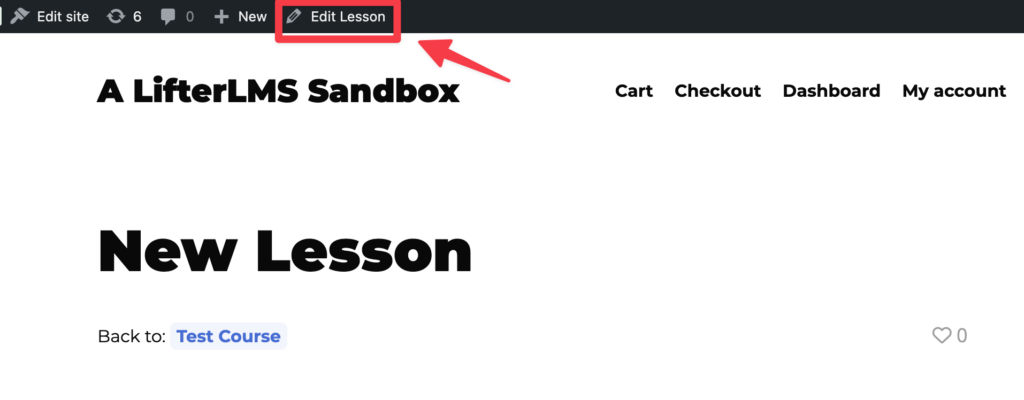
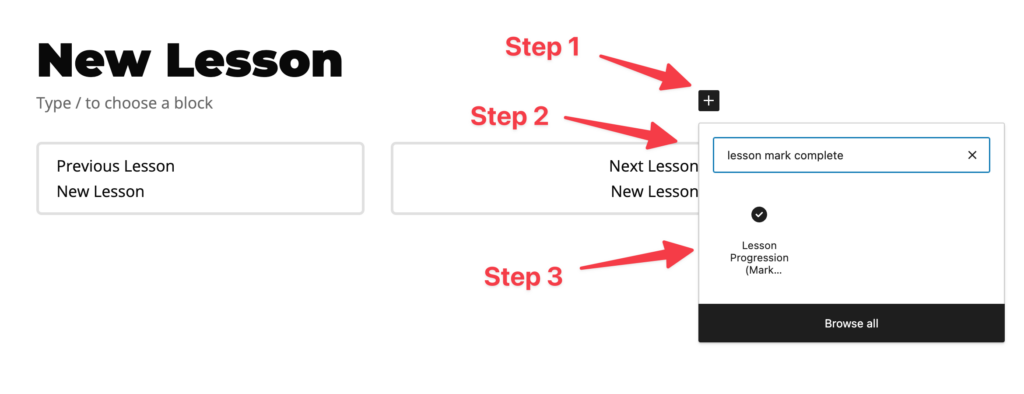
To add this block, Edit a lesson, click on the “+” icon, search for ‘Lesson Mark Complete’ and then add the block to your page.
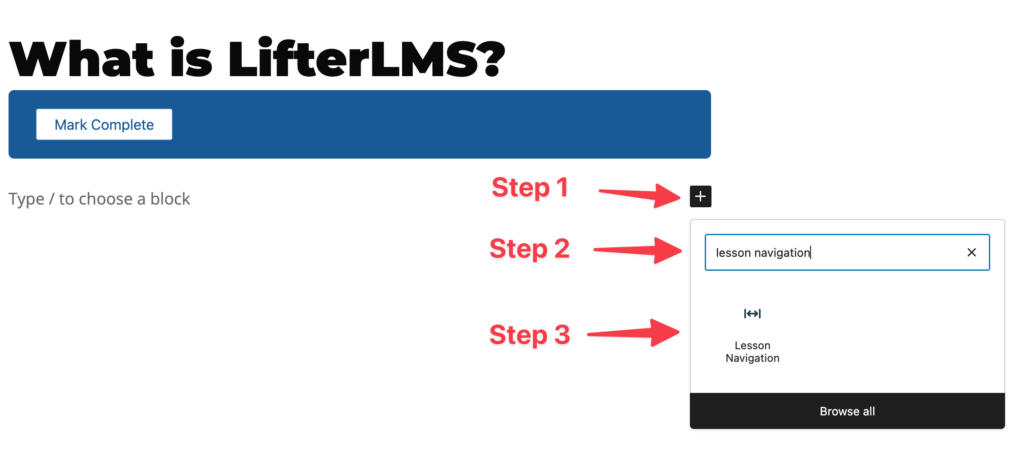
The Lesson Navigation block adds previous/next links at the bottom of a lesson.
To add this block, Edit a lesson, click on the “+” icon, search for ‘Lesson Navigation’ and then add the block to your page.
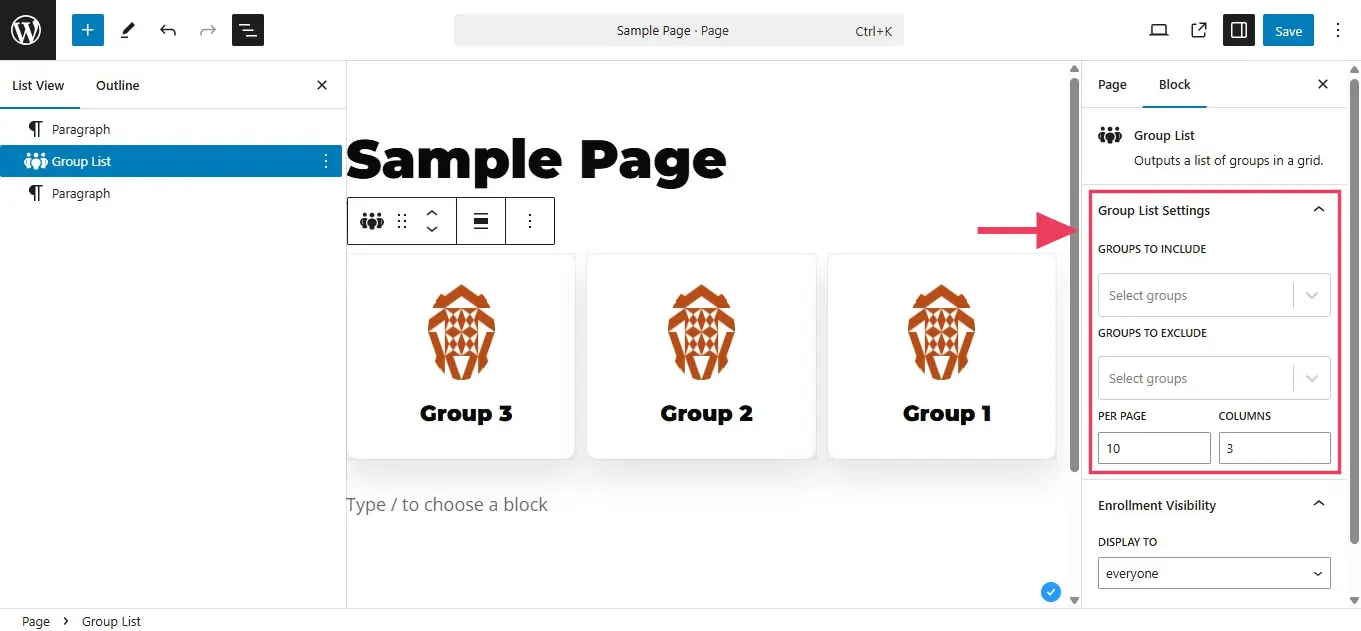
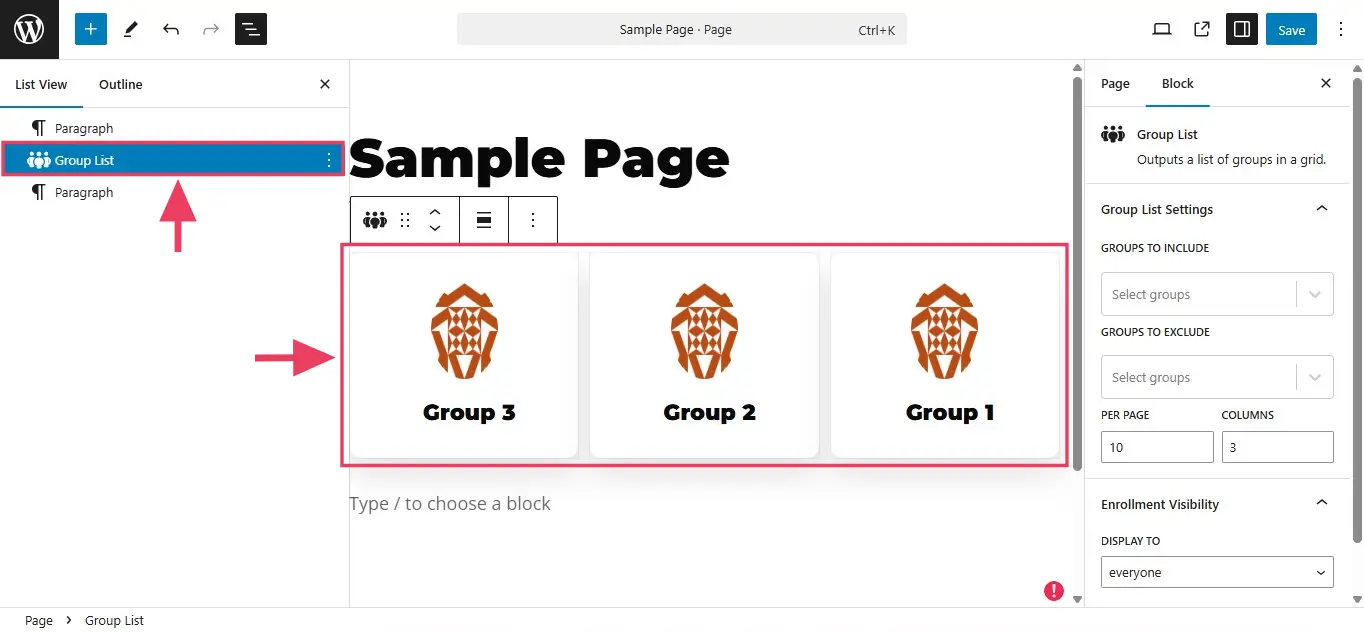
The Groups List block displays your available groups created using the LifterLMS Groups add-on. This block can be added to any page or location of your choice.
There are two types of groups in LifterLMS Groups: closed groups and private groups.
Private groups are visible to anyone who is logged in. If someone who is logged in visits a page that contains the Groups List block, that logged-in user will be able to see all private groups displayed by the Groups List.
Closed groups are not always visible to logged-in users. A closed group listed by the Groups List block will only be visible on the front-end to the creator of that group and to the students enrolled in that group. As a result, even if you are a WordPress administrator, the Groups List block will not show you all the closed groups.
In addition to these built-in visibility settings, you can further control what groups will be displayed by specifying what groups to include and what to exclude, as you can see below. You can also control how many groups will be displayed per page, and how many columns the Groups List block will use.