LaunchPad Settings: LifterLMS Account Settings
The Account Settings tab will allow you to customize the look and feel of the LifterLMS Account Page (also referred to as the LifterLMS My Courses” page).
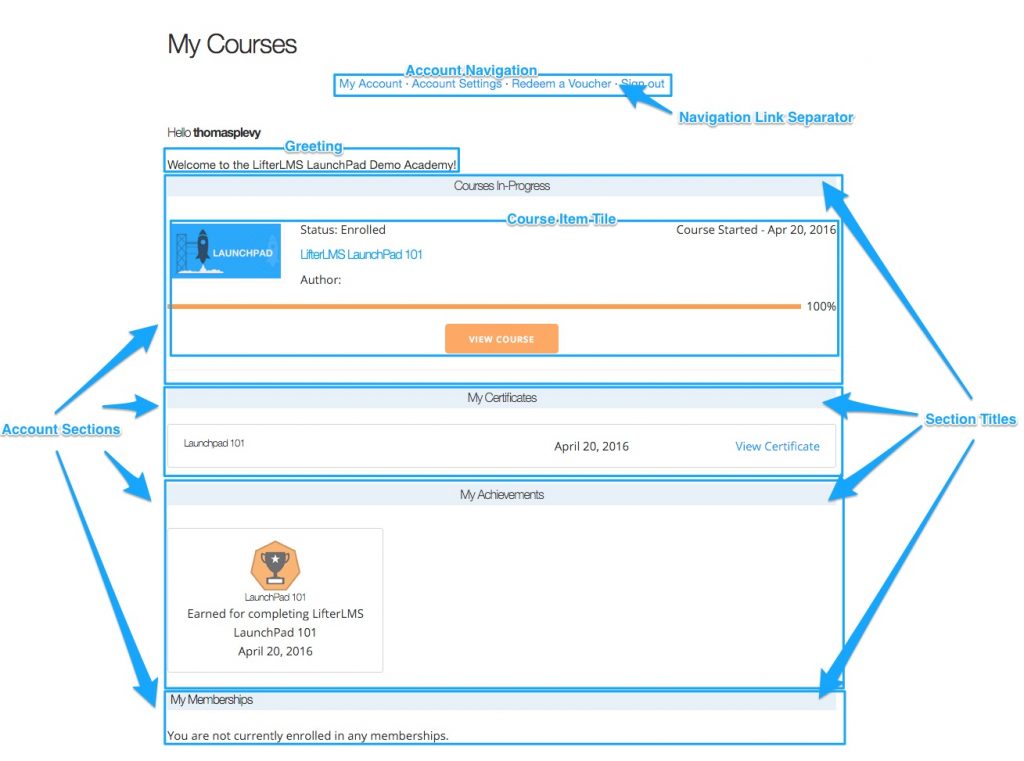
Section: Greeting
Customize the account page greeting.
Setting: Dashboard Greeting
Add content to replace the default greeting message displayed by LifterLMS.
This content can be either text, images, shortcodes, videos (or other supported embeds), or any combination of these. Any content supported by a WordPress WYSIWYG editor can be entered here.
Section: Account Navigation Settings
Customize the appearance of the account page navigation menu. This area allows quick navigation between the various screens available through the Account page.
Setting: Navigation Alignment
Select an option for the alignment of the navigation menu.
Setting: Navigation Margin Top
Enter a number (in pixels).
This number will be the amount of space between the element’s border and the element above it.
Setting: Navigation Margin Bottom
Enter a number (in pixels).
This number will be the amount of space between the element’s border and the element below it.
Setting: Navigation Margin Right
Enter a number (in pixels).
This number will be the amount of space between the element’s border and the right edge of the account page’s content area.
Setting: Navigation Margin Left
Enter a number (in pixels).
This number will be the amount of space between the element’s border and the left edge of the account page’s content area.
Setting: Navigation Padding Top
Enter a number (in pixels).
This number will be the amount of space between the element’s top border and the content inside of it.
Setting: Navigation Padding Bottom
Enter a number (in pixels).
This number will be the amount of space between the element’s bottom border and the content inside of it.
Setting: Navigation Padding Right
Enter a number (in pixels).
This number will be the amount of space between the element’s right border and the content inside of it.
Setting: Navigation Padding Left
Enter a number (in pixels).
This number will be the amount of space between the element’s left border and the content inside of it.
Setting: Navigation Font Size
Enter a number (in pixels).
This number defines the font size of the navigation links.
Setting: Navigation Font Color
Select a color to define the color of the navigation links.
Setting: Navigation Border Width
Enter a number (in pixels) to define the size of the borders of the element.
To hide the border enter “0”.
Setting: Navigation Border Color
Select a color to define the border of the element.
Setting: Navigation Border Radius
Enter a number (in pixels).
This number will allow you to round the corners of the element.
This will only be visible if a border is defined!
Setting: Navigation Link Separator
Enter an alphanumeric character that will be used to separate the links in the navigation.
Section: Account Section Defaults
Define the appearance of the sections and section titles for each section on the account screen.
Section Title Font Size
Enter a number in pixels which will determine the font size of the section titles.
Section Title Font Color
Enter a color used to defined the color of the section title text.
Section Title Alignment
Select an option to set the alignment of the section titles.
Setting: Section Title Margin Top
Enter a number (in pixels).
This number will be the amount of space between the element’s border and the element above it.
Setting: Section Title Margin Bottom
Enter a number (in pixels).
This number will be the amount of space between the element’s border and the element below it.
Setting: Section Title Margin Right
Enter a number (in pixels).
This number will be the amount of space between the element’s border and the right edge of the account page’s content area.
Setting: Section Title Margin Left
Enter a number (in pixels).
This number will be the amount of space between the element’s border and the left edge of the account page’s content area.
Setting: Section Title Padding Top
Enter a number (in pixels).
This number will be the amount of space between the element’s top border and the content inside of it.
Setting: Section Title Padding Bottom
Enter a number (in pixels).
This number will be the amount of space between the element’s bottom border and the content inside of it.
Setting: Section Title Padding Right
Enter a number (in pixels).
This number will be the amount of space between the element’s right border and the content inside of it.
Setting: Section Title Padding Left
Enter a number (in pixels).
This number will be the amount of space between the element’s left border and the content inside of it.
Setting: Section Margin Top
Enter a number (in pixels).
This number will be the amount of space between the element’s border and the element above it.
Setting: Section Margin Bottom
Enter a number (in pixels).
This number will be the amount of space between the element’s border and the element below it.
Setting: Section Margin Right
Enter a number (in pixels).
This number will be the amount of space between the element’s border and the right edge of the account page’s content area.
Setting: Section Margin Left
Enter a number (in pixels).
This number will be the amount of space between the element’s border and the left edge of the account page’s content area.
Setting: Section Padding Top
Enter a number (in pixels).
This number will be the amount of space between the element’s top border and the content inside of it.
Setting: Section Padding Bottom
Enter a number (in pixels).
This number will be the amount of space between the element’s bottom border and the content inside of it.
Setting: Section Padding Right
Enter a number (in pixels).
This number will be the amount of space between the element’s right border and the content inside of it.
Setting: Section Padding Left
Enter a number (in pixels).
This number will be the amount of space between the element’s left border and the content inside of it.
Setting: Section Border Width
Enter a number (in pixels) to define the size of the borders of the element.
To hide the border enter “0”.
Setting: Section Background Color
Select a color to define the background color of the section element.
Setting: Section Border Color
Select a color to define the border of the element.
Setting: Section Border Radius
Enter a number (in pixels).
This number will allow you to round the corners of the element.
This will only be visible if a border is defined!
Section: My Courses Section
This section has settings which apply only to the “My Courses” section.
Setting: Section Title
Enter text to replace the default title of the section
Setting: Section Title Background Color
Select a color which will be used as the background color of the title element.
Section: Course Items
This section allows you to configure settings which are applied to each course “tile” inside the My Courses section
Setting: Course item Margin Top
Enter a number (in pixels).
This number will be the amount of space between the element’s border and the element above it.
Setting: Course item Margin Bottom
Enter a number (in pixels).
This number will be the amount of space between the element’s border and the element below it.
Setting: Course item Margin Right
Enter a number (in pixels).
This number will be the amount of space between the element’s border and the right edge of the account page’s content area.
Setting: Course item Margin Left
Enter a number (in pixels).
This number will be the amount of space between the element’s border and the left edge of the account page’s content area.
Setting: Course item Padding Top
Enter a number (in pixels).
This number will be the amount of space between the element’s top border and the content inside of it.
Setting: Course item Padding Bottom
Enter a number (in pixels).
This number will be the amount of space between the element’s bottom border and the content inside of it.
Setting: Course item Padding Right
Enter a number (in pixels).
This number will be the amount of space between the element’s right border and the content inside of it.
Setting: Course item Padding Left
Enter a number (in pixels).
This number will be the amount of space between the element’s left border and the content inside of it.
Setting: Course item Border Width
Enter a number (in pixels) to define the size of the borders of the element.
To hide the border enter “0”.
Setting: Course item Border Color
Select a color to define the border of the element.
Setting: Course item Border Radius
Enter a number (in pixels).
This number will allow you to round the corners of the element.
This will only be visible if a border is defined!
Setting: Course Image Margin Top
Enter a number (in pixels).
This number will be the amount of space between the element’s border and the element above it.
Setting: Course Image Margin Bottom
Enter a number (in pixels).
This number will be the amount of space between the element’s border and the element below it.
Setting: Course Image Margin Right
Enter a number (in pixels).
This number will be the amount of space between the element’s border and the right edge of the account page’s content area.
Setting: Course Image Margin Left
Enter a number (in pixels).
This number will be the amount of space between the element’s border and the left edge of the account page’s content area.
Setting: Course Image Padding Top
Enter a number (in pixels).
This number will be the amount of space between the element’s top border and the content inside of it.
Setting: Course Image Padding Bottom
Enter a number (in pixels).
This number will be the amount of space between the element’s bottom border and the content inside of it.
Setting: Course Image Padding Right
Enter a number (in pixels).
This number will be the amount of space between the element’s right border and the content inside of it.
Setting: Course Image Padding Left
Enter a number (in pixels).
This number will be the amount of space between the element’s left border and the content inside of it.
Setting: Course Image Border Width
Enter a number (in pixels) to define the size of the borders of the element.
To hide the border enter “0”.
Setting: Course Image Border Color
Select a color to define the border of the element.
Setting: Course Image Border Radius
Enter a number (in pixels).
This number will allow you to round the corners of the element.
This will only be visible if a border is defined!
Setting: Course Image Width
Enter a number (in pixels) to define the width of the course image.
The image’s height will be calculated automatically based on the width to prevent image distortion.
Setting: Course enrollment status Font Size
Enter a number (in pixels) to define the size of the course enrollment status text.
Setting: Hide course start date
Check the box to hide the course start date on the tiles.
Setting: Course Start Date font size
Enter a number (in pixels) to define the size of the course start date text
Setting: Course Title Font Size
Enter a number (in pixels) to define the size of the course title text.
Setting: Course Author Font size
Enter a number (in pixels) to define the size of the course auther text
Setting: View Course Button Text
Enter text displayed on the button students click to view the course.
Setting: Course Item Tile Shadow Offset X
Enter a number (in pixels) to define the size of the tile’s shadow on the X axis.
A Positive number will make a shadow to the right side. A negative number will make a shadow to the right side.
Setting: Course Item Tile Shadow Offset Y
Enter a number (in pixels) to define the size of the tile’s shadow on the Y axis.
A positive number will make a shadow to the bottom. A negative number will make a shadow to the top.
Setting: Course Item Tile Shadow Offset Blur
Enter a number (in pixels) to define the magnitude of the shadow’s blur. A smaller number will make a darker and more compact shadow and a larger number will make the shadow lighter and more spread out.
Setting: Course Item Tile Shadow Offset Spread
Enter a number (in pixels) to define the distance (or size) of the shadow. We recommend leaving this number at 0 for most scenarios.
Setting: Course Item Tile Shadow Color
Select a color which will be used as the color of the tile’s shadow.
Section: My Certificates Section
This section has settings which apply only to the “My Certificates” section.
Setting: Section Title
Enter text to replace the default title of the section
Setting: Section Title Background Color
Select a color which will be used as the background color of the title element.
Section: My Achievements Section
This section has settings which apply only to the “My Achievements” section.
Setting: Section Title
Enter text to replace the default title of the section
Setting: Section Title Background Color
Select a color which will be used as the background color of the title element.
Section: My Memberships Section
This section has settings which apply only to the “My Memberships” section.
This section is an optional section which can be enabled on the LifterLMS Settings Screen in the “Accounts” tab.
Setting: Section Title
Enter text to replace the default title of the section
Setting: Section Title Background Color
Select a color which will be used as the background color of the title element.


