Looking for a way to redirect users after they successfully log in to their WordPress account?
In eCommerce stores, learning management systems, and memberships sites, users are redirected to specific pages as a way to nudge them into taking the next steps. For instance, an eCommerce site can redirect users to their profile pages and urge them to fill in their details.
Websites using an eCommerce or membership plugin may already have an option to create a custom redirect.
If you don’t use an eCommerce or a membership plugin or the plugins don’t offer an option for users redirection, don’t worry! We will show you how to redirect users after a successful login with the help of a dedicated plugin called LoginWP.
Let’s get started with the guide.
How to Redirect WordPress Users After Successful Login
Before we begin with the steps, you need to ask yourself the following questions:
- Which users do you want to redirect? All users or only a few specific users? Do you want to redirect users based on their roles or capabilities?
- Where do you want to redirect them? A custom dashboard, profile page, order details page, product update page, sales, and coupons page, customer support and feedback forms, etc?
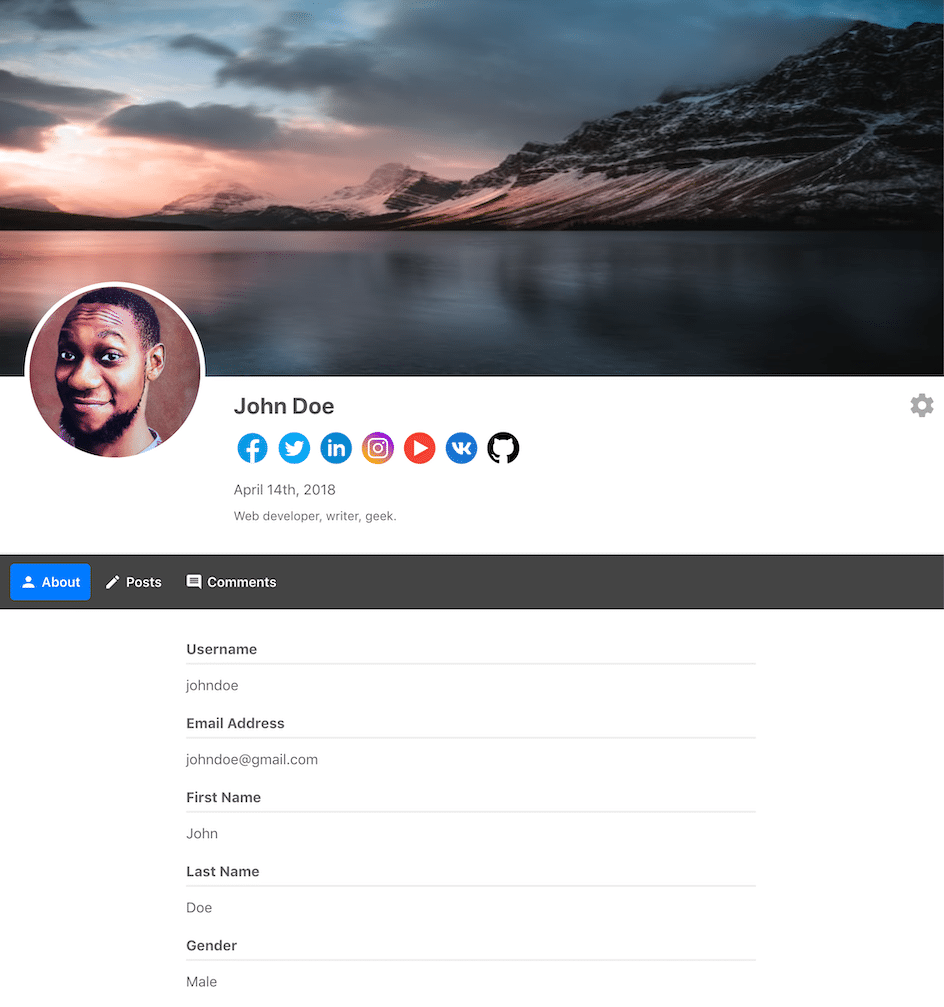
On our demo site, we created a custom user profile and then redirected users to their profile page. So in this tutorial, we will show you:
- How to create a custom user profile page
- And then how to redirect users (all users, specific users, and users based on roles and capabilities) to the custom page
Let’s get started.
Creating a Custom User Profile Page
Like we said before, on our demo site we created a custom user profile page so that’s what we are going to demonstrate below. But if you want to create a different page like an order detail page or a product update page, or a customer support page, we recommend taking a look at this guide on how to create a custom page on a WordPress website.
Now, to create a custom user profile page, you will need to install and activate a WordPress user profile plugin like ProfilePress.
Then on your WordPress dashboard, go to ProfilePress > Forms & Profiles > Add New and select User Profile as a form type.
Enter a name, select your preferred template and proceed to design the user profile.
To preview the user profile, click on Live Preview.
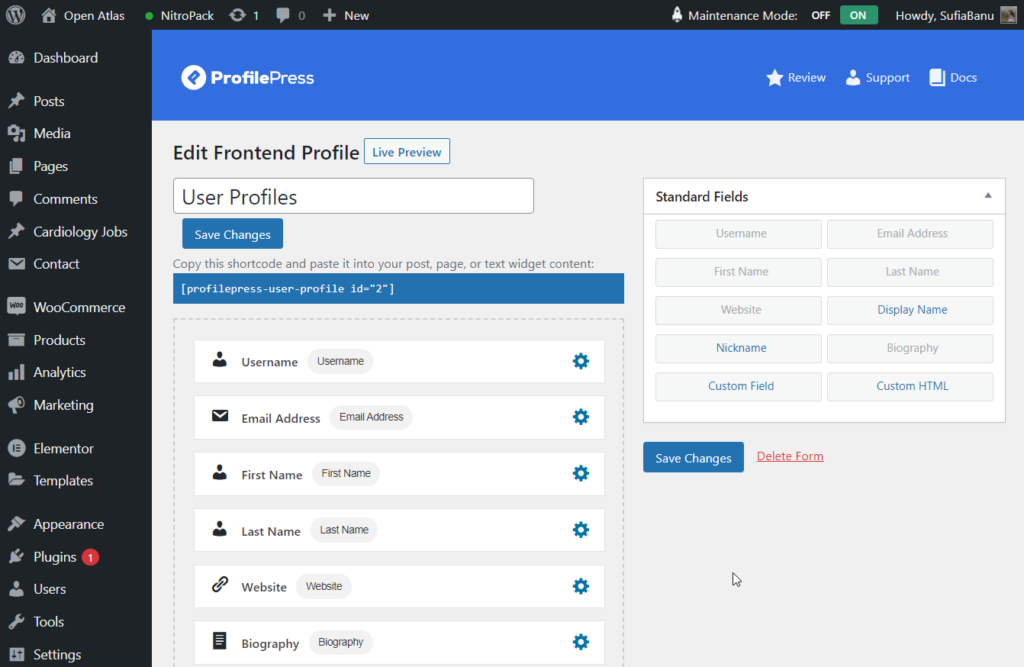
The next step is to set the new page as the default profile page. Go to ProfilePress > Settings > Frontend Profile Settings. Under Page with Profile Shortcode, select the page you just created and save the changes. That’s it.
Now that you have your custom page ready, let’s create a custom redirect for users who log in successfully to your WordPress website.
Redirect Users After Successful Login
In this section, we are covering how to redirect specific users, all users, users with certain roles and capabilities, and users who have enrolled in your course or membership. Let’s begin:
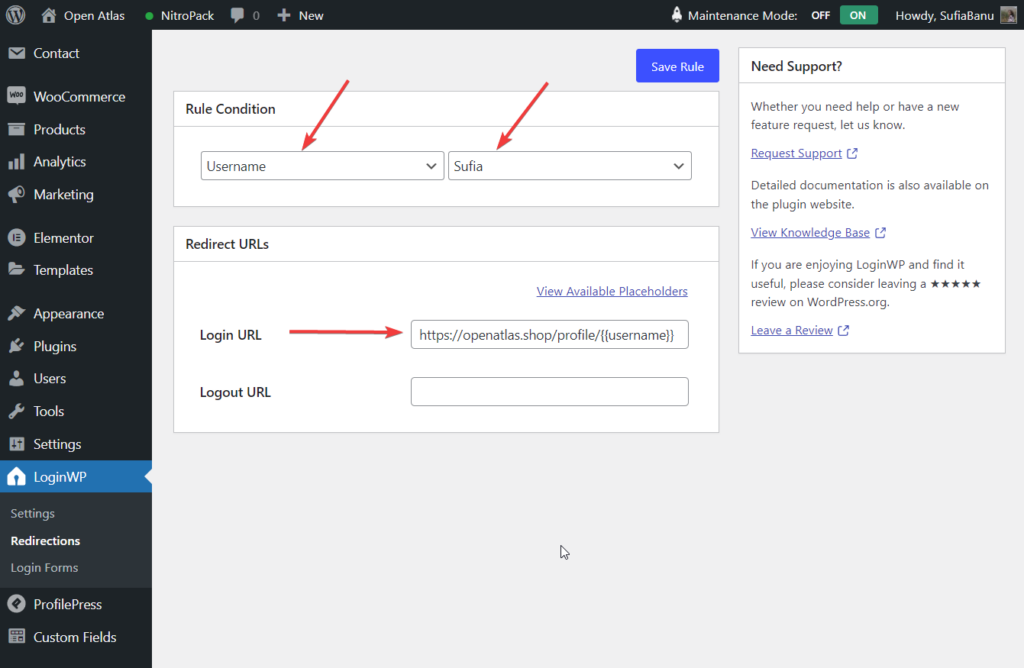
1. Redirect Specific WordPress Users
Go to LoginWP > Redirections > Redirection Rules.
Then under Rule Condition, select Username and the name of the specific user you want to redirect.
Next, insert this URL in the Login URL section: https://yoursite.com/profile/{{username}}
Your users will be redirected to their profiles as soon as they log in.
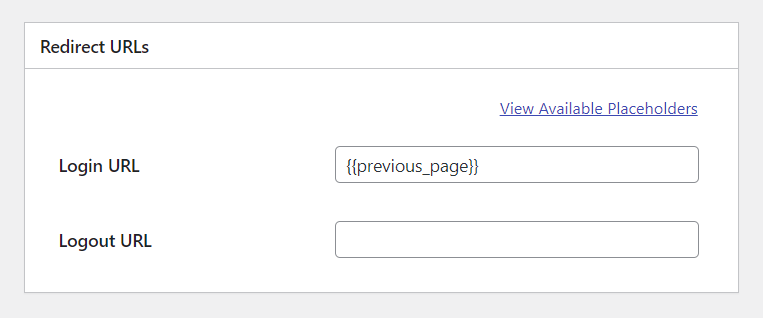
If you don’t want to redirect users to their profiles, then use the View Available Placeholder option to dictate where the users should be redirected.
Here’s a list of the available placeholders:
Username of user: {{username}}
Author URL slug or user nicename: {{user_slug}}
Website URL: {{website_url}}
URL of the page a user is logging in from: {{current_page}}
URL of the page a user was on before redirection to the login page: {{previous_page}}
Let’s say you want to redirect users to the previous page. Insert {{previous_page}} in the Login URL field like this:
2. Login Redirect by User Role in WordPress
To redirect users based on their roles, go to LoginWP > Redirections > Redirection Rules.
Then under Rule Condition, select User Roles and the user role.
Next, there is an option called Order. It comes in handy in situations like this: say a user is both a subscriber and a customer. You have set different rules for subscribers and customers. So when the user tries to log in, the plugin will be confused and won’t know which rule to follow. By using the Order option, you can tell the plugin which rules to implement. The rule with the lowest number (i.e. 1) will be implemented.
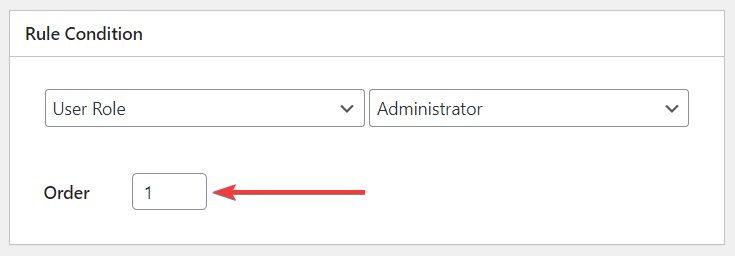
Then, go to the Login URL section and insert this URL: https://yoursite.com/profile/{{username}}
3. Login Redirect by Capabilities in WordPress
Go to LoginWP > Redirections > Redirection Rules.
Then under Rule Condition, select User Capability and then select the capability.
Next, insert this URL in the Login URL section: https://yoursite.com/profile/{{username}}
And save the rule.
4. Login Redirect for Users Enrolled in Your Course or Membership
If you are offering a course on your WordPress website, then you are very likely using a course plugin like LifterLMS. The good news is that you can use LoginWP to redirect users to a course page. Before we show you how to implement this on your website, let’s take a look at some of the plugins that LoginWP integrates with:
- MemberPress
- MemberMouse
- Ultimate Member
- Paid Membership Pro
- WooCommerce
- Gravity Forms
- WPForms
- LifterLMS
- Easy Digital Downloads
- WP User Frontend
- WP User Manager
- ProfilePress
- Restrict Content Pro
- Theme My Login
On our demo site, we are using LifterLMS to offer a course on SEO. So that is what we’ll demonstrate in this section. If you are using any other plugin, you will need to follow similar steps. Just make sure the plugin integrates with LoginWP.
LoginWP integration with LifterLMS lets you redirect your students or website users after they login based on the course or membership they are enrolled in.
To redirect users enrolled in a specific course, go to LoginWP > Redirections > Integrations and enable LifterLMS integration.
Next, navigate to LoginWP > Redirections > Redirection Rules and select Enrolled Course.
If you want to redirect users based on their membership instead, select Enrolled Membership as the rule condition.
On the right, your courses will appear. Select the course your want to redirect the users to.
In the next section, enter the login and logout URL of the page where you want to redirect users who are enrolled in your course.
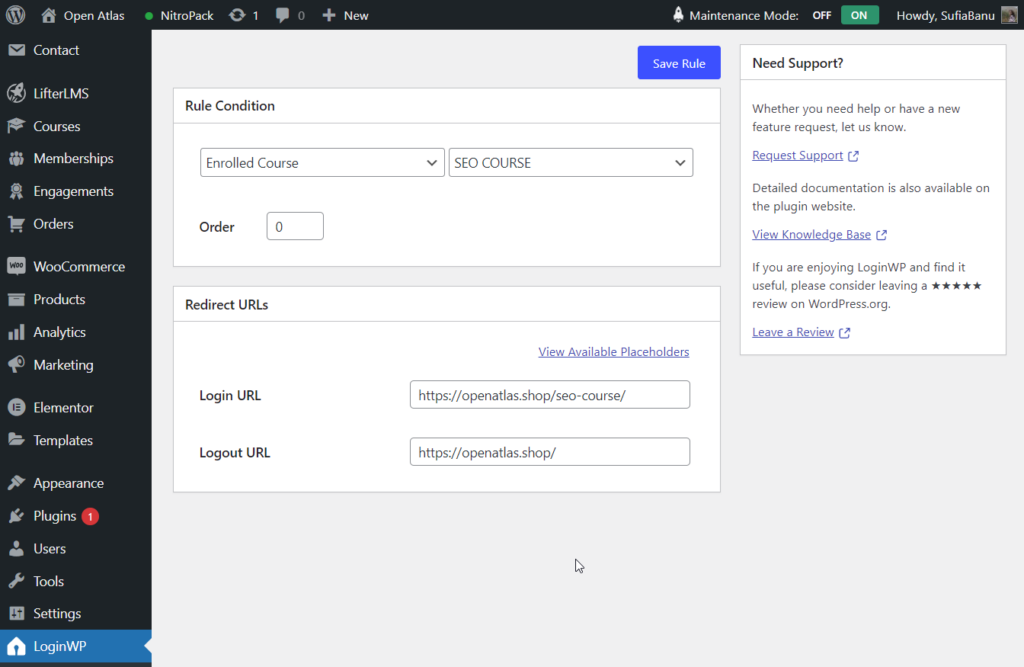
Don’t forget to hit the Save Rule button at the end.
With that, we have come to the end of how to custom redirect users after successful login in WordPress.
5. Login Redirect for All Other Users in WordPress
To redirect all other users that aren’t affected by your defined redirect rules, go to the “All Other Users” section and enter the login and logout URLs.
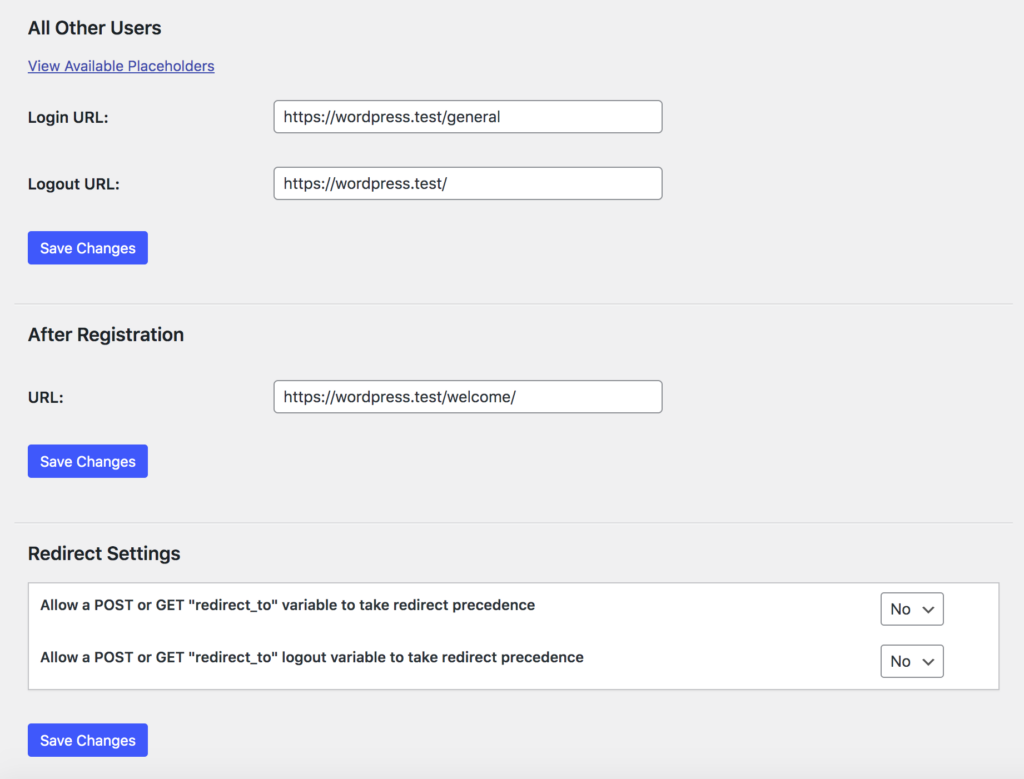
Save your setting and that’s it.
Troubleshooting Login Issues
While setting up redirects you may encounter a few issues based on how your website is set up. In this section, we are discussing how to troubleshoot common login issues that website owners are likely to face when trying to implement custom redirects on their WordPress websites.
1. Update Your Site’s Permalink
You may find that your website users are being redirected to the login page and not your custom URL. This occurs because your server can’t follow your instructions on where to redirect users after successfully logging into their accounts. Perhaps the server was down or the internet connection was severed when you gave the instructions. The good news is, this issue can be solved by updating your permalinks.
Go to Settings > Permalinks and hit the Save Changes button.
Didn’t work? Try the next solution.
2. Create a New .htaccess File
Your site’s .htaccess file controls important functions, like redirects and how your permalinks are structured. Sometimes the .htaccess file gets corrupted and it can lead to different types of login issues like users can be stuck in a redirection loop. Corruption can occur due to many causes like a new plugin being installed, or the internet connection dropping while some important tasks were being executed on your server, among other things.
What you need to do is to create a fresh new .htacess file and delete the old one. Here’s how:
You will need to first locate the file in the root folder of your website. This guide will help you do just that.
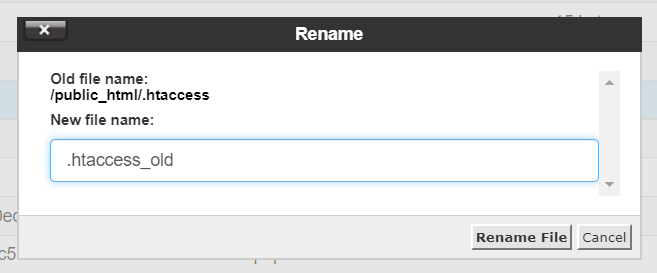
Once you find the .htacess file, right-click and select Rename. Rename the file into something like .htaccess_old.
Next, open your WordPress dashboard in a different tab, go to Settings > Permalinks and click Save Changes. Resetting the permalinks should automatically generate a new .htaccess file.
Go back to the server page and refresh the page. You should be able to see the new .htaccess file. Found it? Now, go to the old .htaccess file and delete it. Just right-click and select Delete.
Check if the redirection issue is solved. If it persists, then most likely it’s caused by a plugin or a theme conflict.
3. Disable Plugins & Themes
Disable all your plugins and check whether it resolves the problem. If users are no longer being redirected to the login page then it proves that one of your plugins is the culprit. To find out which plugin was causing the redirection issue you will need to activate the plugins one by one and keep checking if the redirection issue reappears.
But if disabling the plugin didn’t work, switch to a default WordPress theme to figure out if your current theme was causing the problem.
Did nothing work? Then talk to the support team of LoginWP and tell them what’s going on with your website.
Final Thoughts
Conditional (or custom) redirection is a great way to guide users into taking the next steps. This could lead to a better user experience and could eventually help build user loyalty and trust. Anyone running a membership site or an e-Commerce platform should implement conditional redirection on their website.
That’s it for this one folk. We hope you found our guide useful. For more such helpful guides, please visit our blog.
About the Author Collins Agbonghama

Collins Agbonghama started his journey to becoming a web developer in Nigeria by reading the football news headlines on a friend’s mobile phone. His fascination with development and learning continued to grow, and he now makes a living using WordPress and the web.