
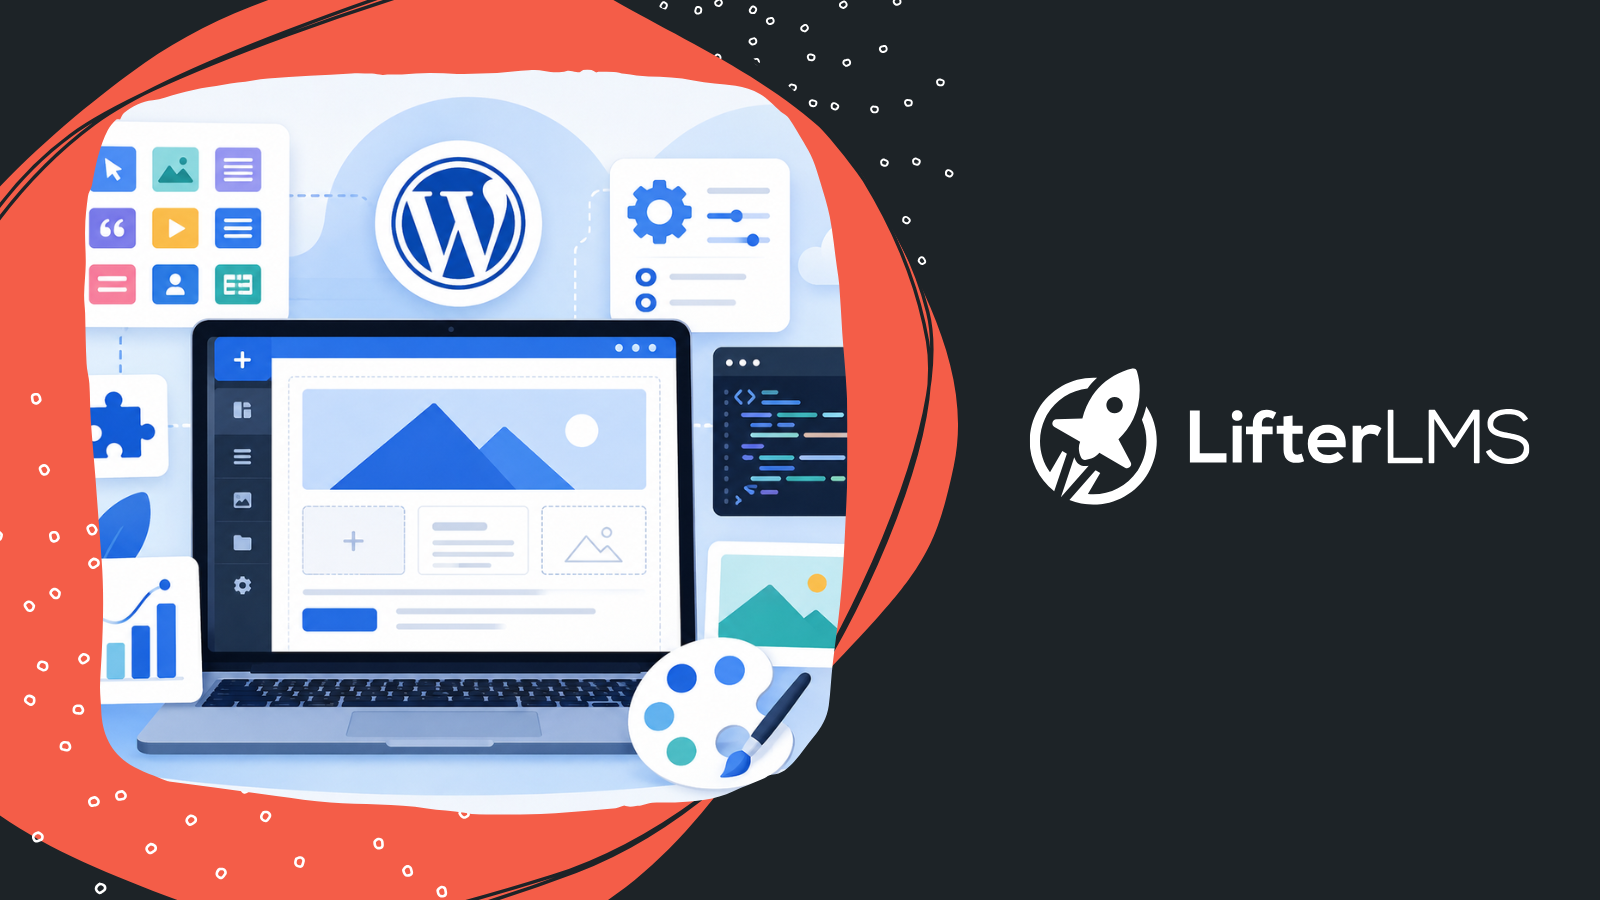
WordPress Full Site Editing, often shortened to FSE, is a modern way to design and manage your entire WordPress website using blocks.
Before Full Site Editing, the Block Editor only controlled the content area of an individual page or post. Your wider site structure – things like the header, footer, archive layouts, and blog post templates – was usually controlled by your theme, the Customizer, or custom template files.
Full Site Editing changes that completely.
It extends the block-based editing experience beyond content and into the full site layout, giving you visual control over the structural elements of your website.
That means you can now edit:
- Your header and footer
- Blog post and page templates
- Archive and search layouts
- Navigation menus
- Global colors and typography
- Reusable layout patterns
- Spacing and style presets
All of this happens inside the Site Editor, using the same familiar block principles you already use when creating lessons, landing pages, or blog posts.
For LifterLMS users and other educators, this makes it much easier to create consistency across your learning experience.
For example, you can make sure every lesson page uses the same readable typography, every sales page includes the same course CTA layout, and every student-facing template keeps navigation to the dashboard or course library easy to find.
A useful way to think about Full Site Editing is this:
- Block Editor = edit one piece of content
- Site Editor = edit how whole groups of content are structured and styled
That difference is what makes FSE so powerful.
Instead of manually rebuilding layouts again and again, you can make one smart template or style decision and apply it consistently across dozens or hundreds of pages.
For growing education sites, this can save a huge amount of design cleanup later.
Watch the WordPress Full Site Editing Tutorial
Prefer to follow along visually? In this complete WordPress Full Site Editing tutorial, Chris Badgett walks through the Site Editor and shows how to customize a block-based WordPress website step by step.
The video covers the same core workflow explained below, including the differences between the Block Editor, Site Editor, and Customizer, and how to edit templates, styles, headers, footers, and other site-wide elements.
What can you actually edit with Full Site Editing?
The best starting points are usually your header, footer, page templates, site-wide styles, and any reusable sections that appear across lessons, sales pages, or resource hubs.
This is why Full Site Editing is less about “making pages look nice” and more about building a consistent system your whole site can use.
Full Site Editing was introduced in WordPress 5.9 and has been expanded in each release since, with improvements to templates, patterns, and global styles.
Most modern block themes, including Sky Pilot, are built to take advantage of these newer capabilities.
What You Need Before You Can Use Full Site Editing
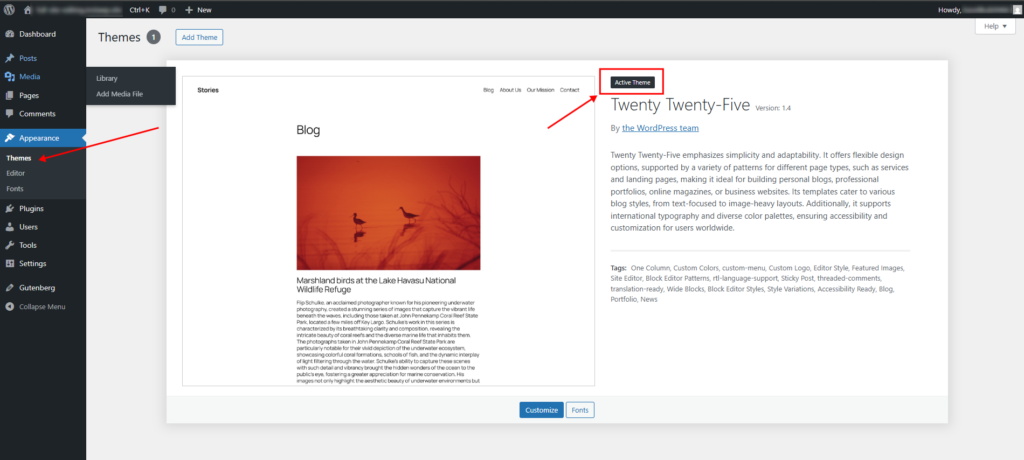
If you don’t see Appearance > Editor, the issue is usually your theme, not WordPress itself.
Full Site Editing requires a block theme.
Block themes are WordPress themes built specifically to support the Site Editor, templates, template parts, patterns, and global styles.
If you’re building a course or membership site, it’s worth starting with a theme designed for that use case.
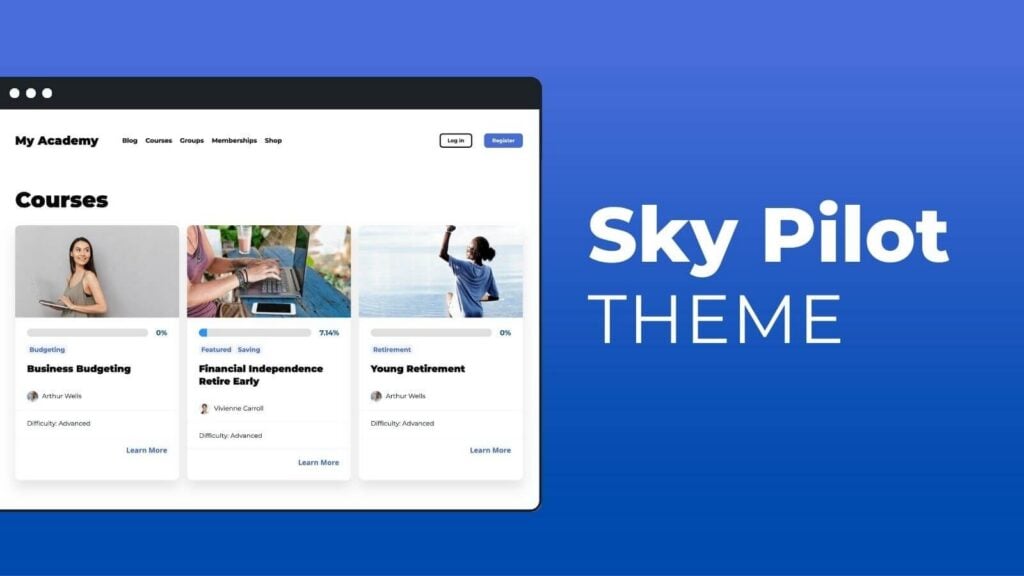
Sky Pilot is LifterLMS’s own block theme, built to work with courses, lessons, and member experiences out of the box. It fully supports Full Site Editing and gives you a clean starting point for structuring lesson layouts, navigation, and course pages.
You can explore Sky Pilot here.
Modern default themes like Twenty Twenty-Three and Twenty Twenty-Four, as well as newer block-based themes such as Sky Pilot, support this out of the box.
Older “classic” themes still rely on the Customizer and traditional PHP template files.
That means your dashboard may still show these options instead of the full Site Editor experience:
- Appearance > Customize
- Traditional widget areas
- Menu screens
- Theme option panels
Your WordPress version also matters. While Full Site Editing first arrived in WordPress 5.9, the experience has improved significantly in later releases.
For a tutorial like this, it is best to work with a current WordPress version and a modern block theme so the interface matches what most users will actually see.
A few themes also sit in the middle, often called hybrid themes. These may support some block-based template features while still relying on parts of the older Customizer workflow.
That can create a mixed experience, so it’s worth checking your theme documentation before assuming every FSE feature will be available.
For educators and membership site owners, this matters more than it may at first appear.
Your theme controls how course libraries, lesson pages, blog archives, member dashboards, and marketing pages all connect visually.
Using a proper block theme gives you much more control over making those areas feel like one seamless student journey.
Themes like Sky Pilot are designed with this in mind, so you’re not starting from a blank layout when building your course platform.
Quick comparison: classic theme vs block theme
| Feature | Classic Theme | Block Theme |
| Main design interface | Customizer | Site Editor |
| Header/footer editing | Theme settings or code | Visual block editing |
| Template editing | PHP files | Templates panel |
| Global typography | Limited | Full Styles panel |
| Reusable patterns | Usually plugin/theme dependent | Native |
| Best for | Older legacy workflows | Modern visual site systems (e.g., Sky Pilot for course and membership sites) |
Once these requirements are in place, the rest of the Full Site Editing workflow becomes much easier to follow.
The next step is understanding how the Site Editor differs from the normal Block Editor and the older WordPress Customizer, because this is where most beginners accidentally edit the wrong thing.
Site Editor vs Block Editor vs Customizer
This is one of the most important distinctions to understand before you start making changes.
All three interfaces can affect how your WordPress site looks, but they do very different jobs. If you confuse them, it becomes very easy to edit something globally when you only meant to change one page, or spend time looking for a setting in the wrong place.
The simplest way to choose the right editor is to think about what should change.
- If you only want to change one lesson, one sales page, or one blog post, use the Block Editor.
- If the change should apply across multiple lessons, pages, or shared layouts, use the Site Editor.
- The Customizer is the older theme-based design interface used by classic themes.
The Block Editor: edit one piece of content
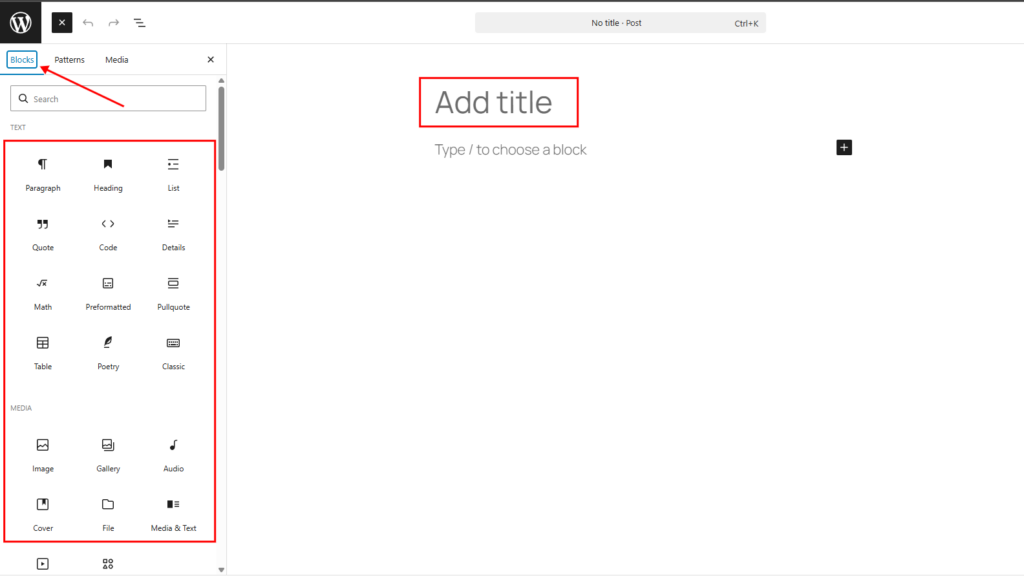
When you create a lesson, write a blog post, or build a landing page, you are usually working in the Block Editor.
This is where you add content blocks such as:
- Headings
- Images
- Video embeds
- Buttons
- FAQs
- Testimonials
- Lesson summaries
These edits affect only that single piece of content unless you intentionally use synced patterns or reusable elements.
For educators, this is where you would typically write lesson content, build a course sales page, or create a student resource page.
The Site Editor: edit the systems behind multiple pages
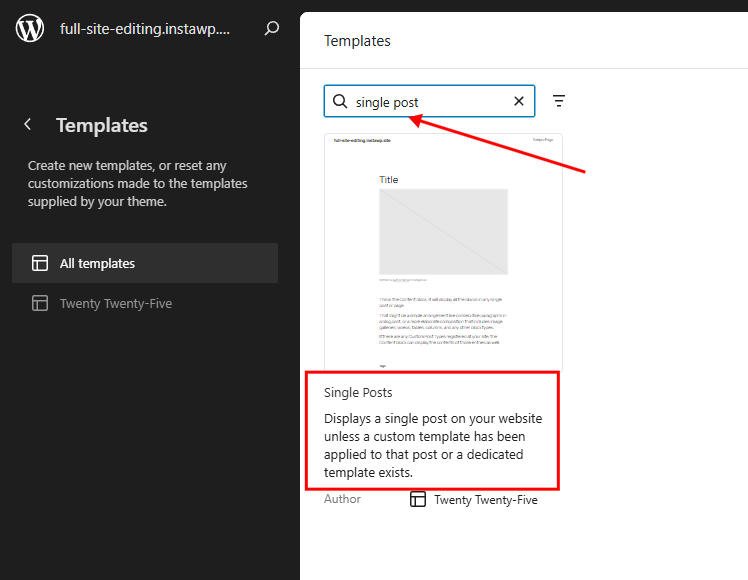
The Site Editor works at the template and site-design level. This is where you change the layout rules that apply across multiple pages at once.
For example, if you edit the Single Posts template, every post that uses it may inherit those changes. If you edit the header template part, every page using that header updates as well.
This is what makes Full Site Editing so efficient.
Instead of manually updating 40 lesson pages, 80 blog posts, or every sales page individually, you can make a template-level change once.
For a LifterLMS-style education site, this is especially useful when you want:
- Every lesson page to use larger typography
- Every resource post to include the same sidebar CTA
- Every student-facing page to include a dashboard shortcut
- Every archive page to keep a consistent layout
The Customizer: the legacy design interface
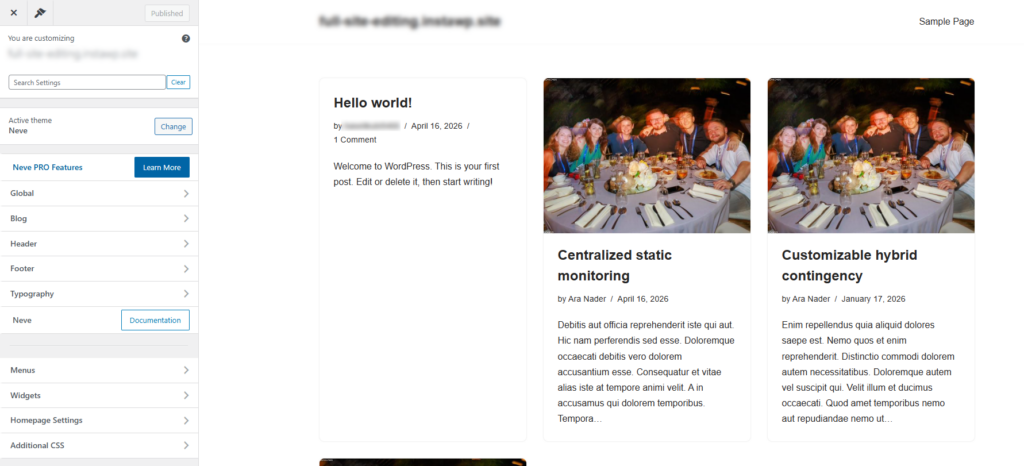
If your theme uses the classic style, you may still use the Customizer.
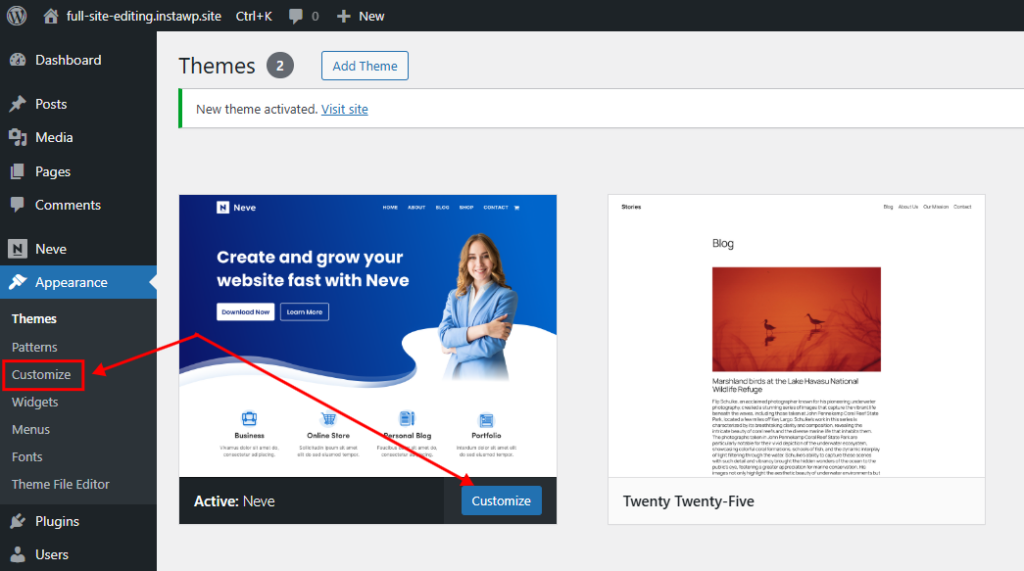
This older interface is still common on many established WordPress sites.
It usually controls:
- Logo
- Colors
- Typography presets
- Menu locations
- Widget areas
- Homepage settings
- Theme-specific options
While still useful, it is usually more limited than the Site Editor because your available controls depend heavily on what the theme developer included.
With Full Site Editing, many of these controls move to a more visual, flexible block-based workflow.
A simple real-world example
Here is the practical difference:
- If you want to change the wording inside one course’s sales page hero section, use the Block Editor.
- If you want to change the header CTA button that appears across every lesson, page, and sales page, use the Site Editor.
If your site still uses a classic theme and you just need to swap the logo or adjust menu locations, you may still be working in the Customizer.
This “single content vs site-wide system” distinction is the key mindset shift that makes Full Site Editing easier to use with confidence.
Key Full Site Editing Terms Explained Simply
Before we move into the hands-on walkthrough, it helps to define the few terms that WordPress uses repeatedly inside the Site Editor.
Once these click, the rest of the tutorial becomes much easier.
Templates
A template controls the layout structure for a type of content.
Think of it as the master layout file for pages that share the same role.
Examples include:
- Homepage
- Single posts
- Standard pages
- Archive pages
- Search results
- 404 pages
If you change the Single Posts template, every post using that template may inherit the updated structure.
Template Parts
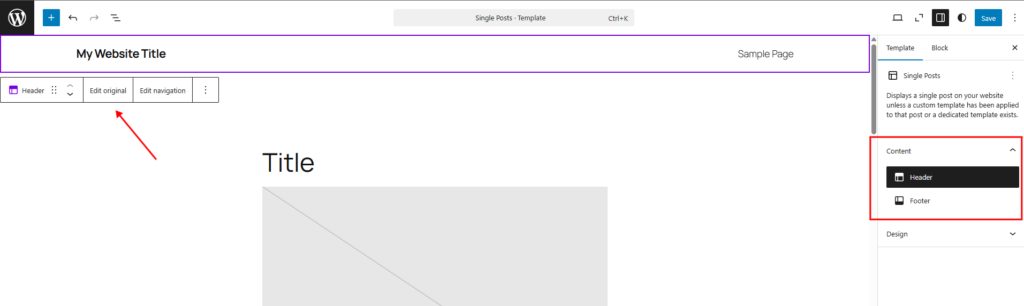
A template part is a reusable section that can be used inside multiple templates.
The most common examples are:
- Header
- Footer
- Sidebar
This is one of the most useful concepts in Full Site Editing.
For example, your lesson pages, blog posts, and sales pages may all use the same header template part.
Edit it once, and all those areas update together.
Patterns
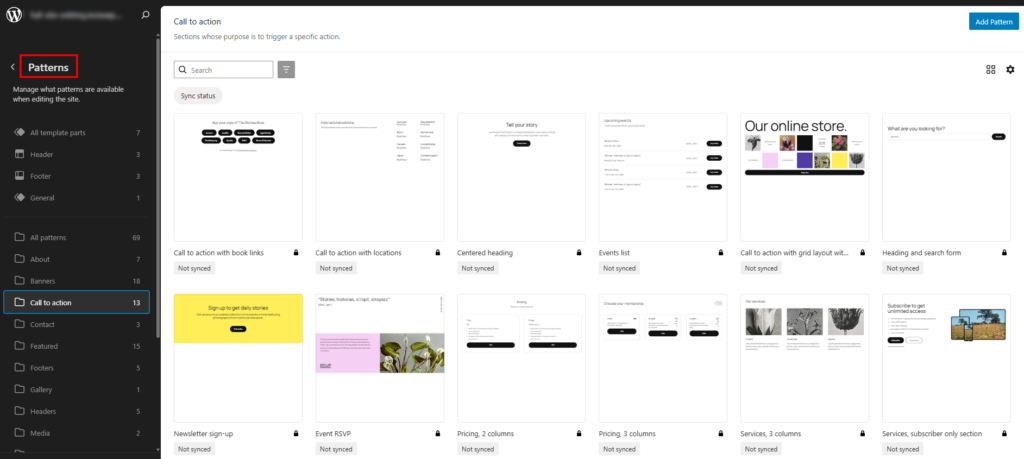
A pattern is a prebuilt layout section made from blocks.
Patterns help you build faster without having to recreate the same design over and over.
You can also choose between:
- Synced patterns – updates apply everywhere
- Unsynced patterns – each instance can be edited independently
For course sites, synced patterns work well for things like CTAs and support sections that should stay consistent.
Useful educator examples include:
- Instructor bio sections
- Course CTA strips
- Testimonial rows
- FAQ layouts
- Lesson recap blocks
- Resource download banners
Patterns are one of the biggest time-saving features in modern WordPress.
Global Styles
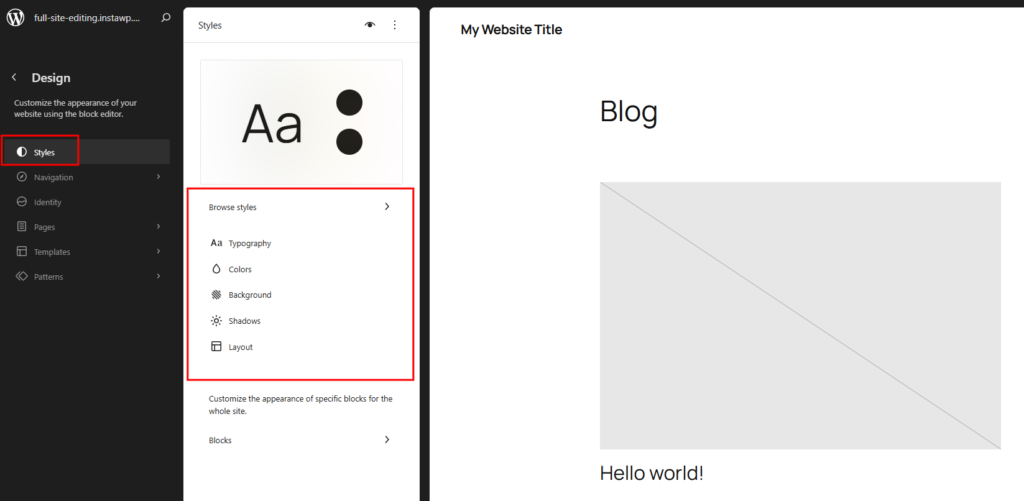
Global Styles control your site-wide visual rules.
This includes:
- Colors
- Typography
- Spacing
- Button styles
- Heading defaults
- Block-level design rules
This is where you make your site feel visually consistent.
You can also use the Style Book, which lets you preview how your typography, buttons, and blocks look across the site in one place.
This is especially useful in Sky Pilot when checking how lesson content, CTAs, and headings will appear before publishing changes.
Navigation Block
The Navigation block replaces the older WordPress menu workflow inside block themes.
Instead of editing menus in a separate screen, you can now manage navigation directly inside your header template.
This makes it much easier to:
- Reorder menu items
- Add CTA buttons
- Include login links
- Add student dashboard shortcuts
- Create mobile-friendly menus
This is often one of the first places educators will want to customize.
Style Variations
Some block themes include style variations, which are prebuilt visual presets for the whole site.
These can instantly change:
- Colors
- Font pairings
- Spacing rhythm
- Button styling
- Overall mood
They are useful if you want a faster starting point before fine-tuning the design.
Once these terms feel familiar, the Site Editor becomes far easier to navigate because you can immediately tell whether you are editing a layout system, a shared component, or a single content page.
Step-by-Step Tutorial: Make Your First Changes in the Site Editor
Now that the core terms are clear, it’s time to make your first practical changes.
For this walkthrough, we’ll assume you’re using the Sky Pilot theme, so the interface and templates match what you’ll see on a real course or membership site.
Step 1 – Open the Site Editor
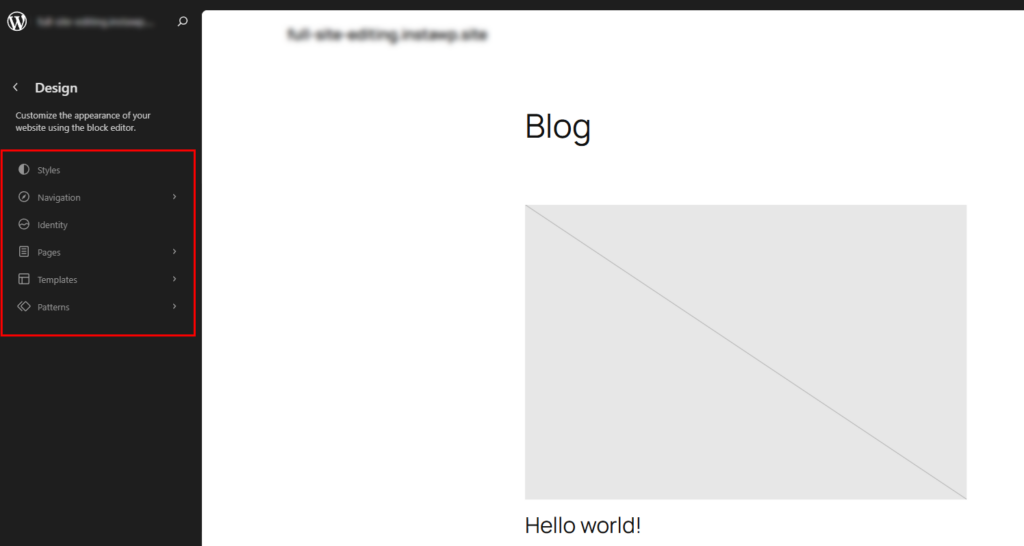
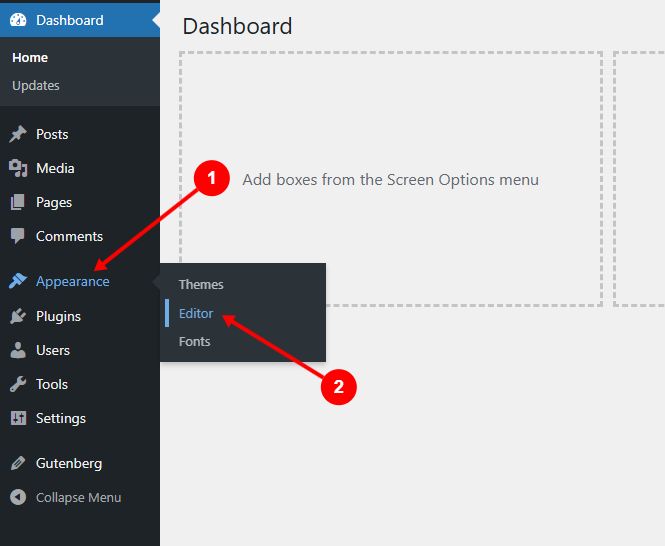
From your WordPress dashboard, go to Appearance > Editor.
With Sky Pilot active, this opens a pre-configured set of templates and styles designed for course and membership sites.
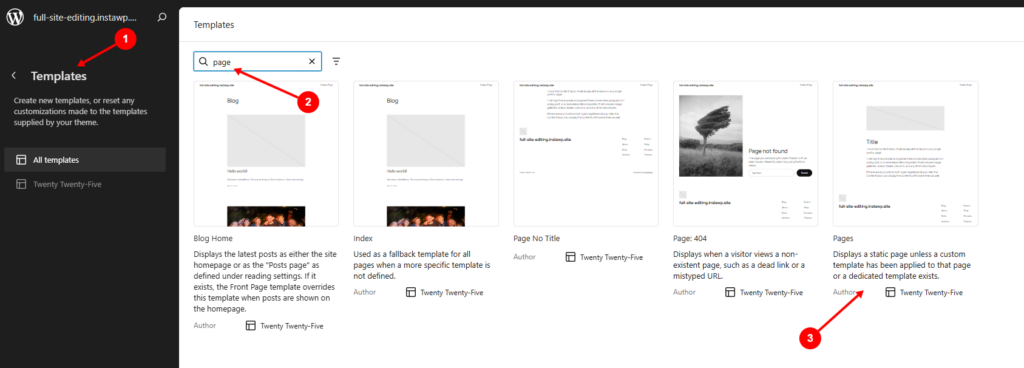
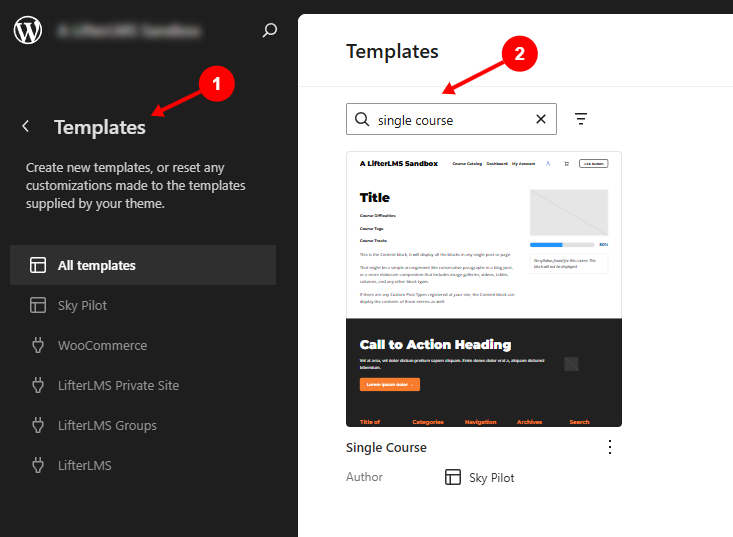
Step 2 – Open Your Templates
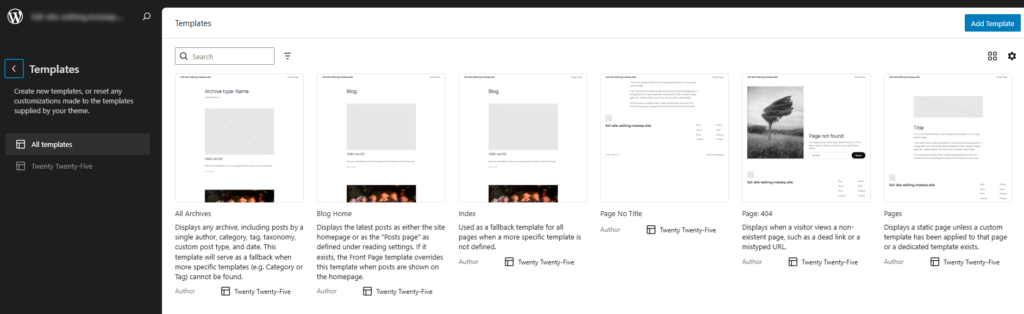
Select Templates.
This is where WordPress stores the repeatable layouts used across your site.
In Sky Pilot, you’ll see templates already structured for common site areas. The most useful starting points are:
- Page
- Single Posts
- Home
- Archive
- Search Results
- 404
For most beginners, the Page template is the safest place to start because it applies to standard pages without affecting blog-specific layouts.
Step 3 – Create a Custom Template
Editing existing templates is a good starting point, but you can also create your own.
To do this:
- Go to Templates
- Click Add New Template
- Choose a base (or start blank)
- Give it a clear name (e.g., “Course Sales Page”)
In Sky Pilot, this is useful when you want different layouts for lessons, sales pages, and resource content without affecting each other.
Once created, you can assign this template to specific pages in the Block Editor.
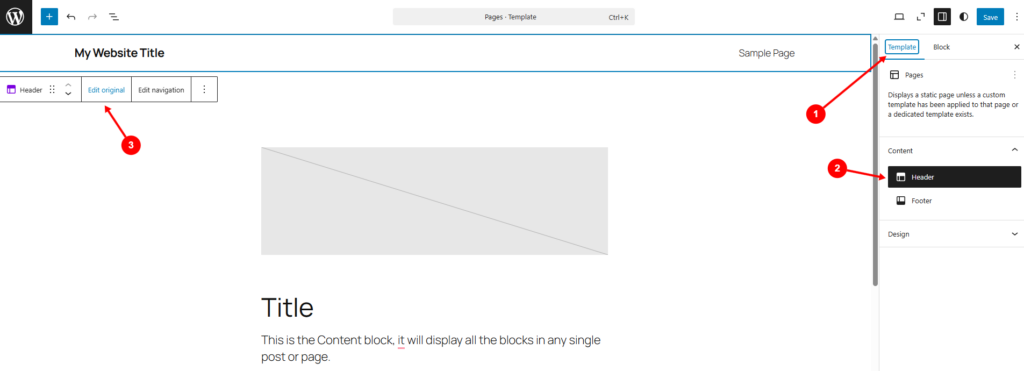
Step 4 – Edit Your Header
Open your Header template part.
This is usually the most immediately useful place to start because the changes are visible across the whole site.
Common first edits include:
- Updating the logo
- Changing navigation labels
- Adding a CTA button
- Rearranging menu items
- Adding login or dashboard links
In Sky Pilot, the header is already structured for navigation, so this is usually where you first refine the student journey.
Add direct links to Courses, Dashboard, My Membership, Login, and Support so learners can always find the next step.
Step 5 – Edit Your Footer
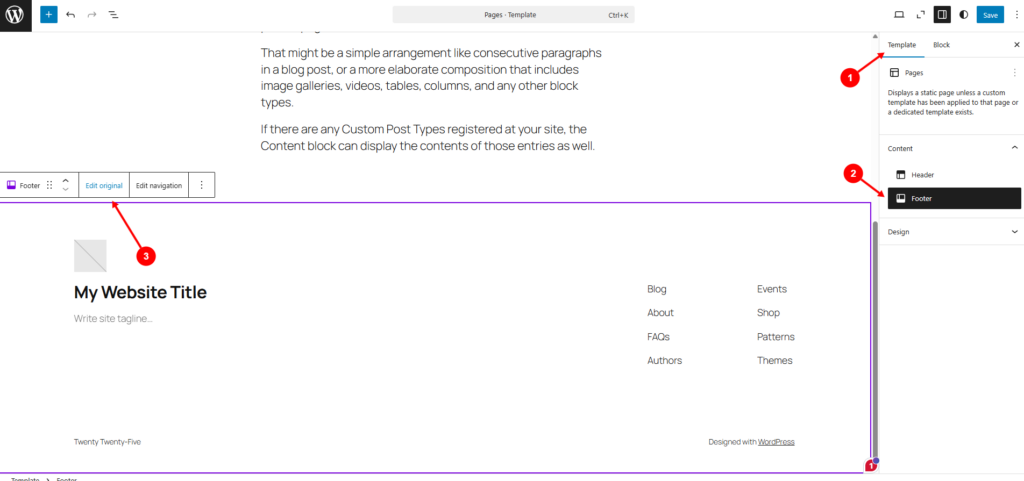
Next, move into the Footer template part.
A good footer improves navigation, trust, and access to support.
For education and membership sites, useful footer items often include:
- Help centre
- Refund or terms pages
- Contact support
- Course catalogue
- Student login
- Privacy links
Because this appears site-wide, even a small improvement here has a significant impact on usability.
Step 6 – Change Global Colors and Typography
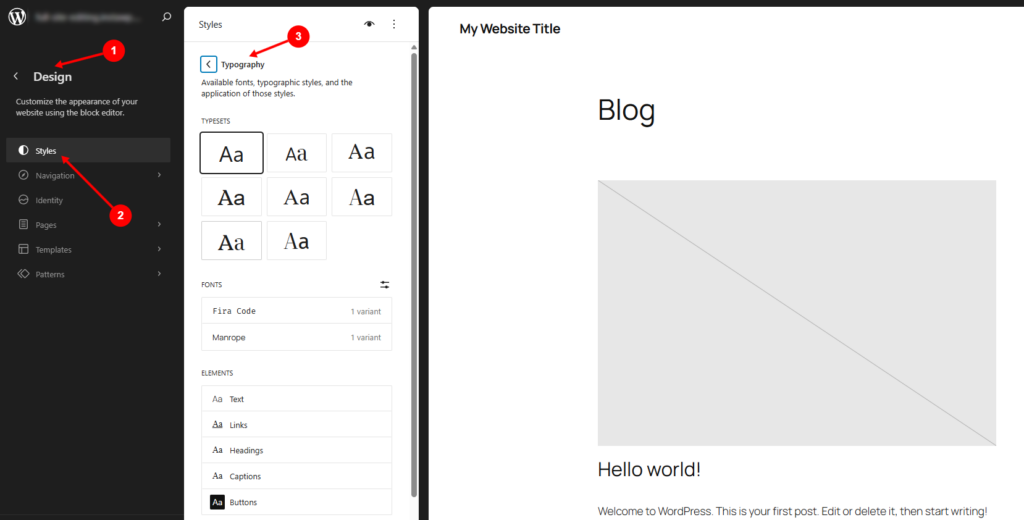
Go to Styles.
This is where you control the visual rules for the whole site.
The most valuable early adjustments are:
- Heading font sizes
- Paragraph readability
- Button colors
- Link styles
- Brand color palette
- Spacing consistency
For course and membership sites, readability usually matters more than visual flair.
In Sky Pilot, the Styles panel controls typography and spacing across lesson pages, sales pages, and member areas, so changes here quickly improve consistency across the entire platform.
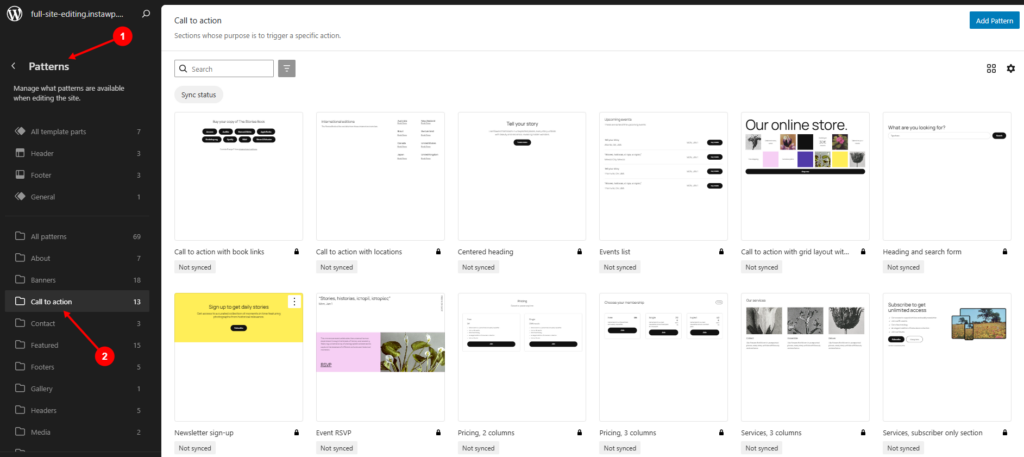
Step 7 – Use Patterns to Build Faster
Open the inserter and switch to Patterns.
Patterns help you create polished layouts much faster than building from scratch.
High-value pattern uses for Lifter-style sites include:
- Course feature sections
- Instructor bios
- Testimonial strips
- FAQ sections
- Lesson recap banners
- Download callouts
This is one of the easiest ways to standardize recurring sections across educational content.
If something doesn’t look right, you can revert templates to their default state.
To do this:
- Open the template
- Click the options menu (three dots)
- Select Reset
This restores the theme’s original layout, which is useful when testing changes in Sky Pilot.
You can also use Query Loop blocks to display dynamic lists of content, such as recent lessons, blog posts, or resources.
In Sky Pilot, this is useful for:
- Course libraries
- Resource hubs
- Blog listings
Instead of manually updating pages, the content updates automatically based on your settings.
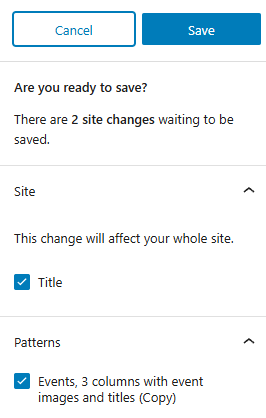
Step 8 – Save Carefully and Check Scope
This is the most important habit in Full Site Editing.
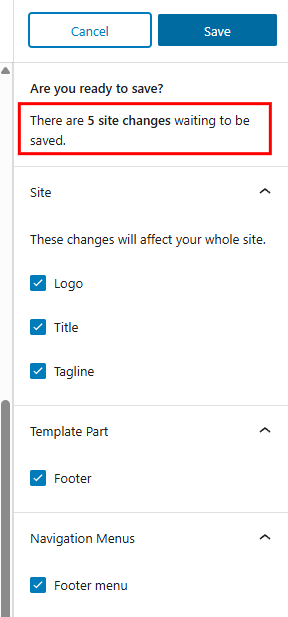
Before clicking save, always review what will be affected.
WordPress will often show whether your change applies to:
- The current template
- A template part
- Global styles
- Navigation
- Multiple connected areas
This review panel prevents accidental site-wide edits.
A Practical Example for Course Creators and Membership Sites
This is where Full Site Editing becomes especially useful for LifterLMS users.
A strong first use case is your lesson layout.
If every lesson should include the same readable typography, dashboard link, support CTA, and download area, Full Site Editing lets you build that once at the template level.
Using the Page template or a dedicated lesson-related template, you can create a consistent learning layout that includes:
- Larger body text for readability
- Consistent heading spacing
- A persistent link back to the student dashboard
- A support/help CTA below each lesson
- Branded buttons for quizzes or downloads
- A clean footer with progress-related resources
Instead of rebuilding these elements manually across dozens of lessons, Full Site Editing lets you define the shared structure once.
That means your students get a more predictable learning journey, and your future content team has less cleanup work.
A similar workflow works beautifully for:
- Course sales pages
- Member resource libraries
- Coaching program hubs
- Certification archives
- Knowledge base content
This is where FSE moves from a “site design feature” to a real student-experience tool.
5 Common Full Site Editing Mistakes to Avoid
Full Site Editing is powerful, but most beginner mistakes come down to one thing: not realizing the scope of the change.
These are the most common issues readers are likely to run into.
1. Editing a template when you only meant to change one page
This is the classic beginner mistake.
If you edit a template rather than the page content itself, the change may appear on every page using that layout.
A simple rule:
- Single page = Block Editor
- Shared layout = Site Editor
This is why the save panel review from the previous section matters so much.
2. Expecting the Site Editor on a classic theme
Many users follow tutorials like this and assume something is missing when they can’t find the Appearance > Editor menu. In most cases, the site is simply using a classic theme.
If the dashboard still shows Appearance > Customize, the theme is likely not fully block-based. This is normal; the solution is to switch to a block theme if Full Site Editing is a priority.
3. Over-customizing instead of using patterns
Many readers start rebuilding the same CTA rows, testimonial blocks, and lesson recap layouts manually, which quickly creates inconsistency.
Patterns are the better workflow. If a section appears more than once, it should usually become a reusable pattern.
This is especially useful for:
- Course CTAs
- Instructor bios
- FAQ blocks
- Student support banners
- Lesson summaries
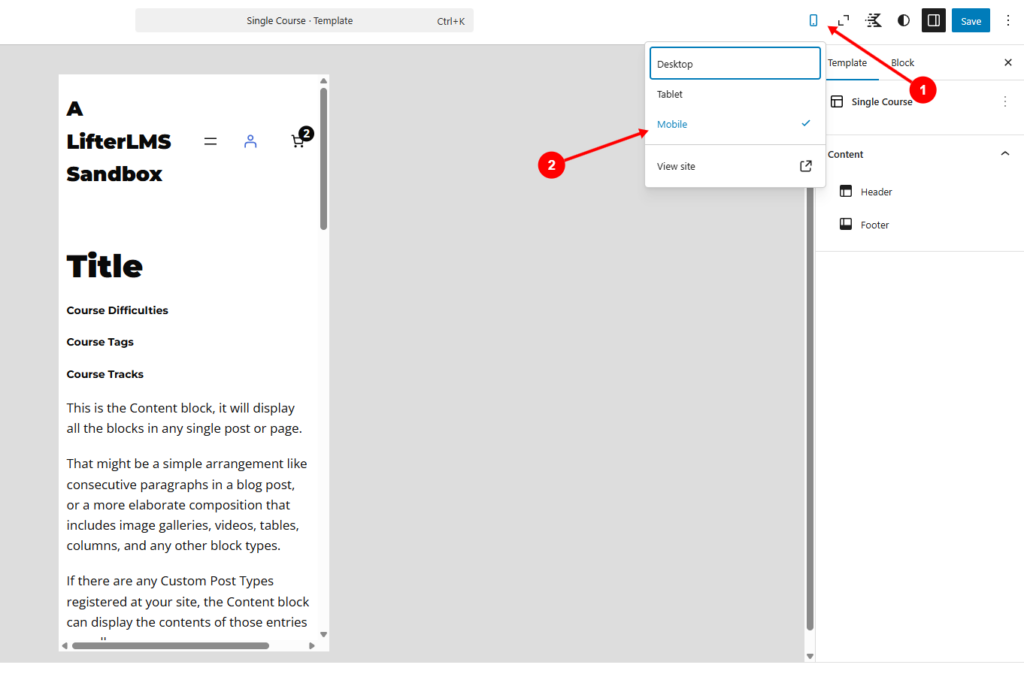
4. Forgetting mobile spacing and readability
A layout that looks clean on desktop can become cramped on mobile. This matters even more for lesson content, where students may be reading from phones or tablets.
Before publishing template-wide changes, always test:
- Heading scale
- Paragraph line length
- Button spacing
- Menu wrapping
- CTA placement
5. Creating inconsistent typography between lessons and sales pages
This is a subtle but important educator-specific issue. If your learning content uses one font rhythm and your sales pages use another, the site can start to feel fragmented.
Use Global Styles to keep the following elements consistent across both learning and marketing content:
- Heading hierarchy
- Paragraph sizing
- Buttons
- Links
- List spacing
That visual continuity improves trust and makes the whole platform feel more professional.
Advanced Features and Power User Tips
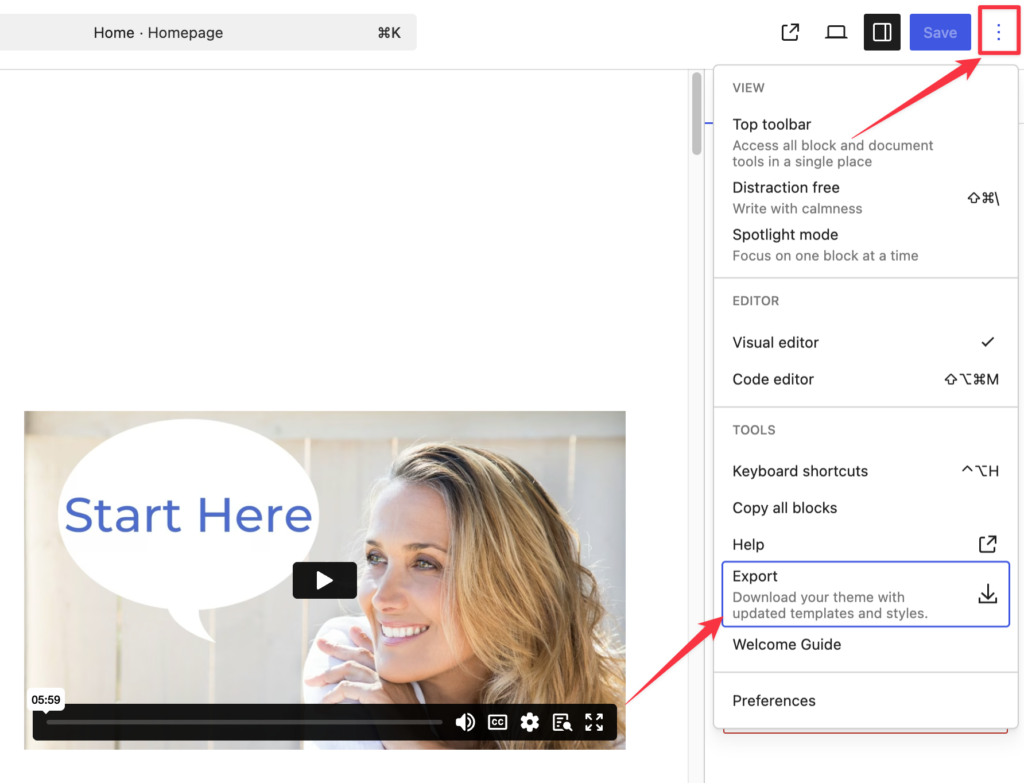
As you become more comfortable with Full Site Editing, you can use advanced features to speed up your workflow. You can easily export your custom templates and styles to reuse them on another WordPress site.
- Go to Appearance > Editor to open the Site Editor.
- Click on the WordPress page; this will open up a menu bar on the side. Look for the “Options” section in the top right corner of your screen.
- Click on Options to open the drop-down menu.
- Click on Export to download your theme files as a zip file.
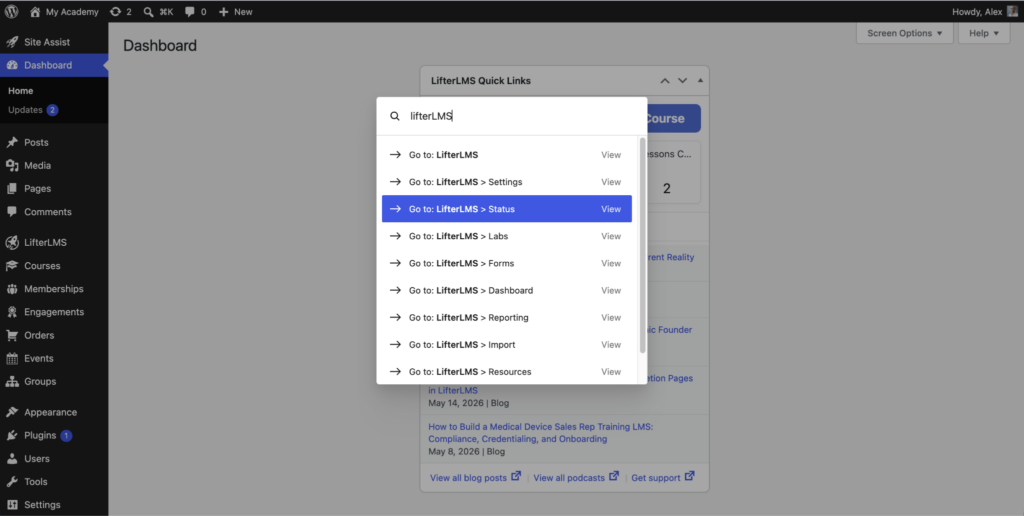
You can also navigate your site faster using the Command Palette.
- Open your WordPress admin panel and press the Control + K (Command + K) keys on your keyboard to open the Command Palette.
- Type “LifterLMS” into the search bar.
- WordPress will show you a list of menu items. You can navigate through the list using your keyboard and jump directly to the desired area without needing to use your mouse.
Accessibility Best Practices
Full Site Editing offers great flexibility, but it can create accessibility challenges if you don’t build your pages carefully. You should ensure that all visitors, including those using screen readers, can easily navigate your LMS site. Follow these steps to keep your site accessible.
- Choose semantic blocks, such as the “Heading” and “Paragraph” blocks, instead of just changing text sizes visually.
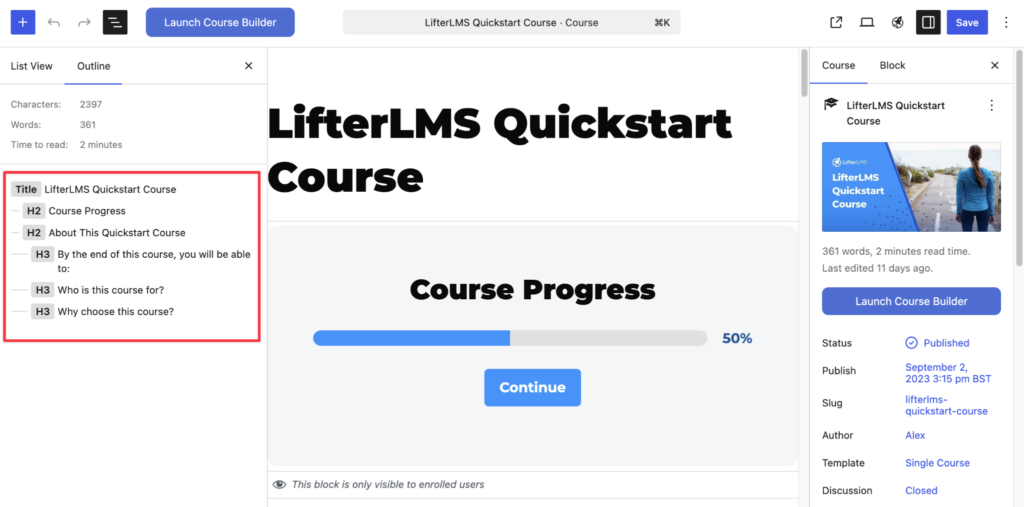
- Set up a clear heading structure by starting with one main heading, followed by secondary headings in order.
- Check your color choices to confirm you have high color contrast between your text and your background.
- Test your site navigation using only the Tab key to ensure keyboard navigation works smoothly.
- Look for the “Alternative Text” field when adding images to your pages.
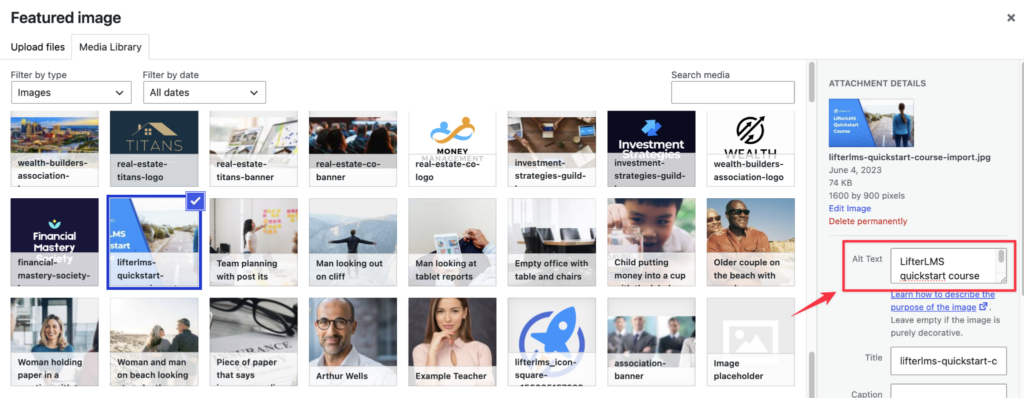
- Click on Save after you write descriptive text for your images.
When you design your website with accessibility in mind, you provide a better learning experience for every student.
Is Full Site Editing Right for Your WordPress Site?
Not every WordPress workflow needs Full Site Editing. For some sites, it is the clearest and most future-friendly way to manage design. For others, a classic theme or mature page builder setup may still be the better choice.
The right decision depends on how much control, consistency, and scalability your site needs.
When Full Site Editing Is A Strong Fit
FSE usually works best when you want:
- Site-wide visual consistency
- Fewer plugin or page-builder dependencies
- Easier updates to headers, footers, and templates
- Reusable layouts across many pages
- Cleaner brand consistency across lessons, resources, and sales pages
For educational sites, this becomes especially valuable as your content library grows. A site with a few pages can usually be managed manually.
Once you’re managing dozens of lessons, sales pages, resource hubs, and member dashboards, template-level control saves a huge amount of maintenance time.
When Full Site Editing May Be Less Ideal
There are still cases where another workflow may suit better.
For example:
- Your site relies heavily on a classic theme
- Your team already has a mature page builder workflow
- You need highly animated visual effects
- Your theme uses deep proprietary settings
- Stakeholders are already trained in another system
This is not a weakness of FSE, but simply means the best workflow is the one your team can manage consistently.
The LifterLMS & Educator Perspective
For course creators, coaches, membership owners, and training teams, Full Site Editing is often a very strong long-term choice. The bigger your learning library becomes, the more valuable template systems become.
Instead of fixing layout inconsistencies across dozens of lessons later, you can establish all of these right from the start:
- A shared lesson structure
- Consistent dashboard links
- Reusable support CTAs
- Unified typography
- Repeatable sales page sections
This makes future growth much easier.
Build a More Consistent Learning Experience With WordPress Full Site Editing
Full Site Editing gives you far more control over the parts of your WordPress site that matter most to the user experience.
Instead of managing headers, lesson layouts, CTAs, and brand consistency in separate systems, you can now control them through one visual workflow.
For educators, coaches, membership sites, and course creators, this is more than a design upgrade. It’s a better way to create a consistent journey from discovery, to enrolment, to learning, to ongoing student support.
The earlier you build that consistency into your templates, patterns, navigation, and styles, the easier it is to scale your site.
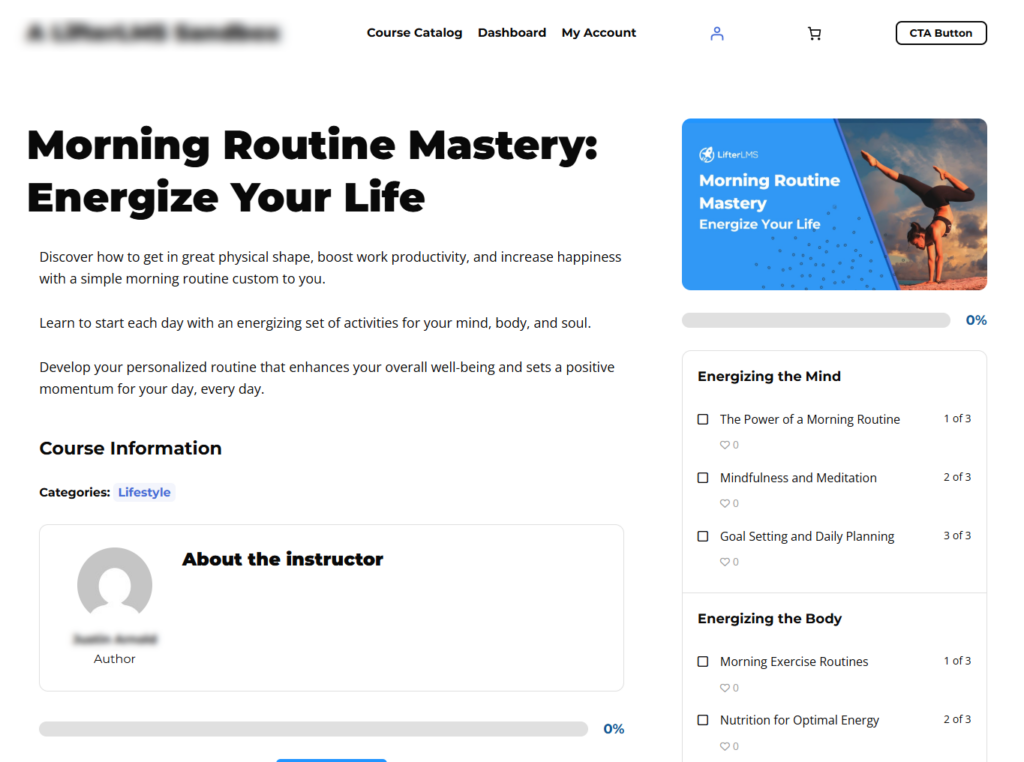
If you’re building your learning platform with LifterLMS, Full Site Editing makes it much easier to create a polished student experience that stays consistent across every lesson, resource page, and sales touchpoint, without rebuilding the same layouts over and over again.
For course creators, it’s one of the most useful ways to improve design consistency, reduce repetitive layout work, and create a smoother student experience as your platform grows.
Build Your Course Platform With Confidence
Full Site Editing gives you control over how your WordPress site looks and feels.
LifterLMS gives you control over how your course platform works.
Together, they let you build a site that not only delivers training, but feels structured, clear, and easy for students to use.
If you’re just getting started, the simplest next step is to start with Sky Pilot and LifterLMS together.
Sky Pilot gives you a ready-made foundation for course layouts, navigation, and templates, so you’re not building from scratch.
- Explore LifterLMS
- View pricing and bundles
- Learn about Groups (for teams, cohorts, and organizations)
Start by improving your header, lesson layout, and navigation. Those small changes will have the biggest impact on how your training platform feels to your learners.
FAQs About WordPress Full Site Editing
The Block Editor controls the content of a single page or post.
The Site Editor (Full Site Editing) controls layouts and design across multiple pages.
A quick rule:
• Editing one page → Block Editor
• Editing many pages at once → Site Editor
This is almost always a theme issue. You are likely using a classic theme, not a block theme.
To fix this:
• Go to Appearance > Themes
• Activate a block theme like Twenty Twenty-Four
• Check again for Appearance > Editor
Yes, especially when using a block theme like Sky Pilot, which is designed for course and membership sites.
LifterLMS handles:
• Courses
• Lessons
• Memberships
• Access rules
• Full Site Editing handles:
• Layout
• Templates
• Navigation
• Styling
Use them together to:
• Standardize lesson layouts
• Add dashboard links across templates
• Keep CTAs consistent
• Improve navigation between lessons and resources
It can, depending on what you edit.
• Editing a page in the Block Editor → only that page changes
• Editing a template → all pages using that template may change
Always check the save panel before confirming changes.
Start small. Do this first:
• Update your header navigation
• Improve your footer links
• Adjust typography in Styles
Avoid editing templates until you understand how changes apply across the site.
Template = the full layout for a type of page (e.g., lesson page, blog post)
Template part = a reusable section (e.g., header, footer)
Edit a template part once, and it updates everywhere it’s used.
A pattern is a reusable block layout. Use patterns when you repeat the same section across pages.
Good examples:
• Course CTAs
• Instructor bios
• Testimonials
• Lesson summaries
• Support banners
If you build something more than once, turn it into a pattern.
For many sites, yes. Full Site Editing is a better fit if you want:
• Cleaner long-term structure
• Fewer dependencies
• Better consistency
• Easier template control
Page builders may still be useful if you rely on:
• Complex animations
• Advanced marketing layouts
• Highly custom visual effects
Not usually, but layouts may change. Before switching:
• Test on a staging site
• Check key pages (home, lessons, sales pages)
• Review menus and widgets
Expect some design adjustments, but your content will remain.
It removes repetition. Instead of fixing layout issues across dozens of lessons, you:
• Update one template
• Update one pattern
• Update one style rule
This is where FSE becomes most valuable. The bigger your site gets, the more time it saves.
Only if you are using a classic theme. With block themes:
• Most Customizer features move into the Site Editor
• Menus become Navigation blocks
• Styles move into Global Styles
Over time, the Customizer becomes less relevant.
Focus on areas that affect every page:
• Header navigation
• Lesson readability (typography)
• Consistent CTAs
• Footer support links
These changes improve the student experience immediately without needing a full redesign.
Gutenberg is the name commonly used for the WordPress block editing project as a whole.
• The Block Editor you use for pages and posts is part of Gutenberg.
• Full Site Editing is an expansion of that same block-based approach to site-wide areas, including templates, template parts, navigation, and global styles.
A simple way to think about it:
• Gutenberg = the overall block editing system
• Full Site Editing = the site-wide design layer built on top of it
Yes. To access the full Site Editor experience, your theme needs to support block-based templates and styles.
If you are still using a classic theme, you will usually see Appearance > Customize instead of Appearance > Editor.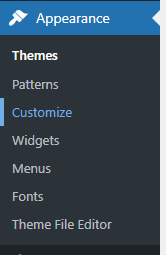
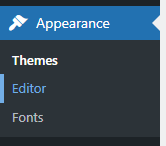
For block themes, yes, in many cases. Most of the settings that once lived inside the Customizer – headers, footers, menus, colors, typography, and layout systems – now move into the Site Editor.
Classic themes still rely on the Customizer. So the real answer depends on the theme your site uses.
Absolutely. In fact, this is one of the most useful environments for it. It makes it easier to keep lesson layouts, student navigation, course CTAs, support sections, and member resources visually consistent.
For LifterLMS users, this means your sales pages, learning content, dashboards, and support resources can all feel like one connected platform.
• A template defines the master structure for a content type.
• A pattern is a reusable layout section that you can insert into content or templates.
A good practical example:
• Template = the overall lesson page structure
• Pattern = a reusable lesson recap CTA block inside that structure
For many sites, yes. If your main goals are any of the following, then FSE can absolutely replace many common page builder workflows:
• Cleaner global consistency
• Easier template control
• Better long-term maintainability
• Fewer plugin dependencies
That said, some advanced visual effects, marketing animations, or highly specialized builder features may still be easier in dedicated page builder ecosystems.